1. The Windows agent
From its very beginning, monitoring Windows servers has been one of the most important tasks performed by Checkmk. As for all other server operating systems, Checkmk therefore also provides its own agent for Windows, an agent program that is both minimalistic and secure.
The agent program is accompanied by the Agent Controller, a component that communicates securely with the Agent Receiver, a process running on the Checkmk server. To do this, the Agent Controller registers itself with the Agent Receiver. The Windows agent can perform functions with the Agent Controller such as TLS encryption of communication or data compression, and is designed to accommodate future enhancements.
The registered, encrypted and compressed pull mode with the Agent Controller is available for all Checkmk editions — provided both Checkmk server and agent have at least version 2.1.0.
The push mode is available in ![]() Checkmk Ultimate.
Reversing the communication direction makes it easier to monitor hosts that are located behind firewalls.
Push mode is usually combined with automatic registration of the Checkmk agent, which is also available in Checkmk Ultimate.
Checkmk Ultimate.
Reversing the communication direction makes it easier to monitor hosts that are located behind firewalls.
Push mode is usually combined with automatic registration of the Checkmk agent, which is also available in Checkmk Ultimate.
Agent packages that use the default configuration open port 6556 immediately following installation. They will output unencrypted agent data via this port to anyone requesting it. For hosts that are accessible from the internet, you should therefore ensure prior to installation via firewall settings that only selected hosts are allowed to access this port. Carry out the registration and the associated activation of TLS encryption promptly after installation. |
For compatibility reasons, the agent supports only the current versions of the Microsoft Windows NT product line (edition). You can find out exactly what these are in the System requirements article.
Important: Other Windows editions are not officially supported. This also includes Windows Embedded, for example. However, for monitoring older Windows versions such as, for example, Windows Server 2008, you can use a legacy agent at your own risk. Legacy agents are agents in older Checkmk versions without the Agent Controller. Of course this means extended functionalities with the Agent Controller, such as TLS encryption or compression will not be available. Legacy agents are available for download here. For the legacy agents some special requirements will need to be considered, and these are summarized in the installation chapter.
The installation, registration, and setup of the agent can be accomplished in just a few steps, because the agent does not need any additional libraries for its functionality, for example. In addition, the agent is shipped with a basic configuration that is sufficient for most applications.
2. Architecture of the agent
The Checkmk agent consists of the agent program and the Agent Controller, which communicates with the Agent Receiver on the Checkmk server. See the general article on monitoring agents for details on the common architectures of the Linux agent and the Windows agent. This chapter specifically covers the Windows implementation.
The agent program check_mk_agent.exe is responsible for the collection of the monitoring data.
The program is started as a Windows service under the LocalSystem account.
It collects data about the local system when called and makes it available to the Agent Controller.
The agent program is minimalistic, secure, easily extendable and comprehensive, and provides access to important data that is not accessible via WMI or SNMP. In some cases, however, monitoring via SNMP in addition to the Checkmk agent can be useful. See the article on monitoring with SNMP for more on this topic. In addition, the agent program is as transparent as a file delivered as executable can be, because you have access to the source code at any time and thus insight into its functionality, and can in principle also compile the agent yourself.
The Agent Controller cmk-agent-ctl.exe is the component within the agent that is responsible for transporting the data collected by the agent program.
It runs as a background process under the Windows LocalSystem account.
In pull mode, it listens on TCP port 6556 for incoming connections from the Checkmk site and queries the agent program via a Windows-specific mechanism for process communication called Mailslot.
3. Quick installation
Checkmk guides you through the user interface to download, install, and register the Checkmk agent on a host, thereby adding it to the configuration environment. An assistant guides you through the necessary steps in a slideout. In the slideout, you can select Windows, Linux, Solaris, or AIX as the operating system for the host. The Beginner’s Guide describes the process in detail for a Linux host in pull mode. The process is identical for a Windows host—only the commands are different.
The main advantage of the slideout is that it displays directly in the GUI the appropriate commands for downloading, installing, and registering a Windows host.
You can copy any command to the clipboard and then run it on the host.
For a Windows host, the agent package is downloaded using curl via the REST API, installed with the msiexec command, and finally, the host is registered with cmk-agent-ctl.
To make the process as simple as possible, authentication in the commands required for download and registration is performed using a one-time token. This token is valid for successful execution within a limited time period. The token is first generated before being used in the aforementioned commands.
Quick download, installation, and registration via slideout are particularly well-suited for quickly creating the first hosts in Checkmk. Detailed information on all possible methods for installing a standard agent (for example, without a one-time token, using agent plug-ins, and with troubleshooting) is provided in the following chapters.
4. Installation
Checkmk provides several ways to install the Windows agent—from a manual installation of the software package to the fully automated deployment including its update function. Some of these installation methods are only available in the commercial editions:
| Method | Description | Checkmk Community | Commercial editions |
|---|---|---|---|
Supplied MSI package |
Simple installation of a standard agent with manual configuration via configuration files. |
X |
X |
MSI package from the Agent Bakery |
Configuration via GUI, an individual configuration per host is possible. |
X |
|
The package from the Agent Bakery is installed for the first time by hand or by script and will from then on be automatically updated. |
X |
As an alternative, you can also distribute the MSI package via other paths, such as the Microsoft Active Directory. The installation can be completely automated here using the MSI format.
4.1. Downloading an MSI package
You install the Windows agent by installing the MSI package.
Before installation, you need to get the package and bring it to the host on which the agent will run (for example with scp or WinSCP).
Getting a package via the Checkmk GUI
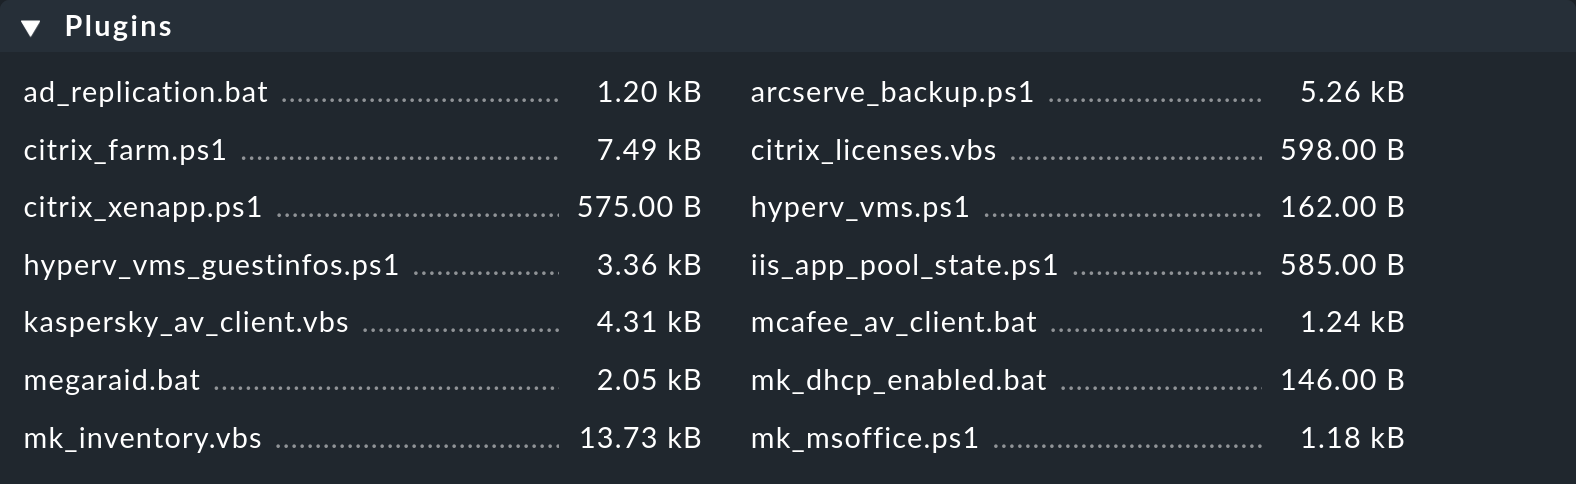
In ![]() Checkmk Community you can find the agent’s Windows package via Setup > Agents > Windows.
In the commercial editions, you first get to the Agent Bakery in the Setup menu via Agents > Windows, Linux, Solaris, AIX, where you find the baked packages.
From there, the Related > Windows files menu item will take you to the list of agent files:
Checkmk Community you can find the agent’s Windows package via Setup > Agents > Windows.
In the commercial editions, you first get to the Agent Bakery in the Setup menu via Agents > Windows, Linux, Solaris, AIX, where you find the baked packages.
From there, the Related > Windows files menu item will take you to the list of agent files:
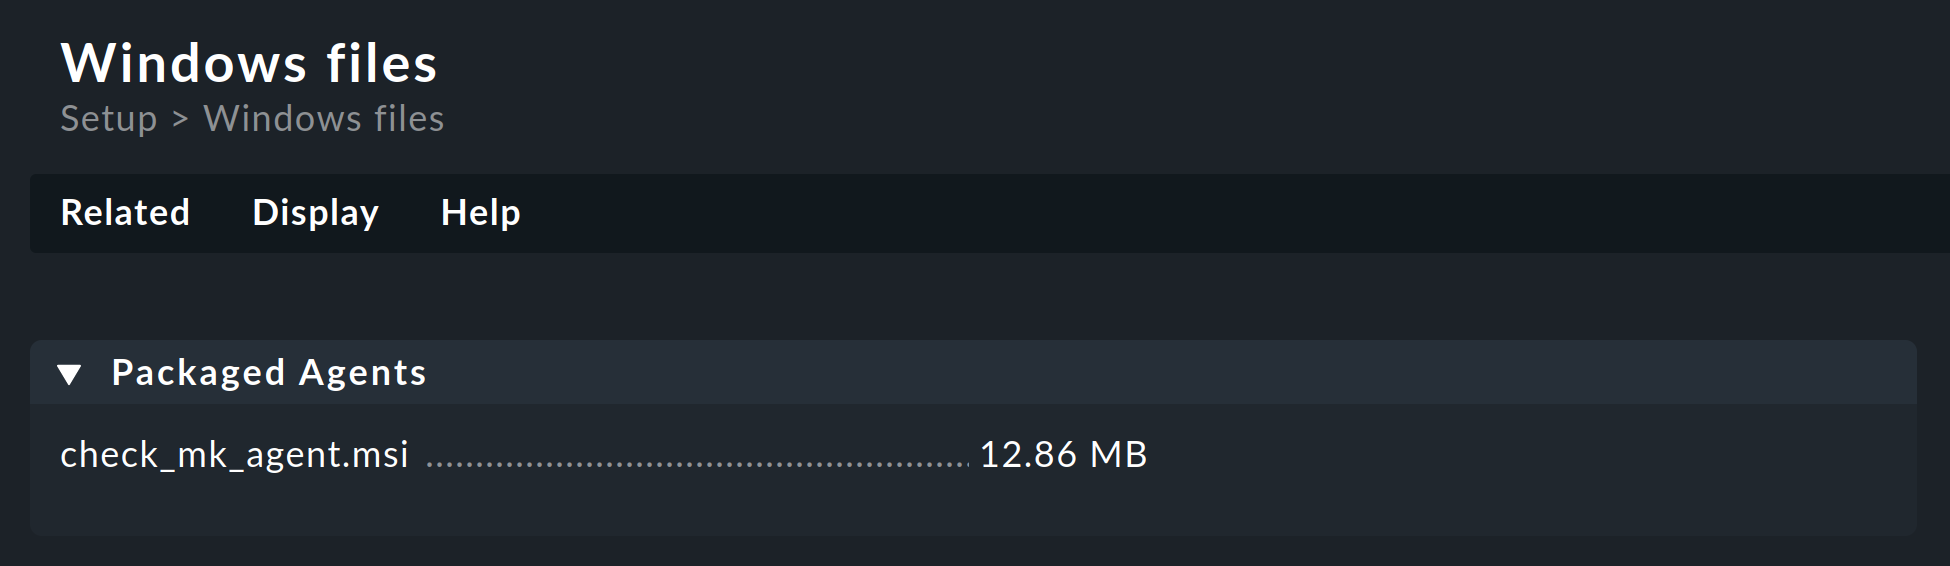
Everything you need can be found right in the first box named Packaged Agents:
the ready-made MSI package file check_mk_agent.msi for installing the Windows agent with its default settings.
Getting a package via the REST API
Checkmk’s REST API provides the following methods for downloading agent packages from the Checkmk server:
Downloading the provided agent.
Downloading an individually prepared agent by host name and operating system.
Downloading an individually prepared agent by hash of the agent and operating system.
Via the REST API you have the option to fetch the package from the Checkmk server directly to the target machine.
For example, the included MSI package with the Windows agent can be downloaded using the following curl command, which authenticates using an automation user.
In newer Windows versions curl is already included, in older versions you will first have to install the curl command environment separately via curl for Windows.
Note: The above command has been split into four lines for readability.
This is just a simple example to demonstrate how this particular REST API endpoint works to download the agent. For details on this and other REST API endpoints, see the API documentation available in Checkmk via Help > Developer resources > REST API > Version 1 > Documentation.
The easiest way to download the default agent is a direct file download:
4.2. Package installation
Manual installation
After fetching the MSI package and—if necessary—copying it to the host to be monitored using scp, WinSCP or other means, start the installation either by double-clicking the MSI file or from the command line as follows:
You will see the start page for the Setup wizard:
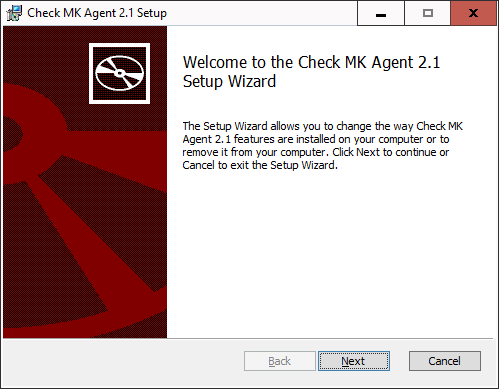
Use the Next buttons to scroll through the pages of the wizard. Accept the license terms of the GNU GENERAL PUBLIC LICENSE to continue. The Setup wizard will then present you with the following page:
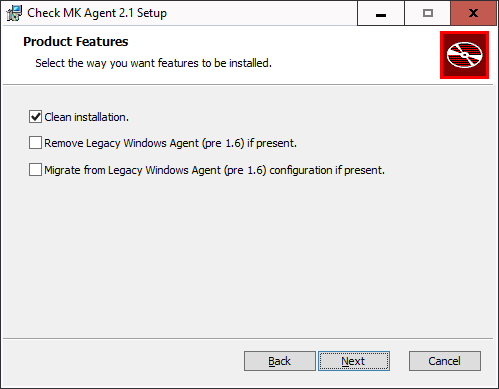
The choices on this page are relevant to you only if a Windows agent is already installed on the host and it is older than version 1.6.0. In version 1.6.0 the architecture of the Windows agent had changed fundamentally. If you are updating (or migrating) to the current agent from a Windows agent older than version 1.6.0, first read the chapter on the old agent in the Checkmk User Guide for version 2.0.0. There you will learn which of the provided options you should select in this particular update case.
In all other cases, we recommend selecting the Clean installation. option.
Confirm the start of the installation and then allow the installation program to make changes (in the User Account Control dialog). When finished, you can exit the Setup wizard.
After the installation, the agent will immediately start as a Windows service and be ready to monitor the system.
Unattended installation
Via the command line, Windows provides administrators with msiexec the possibility of installing MSI packages automatically without requiring user interaction.
An automated installation can then look like this, for example:
In this case, the agent is installed (/i) without user interaction or the user interface (/qn) and is also started immediately as a Windows service.
So this method is great for automatically distributing the agent to many hosts.
You can also use this method to select the three options that were offered to you during the manual installation in the Setup wizard. For each option, there is an identifier that you can use for the installation command:
| Option in the Setup wizard | Identifier |
|---|---|
Clean installation. |
|
Remove Legacy Windows Agent (pre 1.6) if present. |
|
Migrate from Legacy Windows Agent (pre 1.6) configuration if present. |
|
To enable an option, append its identifier followed by an 'equals' sign:
To explicitly disable an option, you must add two more quotation marks following the equals sign:
4.3. Installation using the Agent Bakery
![]() The commercial editions have a software module, the Agent Bakery, for automatically packaging customized agents.
A detailed description of this can be found in the general article on the agents.
Installation of the baked MSI package is done in the same way as described above for the included package.
The commercial editions have a software module, the Agent Bakery, for automatically packaging customized agents.
A detailed description of this can be found in the general article on the agents.
Installation of the baked MSI package is done in the same way as described above for the included package.
In Checkmk Ultimate you can additionally use the Agent Bakery to provide agent packages with a configuration for auto-registration, which facilitates the automatic creation of hosts. In this case, the agent registration is done automatically once the agent package has been installed, and manual registration, as described in the following chapter, will no longer be necessary.
4.4. Automatic updates
![]() If you use the Agent Bakery, you can also set up automatic updates of the agent.
These updates are described in their own article.
If you use the Agent Bakery, you can also set up automatic updates of the agent.
These updates are described in their own article.
4.5. Agent configuration files
During an installation the MSI package stores the program-specific files in C:\Program Files (x86)\checkmk\service\ and the host-specific files in C:\ProgramData\checkmk\agent\.
You do not need to customize the program-specific files.
The host-specific files are used to store plug-ins, log and configuration files and to configure the behavior of the agent.
Note: By default, the entire C:\ProgramData directory is hidden in Windows.
The agent reads three configuration files in succession:
C:\Program Files (x86)\checkmk\service\check_mk.yml
is the default configuration file, which you should not change.C:\ProgramData\checkmk\agent\bakery\check_mk.bakery.yml
is created by the Agent Bakery and should not be changed manually.C:\ProgramData\checkmk\agent\check_mk.user.yml
is your configuration file where you can manually make custom adjustments to test a setting or extension on a host.
If an option has been set in multiple files, then the last file read in determines the content of this option.
For manual work with the agent, therefore, only the last configuration file check_mk.user.yaml is relevant, because it is read in last and thus has the last word.
If the Agent Bakery is not used, this is in fact the only file in which customizations to the agent’s configuration may be made.
As you may have already recognized from the file extension of the configuration files, YAML is used as the file format.
4.6. What follows the installation?
After installing the agent including the Agent Controller, the next step is the registration, which sets up TLS encryption so that the encrypted agent output can be decrypted by the Checkmk server and displayed in monitoring.
There is a special feature when the agent has been installed with the Agent Controller for the first time. In such a case the agent will switch to the unencrypted legacy pull mode, so that the Checkmk server is not cut off from the monitoring data and can continue to display it. This applies to both a new installation and an update of a very old agent (older than version 2.1.0).
It will look like this in the monitoring:

The Checkmk site recognizes from the agent output that the Agent Controller is present and thus that TLS encryption is possible—but not yet enabled. The Check_MK Agent service changes to the WARN state and remains so until you register it. After registration, only the encrypted pull mode will be used for communication. The legacy pull mode is switched off and will remain so. However, it can be switched on again by command if necessary.
The situation will be different when using a legacy agent on a very old Windows system. Without the Agent Controller a registration is not possible. Thus, for legacy agents the only relevant sections in the Registration chapter are adding the host to the Setup and then to the monitoring. In the chapter Testing and troubleshooting you must omit the test for calling the Agent Controller, because this is not available for a legacy agent. Since there is also no TLS encryption without the Agent Controller, you will need to use other methods of encryption if required. In this case we recommend using the built-in (symmetric) encryption using the Symmetric encryption (Linux, Windows) rule.
Note: In the Checkmk Agent installation auditing rule set you will find various settings to check the state of the agent and make it visible in monitoring. Among other things, here you can specify which state the Check_MK Agent service should have if TLS configuration has not yet been performed.
5. Registration
5.1. Overview and prerequisites
Immediately after installing the agent (including when updating a very old agent, i.e., one older than version 2.1.0), only unencrypted communication is possible in the legacy pull mode. An exclusively encrypted data transmission can only be activated once a trust relationship has been established.
An exception to this are the packages preconfigured for the auto-registration and downloaded via the Agent Bakery. These packages perform the registration automatically after installation.
In all other cases, you perform the manual registration promptly after installing the agent. This chapter shows how to perform the registration.
The registration and thus the establishment of the mutual trust relationship is done under a Checkmk user with access to the REST-API.
For this, a good choice is the automation user agent_registration which only has the permission to register agents and is automatically created with every Checkmk installation.
You can randomize the corresponding automation password (automation secret) with the ![]() icon.
You must save the user before you can use the new password.
icon.
You must save the user before you can use the new password.
Note: Since there is no Agent Controller, and thus no registry and TLS encryption, on very old Windows systems you will need to use alternative encryption methods if required. In this case we recommend using the built-in (symmetric) encryption using the Symmetric encryption (Linux, Windows) rule.
5.2. Adding a host to the Setup
First create the new host via Setup > Hosts > Add host. A host must exist in the configuration environment before it can be registered.
In Checkmk Ultimate you will find the Checkmk agent connection mode option in the properties of the host in the section on monitoring agents. Here you can activate the push mode for the Checkmk agent as an alternative to the pull mode, which is available in all editions.
5.3. Registering a host with the server
The registration is done using the Agent Controller cmk-agent-ctl, which provides a command interface for configuring the connections.
You can display command help with cmk-agent-ctl help, also for specific available subcommands, for example with cmk-agent-ctl help register.
Whether the host is configured for the pull mode or the push mode makes no difference for the command examples. The Agent Receiver tells the Agent Controller in which mode it should operate during registration.
Now go to the host that is to be registered. Here you have to make a request to the Checkmk site with administrator rights:
The host name following the --hostname option must be exactly the same as it was when it was created in the Setup.
The --server and --site options specify the name of the Checkmk server and the site.
The server name may also be the IP address, the site name (here mysite) corresponds to the one you see in the URL path for the web interface.
The options are completed by the name and password used by the automation user.
If you omit the --password option, the password will be requested interactively.
Caution, trap for the unwary: If you primarily administer Unix machines, you are used to enclosing paths or parameters with spaces or special characters in single quotes (apostrophes, 0x27).
Windows interprets this character as part of the call—in this case the password—and the registration will fail.
Use double quotes (quotation marks, 0x22) instead.
If the specified values were correct, you will be asked to confirm the identity of the Checkmk site to which you want to connect. For clarity here, we have abbreviated the server certificate to be confirmed:
Attempting to register at cmkserver:8000/mysite. Server certificate details:

PEM-encoded certificate:
---BEGIN CERTIFICATE---
MIIC6zCCAdOgAwIBAgIUXbSE8FXQfmFqoRNhG9NpHhlRJ40wDQYJKoZIhvcNAQEL
[...]
nS+9hN5ILfRI+wkdrQLC0vkHVYY8hGIEq+xTpG/Pxw==
---END CERTIFICATE---

Issued by:
	Site 'mysite' local CA
Issued to:
	localhost
Validity:
	From Thu, 10 Feb 2022 15:13:22 +0000
	To   Tue, 13 Jun 3020 15:13:22 +0000

Do you want to establish this connection? [Y/n]
> Y
Confirm with Y to complete the process.
If no error message is displayed, the encrypted connection will have been established. All data will now be transmitted in compressed form via this connection.
If you want to disable the interactive check of the certificate—for example to fully automate the registration—you might use the additional parameter --trust-cert.
The transferred certificate will be automatically trusted in this case.
Keep in mind that you should take other measures to verify the integrity of the certificate.
This can be performed (manually or scripted) by inspecting the file C:\ProgramData\checkmk\agent\registered_connections.json.
Using the |
5.4. Registering a host automatically with the server
Checkmk Ultimate offers the facility to create hosts automatically at registration. For such auto-registration, in addition to a user with permission to register hosts, you need at least one folder configured to hold the hosts that are to be created automatically.
If these conditions have been met, you can also carry out the registration, including automatic host creation, via the command line.
Usually you will use the Agent Bakery settings procedure,
which includes the C:\ProgramData\checkmk\agent\pre_configured_connections.json configuration file in the agent package and which performs the registration automatically during installation.
The command line call presented here is therefore primarily used for testing and debugging, for example trying out your own agent labels with the --agent-labels <KEY=VALUE> option.
The biggest difference here is the modified register-new subcommand, which is used to request the registration and creation of a new host in the Checkmk site.
The name of the host is the one stored in the %COMPUTERNAME% environment variable.
The subsequent confirmation of the certificate is the same as shown in the last section.
Whether the host is created in pull mode, in push mode or not at all is defined by your settings in the Agent registration rule set. Following a successful registration, it may take several minutes before the host appears in the monitoring.
5.5. Verifying the trust relationship
The cmk-agent-ctl status command now shows exactly one trust relationship with the Checkmk server:
If the information is needed in a machine-readable format, append the additional parameter --json to retrieve the output formatted as a JSON object.
Note: There can only ever be one trust relationship between host and site.
For example, if you register an already registered host mynewhost under a different name (mynewhost2) but with the same IP address, then the new connection will replace the existing one.
The connection from mynewhost to the site will be disconnected and no more agent data will be supplied to the host for monitoring.
5.6. Registration by proxy
For easier registration of multiple hosts, any host on which the agent is installed can perform a registration on behalf of other hosts. The registration process exports a JSON file, which can then be transferred to the target host and imported there. Again, as before, the host registered in the job must already be set up on the site.
First, on any host in the Setup, the registration is performed by proxy.
Here, of course, the Checkmk server comes in handy, as it is usually the first host to be set up.
As with the example above, you can pass the password by option or be asked for it interactively if you omit the --password option.
We redirect the JSON output to a file in the example:
Next we transfer the /tmp/mynewhost3.json file to the host we registered for and import that file:
5.7. Adding the host to the monitoring
Once the registration is complete, perform a connection test and a service discovery in the Checkmk server Setup. Then, as the last step include the discovered services in the monitoring by activating the changes.
If the connection test fails, refer to the following chapter for testing and troubleshooting information.
5.8. Deregistering a host
You can also deregister a host.
On a host connected to the Checkmk server, you can revoke the trust.
Here, in the following command, the Universally Unique Identifier (UUID) to specify is the one output by the cmk-agent-ctl status command:
To delete all connections from the host and additionally restore the legacy pull mode, enter the following command:
After that, the agent will behave as it did following the initial installation and before the first registration, and sends its data unencrypted.
Complete the deregistration on the Checkmk server: In the Setup, on the Properties of host page, select the Host > Remove TLS registration menu item and confirm the prompt.
If you prefer using the command line: On the Checkmk server, for each connection of a host that is in monitoring, there is a soft link with the UUID that points to the folder with the agent output:
5.9. Switching between the push and pull modes
In ![]() Checkmk Ultimate you can switch hosts from push to pull mode and vice versa.
This may be necessary in individual cases if changes to the network topology are pending, or a downgrade to
Checkmk Ultimate you can switch hosts from push to pull mode and vice versa.
This may be necessary in individual cases if changes to the network topology are pending, or a downgrade to ![]() Checkmk Pro--in which only the pull mode is possible—is to be carried out.
Checkmk Pro--in which only the pull mode is possible—is to be carried out.
First specify the access mode in the Setup, in the properties of the host, with the Checkmk agent connection mode option.
Within the next minute, all services will assume the UNKNOWN status since no monitoring data is being received.
Then perform a new registration.
During this re-registration, the Checkmk server’s Agent Receiver tells the Agent Controller whether it expects data in pull or push mode.
A subsequent check using cmk-agent-ctl status will then show a new UUID and a mode consistent with the change made in the Setup.
6. Testing and troubleshooting
A modular system may not work as intended in many situations. Since the agent uses the two components Agent Controller (on the host) and Agent Receiver (on the Checkmk server), there are several places where something can go wrong. When troubleshooting, a structured approach is thus recommended. You can of course also use the step-by-step analysis described here to get to know the data collection and communication provided by Checkmk in more detail.
All of the diagnostic options that are available from the Checkmk server side are described in the general article on monitoring agents. But, of course, there are other diagnostics available when logged in directly to the monitored host itself.
We will work our way from the agent program, through the Agent Controller and TCP port 6556, to the Checkmk site in the following sections. With the Agent Controller in push mode, bypass any tests on port 6556—even if port 6556 is open before the registration, it will be closed following a registration in the push mode. In most cases, after correcting an error, you can restart the service discovery and complete the inclusion in monitoring.
6.1. Checking the configuration
To check that the configuration has been read in as expected, call the agent program with the showconfig option.
With this option you will not only get the configuration as it is currently used by the agent, but additionally, the environment variables as well as the configuration files in use will always be displayed.
If only a certain part of the configuration is of interest, you can limit the output to that specific part.
Here, for example, it is checked whether the options in the ps section have been set correctly:
In this way you get a quick overview of how the three different configuration files have been merged and used by the agent program. Errors will be immediately visible.
6.2. Network environment for registration
If registering a host fails even before a certificate is presented, knowledge about the connections used for communication can help in identifying the problem—and of course in solving it.
To find out why the registration failed, run the registration again with the additional option -vv.
This will display not only errors but also additional information and debugging messages.
For example, if the Checkmk server is not accessible from the host, the output will look something like this:
After executing the cmk-agent-ctl.exe register command, the Agent Controller first queries the Checkmk server via the REST API to determine the port used by the Agent Receiver.
The output shown above indicates that the connection via the REST API failed, both over HTTPS and HTTP.
Consequently, the registration process cannot proceed at this point.
In such a situation you can modify the routing or firewall settings to allow access from the host to the Checkmk server.
If the host to be registered uses an HTTP proxy, instruct cmk-agent-ctl to use the system-wide configured proxy with the additional option --detect-proxy.
If the Checkmk server is reachable and registration still fails, the problem lies elsewhere. The REST API may be unreachable or may not be responding on the correct port for the Agent Receiver.
As a site user you can check which port the Agent Receiver is assigned to on the Checkmk server:
You can explicitly specify the correct port during registration, along with the Checkmk server (--server mycmkserver:8000) to ensure that the Agent Receiver can be reached.
This skips the first request via the REST API, and communication takes place directly with the Agent Receiver without any detours.
You may receive the error message Connection refused even though the port was specified correctly.
In this case, you can configure the routing or firewall settings so that the host to be registered can reach the Checkmk server on the required port (here 8000).
In the case of a registration in push mode the following applies: If the registration has worked, the minute-by-minute transfer of the agent output will also be successful.
If security policies in your environment do not allow access to the Agent Receiver, there is still the possibility to use registration by proxy on the Checkmk server.
6.3. The Agent Controller in dump mode
As the agent program must be called under the LocalSystem account in order to deliver exactly the data that arrives in the monitoring, you should never start it in a shell.
If you want to examine the agent output locally, use the Agent Controller in dump mode (subcommand dump).
This starts the agent program with the correct environment and under the correct user ID and then outputs the result.
Since the output can be a bit longer, the 'more' pager is very handy here. You can exit it with the Q key:
This allows you to verify that the data from the agent program has arrived at the Agent Controller. This output does not yet prove that the agent is also accessible over the network.
6.4. Remote connection test
If in pull mode it has been verified that the agent program and its installed plug-ins are executing correctly,
you can next check via netcat (or nc) whether port 6556 is reachable via the external IP address of the host:
The output 16 indicates whether the connection was successfully established and that the TLS handshake can now take place.
Since everything else here is TLS encrypted, no more detailed check is possible.
If the communication between agent and Checkmk server is still unencrypted (as in legacy pull mode) or is and remains unencrypted (as in legacy agent),
you will get the complete unencrypted agent output with this command instead of the 16.
For more diagnostics to run on the Checkmk server, see the general article on the monitoring agents. In particular, you can also perform a connection test using the Checkmk interface. You will get the result in the Agent: box.
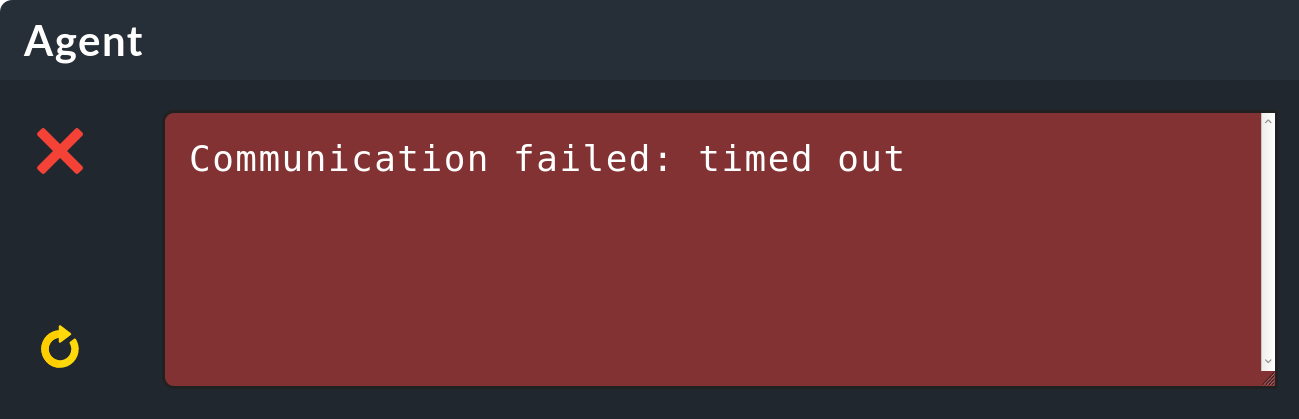
If you get no information or only a timeout error message during the connection test, as in the example above, you should check the Inbound Rules of the Windows firewall on the host.
6.5. Windows Firewall
The agent already creates a rule in the Windows Firewall during its installation, so that the Agent Controller can be reached from the outside via port 6556. When using the push mode, it is usually not necessary to change its settings. If you use a very strict firewall configuration, the Outbound Rules for connections to the monitoring server must be configured so that at least port 8000 (for easier registration, additionally 80 or 443) is reachable.
In current versions of Windows you can find the Windows Defender Firewall with Advanced Security via Windows Settings (Settings > Windows Security) or start it by calling wf.msc from the command line:
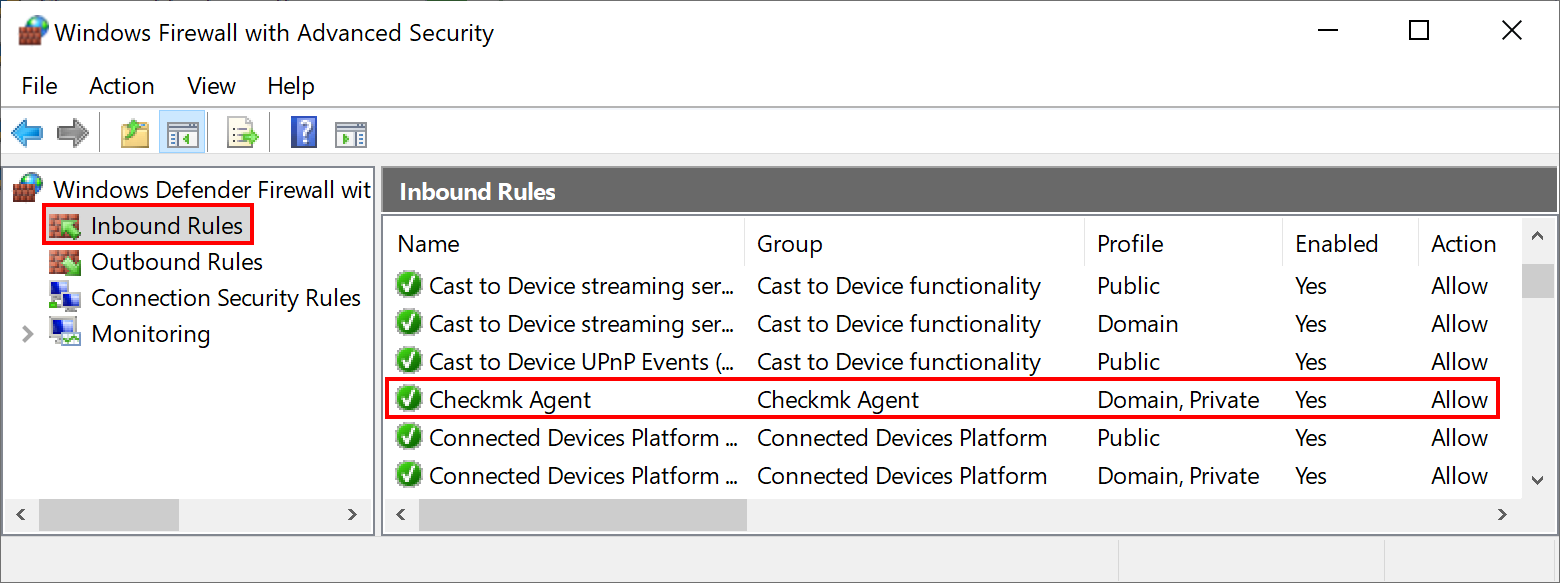
If you do not find such an entry in the Windows Firewall settings, you can add it at this exact location. To do this, click on New Rule in the Action menu.
This opens a wizard for creating a new firewall rule. Set the five choices as follows:
Rule Type |
Leave the selection here at Program. |
Program |
Enter This program path |
Action |
Allow the connection. |
Profile |
This point strongly depends on the configuration of your network. However, in most cases it is recommended to enable only Domain and Private here. |
Name |
Give the rule a concise and short name. |
Alternatively, you can automate this step and set the rule directly on the command line. Modify the following command to your customized installation path if necessary:
Note: The command has been split into four lines for readability.
6.6. Troubleshooting the agent in push mode
In your Checkmk site’s ~/var/agent-receiver/received-outputs/ folder, for each registered host you will find a soft link that uses the host’s UUID as its name.
For hosts in push mode this soft link points to the folder with the agent output, for pull hosts it points to a non-existent file with the name of the host as used in the monitoring.
Based on the age of the cached agent output, you can determine whether the regular transmission was successful or is being interrupted by sporadic network problems, for example.
Furthermore, you can take a look at the log file C:\ProgramData\checkmk\agent\log\check_mk on the host (paths may be configured differently).
Lines such as the following indicate connection problems:
Dez 15 17:59:49 myhost23 cmk-agent-ctl[652648]: WARN [cmk_agent_ctl::modes::push] https://mycmkserver:8000/mysite: Error pushing agent output.6.7. Connections are being lost
If a host has been configured for auto-registration with the Agent controller auto-registration rule set and the Keep existing connections option is set to no, whenever the cmk-agent-ctl-daemon service is restarted (for example, when a host is restarted), all other connections will be removed—except the connection configured for auto-registration.
This affects, for example, hosts where connections to multiple sites were set up before the baked agent package was installed, or connections were manually added after the agent package was installed.
You can temporarily override this behavior by setting the keep_existing_connections variable to true in the C:\ProgramData\checkmk\agent\pre_configured_connections.json file on the host.
You can achieve a permanent change across an agent package update by setting Keep existing connections to yes in the above rule set.
6.8. Waiting time until changes become visible
When auto-registering a host, typically about two minutes pass before the host appears in the monitoring.