1. The virtual appliance
With the Checkmk virt1 virtual appliance you can run Checkmk as a guest on an existing virtualization platform (hypervisor) such as VMware ESXi, Hyper-V or Proxmox. Supported editions: Checkmk Pro, Checkmk Ultimate and Checkmk Ultimate with Multi-Tenancy.
The operating system and a web interface for administration are already preinstalled in the appliance. The appliance is set up with dialog support, can be configured via the web interface and is ready for use after a few simple steps. You therefore do not need any Linux knowledge.
2. Downloading the appliance
You can download the appliance software via the download page.
The following file types are available as downloads for the virtual appliance:
-
OVA file: The virtual appliance Checkmk virt1 for import into the hypervisor. OVA stands for Open Virtualization Archive and is the archive format used by the Open Virtualization Format (OVF). The OVA file can be found in the download area at the Checkmk appliance product.
You need this file for the initial installation.
-
CFW file: The appliance’s firmware. Just like the OVA file, a CFW file is provided in the download area for each firmware version. You can use this file to update an already installed appliance during operation. An update of the firmware is done through the appliance web interface.
You do not need the CFW file for the initial installation, as the OVA file already contains the firmware.
-
CMA file: The Checkmk software for installation in the appliance. Starting with firmware version 1.4.14, no Checkmk software is preinstalled in the appliance. You also carry out the installation of the Checkmk software via the appliance web interface. The CMA file is available in the download area after selecting the appliance as the platform, the Checkmk edition and version.
You will only need the CMA file after the installation has been completed—when you configure the appliance.
Download the OVA file for the initial installation of the virtual appliance.
3. Installation in VMware ESXi
3.1. Prerequisites
You need the OVA file for the appliance. You will also need an ESXi server already running on the network and data storage in this for the virtual machine configurations.
3.2. Importing the appliance
The appliance import runs largely automatically, but afterwards you should take a look at the network configuration.
In the ESXi main navigation, select the item Virtual Machines.
Start the import wizard via Create/Register VM.
Select the import via OVA/OVF.
Add the OVA file.
Continue clicking through the wizard without making any further changes.
The import process may take a few minutes, after which the new virtual machine will then be made available.
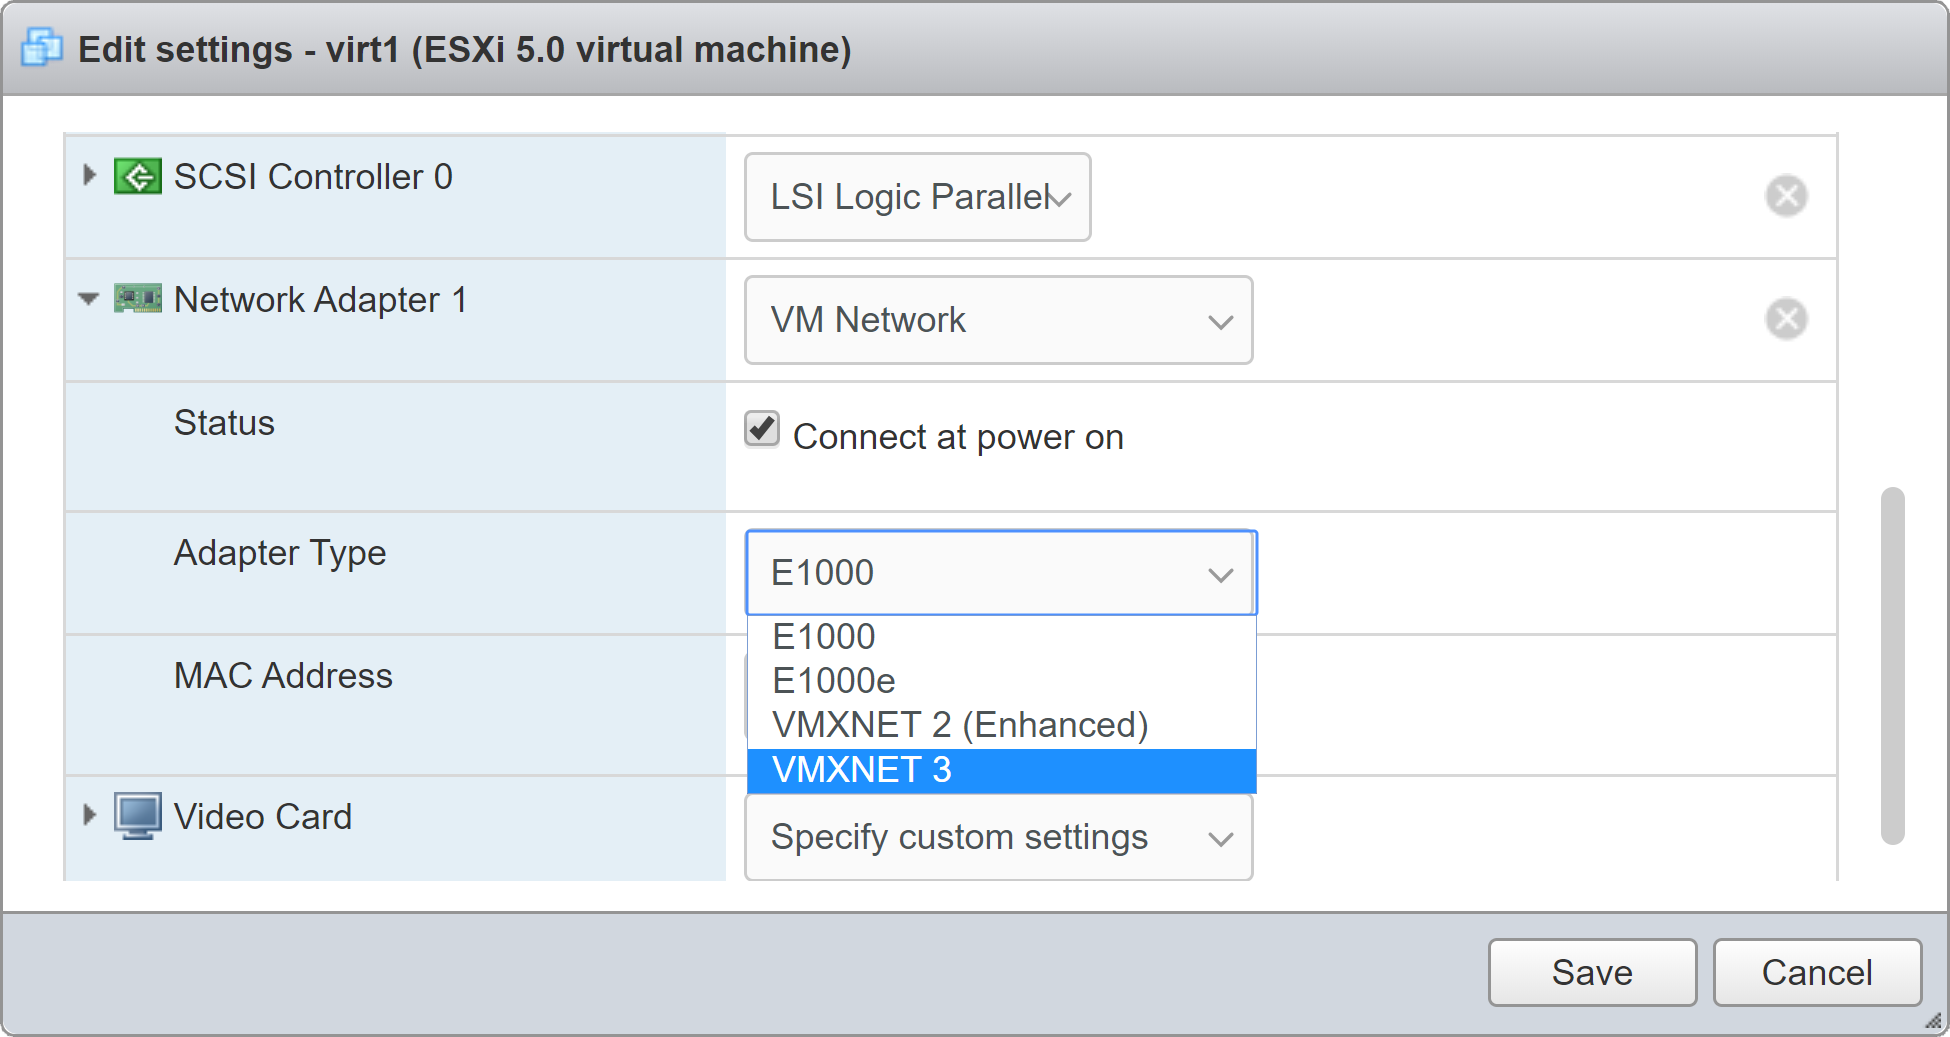
Important: The Checkmk virt1 comes with an E1000 type network interface, an emulation of the 1 GB network adapter Intel 82545EM Gigabit Ethernet NIC, for which drivers are usually already available. For better performance on an ESXi server you should replace this card with a card of the VMXNET 3 type, a completely virtualized 10 GB interface. To do this, change the setting under virt1 > Edit > Network Adapter 1 > Adapter Type:
You will now have completed the VMware ESXi-specific steps. Your appliance is now ready to start and you can begin with its basic configuration.
4. Installation in Hyper-V
4.1. Prerequisites
You need a Hyper-V server that is already running in the network and a data store for the configuration of the virtual machine. You will also need the appliance zip archive. This must be at least version 1.7.11. Extract the zip file to the location where you usually store the virtual hard disks for your Hyper-V VMs.
At this point, we will only describe the setup via the Hyper-V Manager. If you are instead using System Center Virtual Machine Manager (SCVMM), you should also be able to follow these instructions, as the differences in setting up a virtual machine are marginal. |
4.2. Importing the appliance
TL;DR—The short version
The following table contains all the adjustments you need to make during the creation of the virtual machine in Hyper-V Manager. It is aimed at users who have mastered Hyper-V in their sleep and do not wish to follow the step-by-step instructions below.
| Step in the wizard / setting | Field | Content |
|---|---|---|
Specify Name and Location |
Name |
Freely selectable |
Specify Generation |
- |
Generation 2 |
Assign Memory |
Startup memory |
Minimum 8192 MB |
Assign Memory |
Use Dynamic Memory for this virtual machine |
Do not activate this option. |
Configure Networking |
Connection |
Freely selectable |
Connect Virtual Hard Disk |
Use an existing virtual hard disk |
Select the disk from the zip archive with the file name containing |
Settings in the VM Settings |
||
Security |
Enable Secure Boot |
Do not activate this option. |
Processor |
Number of virtual processors |
Minimum 2 |
SCSI Controller |
Add Hard Drive |
Select the disk from the zip archive with the file name containing |
Step-by-step instructions
If that was too fast for you, let’s go through the steps more slowly.
The import of the appliance is largely guided, but you should then take a look at the network configuration.
Start the Hyper-V Manager, open the Action menu and select the option New > Virtual Machine.
In the Specify Name and Location dialog, you can freely assign a name for the VM and also specify the storage location as required.
In the next step Specify Generation you must select Generation 2.
Next, assign memory to the VM (Assign Memory). The minimum requirement here is 8192 MB. When configuring the memory, make sure that Use Dynamic Memory for this virtual machine is not activated.
In the Configure Networking step, you may need to select the correct connection.
Now in the step Connect Virtual Hard Disk, you must select the option Use an existing virtual hard disk. Then click on Browse and select the virtual hard disk previously extracted from the zip file, with the file name containing
disk1.Then click Finish, but do not start the VM yet.
Back on the Hyper-V Manager main screen, select your new VM for Checkmk and then click Settings. Here the following edits will need to be made:
Select the Security setting and deactivate the Enable Secure Boot checkbox.
Navigate to Processor and assign at least 2 virtual CPUs.
Then click on SCSI Controller and add a new Hard drive via Add. Under the Virtual hard disk field you will again find the Browse button. This time, select the virtual hard disk with the file name containing
disk2.Optional: Checkmk is installed on this second disk (
disk2), where all Checkmk sites and their associated data are also stored. By default, this virtual hard disk had a size of 100 GB. If you need a larger disk for your sites and data, click Edit now and select the Expand action. When the virtual appliance is started for the first time, this disk is initialized and cannot be enlarged afterwards.
Close the settings by clicking on Apply.
You can now start the VM and finally connect directly to the Hyper-V Manager, for example. This completes the Hyper-V-specific steps. Your appliance is now ready to start and you can begin with the basic configuration.
5. Installation in Proxmox
5.1. Prerequisites
You will require the OVA file for the appliance and a functioning Proxmox installation (a basic configuration is sufficient).
5.2. Procedure
The import in Proxmox currently needs to be done partly by hand, so it consists of several steps:
the creation of the virtual machine via the Proxmox web interface
uploading the OVA file to the Proxmox server
unpacking the OVA file in the terminal
importing the virtual hard disks using the terminal
activating the disks, selecting a boot disk and enabling UEFI
5.3. Importing the appliance
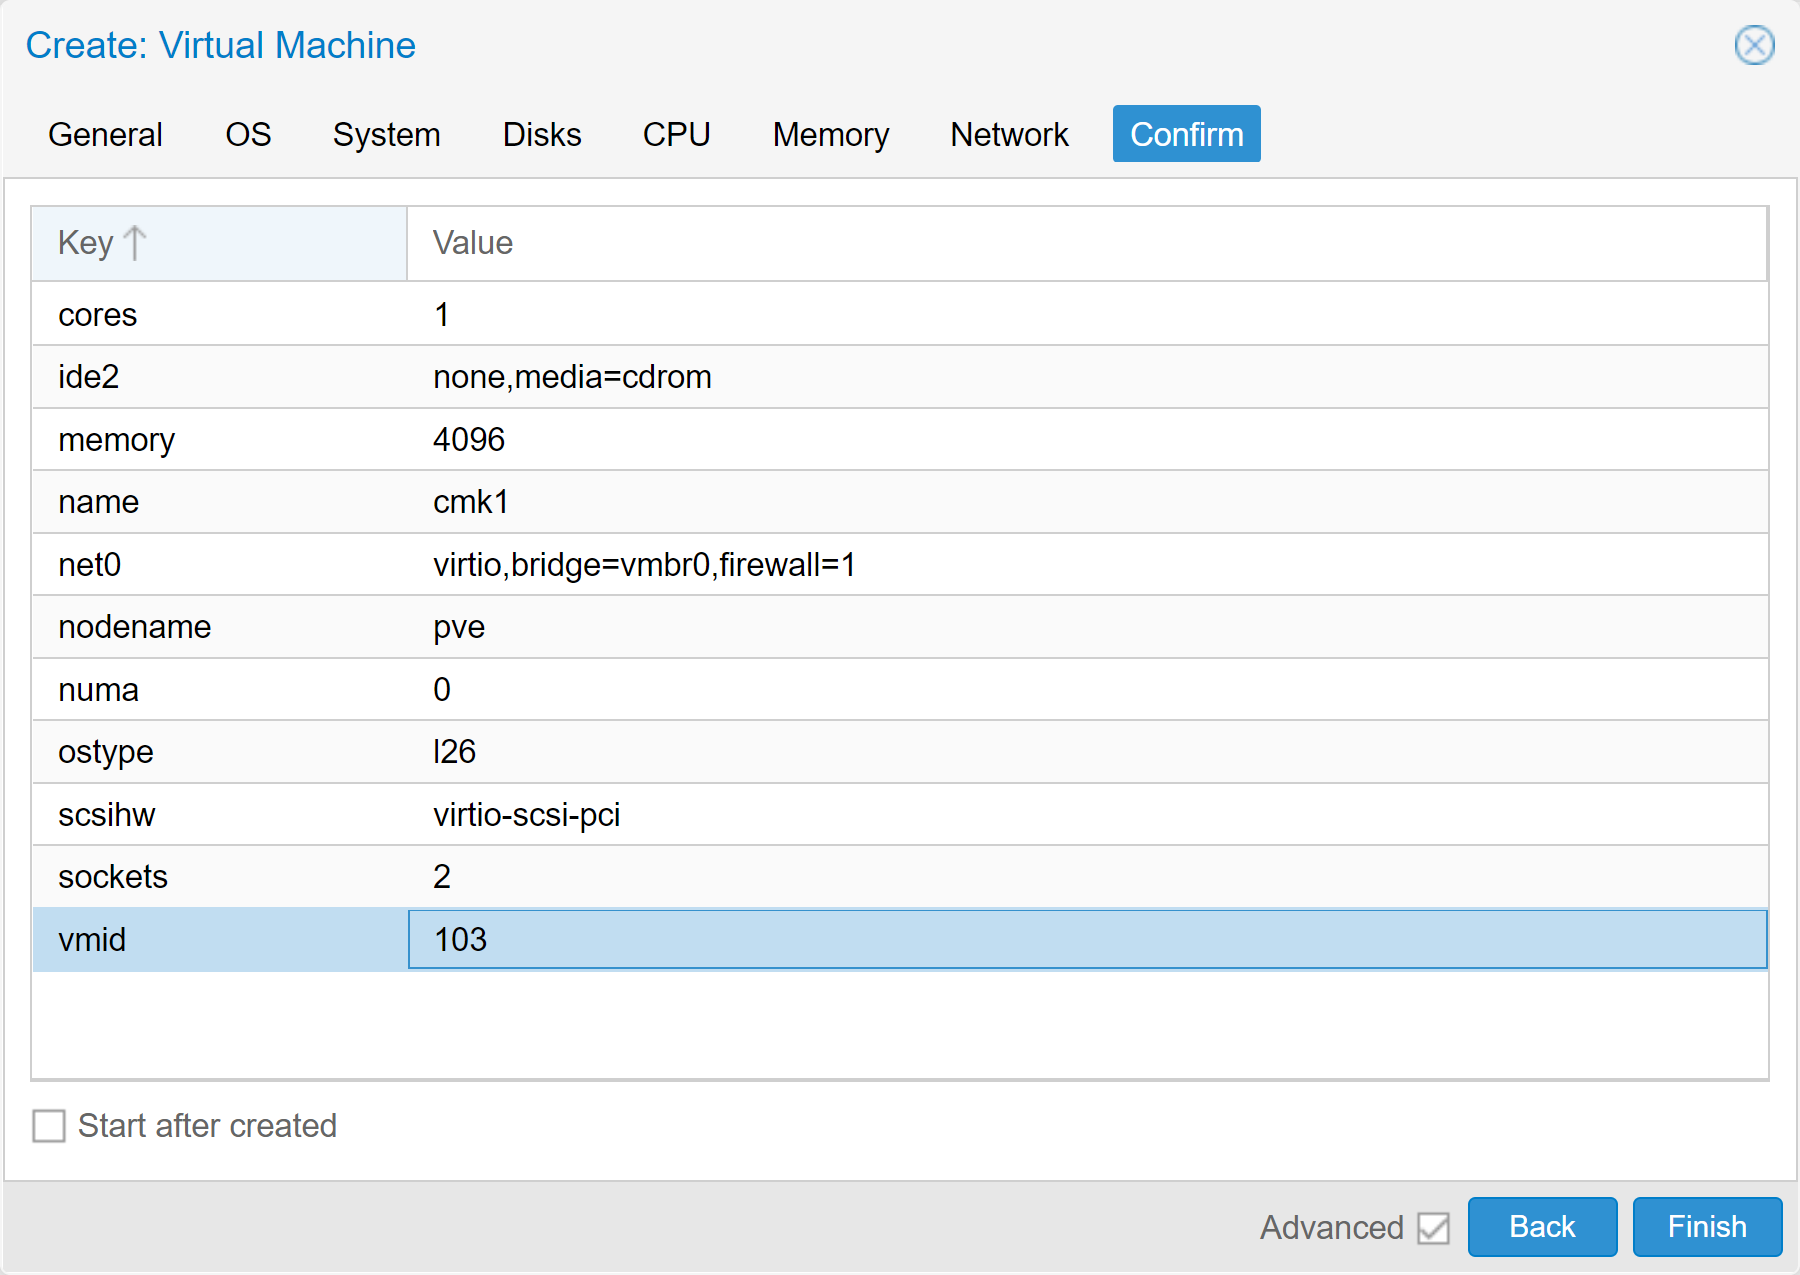
First create a virtual machine in the Proxmox web interface. When doing so, configure at least the following settings differently from the defaults:
General > VM ID: any, here
103OS: Do not use any media
OS > Guest OS > Type: Linux.
System: Activate the option Qemu Agent.
Disks: Delete the default entry.
CPU > Cores:
2Memory (MiB):
8192
Now upload the OVA file to the Proxmox server (here myproxmox.com):
Switch to the Proxmox server via SSH and unpack the uploaded OVA file:
Then import the two virtual disks into the virtual machine (here the VM ID 103) and your storage (default: local-lvm):
You can now delete the CMA file and the unpacked files.
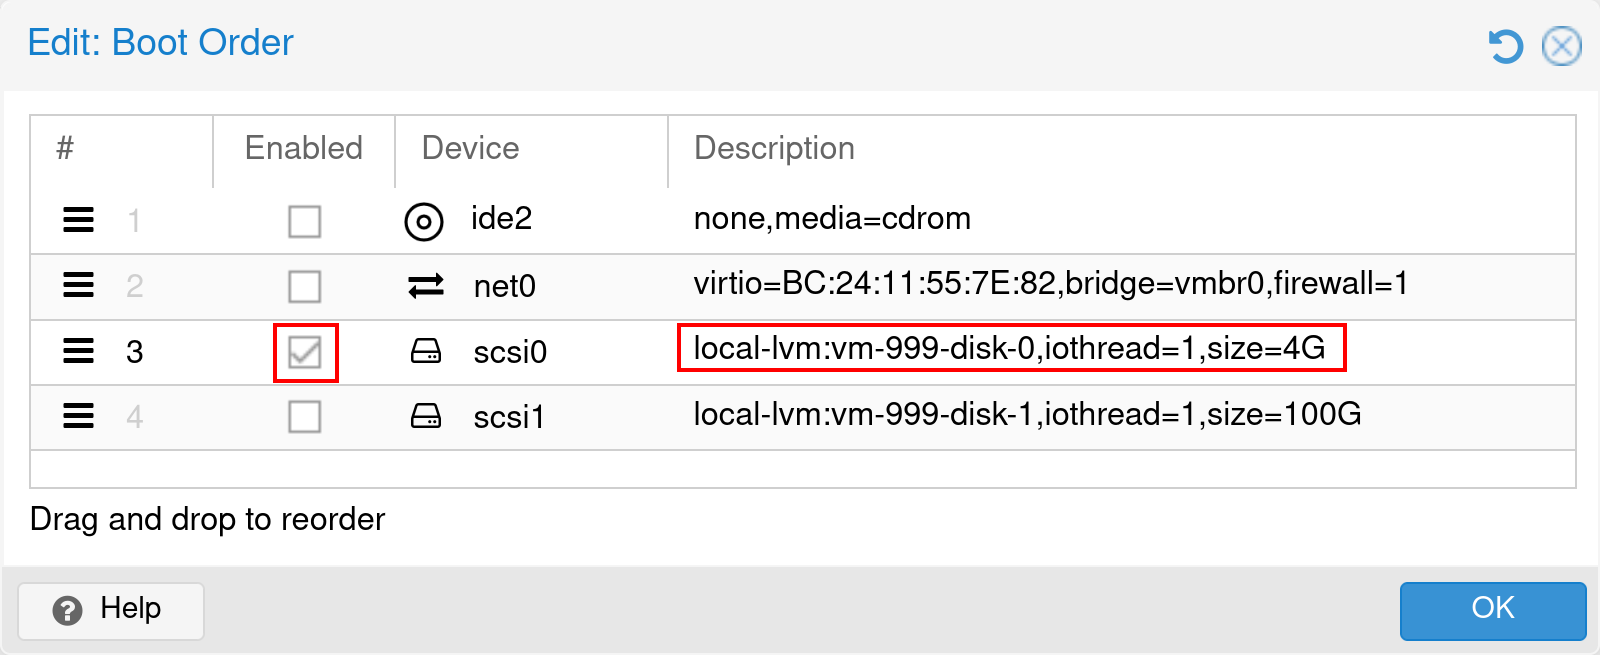
Next, you must activate the hard disks you just imported in Proxmox, because after the import process, they are initially Unused. Open the VM in the GUI of Proxmox and select Hardware. Double-click on the first hard disk and then click on Add. Repeat this for the second hard disk.
As of version 1.7.0 new installation of the Checkmk appliance only support UEFI booting. To enable UEFI you first need an EFI disk. Add this by clicking Add and selecting EFI Disk. Select the storage for this new EFI disk, uncheck the checkbox Pre-Enroll keys and hit OK. Double-click BIOS and switch this to OVMF (UEFI).
Next you have to enable the device with the string disk-0 in its description as a boot device via Options > Boot Order.
Disable all other devices in this menu and click OK.
You have now completed the Proxmox-specific steps. Your appliance is now ready to start and you can begin with its basic configuration.
6. Installation for testing purposes
The following environments should not be used productively. We provide these installation instructions solely for the purpose of creating a (possibly limited) test instance of Checkmk.
6.1. Installation in VirtualBox
Prerequisites
For the following steps, you will need a functioning VirtualBox installation in addition to the OVA file. It does not matter on which system VirtualBox is running.
Importing the appliance
Start the import of the OVA file via File > Import Appliance and select the OVA file. You will then see all of the settings for the virtual machine—and you can leave these as they are for now. You can, of course, modify values at this point or later, for example, to assign additional resources to the machine.
Important: In the appliance settings, you should always select the Generate new MAC addresses for all network adapters option under MAC Address Policy. Otherwise, there will be problems if more than one appliance with the same MAC address is running on the network.
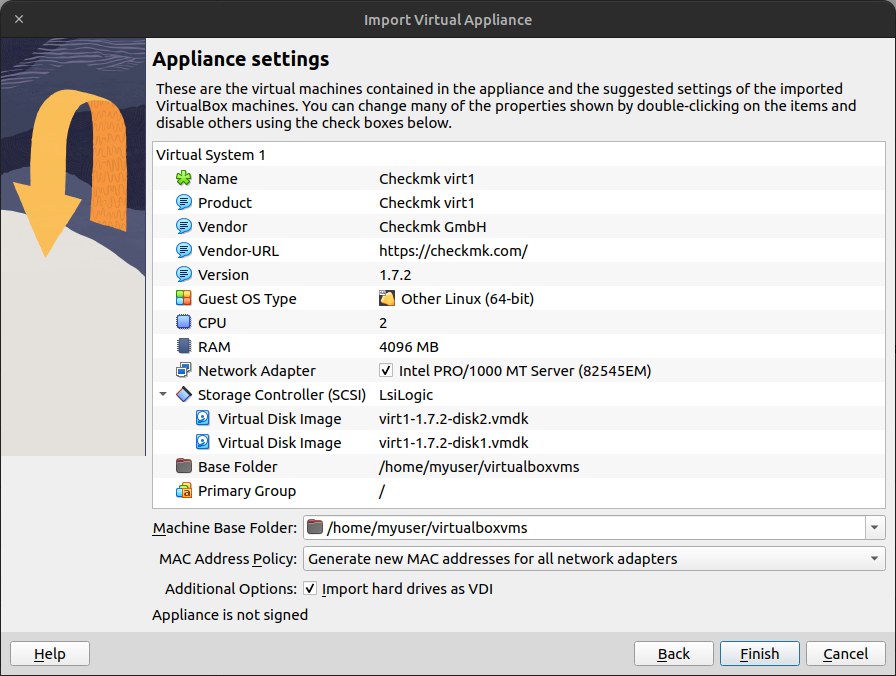
You can now import the appliance.
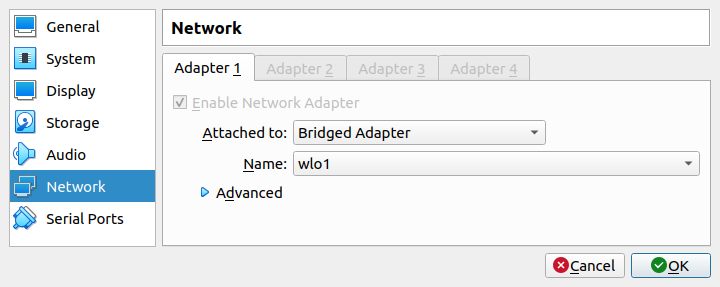
Following the import, you will still need to carry out one more step: Call up the network configuration for the virtual machine. The mode here is set to Bridged Adapter: The virtual network adapter is thereby connected to an adapter on your host—and of course these will vary. If in doubt, simply exit the configuration without changing it by pressing OK — VirtualBox will then automatically fill in the missing adapter name with your default adapter.
You have now completed the VirtualBox-specific steps. Your test appliance is now ready to start and you can begin with its basic configuration.