

1. Introduction
No non-trivial software is ever bug-free—and that applies to Checkmk as well. This means it’s important to update Checkmk regularly. During the first few months following the release of a new major version, we aim to deliver bug fixes, feature enhancements, performance optimizations, and security updates on a weekly basis. Later in the product lifecycle, you can expect monthly updates. And approximately once a year, a new major version that expands the functionality of Checkmk is released.
Due to the specific nature of site management with omd, simply installing a new Checkmk package via the package manager is not sufficient.
This article explains exactly what needs to be done during updates—whether patch or major versions—and how to resolve conflicts.
If you are planning to update the Checkmk version from 2.4.0 to 2.5.0, you should also read the Update to version 2.5.0 article, which covers many details specific to this update.
 |
This article covers updating the Checkmk version and the basics of using the |
2. Background
Updating Checkmk to a new version works a little differently than with other software. Why?
The reason is that Checkmk not only allows multiple independent sites on a single server, but also multiple simultaneously installed software versions. Each site is assigned to an installed version. Consider the following situation on a fictional server as an example:
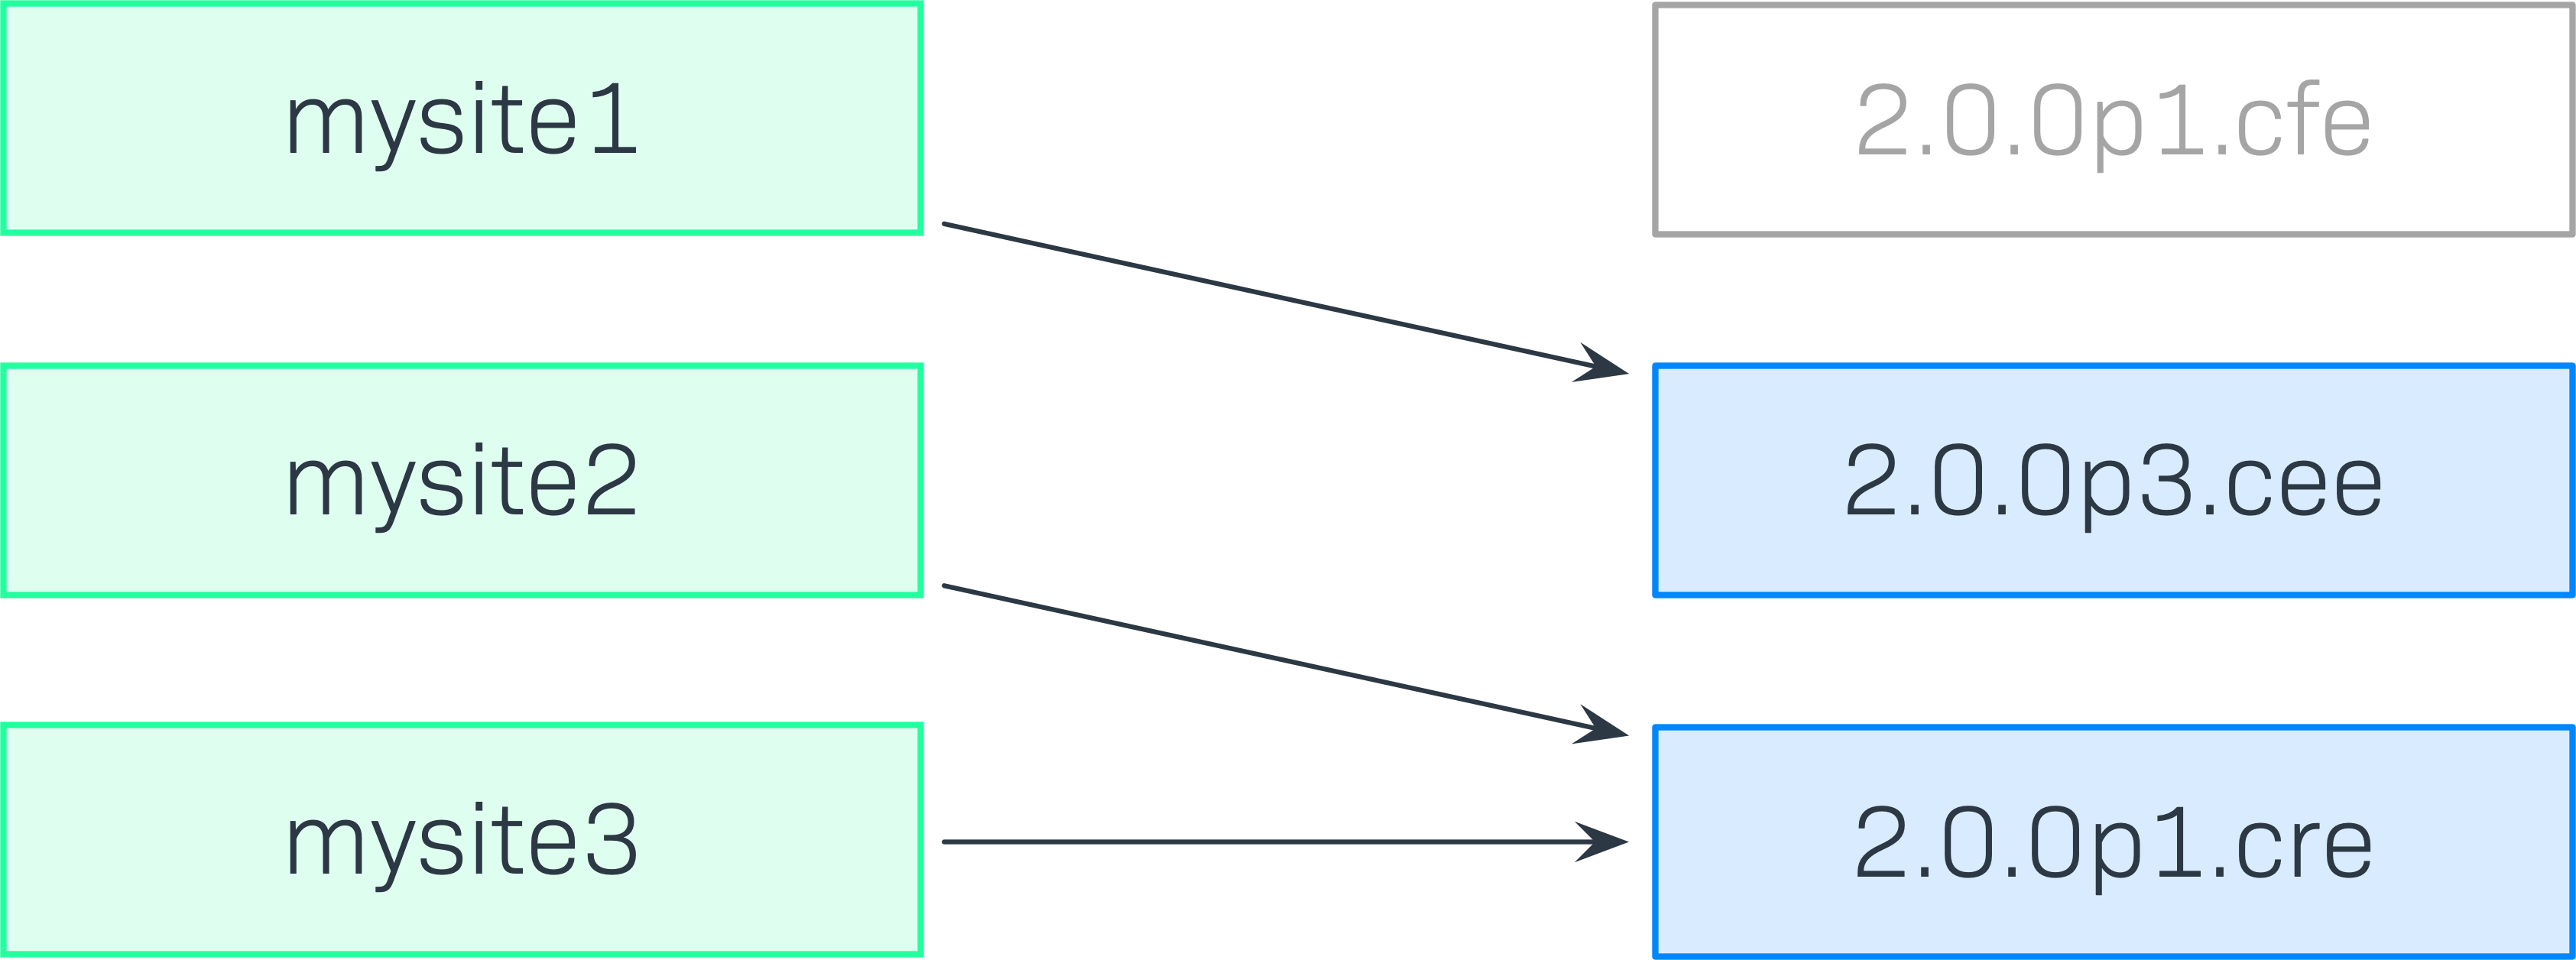
Here, the mysite1 and mysite2 sites are using version 2.5.0p3.pro, and the mysite3 site is using version 2.5.0p1.community.
Additionally, although the Checkmk version 2.5.0p3.ultimate has been installed, it is not currently in use.
This example makes it clear that an update is not simply a matter of installing a new RPM/DEB package of Checkmk on the server, one more action is also required. Consider the following situation as an example:

Here, the mysite3 site is to be updated to Checkmk version 2.5.0p3.community.
The first step is to download and install the appropriate RPM/DEB package.
This is done in exactly the same way as during the initial installation.
The newly installed version is not yet being used by any site, so it looks like this:
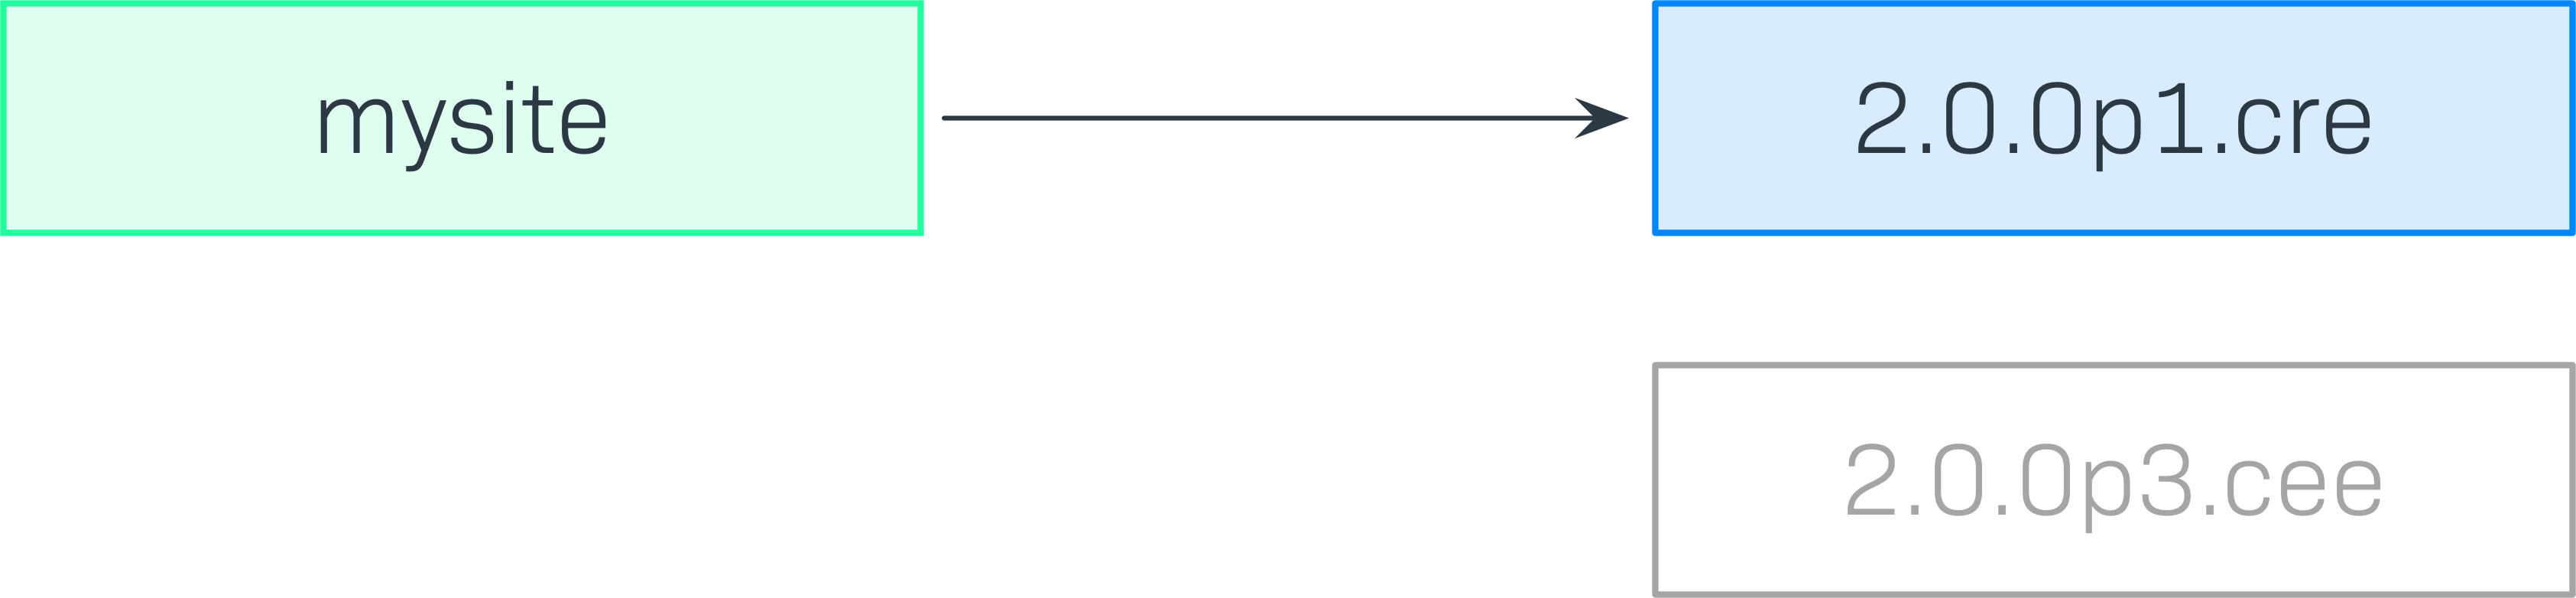
The second step is to update the site from 2.5.0p1.community to 2.5.0p3.community.
This is done using the omd update command, which you will learn about in detail below:
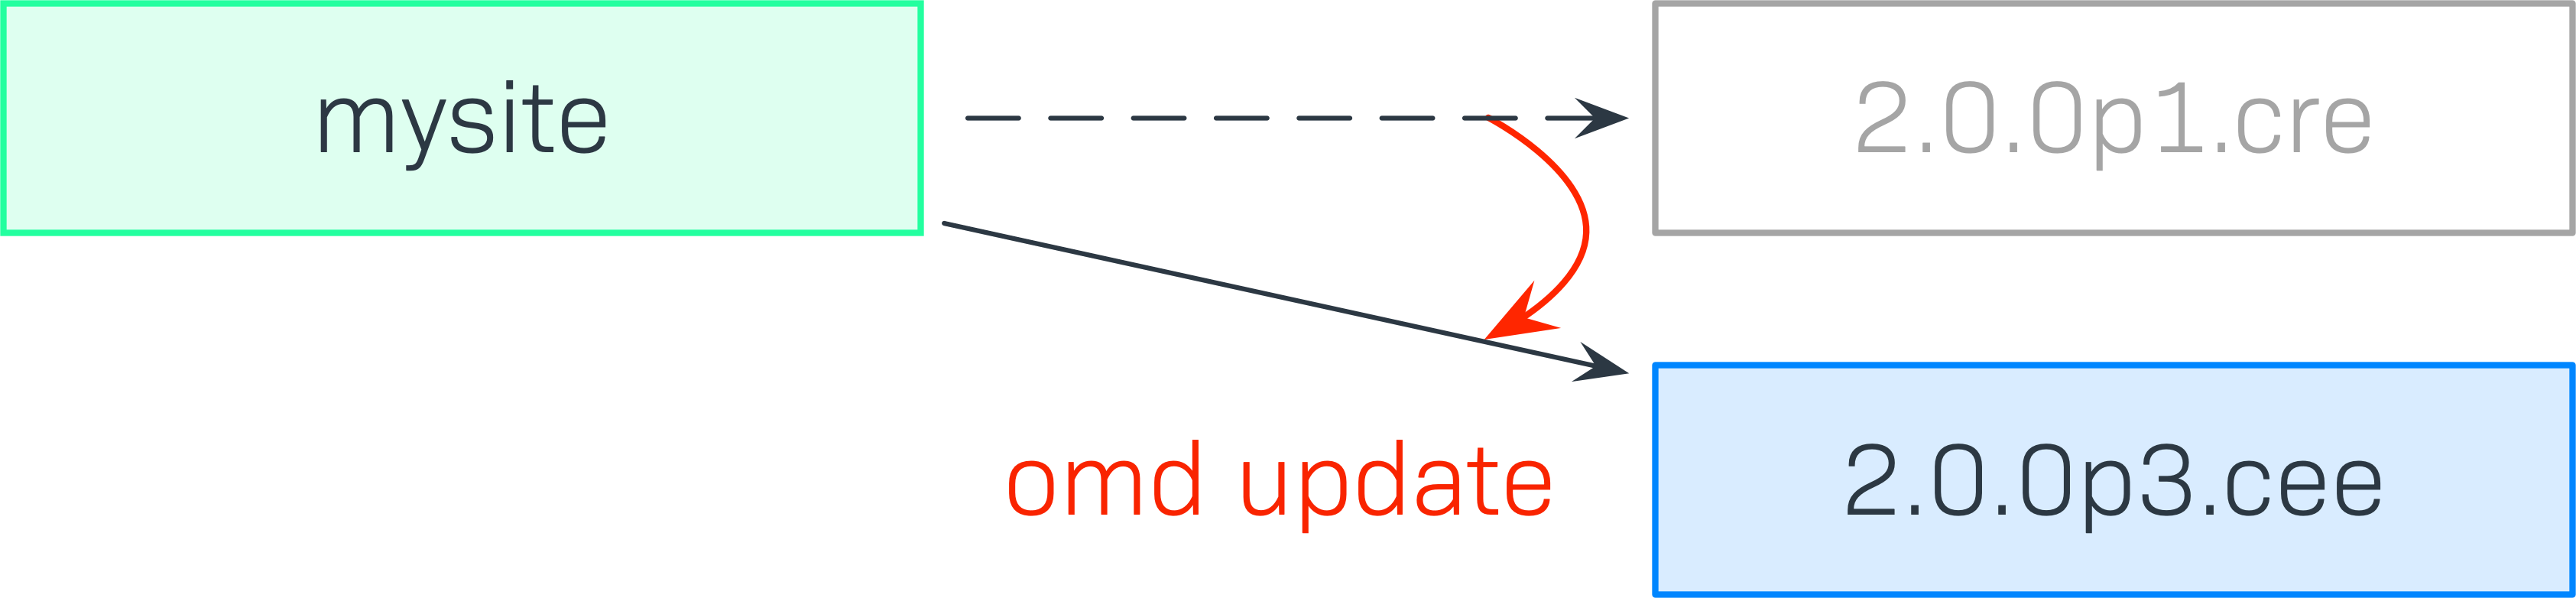
Following the update, you can remove the 2.5.0p1.community version (if it is no longer needed).
3. Preparations
The topics described in the following sections apply to every update—whether within a major version (from a lower to a higher patch version) or from one major version to the next. The separate Update to version 2.5.0 article covers additional details regarding major version updates.
The preparatory steps are always the same:
Determine the update path and download the required installation packages and extensions.
Next, perform a cleanup: The local directory should no longer contain any files that are not associated with a package.
Then perform the compatibility check for installed extensions.
Finally, create and test the backup.
3.1. Determining the update path
The update path determines which packages you will need to download and, if applicable, whether an update of the Linux distribution is required before the Checkmk update, or whether it is possible after the Checkmk update.
Major version update
When updating to a higher major version, you must always update to the next major version; you cannot simply skip one. If you want to update from 2.3.0 to 2.5.0, first update to 2.4.0. The reason is simple: there are sometimes so many changes between two major versions that skipping one would cause problems. When updating, always use the highest patch version available.
This also applies to the initial version. An update from 2.3.0p42 to 2.5.0p17 therefore follows this path:
2.3.0p42 2.3.0p51 2.4.0p38 2.5.0p17
The Update matrix shows which Checkmk major versions no longer support which Linux distribution versions. This will help you determine whether an Linux distribution update is required before a major Checkmk update.
Patch version update
A patch version update is generally possible starting with the first stable major version. Any exceptions that require intermediate steps are listed on the download page. The update from 2.5.0p1 to 2.5.0p17 therefore follows this path:
2.5.0p1 2.5.0p17
Accordingly, only the installation package for Checkmk 2.5.0p17 needs to be downloaded.
The Update matrix also shows which Checkmk patch version introduced support for a new Linux distribution version. This allows you to determine whether a subsequent Linux distribution update to the eagerly awaited latest version is possible with the current patch version.
3.2. Checking local files
Local files allow you to customize and extend the functionality provided by Checkmk.
These files are located in the local part of the site’s directory structure, i.e., in ~/local.
Local files can cause problems during an update, as they may no longer be compatible with the new Checkmk version.
Since Checkmk cannot detect and handle local customizations or third-party extensions during an update, you should check your Checkmk site before updating to see if you are using local files and, if so, which ones.
Get an overview of the local files in your Checkmk site by running the following command as a site user, (where the -L option ensures that symbolic links are also followed):
In a fresh Checkmk installation, the output should be empty.
If files are found, compare the list with the output of mkp find.
Ideally, local files are already fully bundled in MKPs.
If this is not the case, bundle related files into Checkmk extension packages (MKPs). Once combined into a package, an extension can be disabled or re-enabled as a whole.
3.3. Checking MKPs for compatibility
When updating to a higher patch version within a major version, compatibility issues with MKPs are rarely a concern. However, incompatibilities can never be ruled out entirely. For example, some extension developers set the highest compatibility to a specific patch version of Checkmk if a REST API provider discontinues a version as of a certain date.
The likelihood of incompatibilities is greater when updating the major version. If you encounter incompatible extensions obtained from third parties (for example, from the Checkmk Exchange), check whether a newer version is available. If this is not the case—or if you developed the extension yourself—you will find all of the necessary information for adapting your extensions in the article Developing extensions for Checkmk.
3.4. Creating a backup
We do not need to explain to you how important it is to create a backup immediately before an update, so that you do not lose too much of your monitoring history in the event of a failure.
For detailed examples of backing up with omd backup, see the article on site administration with omd.
In addition to file-based backups, it is advisable to enable configuration versioning with Git in the Global settings. This ensures that there are no gaps in the monitoring data in the event that a rollback is necessary.
Testing the backup
It is worth noting here that a regular backup can also be useful for testing an update.
You can restore the backup under a different name—and then test the update with the newsite site:
Testing the update
First, run the update on this new, cloned site to verify, for example, that the local changes mentioned above work in the new environment.
If the tests with the cloned site were successful, for reasons of space and performance, you will usually want to delete or at least deactivate the cloned site (omd disable newsite) before the actual update of the production site.
4. Performing the update
The update essentially consists of two steps:
First, use the Linux distribution’s package manager to install the new Checkmk package—or the new packages, if you want to install the latest patch version of the existing major version before updating the major version.
Next, use
omd updateto activate the new Checkmk version for the site to be updated. If necessary, repeat the process for each step of the update path.
4.1. Installing new Checkmk versions
As described in the introduction, the first step in the update process is to install the desired new version of Checkmk. This is done exactly as in the initial installation—however it will likely run a bit faster because most of the required packages have already been installed. In the following example, a package for Ubuntu 24.04 (Noble Numbat) is installed:
If a major version update is planned and the site to be updated is not yet at the latest patch version, you must first also install the corresponding patch package:
You can view the list of installed Checkmk versions at any time using the omd versions command:
One of these versions is marked with (default).
This default version is automatically used when creating new sites.
When managing existing sites, the default version is irrelevant.
The omd command always starts with the version that matches the site for which the command is called.
The omd sites command provides a list of the current sites and the versions they use:
4.2. Updating a site
|
If you are performing a major version update and your site is not yet at the latest patch version of the previous major version (for example, update path 2.4.0p23 2.4.0p38 2.5.0p17), perform the steps described here first for 2.4.0p38, then for 2.5.0p17. |
Once the desired new version has been installed, you can update the site.
No root privileges are required for this.
It is best to perform the update as the site user:
Make sure that the site has been stopped:
Updating—which essentially means switching to a different version—is now done simply with the omd update command:
If there is more than one possible target version, you will be presented with the following options:
 ┌───────────────Choose target version──────────────────┐
 │ Please choose the version this site should be        │
 │ updated to                                           │
 │ ┌──────────────────────────────────────────────────┐ │
 │ │   2.5.0p5.community  Version 2.5.0p5.community   │ │
 │ │   2.5.0p5.pro        Version 2.5.0p5.pro         │ │
 │ │                                                  │ │
 │ │                                                  │ │
 │ └──────────────────────────────────────────────────┘ │
 ├──────────────────────────────────────────────────────┤
 │             <Update now>    <  Cancel  >             │
 └──────────────────────────────────────────────────────┘
In the following dialog box, confirm the selected update to the new version:
 ┌──────────────────────────────────────────────────┐
 │ You are going to update the site mysite from     │
 │ version 2.4.0p31.cre to version                  │
 │ 2.5.0p5.community. This will include updating    │
 │ all of your configuration files and merging      │
 │ changes in the default files with changes made   │
 │ by you. In case of conflicts your help will be   │
 │ needed.                                          │
 ├──────────────────────────────────────────────────┤
 │           <Update!>      < Abort >               │
 └──────────────────────────────────────────────────┘
If you perform a version update at the same time as an edition upgrade from Checkmk Community to one of the commercial editions, you will be reminded of this fact again as a precaution:
 ┌───────────────────────────┐
 │ You are updating from     │
 │ Community to Pro. Is this │
 │ intended?                 │
 ├───────────────────────────┤
 │     < yes >   < no  >     │
 └───────────────────────────┘
An important part of the update is updating the included configuration files. Any changes you may have made to these files are not simply discarded, but merged. This works very similarly to version control systems, which attempt to automatically merge simultaneous changes made by multiple developers to the same file.
Sometimes—if the changes affect the same part of the file—this does not work, and a conflict occurs. We show you how to resolve this below.
The update displays a list of all modified files and directories (abbreviated in the following example):
2026-02-19 13:47:54 - Updating site 'mysite' from version 2.4.0p38.cre to 2.5.0p17.community...

 * Updated        .profile
 * Installed dir  var/check_mk/packages_local
...

Installed default file of version 2.5.0p17.community.
 * Installed link etc/rc.d/60-ui-job-scheduler
 * Installed link etc/rc.d/85-rabbitmq
...

Creating temporary filesystem /omd/sites/mysite/tmp...OK
Executing 'cmk-update-config --conflict ask --dry-run'
-| ATTENTION
-|   Some steps may take a long time depending on your installation.
-|   Please be patient.
-|
-| Cleanup precompiled host and folder files
-| Verifying Checkmk configuration...
-|  01/08 Legacy check plug-ins...
-|  02/08 Rulesets...
...
-|  07/08 Invalid hosts labels...
-|  08/08 Deprecated .mk configuration of plugins...
-| Done (success)
-|

Completed verifying site configuration. Your site now has version 2.5.0p17.community.
Executing update-pre-hooks script "01_mkp-disable-outdated"...OK
Executing update-pre-hooks script "02_cmk-update-config"...
-| ATTENTION
-|   Some steps may take a long time depending on your installation.
-|   Please be patient.
-|
-| Cleanup precompiled host and folder files
-| Verifying Checkmk configuration...
-|  01/08 Legacy check plug-ins...
-|  02/08 Rulesets...
...
-|  29/30 Validating configuration files...
-|  30/30 Update core config...
-| Generating configuration for core (type nagios)...
-| Precompiling host checks...OK
-| Done (success)
OK
Finished update.
If the line highlighted in the output above, Completed verifying site configuration, appears, the site has been switched to the new version:
… and can be started:
5. Follow-ups
Software development means change. And since we are always working to keep Checkmk up to date, we sometimes have no choice but to break with old traditions and make changes that are incompatible. This means that after an update, you should adjust your configuration or at least check it. As a rule, we try to use sensible default values for new options, but even this often means that it’s at least a good idea to verify the new settings.
5.1. Updating the system Apache configuration
Changes to the configuration of the site web server (currently: Apache) frequently require configuration changes to the system web server (Checkmk also depends on Apache).
These changes cannot be applied using the instance user’s permissions.
Therefore, after each update, run the command omd update-apache-config mysite as root for the Checkmk instances that were updated.
If no configuration changes are necessary, the command will simply do nothing.
If you have switched the system web server from Apache to a different one (such as Nginx), check Werks that contain omd update-apache-config mysite and manually adjust your configuration if necessary.
5.2. Checking for incompatible changes
While incompatible changes are less common in patch releases and usually require only minor adjustments, major updates more often result in new check plug-ins replacing existing ones. If you are using one of the affected plug-ins, a new service discovery will be necessary on the affected hosts following the update.
An overview of all changes in Checkmk, including a search function, can be found online in our Werks.
Even more convenient, however, is the search function built into Checkmk. After logging in to the site, you will find a red-highlighted link at the top of the Help menu showing the number of incompatible and unconfirmed changes:
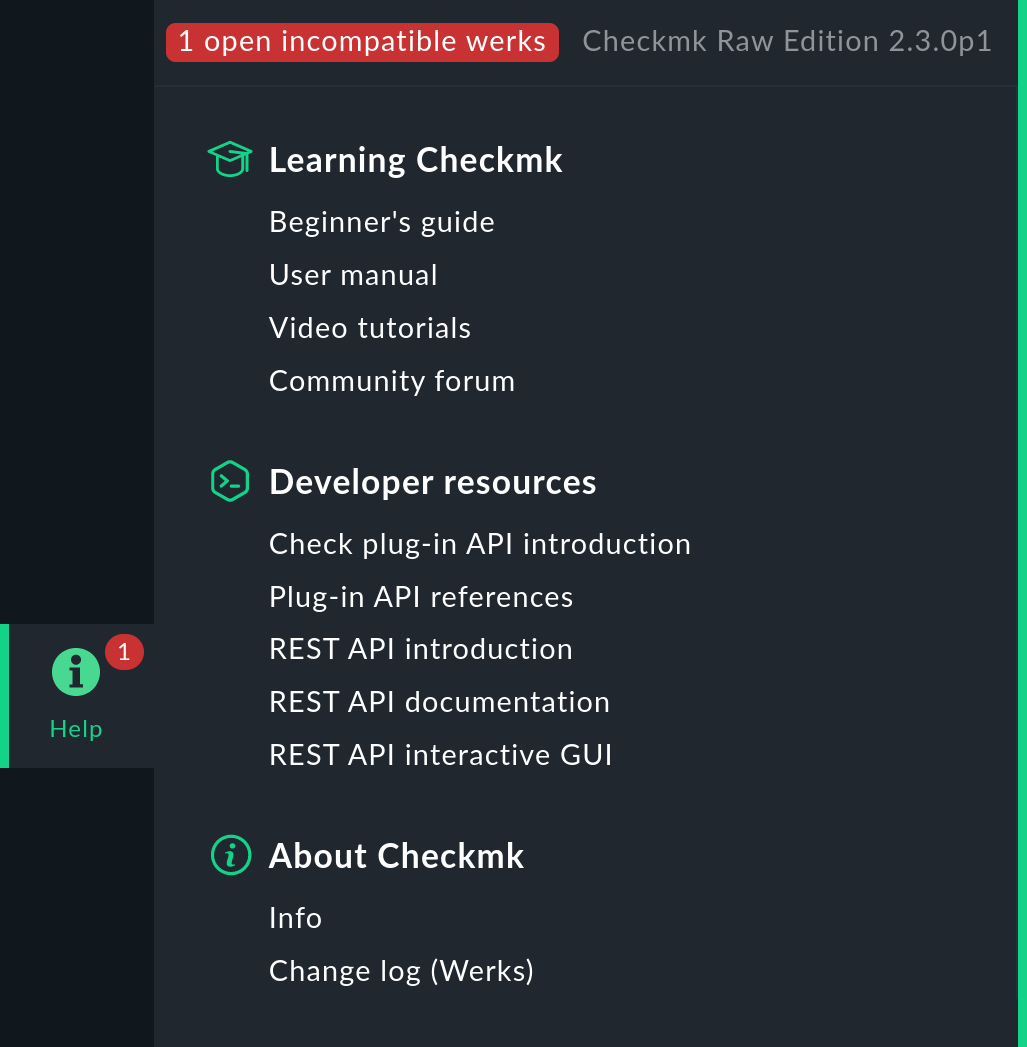
Checkmk tracks the incompatible changes introduced by the update to the current version, and prompts you to review and then acknowledge them:
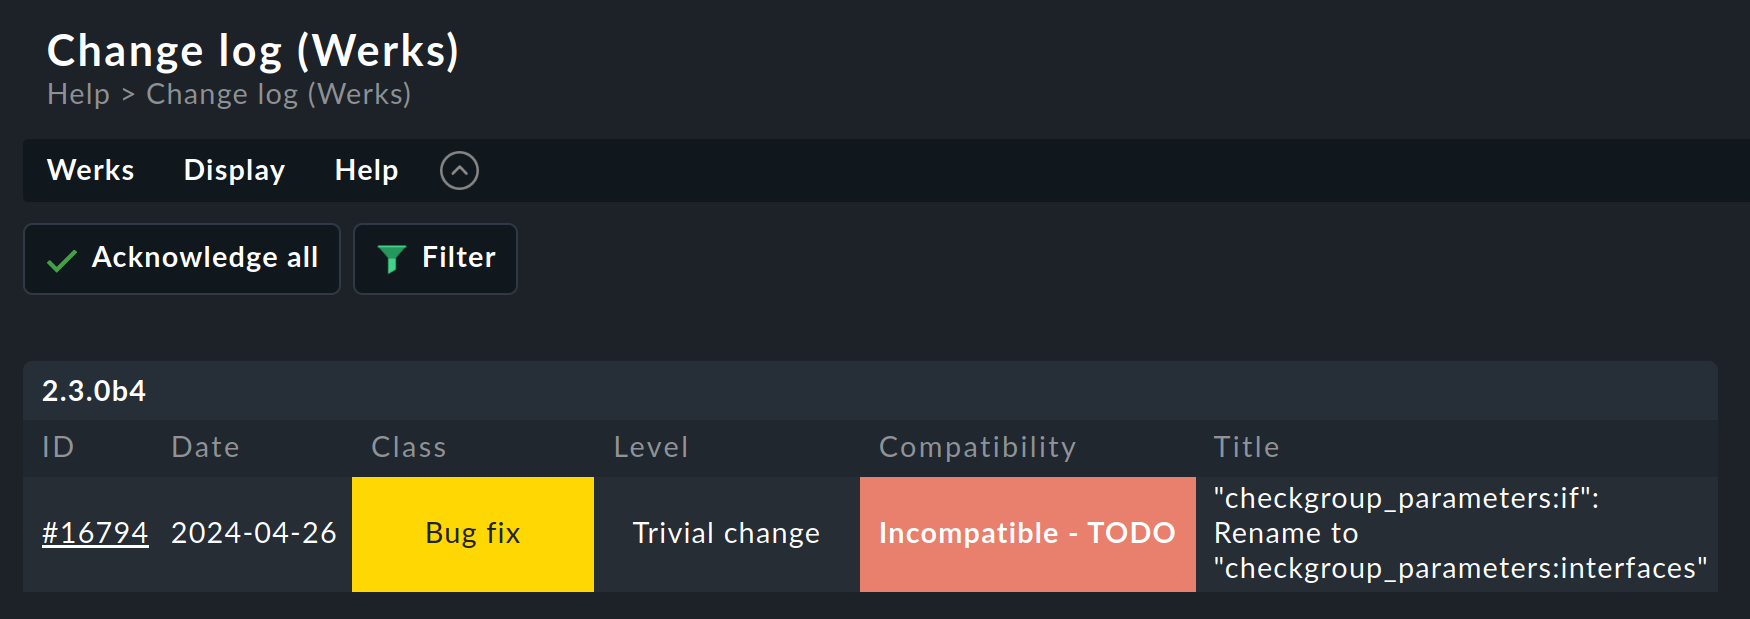
If you open this page via the red link in the Help menu, you will only see the 'Werks' (i.e., the changes) that require action and are therefore marked with Incompatible - TODO. You can open each Werk individually, view it, confirm it with a mouse click—and thus gradually reduce the number of open, incompatible changes. Additionally, the Help > About Checkmk > Change log (Werks) menu item gives you access to the complete history of changes in the current major version.
6. Updates in distributed environments
There are two different approaches for updating all sites within a distributed monitoring—that is, the central site and the remote sites.
Important: Regardless of which approach you choose, you should of course first create backups of all sites before proceeding.
The preferred, secure approach is the one-step update, in which you perform the following steps:
Stop all sites.
Perform the update for all sites.
Restart the updated sites.
If this is not possible—for example, because the environment is distributed across sites in different time zones and the sites are managed by different teams—a temporary mixed operation may be permitted under strict conditions.
For major updates, the version difference must be exactly one version, and a specific patch version of the source version is always required.
The following order must be strictly adhered to: First, update all remote sites; only then, as the final step, update the central site. This ensures that at no point does a configuration generated by a newer Checkmk version end up on an older Checkmk version.
The following table shows the possible combinations when updating from 2.4.0 to 2.5.0:
| Central site | Remote site(s) | Allowed? | Notes |
|---|---|---|---|
2.4.0 |
2.4.0 |
Yes |
State prior to updating all sites. |
2.4.0 |
2.5.0 |
Yes |
Minor functional limitations are to be expected during the update; therefore, keep the mixed operation period as short as possible. There is no risk to data or configuration. |
2.5.0 |
2.4.0 |
No |
Warning: In a central setup, there is a risk of irreparably damaging remote sites. Avoid such a situation at all costs! |
2.5.0 |
2.5.0 |
Yes |
State after updating all sites. |
6.1. Technical background
The technical rationale for this approach lies in the protocols used: The central site primarily accesses the data from the remote sites in read-only mode via Livestatus; in a central setup, it also accesses the data in write mode via a non-public HTTP API. In both cases, new versions introduce proper supersets of the protocols used. Thus, an older central site uses only a proper subset of the functionality of the newer remote sites. If the central site were to be updated first, it might use API calls or Livestatus requests on the remote sites that they do not yet understand.
The maximum version difference for a single major version, in turn, results from the fact that the removal of interfaces is accompanied by a grace period of exactly one version.
6.2. Extension packages in central setup
To facilitate phased updates, Checkmk allows you to store extension packages with the same name but in different versions—one compatible with the older central site and one compatible with the newer remote sites. The appropriate package is activated in each case. Details are described in the article on extension packages (MKPs).
6.3. Cascading Livestatus
When using viewer sites, viewer sites may only be updated after the sites whose data they display have been updated. If a viewer site displays only data from remote sites, it may be updated as soon as those remote sites have been updated. If, on the other hand, the viewer site also displays data from the central site, it must be updated last.
7. Updating a Docker container
The update process for a Checkmk site in a Docker container is very simple. There are only the following prerequisites:
The container is not deleted when it is stopped. This means that the
--rmoption was not used when starting the container.You know the ID of the data volume associated with the container. Normally, you should have assigned a unique ID to the container’s volume when you started it. If you are unsure of your volume’s ID, you can retrieve information about the container named
myContainerusing thedocker inspect myContainercommand.
If you have followed the Installation Guide for Checkmk in Docker, you should have automatically met the prerequisites.
The update itself is completed in 3 steps:
Stop the container.
If the Checkmk container is namedmyContainer, the command is:docker stop myContainer.Remove the container.
The command for this is:docker rm myContainer.Start a new container with the desired version and mount the existing volume.
For instructions on mounting volumes, see the Installation Guide for Checkmk in Docker.
After that, Checkmk will automatically take care of the rest of the actions, then update and start your Checkmk site. You will then be able to log in as usual.
8. Rolling back to a lower version
The omd update command also allows you to 'update' to a lower version (a 'downdate').
This procedure is intended only for cases of regression.
A rollback should only be performed if you have a backup of the configuration from immediately before the update (for example, using the global setting for version control with Git).
 |
After such a backwards update, many adjustments will be necessary to restore compatibility between the configuration and the runtime environment—especially, but not exclusively, when 'updating' to a lower major version. Therefore, we strongly advise against this approach—and cannot provide support for 'updates' to a lower version. |
In principle, restoring a backup is always preferable to a rollback via 'downdate'. However, there are situations in which attempting a rollback may offer advantages. These can include, for example:
When the backup archive is very large, and restoring it would take a very long time.
Checkmk had already been running for some time before problems arose, and the resulting gap in the monitoring data would be disruptive.
If not too many changes have been made to hosts and services (so that the RRDs largely match the old configuration) and a version of the configuration from immediately before the update is available, you can attempt a rollback. After the rollback, thoroughly verify that everything is working as expected.
9. Updating configuration files
During an update, Checkmk attempts to adapt all standard configuration files to the requirements of the new version. This is similar to the process involved in updating a Linux distribution, but goes beyond that in its implementation. For example, Checkmk can handle a wide variety of scenarios, such as:
Merging file changes with the user’s local changes.
Files, directories, and symbolic links that are obsolete in the new version, or have been deleted by the user.
Changes to permissions.
Changes to the file type (a directory or file becomes a symbolic link, or vice versa).
Changes to the target of symbolic links.
Throughout this process, Checkmk always ensures that your local changes are preserved, while at the same time implementing all changes necessary for the new version. In many cases the update runs smoothly and requires no user intervention.
9.1. Conflicts resolved interactively
If the new version includes a change to a configuration file that you have since modified yourself, Checkmk will attempt to automatically merge both changes. This is done using the same methods that version control systems use.
The fewest problems occur when your changes and Checkmk’s changes are far enough apart (at least a few lines). In that case, the merge takes place automatically without your help.
If two changes conflict because they affect the same part of the file, Checkmk cannot and will not decide which of the two changes is more important. In this case, you, the user, will be prompted to resolve the conflict interactively:
  Conflicts in etc/mk-livestatus/nagios.cfg!
  I've  tried to  merge the changes  from version  2.4.0p22.cre to 2.5.0p1.community
  into  etc/mk-livestatus/nagios.cfg. Unfortunately  there are  conflicts with
  your changes. You have the following options:


  diff        Show differences between the new default and your version
  you         Show your changes compared with the old default version
  new         Show what has changed from 2.4.0p22.cre to 2.5.0p1.community
  edit        Edit half-merged file (watch out for >>>>> and <<<<<)
  try again   Edit your original file and try again
  keep        Keep half-merged version of the file
  restore     Restore your original version of the file
  install     Install the new default version
  shell       Open a shell for looking around
  abort       Stop here and abort update!
You will now have the following options:
d |
This shows you the differences between the new default version of the file and your version in the form of a 'unified diff' ( |
y |
This is similar to the previous function, but shows the changes you made to the file based on the previous default version. |
n |
This third option essentially closes the loop and shows the changes that Checkmk wants to make to the file. |
e |
Resolve the conflict manually in the editor. |
t |
Open your original file—without the changes that have already been successfully merged—in an editor. Now edit the file to resolve any conflicts. After closing the editor, Checkmk will attempt to merge the changes again. |
k |
Here, you can choose to accept the file as it is. The successfully merged changes will be retained. Otherwise, the file will remain as you have modified it. |
r |
This restores your file to its original state and skips the Checkmk update for this file. You will need to make any necessary adjustments yourself. |
i |
Install the new default version of the file: Your changes to the file will be lost. |
s |
If you are unsure, you can open a shell with s. You will be in the directory where the affected file is located, allowing you to assess the situation. Exit the shell with Ctrl+D to continue the update. |
a |
Cancel the update. The old version will remain in the site, and the site’s previous configuration will be restored. You can attempt the update again at any time. |
9.2. Other conflict situations
In addition to merging file contents, there are a number of other situations in which Checkmk will need you to make a decision. Some of these are very unusual situations, but they will still require proper handling. In these cases, Checkmk will always give you the option to keep your version or adopt the new default version. In addition, you always have the option to cancel or open a shell. Examples of such situations can include:
Conflicting changes to the file type (e.g., when a file is replaced by a symbolic link)
Conflicting changes to file permissions
Modified files that are omitted in the new version
Files, directories, or links you created that conflict with new files/directories/links
Failures in the migration of rules or other configurations
If an update fails, it is worth first checking any changes you have made to configuration files yourself. Furthermore, you should check whether a poorly programmed extension might be causing the problem and disable it if necessary. Of course, it’s simply possible that an error has crept into the update routine. In such a case, please report the issue via a support ticket (if you have a support contract) or on the Checkmk Forum.
|
Starting with Checkmk 2.3.0, if an update fails, the configuration will be restored to its state prior to the update.
An update may fail due to an unexpected internal error, but also due to user input during the update process—for example, by selecting the |
10. Updating using a script
Would you like to automate the Checkmk software update, either partially or completely?
If so, you may have initially run into trouble with the interactive prompts from omd update.
There is a simple solution for this.
The command actually supports options specifically designed for use in scripts.
For parameters that can be used with many omd subcommands, take a look at the article on site administration with omd.
The most important ones in the context of updates are:
The
--forceparameter (abbreviated as-f) disables many checks, which is why we advise against using it. Instead, use the parameters that begin with--confirmor--ignore.The
-Vparameter, followed by a version identifier, which specifies the target of the update.
The options shown here are supported starting with omd version 2.5.0 and will be expanded in the future.
Please note that these options will already be available after installing a Checkmk package in version 2.5.0 and can therefore be used when updating from 2.4.0 to 2.5.0.
If you want to ensure that your scripts also work on servers where Checkmk 2.4.0 provides the default omd, refer to this article in the Checkmk 2.4.0 User Guide.
The legacy options described there still work with the omd provided by Checkmk 2.5.0, but will no longer be accepted in version 3.0.0.
10.1. Suppressing confirmation dialogs
The following options control the behavior of the pre-checks and should be used in preference to --force (short for -f):
|
Suppresses the confirmation dialog for the selected version. |
|
Suppresses the confirmation dialog for the selected edition during an upgrade. |
|
Suppresses the abort in case of version incompatibilities (for example, if 2.4.0p22 is installed but 2.4.0p23 is actually required). |
|
Suppresses the abort message for edition incompatibilities (for example, during a downgrade from Checkmk Ultimate with Multi-Tenancy). |
10.2. Options for file-based updates
The following options control the behavior during the first step of the configuration update, the file-based update:
|
The default behavior; the user is prompted for instructions on how to proceed. |
|
Aborts immediately in the event of a conflict. |
|
The user’s most recent changes are discarded, and the default version of the configuration file is installed. |
|
The user’s most recent changes are retained, and the default version of the configuration file is ignored. |
10.3. Options for configuration updates
The following options are passed to the cmk-update-config program and control the behavior during the second step of the configuration update, where format changes or conversions from lists to objects are performed.
|
The default behavior; the user is prompted for instructions on how to proceed. |
|
Ignores any conflicts. However, Checkmk may then become inoperable, requiring manual intervention. Did we mention the importance of having a recent backup? |
|
Aborts immediately in the event of a conflict. |
An example of the complete command for an automatic update of the mysite site to version 2.5.0p17.community:
The && before omd start prevents the site from starting if omd update aborts with an error while updating the configuration.
Replace the && with a semicolon (;) if you absolutely want to attempt a startup even in such a situation.
11. Output during an update
Whenever the update process automatically makes changes to files, it outputs a line explaining the change. The following scenarios are possible (when referring to files, this also applies to links and directories):
Updated |
A file has changed in the new version. Since you have not made any changes to the file, Checkmk will simply apply the new default version of the file. |
Merged |
A file has changed in the new version, while you have also made other changes to the file. Both changes were successfully merged without any conflicts. |
Identical |
A file has changed in the new version. At the same time, you have already modified the file yourself in exactly the same way. Checkmk does not need to take any action. |
Installed |
The new version includes a new configuration file, which has just been installed. |
Identical new |
The new version includes a file, but you have since created the same file with the same content yourself. |
Obsolete |
A file is missing from the new version. You have already deleted this file anyway. Nothing happens. |
Vanished |
Here, too, a file is missing, but you neither deleted nor modified it. Checkmk automatically removes this file. |
Unwanted |
You deleted a file that is normally present. Since there have been no changes to the file in the new version, Checkmk leaves the file missing. |
Missing |
You have deleted a file that has been modified in the new version. Checkmk does not recreate the file, but warns you with this message. |
Permissions |
Checkmk has updated a file’s permissions because different permissions are set in the new version. |
12. Files and directories
Here you will find files and directories relevant to this article.
As always, paths that do not begin with a / are relative to the site’s home directory (/omd/sites/mysite).
| Path | Description |
|---|---|
|
Symbolic link to the installation of the Checkmk version used by this site. |
|
This directory contains a subdirectory for each installed Checkmk version. The files belong to |
|
This directory contains the home directory for each site, along with its configuration files and variable data. The files belong to the site user and are modified during configuration and operation. |
|
Management command for Checkmk sites. This is a symbolic link to the |