1. Introduction
At this point, we are assuming that you have already familiarized yourself with the basics of data source programs and special agents and understand their basic mechanisms. Special agents add simple configurability to a data source program. Rules in the Setup are used for this. The configurability can affect both the scope and type of data retrieved as well as its pre-processing before it is transferred as agent output to the further processing chain.
Each special agent is an independently executable program without dependencies on Checkmk programming interfaces. As with data source programs, special agents are also called at the usual check interval (usually one minute by default). A process is started by the special agent and the agent’s output is transferred to the standard output. The special agent then terminates. This allows you to implement special agents in any programming language. However, short-running processes mean that just-in-time compiled languages such as Java are less suitable than compiled languages or fast-starting interpreted languages.
The triggered processes are configured via command line parameters when the special agent is called. To do this, you determine how GUI elements such as text input fields or checkboxes are to be mapped to specific parameters.
Code examples created for this article are available in our GitHub repository and the finished Open-Meteo special agent is available as MKP in the Checkmk exchange.
2. Creating a 'minimal' special agent
When developing special agents, you must also ensure that you use the respective site user for the file creation. If owners or permissions are not correctly defined, this can lead to problems and incompatibilities. |
In contrast to the data source program, a special agent cannot be located anywhere in the file system.
It has its specific location in Checkmk’s directory hierarchy.
In addition, the file name must begin with agent_.
Furthermore, special agents must always be made known to the Checkmk site.
A minimal, executable special agent therefore requires at least three files: the special agent, the rule configuration and the call configuration.
2.1. Preparing the environment
As a preparatory step, you should therefore create three directories, all of which are located under ~/local/lib/python3/cmk_addons/plugins/<plug-in_family>.
The fourth directory shown in the below example is optional — it may be used for an agent-based check.
2.2. The special agent
What could be better suited as a minimal special agent than a local check that provides a "Hello World!" service? Even a simple shell script that generates two lines of output can do this:
This script must not have a file extension. |
Do not forget: The file must be made executable:
This will assign the necessary permissions:
for the owner of the file (read, write, execute)
for the group associated with a file (read, execute)
for other users (read, execute).
2.3. Configuring the rule
An absolute minimum rule is now created:
Title and category are defined.
The GUI form for configuration remains empty.
The name refers to the name of the special agent, which is given the prefix agent_.
An agent configured in this way will be available in Other integrations.
However, its configuration template contains no entries because of the empty elements={}.
2.4. The call configuration
This configuration combines the special agent to be executed with the settings obtained from the GUI and the default settings.
These settings now become call parameters.
The name again refers to the name of the special agent, which is given the prefix agent_.
This provides the basic requirements for the special agent. You can, of course, add further information to these at any time.
2.5. The first test
Once the files have been created, first check whether Checkmk can validate them:
Next, restart the site’s web server:
If you want the new rule to be visible in the search immediately, you will need to restart the in-memory database Redis:
If you now open Setup > Agents > Other integrations, you should see the new entry Hello special! in the Custom integrations section.
If this is missing, first check whether you have stored all of the files in the designated location. If you are looking for other possible sources of error, in the commercial editions you can do this conveniently via the administration of Checkmk extension packages. Alternatively, we have listed the most important sources of errors and possible solutions in the Troubleshooting chapter.
3. A more complex example: A complete weather service
A check that never changes its state is — well — pretty predictable. So we will dare to take the step towards a 'real' special agent that queries a web or REST API and receives an object as a JSON or XML structure in response. These are also typical data formats when accessing the APIs of network devices such as SAN devices.
So that you won’t need any specific hardware for this exercise, we will use the free API from Open-Meteo.com.
Our goal is to write a complete special agent that is configured with latitude and longitude.
To keep the exercise simple, the special agent will also interpret the data directly.
For example, the special agent should assume the WARN state for temperatures below 5 degrees Celsius, and the CRIT state for temperatures below 0 degrees.
We abbreviate our check to ometemp, the special agent to agent_ometemp and so on.
Open-Meteo allows free use for non-commercial purposes and reserves the right to block IP addresses if there are too many requests. The minute-by-minute query of the API is still within tolerable limits. Nevertheless, you should not overuse the service, and delete special agent rules that use this service following successful testing. Take particular care to ensure that special agent assignment rules created for the test only apply to one host and not to dozens or hundreds! |
3.1. Preparing the environment
As in the previous exercise, first create the required directories — this time with the name ometemp instead of hellospecial.
3.2. The special agent
Now that real data is to be processed, you will also need to give some thought to the programming language and pre-processing, for example.
Our exercise queries a public API and receives JSON data.
This could be done in the shell with a curl command.
However, since Checkmk comes with a well-equipped Python, it makes sense to use it.
The next decision involves the processing of the data. For example, you can simply pass JSON data through to the agent output or convert it into a table format in the special agent. In practice, you will usually decide this depending on your working environment: Has the 'division of labor' been taken into account when developing your check? Does the prepared data simplify the development of the associated agent-based check plug-in? Or do they even make that superfluous? The latter is the case if data can be prepared in such a way that it can be parsed with an existing check plug-in.
Our example simply forwards the JSON response.
Parsing then takes place in the agent-based check plug-in.
Longitude and latitude are entered using the command line arguments --latitude and --longitude.
To be able to read command line arguments better, we use the argparse library.
Since Open-Meteo supports the latitude and longitude encoded in the URL, a URL with placeholders is sufficient.
Try this URL in the browser with your own latitude and longitude.
Reminder: This script must not have a file extension. |
The ometemp agent section will only contain the received JSON object.
Test the special agent by calling it on the command line.
Your output on the command line should now look something like this:
<<<ometemp:sep(0)>>>
{"latitude":48.14,"longitude":11.6,"generationtime_ms":0.022292137145996094,"utc_offset_seconds":0,"timezone":"GMT","timezone_abbreviation":"GMT","elevation":536.0,"current_units":{"time":"iso8601","interval":"seconds","temperature_2m":"°C"},"current":{"time":"2026-07-01T18:15","interval":900,"temperature_2m":18.4}}
3.3. The rule configuration
The next step is the rule configuration for the agent. Once completed, this rule will be displayed in Setup > Agents > Other integrations in the Environmental grouping.
The headings for the grouping in Setup > Agents > Other integrations will be made visible dynamically. This means that it will only be possible to see the Environmental grouping once the first special agent sorted into it is available. A — non-exhaustive — overview of the usable groupings can be found under Files and directories at the end of this article. |
With this, the special agent has also been created.
After checking with cmk-validate-plugins, restart the site’s web server:
A rule could now be created based on this special agent with Add rule: Open-Meteo temperature. This rule will however not do much yet, since it currently only contains the two fields for entering the longitude and latitude.
Extension: Using passwords
In many cases a username and password or an API key are required to access data.
Separate formspec elements are available for managing passwords.
These allow you to either define passwords ad hoc or to access the password store.
In this example, the following extension to the script created above can be used for this purpose.
Extend the first line with the additional variables and insert the new program sections:
Do not forget to restart the site’s web server after editing (in this case extending) a script.
As the example with Open-Meteo does not require a password, we show the basic handling of passwords here, but do not include them in the API call.
3.4. The call configuration
Next, we extend the new special agent so that it not only contains the longitude and latitude, but also processes these. Our ultimate goal is to obtain the current temperature values for our location. The following configuration therefore combines the special agent to be executed with the settings obtained from the GUI — i.e. from our existing rule section — and the settings from the standards.
The values for longitude and latitude, which you can usually specify, are now transferred to the dictionary named params.
At the same time, the host_config object contains all host-specific settings that are to be used here.
For example, host_config.primary_ip_config.address gives you access to the primary IP address, and host_config.name contains the host name.
When transferring to the special agent, note that the call is made via a shell.
The list of call parameters may therefore only contain strings.
The settings then become call parameters that end up in the command_arguments list.
Using passwords
The example shown here passes passwords in plain text as command line arguments.
Without additional security measures, these passwords could be read from the process table, for example.
This vulnerability can be minimized by changing the entry in the process table when the program is started.
In Python, for example, this can be done with the |
As passwords are stored as an object, access is via that object’s unsafe() function:
3.5. The check plug-in
For the sake of completeness, we also show the agent-based check plug-in here. The development of these plug-ins is described in detail in the article on agent-based check plug-ins.
One difference to the example mentioned in the article is the transfer of the JSON returned from the REST API:
The check plug-in always receives the agent section as a two-dimensional list (‘list of lists‘) of strings.
First of all, we use the itertools to turn this two-dimensional list into a one-dimensional one.
We then concatenate this resulting array with spaces, which converts the entire agent section into a single string.
Finally, we directly load the string as an object with json.loads().
3.6. Final testing
It is always a good idea to run a validation with cmk-validate-plugins if you have made changes to elements that are executed within Checkmk processes.
In this article, these include rules, call configuration, and check plug-ins.
If you have only made changes to the call configuration and the special agent itself, it is sufficient to generate a new configuration for the monitoring core and restart it. This is done with the command:
If you have also modified rules or check plug-ins, first generate the configuration for the monitoring core and then restart the entire site:
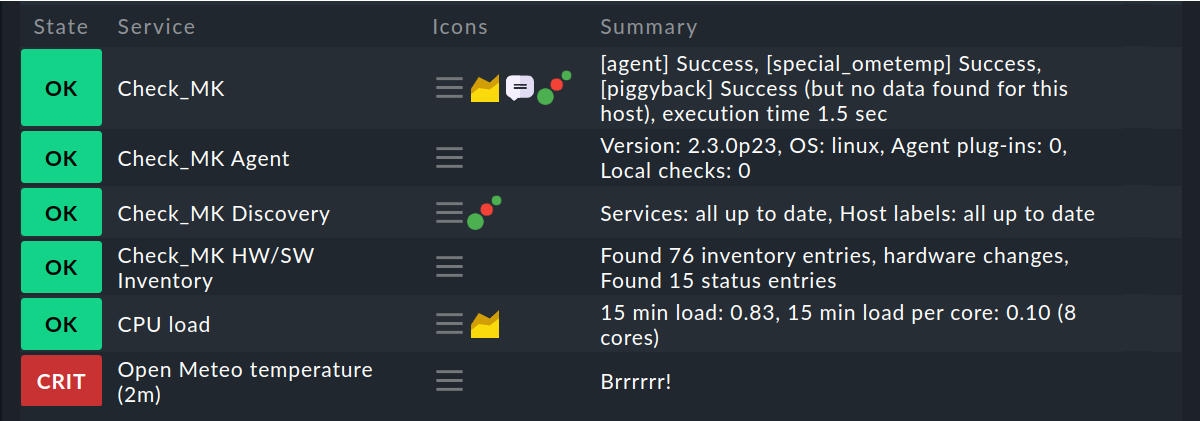
The scripts described in this article for special agent, rule configuration, and call configuration, when used in combination with this check plug-in, should now provide you with a functioning service in Checkmk:
4. Troubleshooting
Even when developing your own special agents, errors and problems can (unfortunately) occur.
Identifying what has caused an error is just as important as fixing it.
To get an initial idea of possible causes, you should first run cmk-validate-config.
The following sections will help you further isolate the source of a problem.
4.1. Warnings in the host’s service overview
If the Check_MK service suddenly changes its status to WARN or CRIT after its special agent has been activated, take a look at its associated Summary.
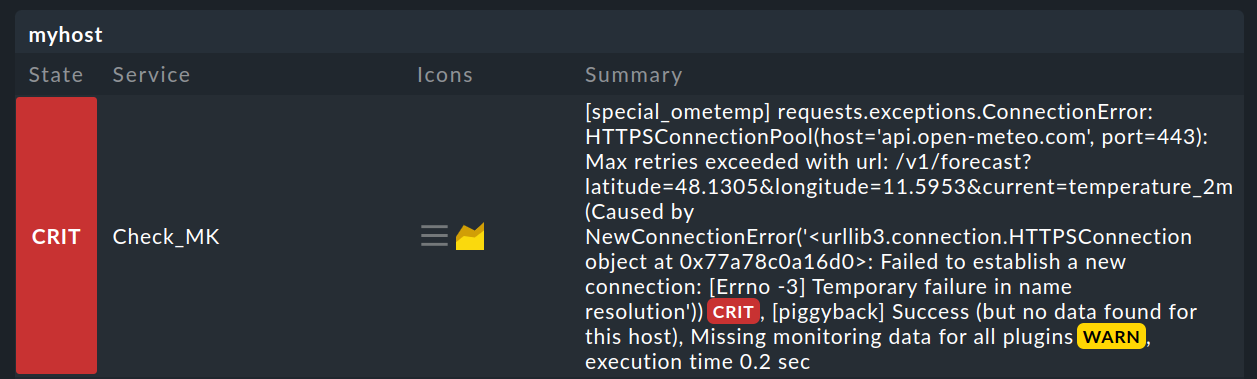
If the Summary indicates a connection with the new special agent, check the host properties. The Configured API integrations and Checkmk agent value must be selected for the Checkmk agent / API integrations parameter.

4.2. The rule has disappeared or a warning is displayed
If your special agent is not (or no longer) displayed in Checkmk under Setup > Agents > Other integrations, there may be an error in the rule configuration (rulesets/special_agent.py).
![]() If you are using one of the commercial editions, you may instead see a red warning when trying to edit the rule or create a new one.
Follow the link to the crash report page.
The possible cause of the problem will be displayed there.
If you are using one of the commercial editions, you may instead see a red warning when trying to edit the rule or create a new one.
Follow the link to the crash report page.
The possible cause of the problem will be displayed there.
Then view the error descriptions:
For example, you will receive an output like this:
2024-12-17 10:15:51,742 [40] [cmk.web 2669118] Error converting to legacy rulespec 'ometemp' : name 'migrate_to_password' is not definedCheck the syntax of your rulesets/special_agent.py file.
Check whether all of the required libraries have been taken into account and all variables have been imported.
Check whether all indentations are correct and check the entire syntax.
If your rule was previously visible in Checkmk and — following a modification to the rule configuration — has suddenly disappeared, then you will only notice this if you want to adapt existing rules or create new rules. The problem will not affect the monitoring of existing services. |
4.3. Error messages when activating changes
There may also be a problem in the call configuration or in the actual special agent. This becomes visible, for example, because a yellow warning is being displayed during Activate changes.
Check the file server_side_calls/special_agent.py according to the information in the error message.
If this does not resolve the error, you can search for error messages on the command line again:
After a moment’s patience, you will receive an output similar to the following (here abbreviated for clarity):
Traceback (most recent call last):
  File "/omd/sites/devtest/bin/cmk", line 118, in <module>
    exit_status = modes.call(mode_name, mode_args, opts, args)
                  ^^^^^^^^^^^^^^^^^^^^^^^^^^^^^^^^^^^^^^^^^^^^
  File "/omd/sites/devtest/lib/python3/cmk/base/modes/__init__.py", line 70, in call
    return handler(*handler_args)
           ^^^^^^^^^^^^^^^^^^^^^^
  File "/omd/sites/devtest/lib/python3/cmk/base/modes/check_mk.py", line 562, in mode_dump_agent
    for source in sources.make_sources(
                  ^^^^^^^^^^^^^^^^^^^^^
  File "/omd/sites/devtest/lib/python3/cmk/base/sources/_builder.py", line 407, in make_sources
    return _Builder(
           ^^^^^^^^^
  File "/omd/sites/devtest/lib/python3/cmk/base/sources/_builder.py", line 140, in __init__
    self._initialize_agent_based()
  File "/omd/sites/devtest/lib/python3/cmk/base/sources/_builder.py", line 198, in _initialize_agent_based
    special_agents = tuple(make_special_agents())
                     ^^^^^^^^^^^^^^^^^^^^^^^^^^^^
  File "/omd/sites/devtest/lib/python3/cmk/base/sources/_builder.py", line 187, in make_special_agents
    for agent_data in special_agent.iter_special_agent_commands(agentname, params):
  File "/omd/sites/devtest/lib/python3/cmk/base/server_side_calls/_special_agents.py", line 139, in iter_special_agent_commands
    yield from self._iter_commands(special_agent, params)
  File "/omd/sites/devtest/lib/python3/cmk/base/server_side_calls/_special_agents.py", line 115, in _iter_commands
    for command in special_agent(processed.value, self.host_config):
  File "/omd/sites/devtest/local/lib/python3/cmk_addons/plugins/ometemp/server_side_calls/special_agent.py", line 13, in _agent_arguments
    "--user", params['bulla'],
              ~~~~~~^^^^^^^^^
KeyError: 'bulla'
The last lines of the output are particularly interesting:
In the file server_side_calls/special_agent.py an attempt is being made to access a dictionary element params that does not exist.
4.4. Verifying agent output
Another source of error may be that the check plug-in is not outputting any data. This can also be checked on the command line:
If you receive an error message here instead of a string with the current measurement data, use the error message to correct it.
5. Files and directories
5.1. Directories
| File path | Description |
|---|---|
|
Base directory for storing plug-in files. |
|
Storage location for executable files. |
|
Storage location for rule set files. |
|
Storage location for call configuration files. |
|
Storage location for agent-based check plug-ins. |
|
The standard special agents are installed here. |
|
Storage of the special agents you have modified. |
|
Storage of your own programs or scripts that are to be in the search path and which can be executed directly without specifying a file path. If a program is in both |
5.2. Available groupings in Other integrations
| Name | Description |
|---|---|
|
Application monitoring |
|
Cloud monitoring |
|
Monitoring of configuration management systems |
|
Monitoring of databases |
|
Everything that doesn’t fit somewhere else |
|
Monitoring of environment and surroundings |
|
Monitoring of the Linux operating system |
|
Network monitoring |
|
Monitoring of middleware |
|
Monitoring of notification systems |
|
Operating system monitoring in general |
|
Monitoring of peripheral devices |
|
Power supply monitoring |
|
Monitoring of server hardware |
|
Monitoring of storage systems |
|
Synthetic monitoring |
|
Monitoring of virtualization environments |
|
Monitoring of the Windows operating system |