1. Introduction
Checkmk enables you to comprehensively monitor Microsoft SQL Servers (abbreviated to 'MSSQL' in the following). A complete list of all available check plug-ins can be found in our Catalog of check plug-ins.
To be able to monitor the databases, you will also need the mk-sql agent plug-in in addition to the Checkmk agent.
As of Checkmk 2.3.0, this agent plug-in is also able to monitor databases on remote systems.
This refers to MS-SQL databases on your own remote servers—not those of arbitrary cloud providers!
Exception: Microsoft Azure SQL databases are explicitly supported.
No additional software is required on either the Checkmk or the database server.
The only mandatory requirement for using mk-sql is that the TCP/IP protocol is activated in the SQL server network configuration.
If TCP/IP is not permitted or otherwise allowed in your MSSQL server environment, you must use the legacy agent plug-in mssql.vbs until further notice.
2. Setting up an account for monitoring
The agent plug-in requires access to your MSSQL instances. As a rule, it is clear—long before the monitoring team arrives—what such access can or may look like.
2.1. Set up a user / use an account
- Linux
Creating a user for the monitoring
You will need a user who can connect to your MSSQL instance. This user requires at least the following permissions:
Connect SQL
Connect any database
View server state
Apart from these permissions, it is up to you or your organization how such a user can or must be created.
You can use a local user for testing purposes. If there is no corresponding user on your MSSQL server or in your instance, you can create one on your Linux system via the command line:
In the following example, this is being done for the user
checkmk:Follow the prompts to assign a password, etc.
Then:
- Windows
In the case of MSSQL, there are two options. Either you use only the Windows Authentication mode or the mixed mode SQL Server and Windows Authentication mode.
Using the LocalSystem account
The Checkmk agent is executed on Windows systems under the LocalSystem account (
NT AUTHORITY\SYSTEM). If you can also use this LocalSystem account for monitoring MSSQL, you will only need to ensure that this account (login) has as a minimum the permissions for the following securable elements (Securables):View server state
Connect SQL
Connect any database (optional)
The permission Connect any database (optional) is optional, but is required in almost all MSSQL monitoring scenarios.
Using a dedicated account
There are good reasons for not running MSSQL monitoring via the Windows LocalSystem account. Potential reasons include security requirements in the organization or simply the desire to have dedicated and clearly named accounts, the purpose of which is already clear from the name.
The plug-in of course also works with such accounts (logins).
The basic requirement in MSSQL is that the Server authentication is set to SQL Server and Windows Authentication mode. If you do not want to or cannot use the Windows LocalSystem account, this requirement should have already been met, but it should not go unmentioned here.
If there is no corresponding user on your MSSQL server or in your instance, you can create one on your Windows system via the Microsoft SQL Server Management Studio (with any username):
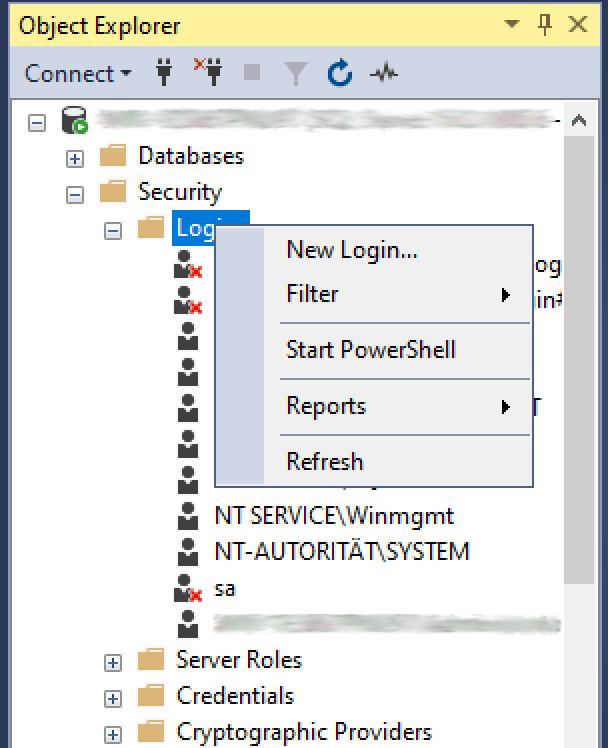
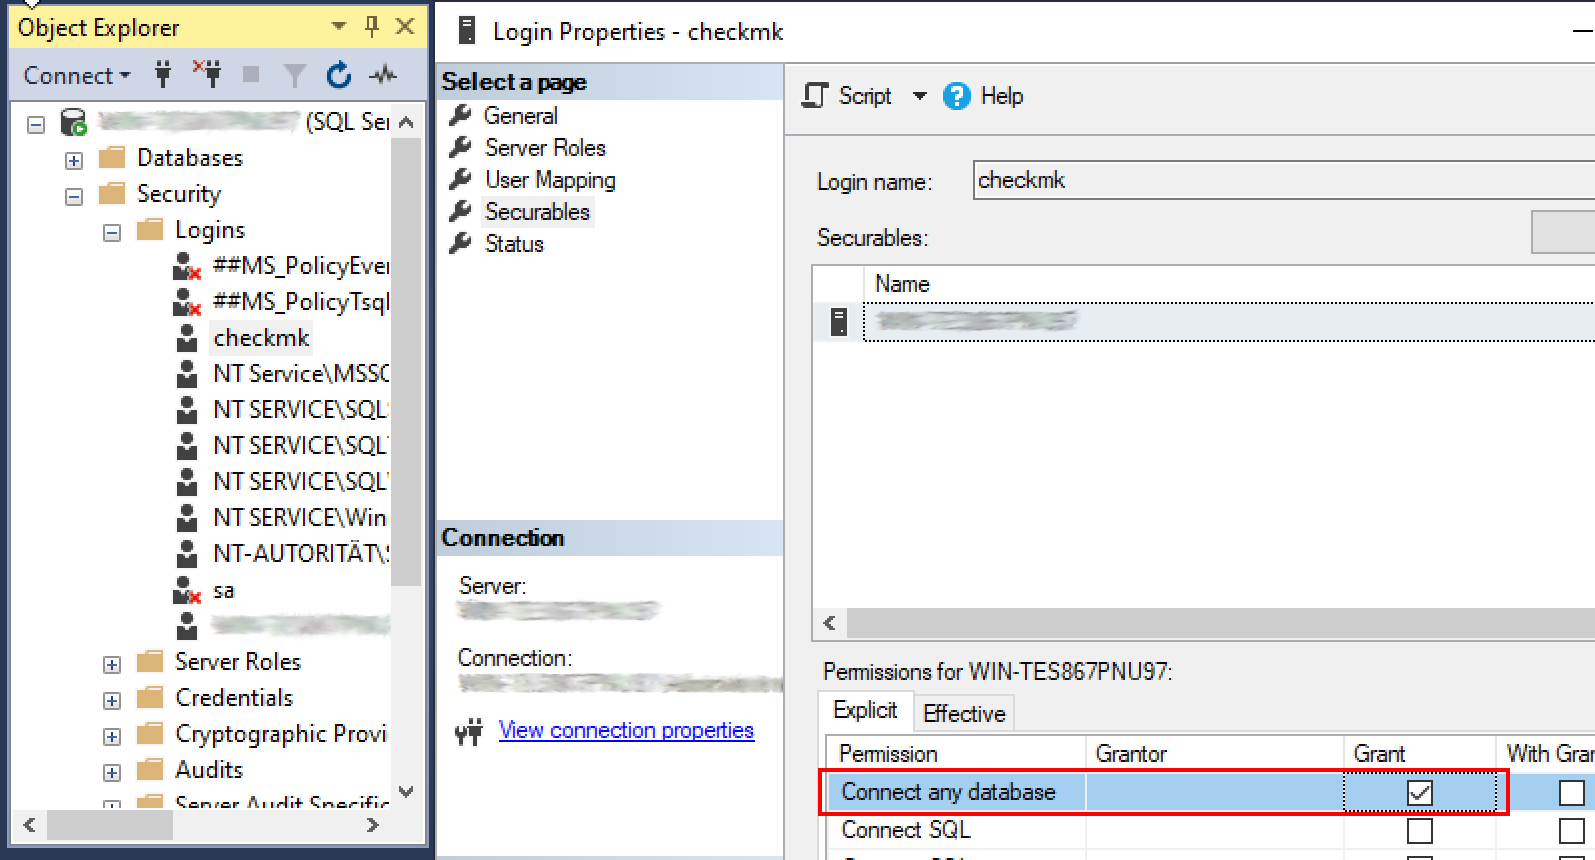
This login requires the following permissions:
Connect SQL
Connect any database
View server state
Grant these permissions in the Object Explorer via Security > Logins. Open the properties of the account (login) and click on Securables. Under Explicit you will find the three entries mentioned above. Set the corresponding check marks in the Grant column and confirm with OK.
Alternatively, you can also create the user and the permissions via the command line. In the following example, this is done for the user
checkmk:and after that:
3. Setting up MS-SQL plug-in
3.1. Configuration via the Agent Bakery
![]() The setup has been very simplified in the commercial editions
using the Agent Bakery, as syntax errors in the configuration files are avoided and customizations to suit changing environments can be made easily.
The main difference to a manual installation is that you only have to work on the MSSQL host via the command line if you want to make special MSSQL-specific configurations.
The setup has been very simplified in the commercial editions
using the Agent Bakery, as syntax errors in the configuration files are avoided and customizations to suit changing environments can be made easily.
The main difference to a manual installation is that you only have to work on the MSSQL host via the command line if you want to make special MSSQL-specific configurations.
For the initial setup it is sufficient to create a corresponding rule in the Agent Bakery.
You can find the rule set under Setup > Agents > Windows, Linux, Solaris, AIX > Agent rules.
There search for mssql in the search field:

Setting up the agent rule
- Linux
Under Authentication select the SQL database user credentials option.
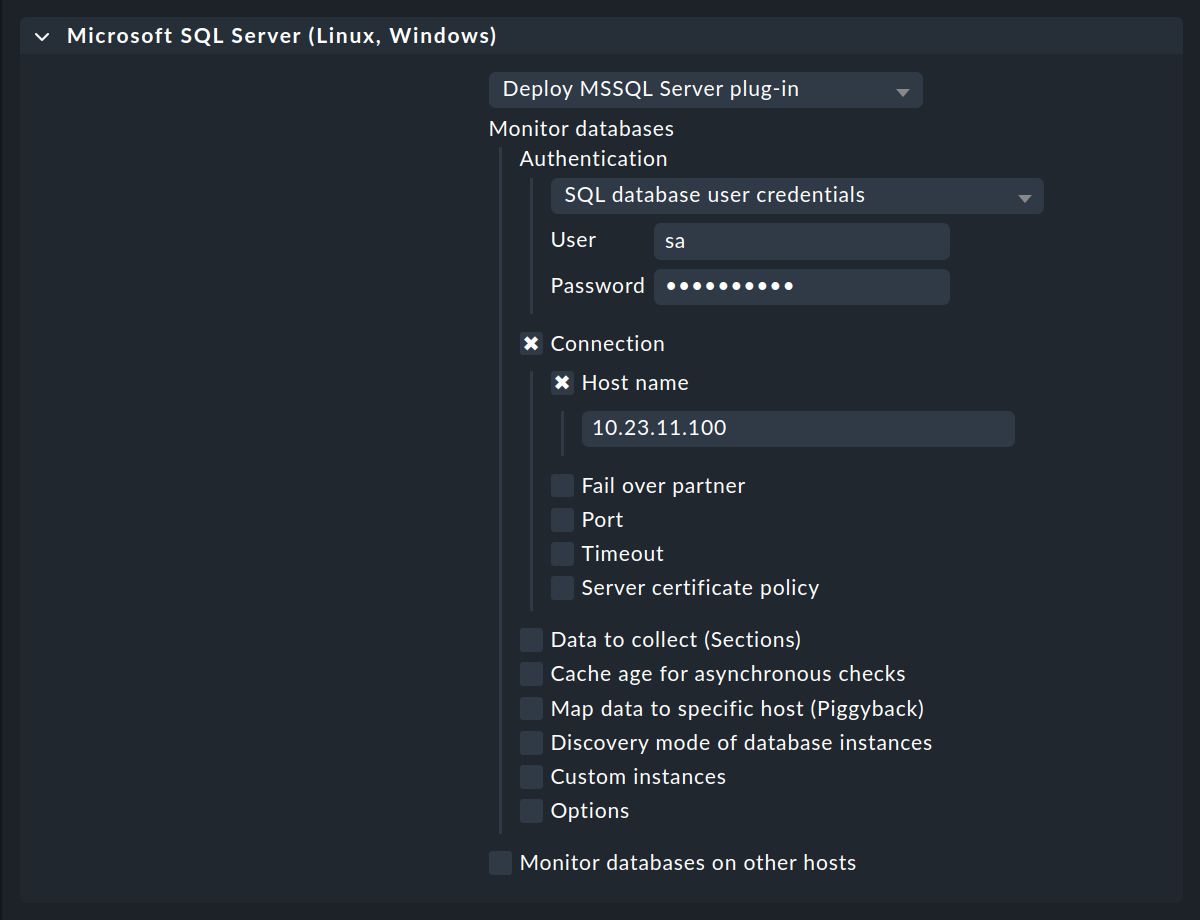
Then enter the Login name in the User field and add the corresponding Password. For the Connection, add the Host name.
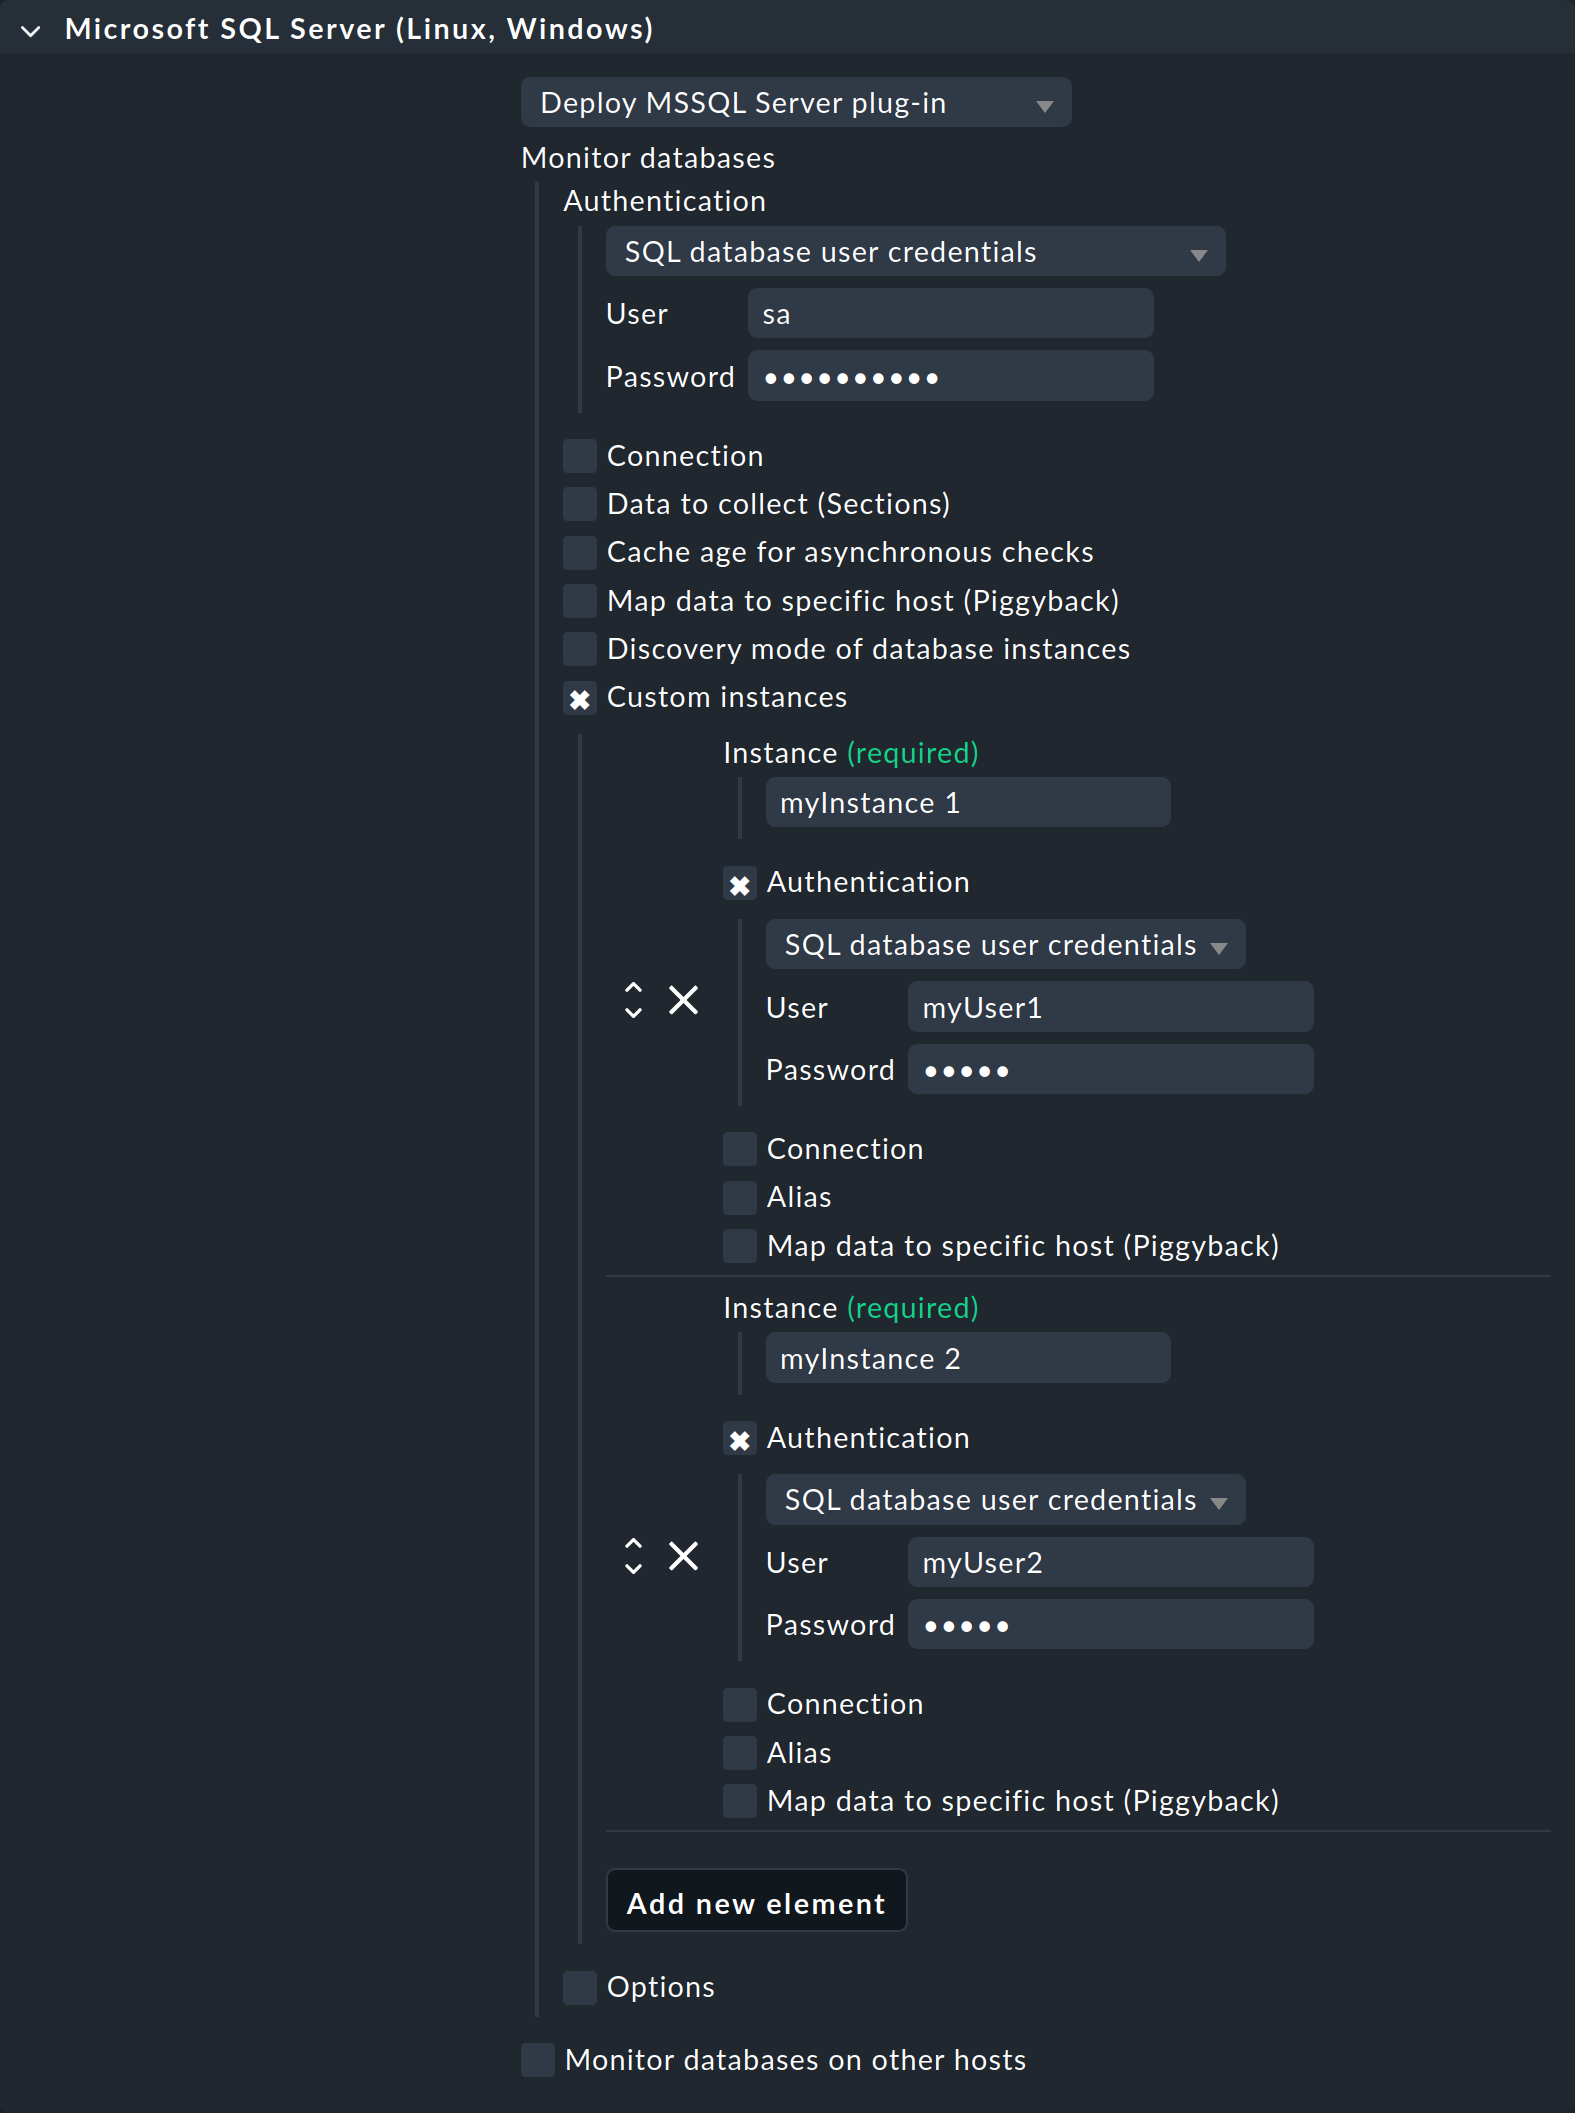
If you are running multiple MSSQL instances with different usernames and passwords on the host, select the Custom instances option. Use Add new element to access the details for the first—and then each additional—instance to be monitored. Enter the access data for each instance here, as described above.
- Windows
Depending on how the agent plug-in is allowed to log in to your MSSQL server (see Setting up an account for monitoring), select the appropriate option under Authentication. If you are using the LocalSystem account (
NT AUTHORITY\SYSTEM), leave the selection at Local Integrated Authentication (Windows).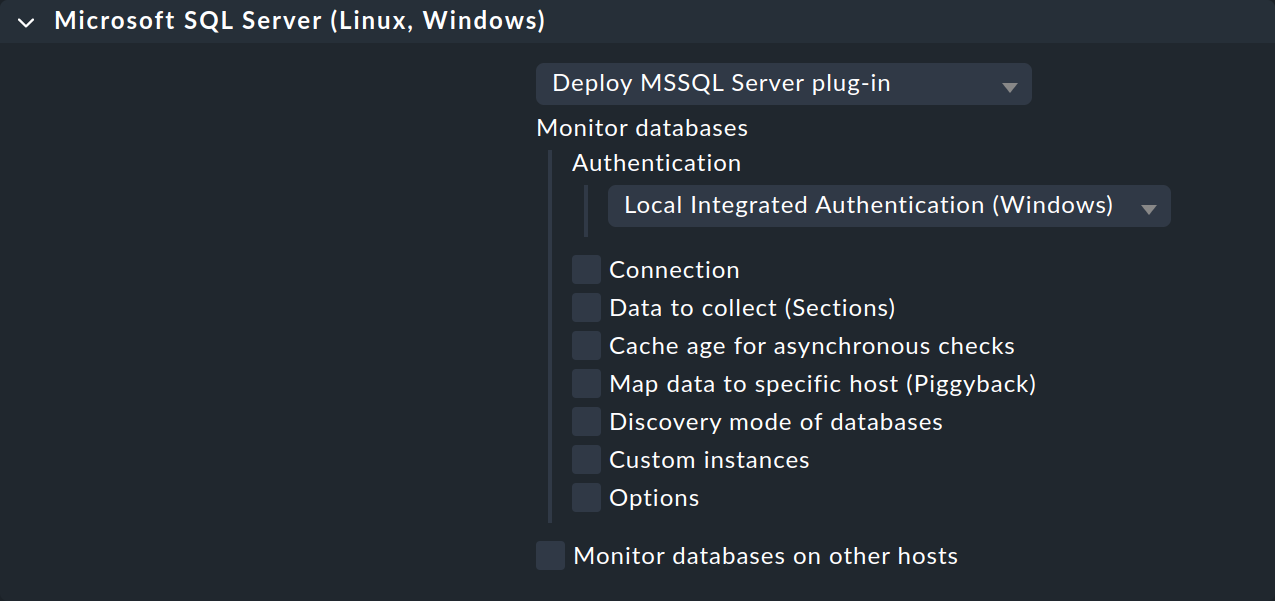
If you use SQL Server Authentication instead, select the SQL database user credentials option, and also enter the Login name (see Using a dedicated account) in the User field and add the corresponding Password.
If you are running multiple MSSQL instances with different usernames and passwords on the host, select the Custom instances option. Use Add new element to access the details for the first—and then each additional—instance to be monitored. Enter the access data for each instance here, as described above.

Installing the agent plugin
The plugin is then installed as usual via the Agent Bakery: Bake and sign the agent, and then either download it manually and install it on the relevant hosts, or, if configured, wait for or trigger the automatic agent updates.
3.2. Setting up the connection manually
If you use ![]() Checkmk Community or do not want to use the Agent Bakery of the commercial editions, set up the communication manually.
Checkmk Community or do not want to use the Agent Bakery of the commercial editions, set up the communication manually.
For the rest of this description, we assume that the agent for Linux resp. Windows monitoring has already been installed on the host.
Creating a configuration file
- Linux
On the Linux host, create an
mk-sql.ymlfile in the directory specified below:If you are running multiple MSSQL instances with different usernames and passwords on the host, add the details of the instances to the
ymlfile accordingly. Yourymlfile could then look like this, for example:- Windows
On the Windows host create an
mk-sql.ymlfile in the directory specified below:When using the LocalSystem account, this is all that is required:
If you use a dedicated account for monitoring, in its place, you will need the following content:
If you are running multiple MSSQL instances with different usernames and passwords on the host, add the details of the instances to the
ymlfile accordingly. Yourymlfile could then look like this, for example:
Installing the agent plug-in
The mk-sql plug-in can be found…
- Linux
…in Checkmk Community under Setup > Agents > Linux and in the commercial editions …under Setup > Agents > Windows, Linux, Solaris, AIX > Related > Linux, Solaris, AIX files:
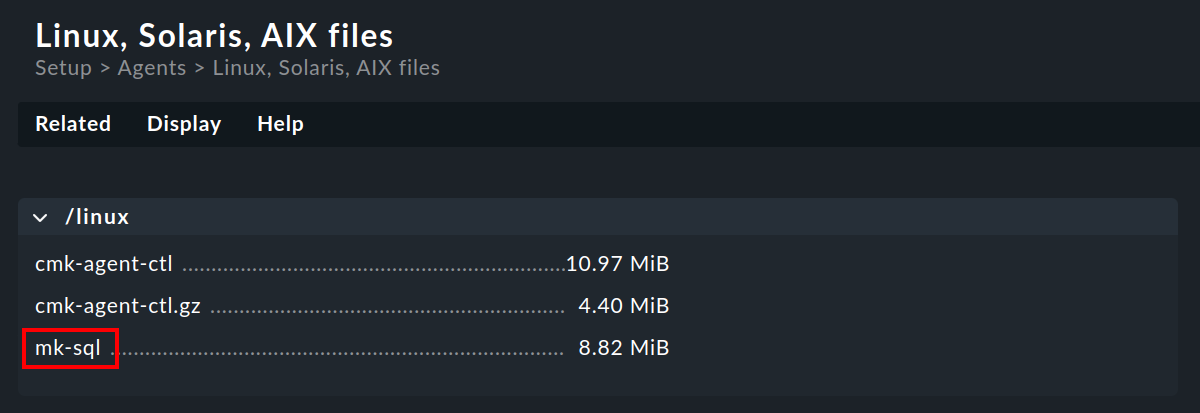
Download the
mk-sqlfile and place it on the Linux host in the/usr/lib/check_mk_agent/plugins/directory.- Windows
…in Checkmk Community under Setup > Agents > Windows and in the commercial editions …under Setup > Agents > Windows, Linux, Solaris, AIX > Related > Windows files:
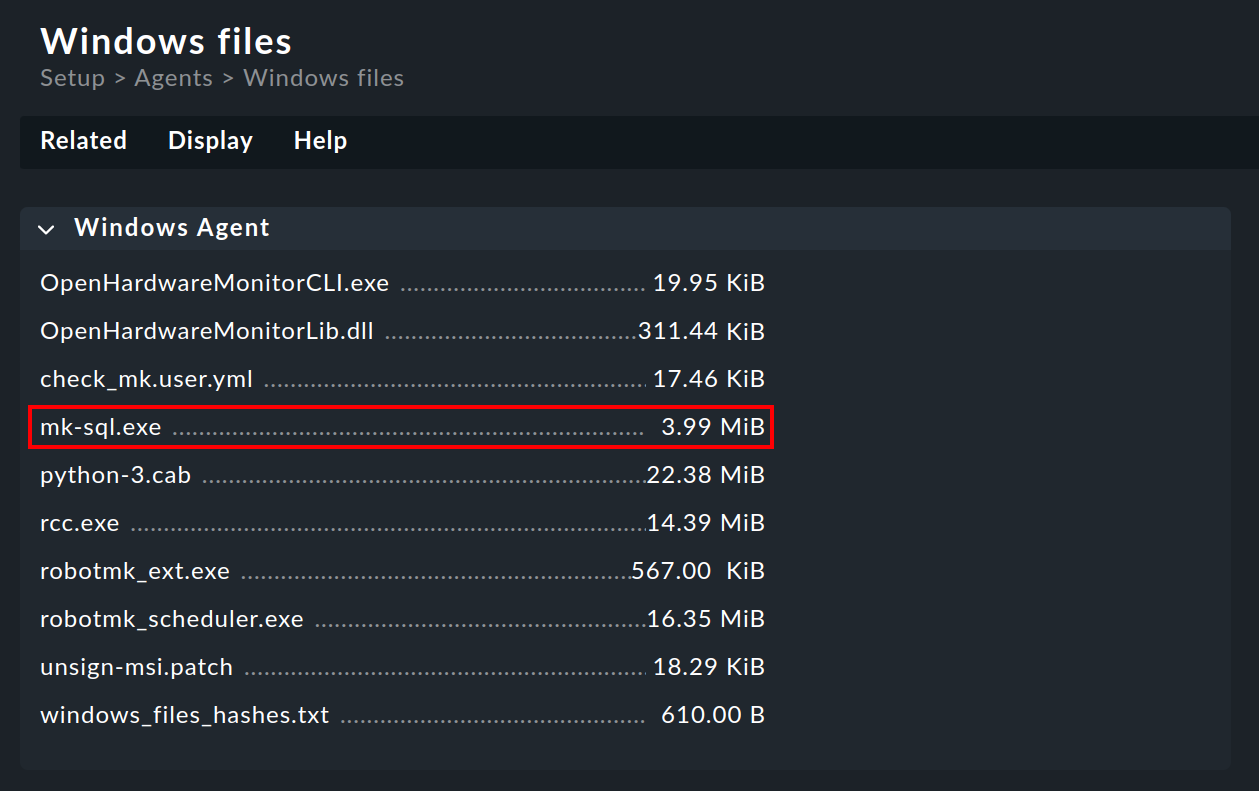
Download the
mk-sql.exefile and save it on the Windows host in the directoryC:\ProgramData\checkmk\agent\plugins\.
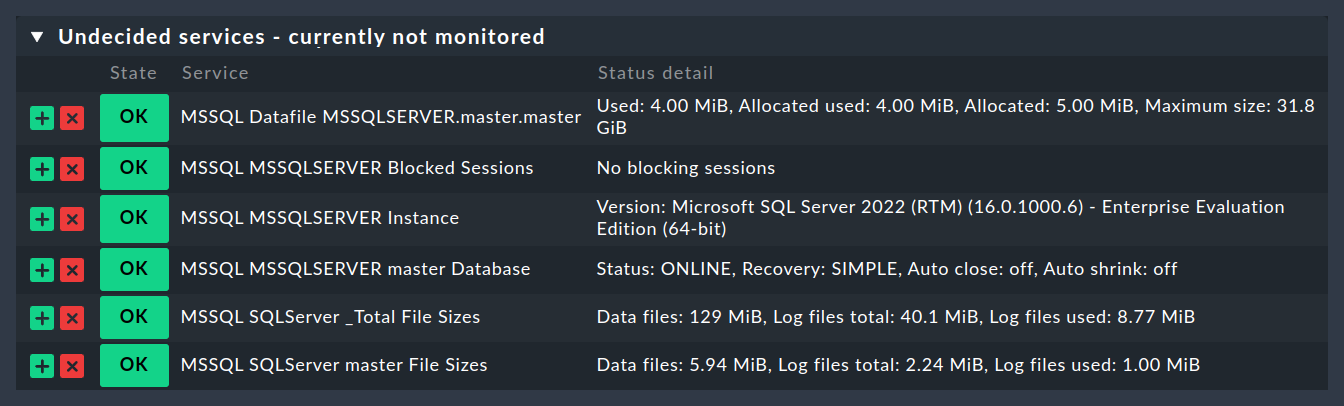
3.3. Configuring services
Now that you have installed and configured the agent plug-in, you can perform a service discovery for this host. The following screenshot shows only a selection of the services that can be found:
4. Extended configuration
4.1. Asynchronous execution of the agent plug-in
The agent plug-in for monitoring MSSQL can—like so many others—be executed asynchronously, for example to take account of the longer runtimes of large MSSQL instances.
- Linux
To execute the agent plug-in asynchronously under Linux, edit the configuration of the plug-in and add a
cache_ageline to themainsection:For detailed instructions on how to run agent plug-ins asynchronously on a Linux host, see the article on the Linux agent.
- Windows
To run the agent plug-in asynchronously under Windows, edit the configuration of the plug-in and add a
cache_ageline to themainsection:For detailed instructions on the asynchronous execution of agent plug-ins on a Windows host, see the article that explains the Windows agent.
4.2. Configuring threshold values
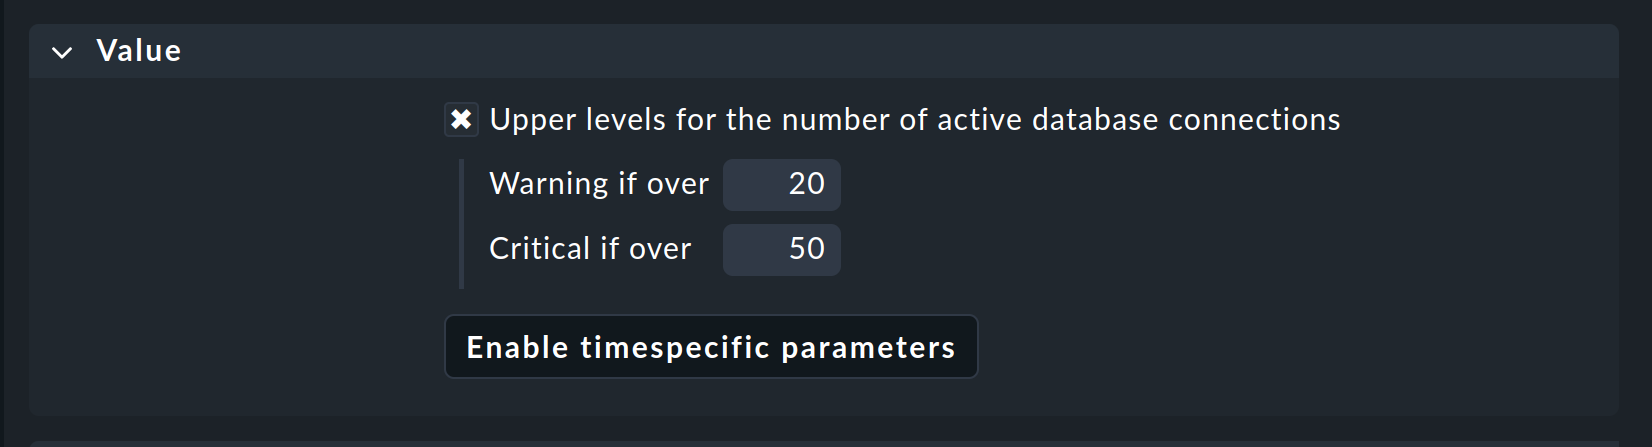
Monitoring connections
You can specify your own threshold values for the utilization of the maximum number of simultaneous connections specified by MSSQL, as these are much more dependent on the structure of your MSSQL instance than with other services. You can set up the corresponding threshold values in no time at all using a rule from the MSSQL Connections rule set.
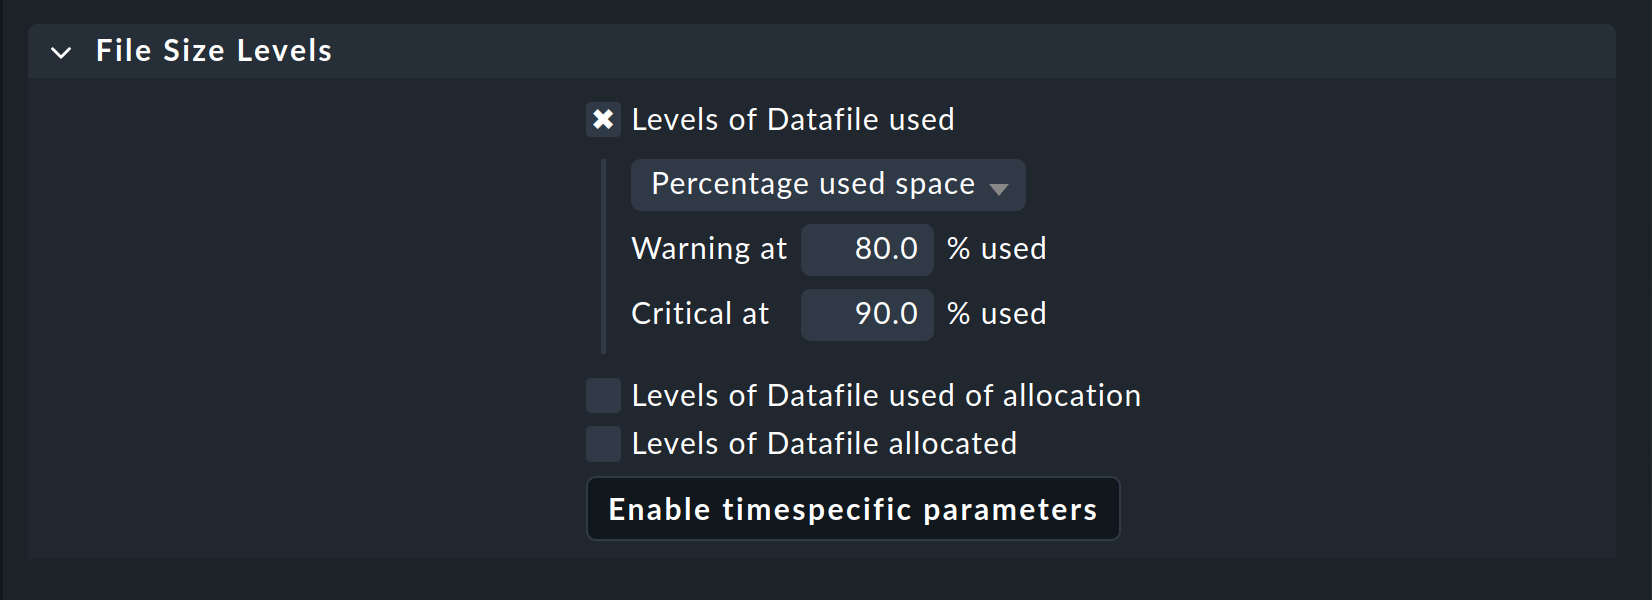
Monitoring file sizes
You can also define threshold values for the sizes of individual files in MSSQL. To do this, use the MSSQL datafile sizes rule set.
4.3. Further options
With the settings you have just made, you first create a simple agent for monitoring your MSSQL instance, which is located directly on the host. All available data is evaluated directly in Checkmk and this should be sufficient for a typical case scenario. However, if your organization has a more complex MSSQL environment, there are further options, both for monitoring the database on the same host and for monitoring it on a remote host. These options are basically the same for both connection types.
| Option | Description |
|---|---|
Connection |
If you need more specific connection data for the general connection to the MSSQL server, you can specify this here. You can use Connection → Exclude system databases (or |
Data to collect (Sections) |
Here you can restrict by section which data should be collected and whether it should be collected synchronously or asynchronously. |
Cache age for asynchronous checks |
You can change the cache period in seconds for the previously defined asynchronous checks. |
Map data to specific host (Piggyback) |
Piggyback data can be assigned to a host, regardless of the actual source. For example, the SQL information can be separated from the data of the underlying Windows server. |
Discovery mode of database instances |
Settings for the search in the instance. |
Custom instances |
In addition to the general settings for accessing your MSSQL server, you can also define your own settings for specific instances here. |
Options |
The maximum number of parallel SQL server connections can be set here. |
5. Diagnostic options
5.1. Possible errors and error messages
Error message: Failed to gather SQL Server instances
Check whether the TCP/IP connection has been configured and is working properly.
6. Files and directories
6.1. On the MSSQL host
- Linux
File path Description /usr/lib/check_mk_agent/plugins/Directory for storing the agent plug-ins.
/etc/check_mk/mk-sql.ymlConfiguration file for the agent plug-in.
- Windows
File path Description C:\ProgramData\checkmk\agent\plugins\Directory for storing the agent plug-ins.
C:\ProgramData\checkmk\agent\config\mk-sql.ymlConfiguration file for the agent plug-in.
6.2. On the Checkmk server
| File path | Description |
|---|---|
|
The agent plug-in to be copied to your Windows hosts in order to monitor MSSQL there. |
|
The agent plug-in to be copied to your Linux hosts to monitor MSSQL there. |