1. Introduction
Checkmk provides a number of ways for organizing hosts: These include grouping by folders, host tags, labels, parents and host groups. Sometimes, however, it is not so easy to decide which tool is the most suitable for a specific task, and seemingly simple questions turn out to be more complicated than expected. Why are there both host tags and labels? Which properties can be assigned to folders and then be inherited in the folder structure? Where do I find the condition for host groups in a rule? (Spoiler alert: there is no such thing).
This article gives an overview of the various structuring elements in Checkmk and explains their similarities and differences. You will then have all the information you need to set up a structure that suits your environment. We realize that aspects that are important for this topic are still missing at this time. We are therefore continuously working to fill these information gaps, bit by bit.
Particularly interesting are the structuring elements for the configuration environment, which can be selected as conditions in rules, i.e. folders, host tags and labels. This allows you to access your structure based on rules and, for example, automatically sort (new) hosts into the folders intended for them. In addition, for each of the structuring elements presented, you will learn how to use them in the monitoring environment.
Finally, at the end of this article, the important properties of the structuring elements are summarized in a table.
2. Folders and inheritances
2.1. Structuring with folders
Everyone who works with computers is familiar with files and folders. In Checkmk this well-known principle has been adopted for the structuring of hosts, which are stored in folders. Only the Main folder — the folder tree’s root — is predefined. Below (within) this main folder, you can create your own folder structure with as many subfolders as desired, visualized as a so-called host tree. Commonly used criteria for building the host tree are location, technology and organizational structure. You can access the Main folder by selecting Setup > Hosts > Hosts.
Via folders, attributes can be inherited by subfolders and the hosts they contain. See the Host administration article for details on how inheritance works. Inherited are the folder attributes, i.e. the folder properties displayed in the Setup on the Folder properties page such as monitoring agents and permissions — but also other structuring elements such as host tags, labels, or parents. Many of the folder properties can also be found in the host properties on the Properties of host page. Inheritance is especially useful for attributes that are common to many hosts, such as whether the host should be monitored by Checkmk agent or by SNMP. Another advantage with inheriting folder attributes is that you can prepare folders to hold any hosts that will be added in the future. Just drop the new host into the appropriate folder and all predefined attributes will be automatically correct for the new host.
In order to take full advantage of inheritance, it has proven useful to first think about an organizational system and then fill this system with content. Thus, you first create the structure of the folders and their hierarchy, and you then sort your hosts into the appropriate folders.
This is all the more important the larger the environment and the more numerous the hosts. Once a folder structure has been set up, it can be later modified and folders can be renamed without any problems. Care must be taken, however: Moving a host to another folder may change its attributes without you being aware of it — i.e. the target folder may have different attributes from the source folder.
Only in rare scenarios can a folder structure alone represent the complexity of real systems however. If you want (or need) to organize your hosts according to many different criteria, the host tags described in the next chapter can additionally come in handy.
2.2. The folder structure in monitoring
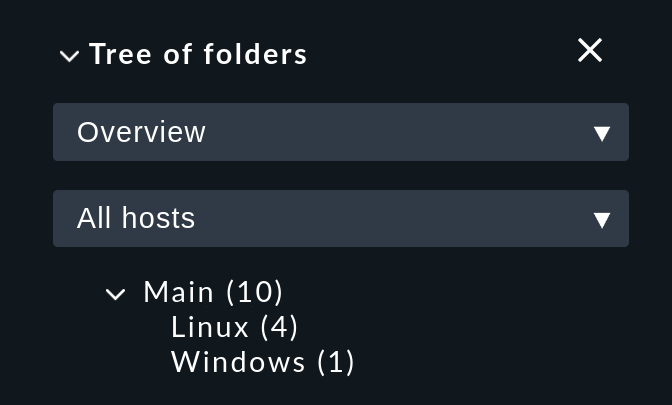
The tree structure generated by the folders is also visible in the monitoring environment — but only if a folder contains at least one host.
The filter bar
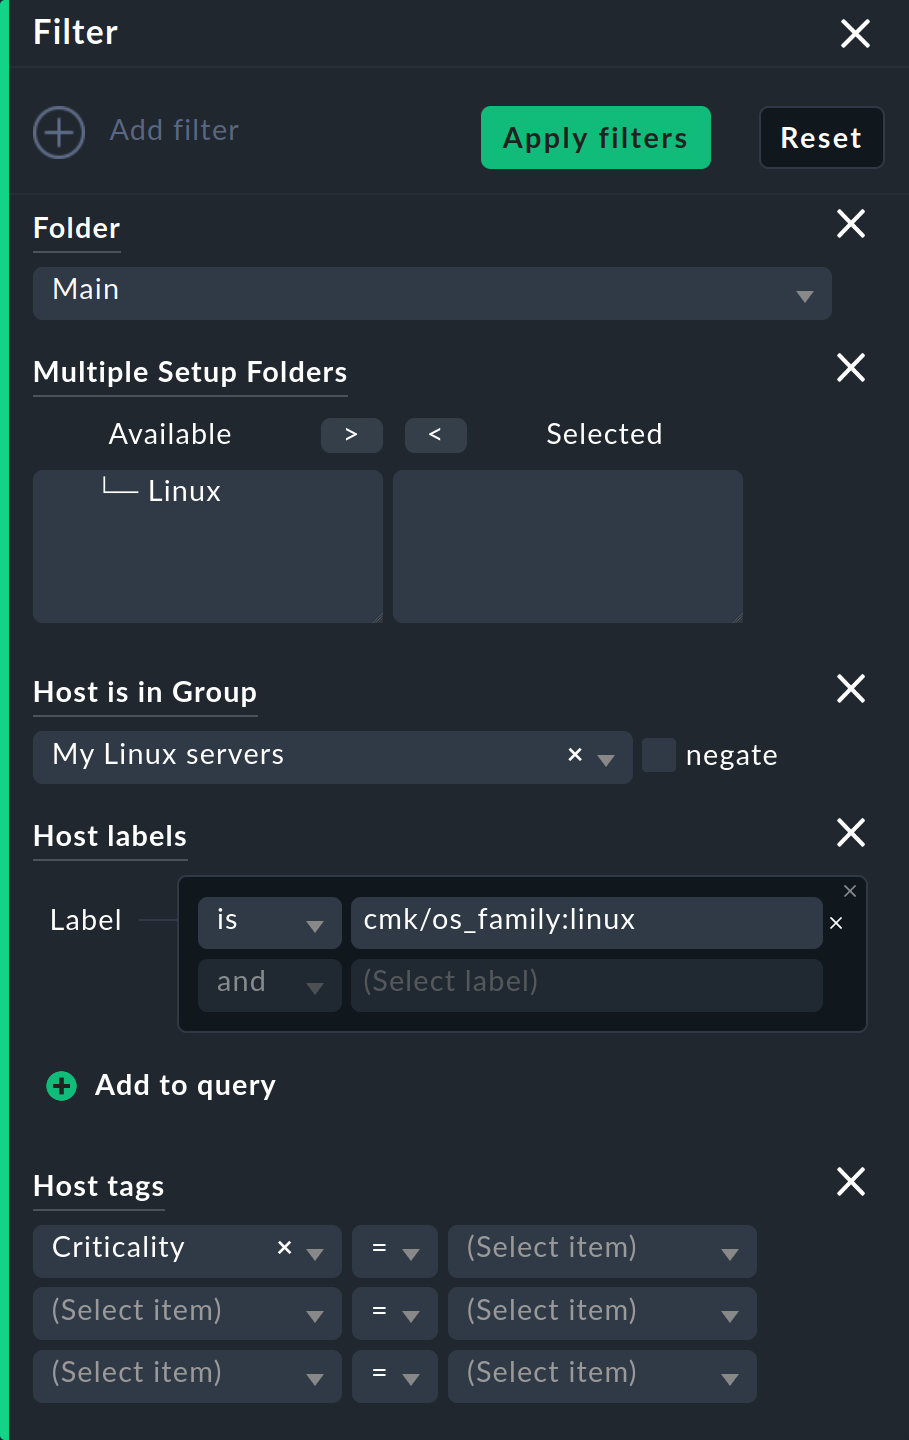
Firstly, in the view's filter bar, there is the Folder filter, which allows you to restrict the current view to the hosts below a specific folder.
As the following image shows, further filters are also available for other structuring elements such as host tags, labels and host groups.
Tree of folders
Secondly, in the sidebar, the Tree of folders snap-in provides the same selection options as the Monitor menu, but can additionally limit the display to one folder:
3. Host tags
Host tags are described in detail in this User Guide in the Beginner’s guide and in its own article. Therefore, only the most important points are covered in brief in this article:
A host tag is an attribute that is assigned to a host. Host tags are organized in groups, the so-called host tag groups. With the creation of a host tag group, all tags of this group are completely defined. The tags in a group are mutually exclusive, i.e. each host receives exactly one tag from the group. If you have not specified anything else, this is the first tag in the group, which then serves as the default value.
Refinements of this general concept are the checkbox tags and the auxiliary tags.
A checkbox tag is a special host tag group with only one element and is used to make a yes/no decision of the type: 'This host is running Oracle.'
With auxiliary tags combinations of different tags from a group are possible, for example the Windows Server 2012 R2 tag and Windows Server 2016 tag with the Windows auxiliary tag.
3.1. Structuring using host tags
Host tags have properties that are similar to those of labels and folders.
Assigning a tag or a label to a host has a very similar result. In both cases, you can use the assigned flag in the configuration to set conditions in rules. However, before you can assign a host tag, you must define the associated host tag group — that is, think about all of the possible values such a tag could have.
The completeness of a host tag group is therefore reminiscent of the setting up of the folder structure. Just as a host can only be placed in one folder, it can also only carry one tag from a host tag group. In other words, a host is always assigned to a folder and always has a tag from a host tag group (if we leave the checkbox tags aside for a moment). Therefore, host tags are suitable for properties that are always there (or at least should be) and are usually specified by the Checkmk administrator for the entire system to be monitored and for all Checkmk users.
As for the folder structure: For the configuration of large environments, from the beginning it is very helpful to set up a well-planned structure of host tags.
You assign tags to a host on the Properties of host page — when creating or editing a host.
You will find many attributes in both the properties of a host and in the folder properties — and the same applies for the host tags.
This means that host tags are valid not only for hosts but also for folders.
And thus host tags are also inherited via the folder structure in Checkmk.
To prevent unwanted surprises from occurring during inheritance, you should pay attention to the default value when defining a host tag group.
As a rule, it makes sense to set a neutral value as a default here, such as None or not applicable.
Later changes to host tags once they have been set up are possible, but should be avoided — when it involves renaming the ID of a tag, as this requires manual rework in most cases. Changes that only affect a display or only add new choices, on the other hand, are unproblematic and have no effect on the existing hosts and rules.
3.2. Host tags in monitoring
Host tags are not only useful in configurations, but also in monitoring. For example, in the filter bar of views there are also filters for host tags, as shown in the screenshot in the chapter on folders.
4. Labels
Labels are attributes assigned to a host, which means they are thus — just like host tags — identifiers for a host. The detailed introduction in the article on labels explains the concept of labels in comparison and in contrast to host tags. At this point, we can limit ourselves to briefly describing the basics on labels:
Labels are simple key-value pairs, such as os:linux, os:windows or foo:bar, which have not already been predefined elsewhere.
There are (almost) no restrictions when defining labels — except for the following:
A key and its value must be separated by a colon.
A host can have any number of labels, but only one value per key.
For example, a host that has the label foo:bar cannot at the same time have foo:bar2.
By the way, in Checkmk not only hosts but also services can have labels. There are however some peculiarities to consider with service labels, which are described in the article on labels.
4.1. Structuring using labels
Once the labels have been defined, you have the same functionality with them that you have with folders and host tags. During a configuration you can define the conditions for the rules to be dependent on the labels.
While with host tags all hosts are already provided with a host tag by the definition of the host tag group, the assignment in the case of labels works differently. Labels can be defined explicitly, via rules, and automatically. The various ways that hosts can receive their labels is something to keep in mind when it comes to how you can use labels to structure your hosts.
Explicit label assignment is performed in a host’s properties, using the Custom attributes box. Enter a key-value pair, press Enter: Done! Labels can also be defined in the properties for folders, which are then inherited via the folder structure in Checkmk.
If you don’t really need a value for a label, but only want to know whether a certain label is attached to the host or not, simply assign yes as a value (vm:yes), for example.
If you follow this scheme consistently, it will be easier for you to define conditions for such labels later on.
The explicit assignment is very simple, but has its pitfalls, because the risk of inconsistencies due to spelling errors is high.
Since labels can be assigned freely, Checkmk also cannot check whether foo:bar, Foo:bar or Fu:baa is the 'correct' label.
You should therefore also consider how you keep it case-sensitive, since if you later define conditions via labels, then the correct spelling must be strictly maintained, both for the key and for the value.
It is therefore sensible to dispense with explicit assignment for the structuring of hosts and to use rule-based or automatic creation of labels.
If host tags are suitable for global properties that are always present, and which are usually specified by the Checkmk administrator for the entire system to be monitored and for all Checkmk users, then individual Checkmk users can use labels to implement the specific requirements in their area of responsibility. For a manageable local structure, labels can fill in the gaps left vacant by global administration, playing to the advantages that labels provide: They are quick and easy to create — and also to delete.
4.2. Labels in monitoring
You can get a complete overview of all of the labels for a host in the monitoring environment via the host’s status view.
In the filter bar of table views you have access to all host labels — and can even combine them with the Boolean operators Not, And and Or for filtering.
Both methods are described in the labels article.
5. Parents
5.1. Structuring using parents
You have already learned what parents are and how they work in the Basic principles of monitoring article.
5.2. Creating parents manually
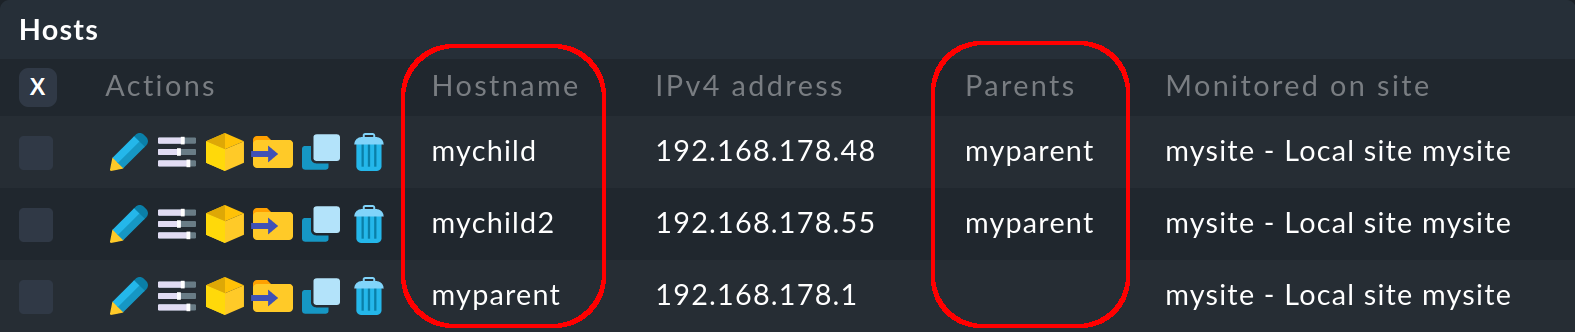
To define a parent for a single host, do the following: Select Setup > Hosts > Hosts and click the desired host to display its properties. In the Basic settings box, enter the parent by its name or IP address. As soon as a parent has been specified, a further input field for an additional parent appears:
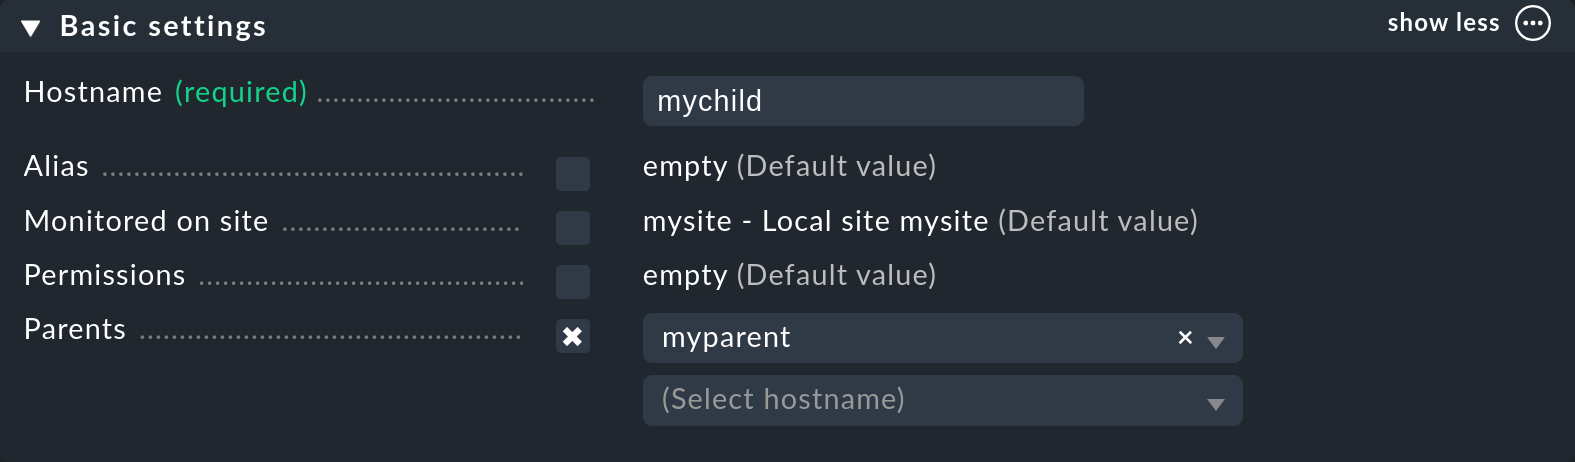
Important: Specify only direct parent hosts.
In a similar way, parents can also be specified in the properties of folders and thus inherited by the hosts the folders contain, as described in the earlier chapter on Folders and inheritances.
5.3. Specifying parents using a scan
When setting up a new monitoring system, and from the start creating a well organized structure with folders and parents, you will probably be fine with parent inheritance via folders. You can also set up parents automatically via the Parent scan however.
Using the IP protocol on the network layer of the OSI model (layer 3), using traceroute, the scan searches for the final gateway upstream of a host.
If such a gateway is found and its IP address belongs to one of your monitored hosts, it is set as the parent.
If traceroute does not get any information from the hops preceding the targeted host, the latest successful hop is used.
However, if no gateway is found among the monitored hosts, Checkmk creates an artificial 'ping-only host' by default in the Parents folder which is created at the same time.
However, this default setting can also produce undesirable results. As an example, let’s take a typical, small network with the address range 192.168.178.0/24. If a host with an address from a different address range — which cannot be pinged — is now added to the monitoring, the scan will try the route via the router, and will find only the network provider’s node there. And so, for example, a telecom server from the WAN area could then be set as the parent for this host. To avoid this you can deactivate the corresponding option before the scan.
If you want to scan a folder with new hosts for parents, do the following: First open the desired folder and select Hosts > Detect network parent hosts from the menu to open the scan configuration. By the way, instead of scanning an entire folder, you can also just scan a subset of hosts by selecting them in advance in the first column of the list.
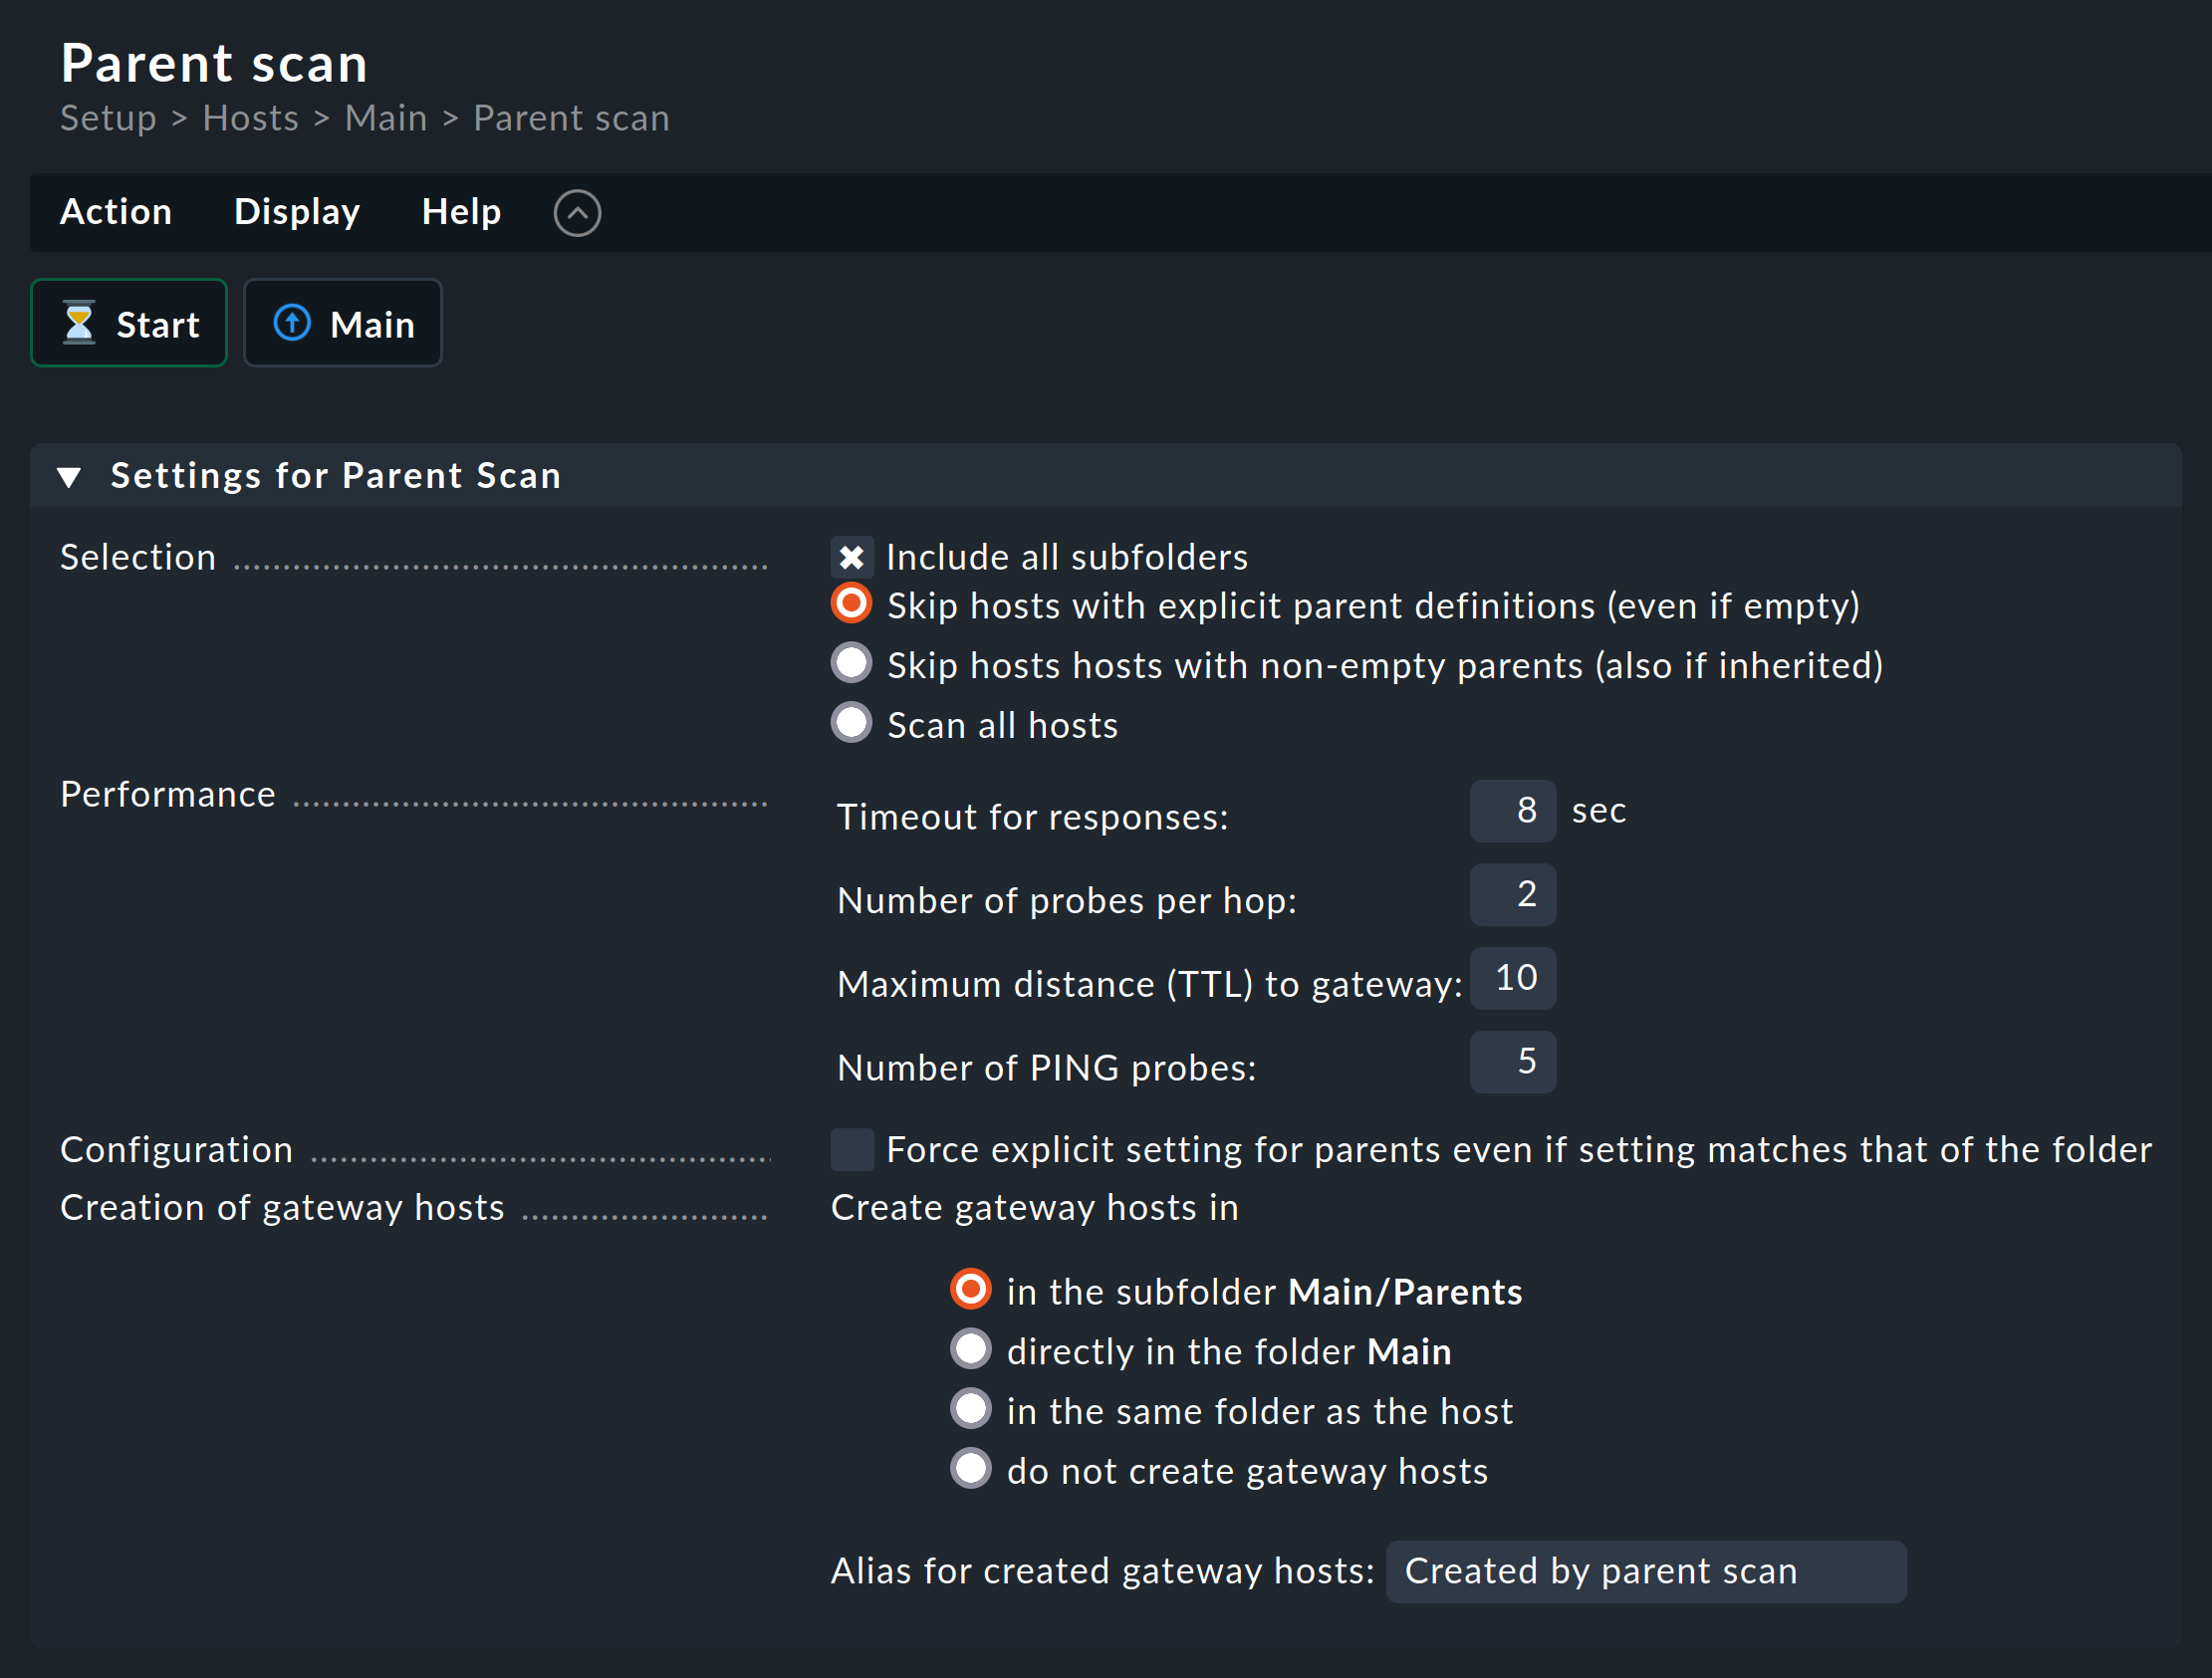
To completely rescan all hosts in all subfolders, regardless of any manually set parents, select the Include all subfolders and Scan all hosts options. In the Performance section, you can tailor the scan duration, which can take quite a long time if you have many hosts.
Under Creation of gateway hosts you determine whether, how and under which alias newly found parent hosts are created. Disable this function if you want to limit parents to monitored hosts.
Now click Start. You can watch the output of the scan in real time while it is being performed.
You will then see the configured parents and, if applicable, a new Parents folder in Main (if you specified this before the scan).
This completes the scan.
5.4. Parents in monitoring
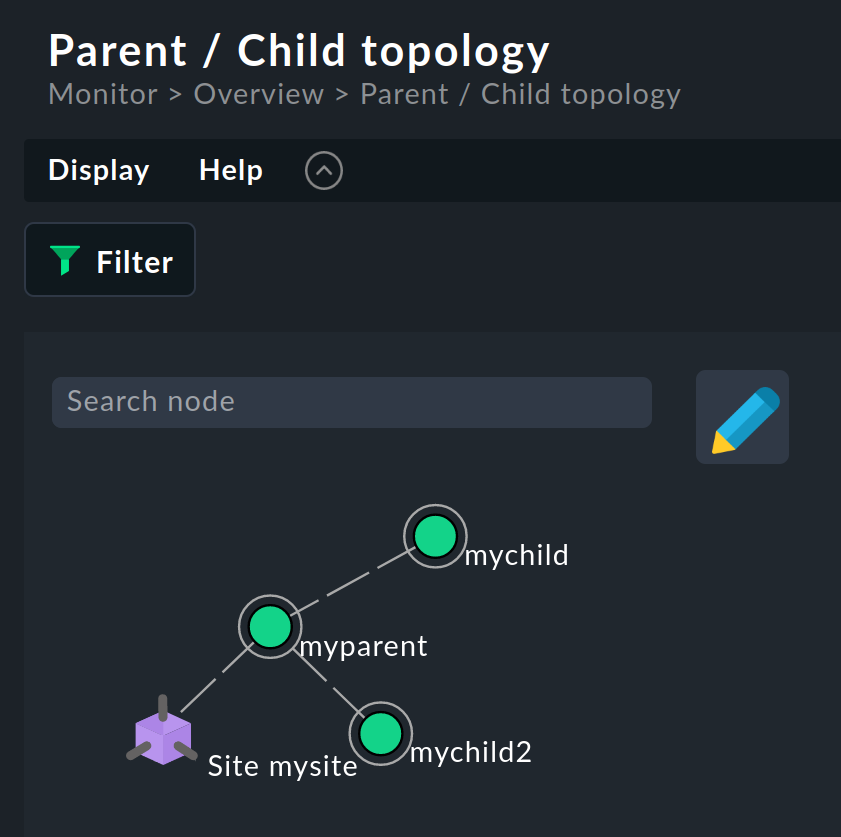
After a scan has been performed and the changes have been activated, the parent-child relationships are visualized as a topology map, which you can access via Monitor > Overview > Parent / Child topology:
If the results from the scan do not seem plausible in some places, a manual call to |
6. Host groups
Host groups allow you to collect a number of hosts together for display in a monitoring view. For example, you can display all Linux servers, Windows servers, and certain application servers together by setting up a host group for each of these server types.
A host group is populated using a rule. In this rule’s conditions, you can access folders, host tags, and labels, as usual. Host groups themselves do not by default appear as selection criteria in rules because they are not used for configuration, rather they are used for views.
6.1. Creating host groups
You can find the host groups under Setup > Hosts > Host groups.
You create a new host group via the Add group button. The creation is a simple process and is limited to the assignment of a unique name — which cannot be changed later — and an alias:

6.2. Adding hosts to host groups
To add hosts to host groups, use the Assignment of hosts to host groups rule set, which can be found at Setup > Hosts > Host monitoring rules. Create a new rule.
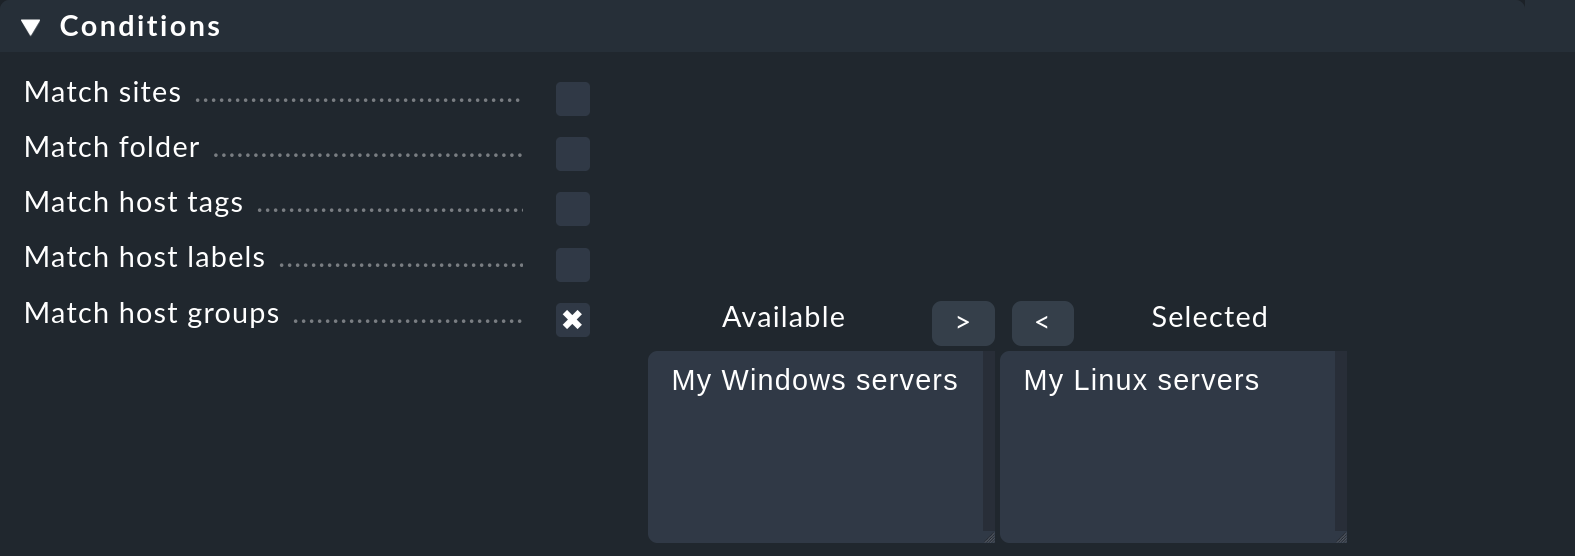
First, in the Assignment of hosts to host groups box, select the host group to which hosts should be assigned, such as the My Linux servers group in the example:

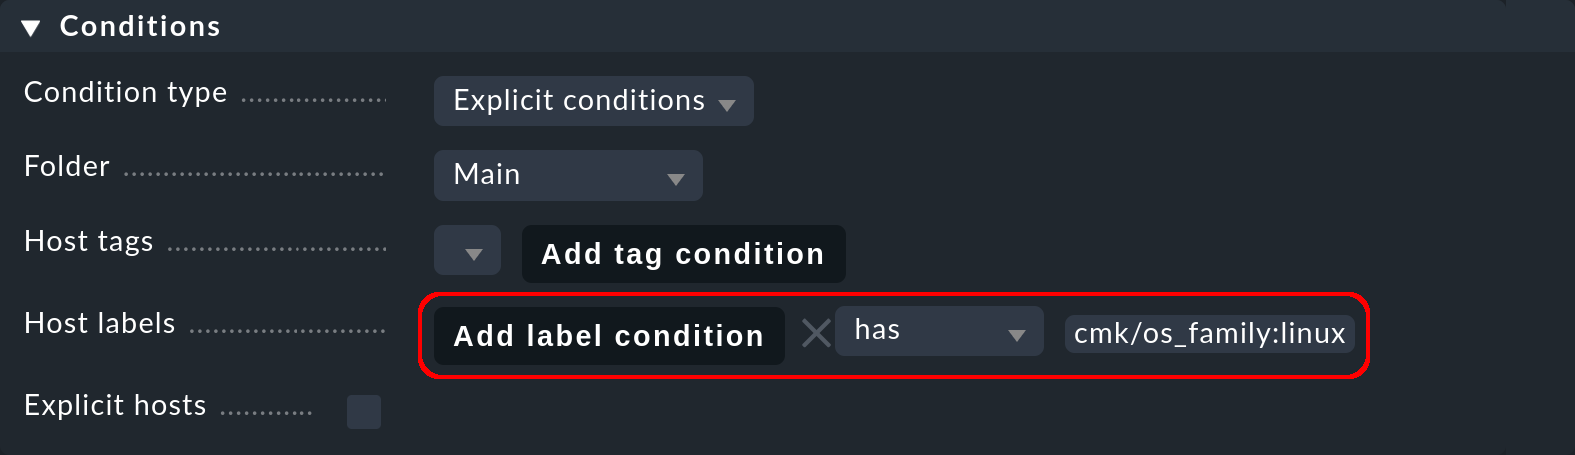
Next, in the Conditions box, attend to the filter or the filters to delimit the group — since filters can be combined, of course. You can filter hosts by folders, host tags, host labels, or specify specific hosts. If, in the host group, you want to include hosts with two tags from the same host tag group, you must create two separate rules. In general, group assignments are cumulative. Hosts can be in multiple groups and groups can be populated by multiple rules.
In the following example, we use the host label cmk/os_family:linux automatically assigned by Checkmk to add the Linux servers to the host group:
Afterwards you will still need to activate the changes as usual.
6.3. Host groups in monitoring
Overview of the host groups
In monitoring, you can conveniently check the result of your assignments in the Setup. The existing host groups will be listed under Monitor > Overview > Host groups:
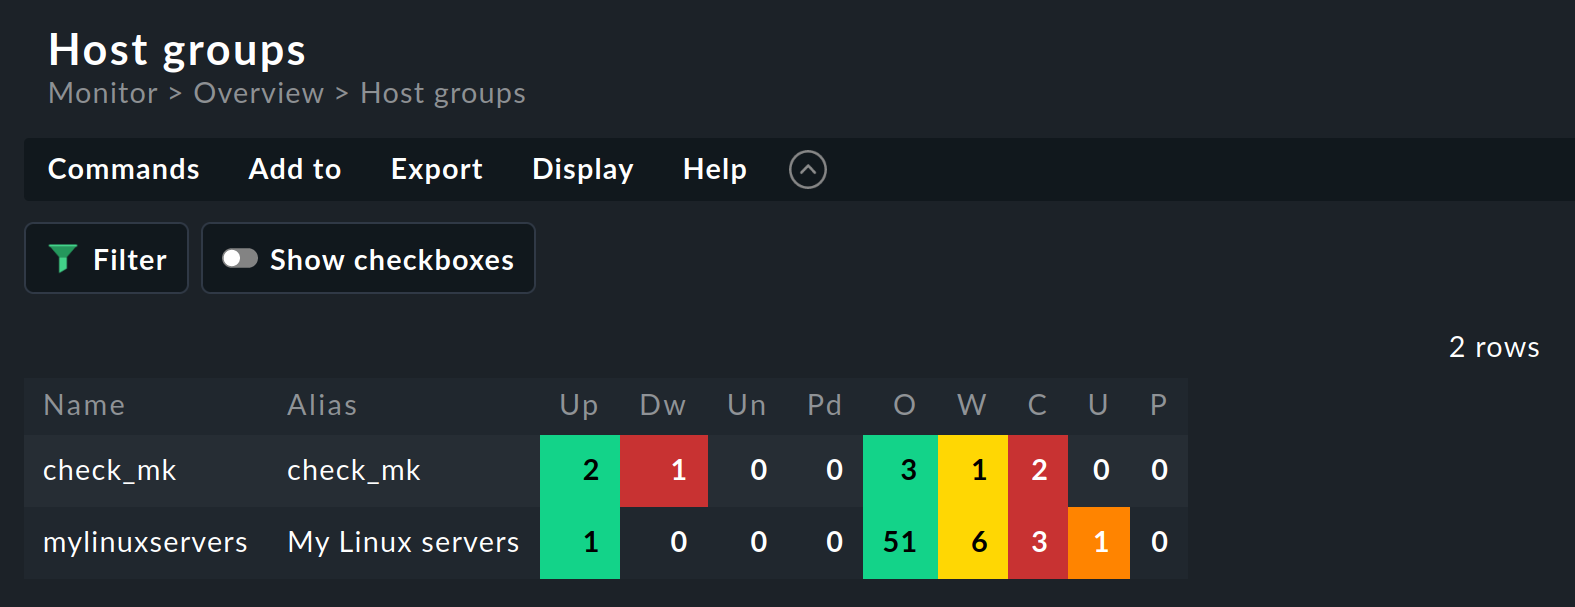
Clicking on a host group’s name will take you to a complete view of the hosts in that group.
Away from this overview you can use host groups in various places, such as for creating views and NagVis maps, and as filters in rules for notifications and alert handlers.
Views
The only important thing when creating views (via Customize > Visualization > Views) is to select a Datasource that uses host groups, e.g. Host groups.
In the Monitor menu you can find ready-made views, for example Host groups, which we have already shown in the previous section.
NagVis maps
You can access NagVis maps with the sidebar's NagVis maps snap-in. In a NagVis map you get as a result for example the summary for a host group via hover menu over a single icon:

Notifications and alert handlers
In the rule sets for notifications and alert handlers, the host groups are available as filters under the Conditions:
7. Summary
To improve clarity, the following table shows important properties of the structuring elements presented in this article.
| Structuring element | Creation | Adding hosts | Condition in rules | Inheritance via folders | Visibility in monitoring |
|---|---|---|---|---|---|
Folder |
Manually in Setup (Setup > Hosts > Hosts) |
Manually in Setup (Setup > Hosts > Hosts) |
Yes |
— |
Snap-in Tree of folders, filters in table views |
Host tags |
Manually in Setup (Setup > Hosts > Tags) by specifying the host tags group |
Automatically by specifying the host tags group |
Yes |
Yes |
Snap-in Virtual host tree, filters in table views |
Labels |
Manually/explicitly in Setup (Properties of host), by rule (Host labels) or automatically |
— (A label is always created for a host.) |
Yes |
Yes |
Status view of a host (Status of Host), filter in table views |
Parents |
Manually in Setup (Properties of host) or automatically by scan in a folder or for selected hosts (Hosts > Detect network parent hosts) |
— (A parent is always created for a host). |
No |
Yes |
Topology map (Monitor > Overview > Parent / Child topology) |
Host groups |
Manually in Setup (Setup > Hosts > Host groups) |
By rule (Assignment of hosts to host groups) |
No |
No |
As own view (Monitor > Overview > Host groups), filter in views, etc. |