1. Introduction
The most important task when setting up a monitoring tool is to manage the systems to be monitored — the hosts. This is not just a matter of ensuring that they are entered with the correct master data (e.g. host name, IP address). Settings for the monitoring (e.g. notifications, thresholds, etc.) also require regular maintenance.
Checkmk was designed from the beginning for environments with very many hosts, and has its own specific approach for making the configuration of such environments manageable for the user. The main Checkmk principles are:
A hierarchy of folders in which hosts are stored.
Host tags and a rule-based configuration derived from the tags.
Automatic detection of the services to be monitored.
In general, it has proven useful to think about an ordering system first and then fill it with content. To learn about the possibilities Checkmk offers to bring order to your hosts, see the article on structuring hosts.
2. Folders and inheritance
Everyone who works with computers knows the principle of files and folders. Checkmk uses an analogous principle for the administration of the hosts, which effectively take over the role of the files. Since folders can themselves be contained in folders, the result appears as a tree structure.
2.1. Folder hierarchy
The user is completely free in the design of their own tree structure. Any form of differentiation is possible. However, there are three common criteria for the structure of the host tree:
Location (e.g. Munich versus Shanghai)
Host type (e.g. switch versus load balancer)
Organization structure (e.g. database versus network groups)
The criteria can of course be mixed, split by location in the first level of the tree and then by host type in the second for example.
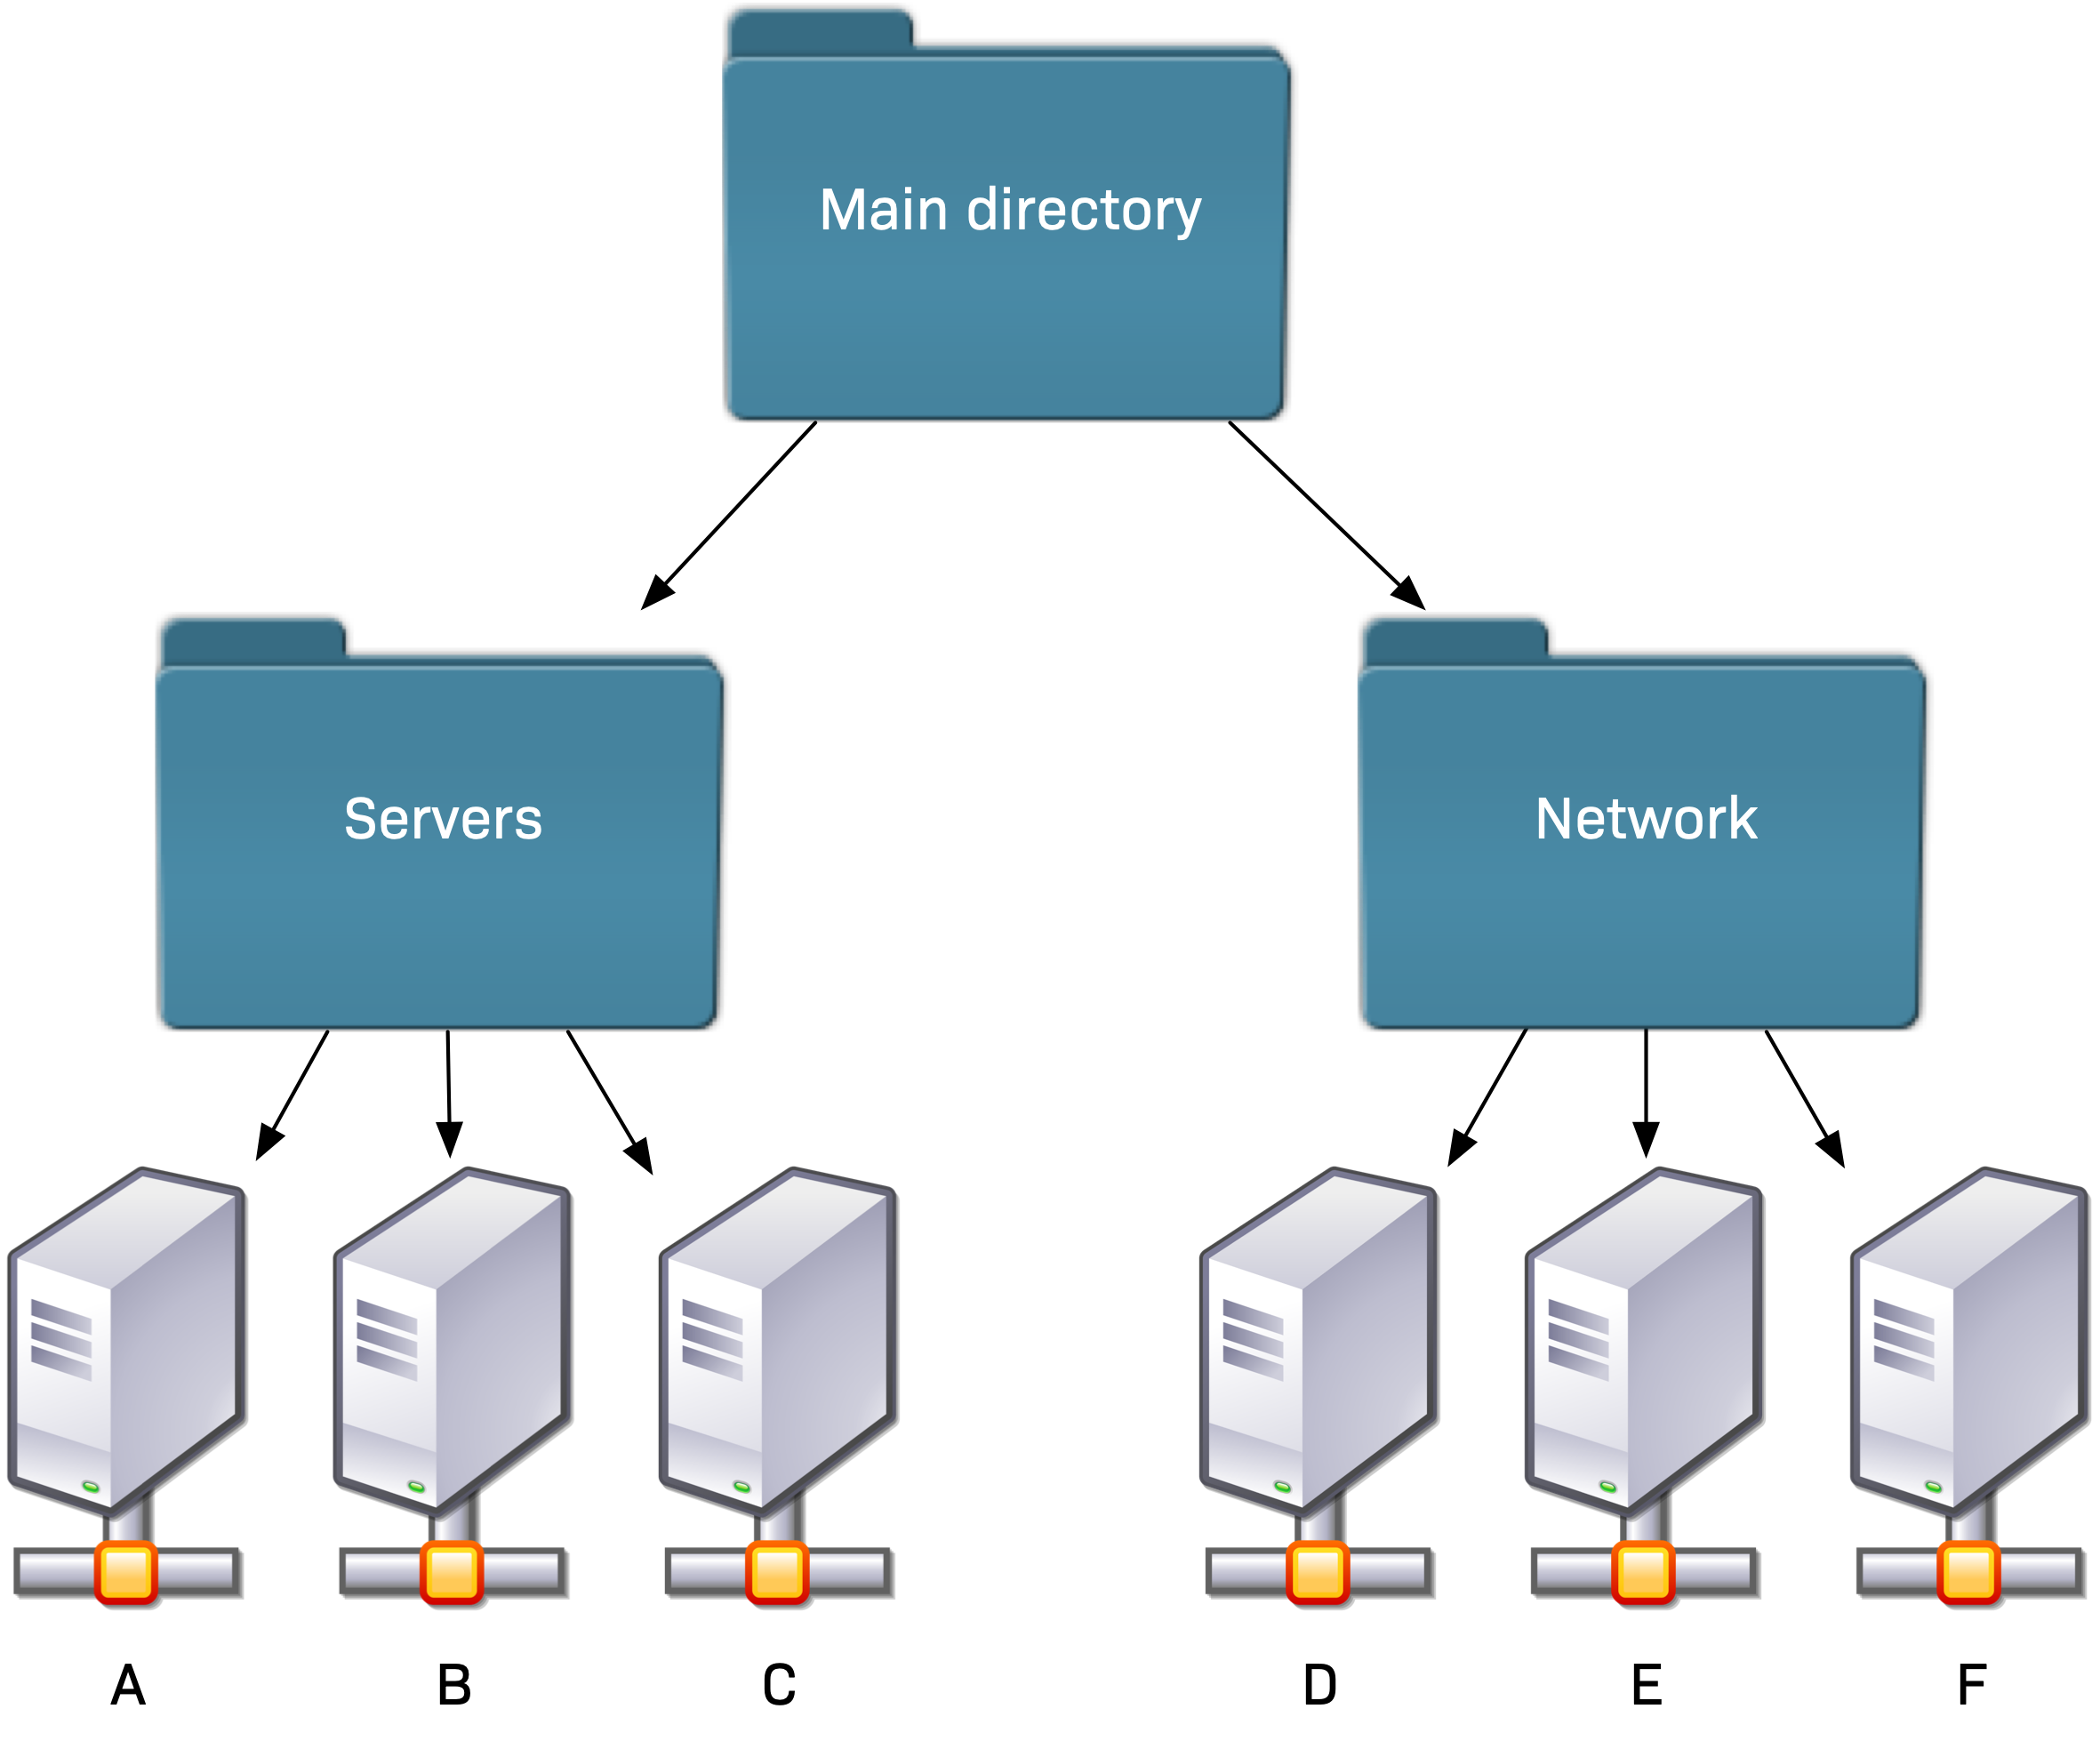
If you like simplicity, you should put hosts only in the 'leaves' of the tree (even if Checkmk allows hosts in middle folders). The following example shows a simple tree structure by host type: Hosts A, B, and C are placed in the Servers folder, and D, E, and F are placed in the Network folder:
2.2. Inheriting attributes
If you build the tree cleverly, you can use it to inherit attributes in a meaningful way. This is especially useful for those attributes that are common to large groups of hosts, such as the SNMP community or host tags that you use to determine whether the host should be monitored by a Checkmk agent or by SNMP.
The following example shows the inheritance of the tag groups 'Criticality' (with the values prod and test) and 'Checkmk agent / API integrations' (with the values tcp and no-agent).
The tcp auxiliary tag is automatically set when the Checkmk agent and/or an API integration is selected, while no-agent is the option of choice when monitoring via SNMP.
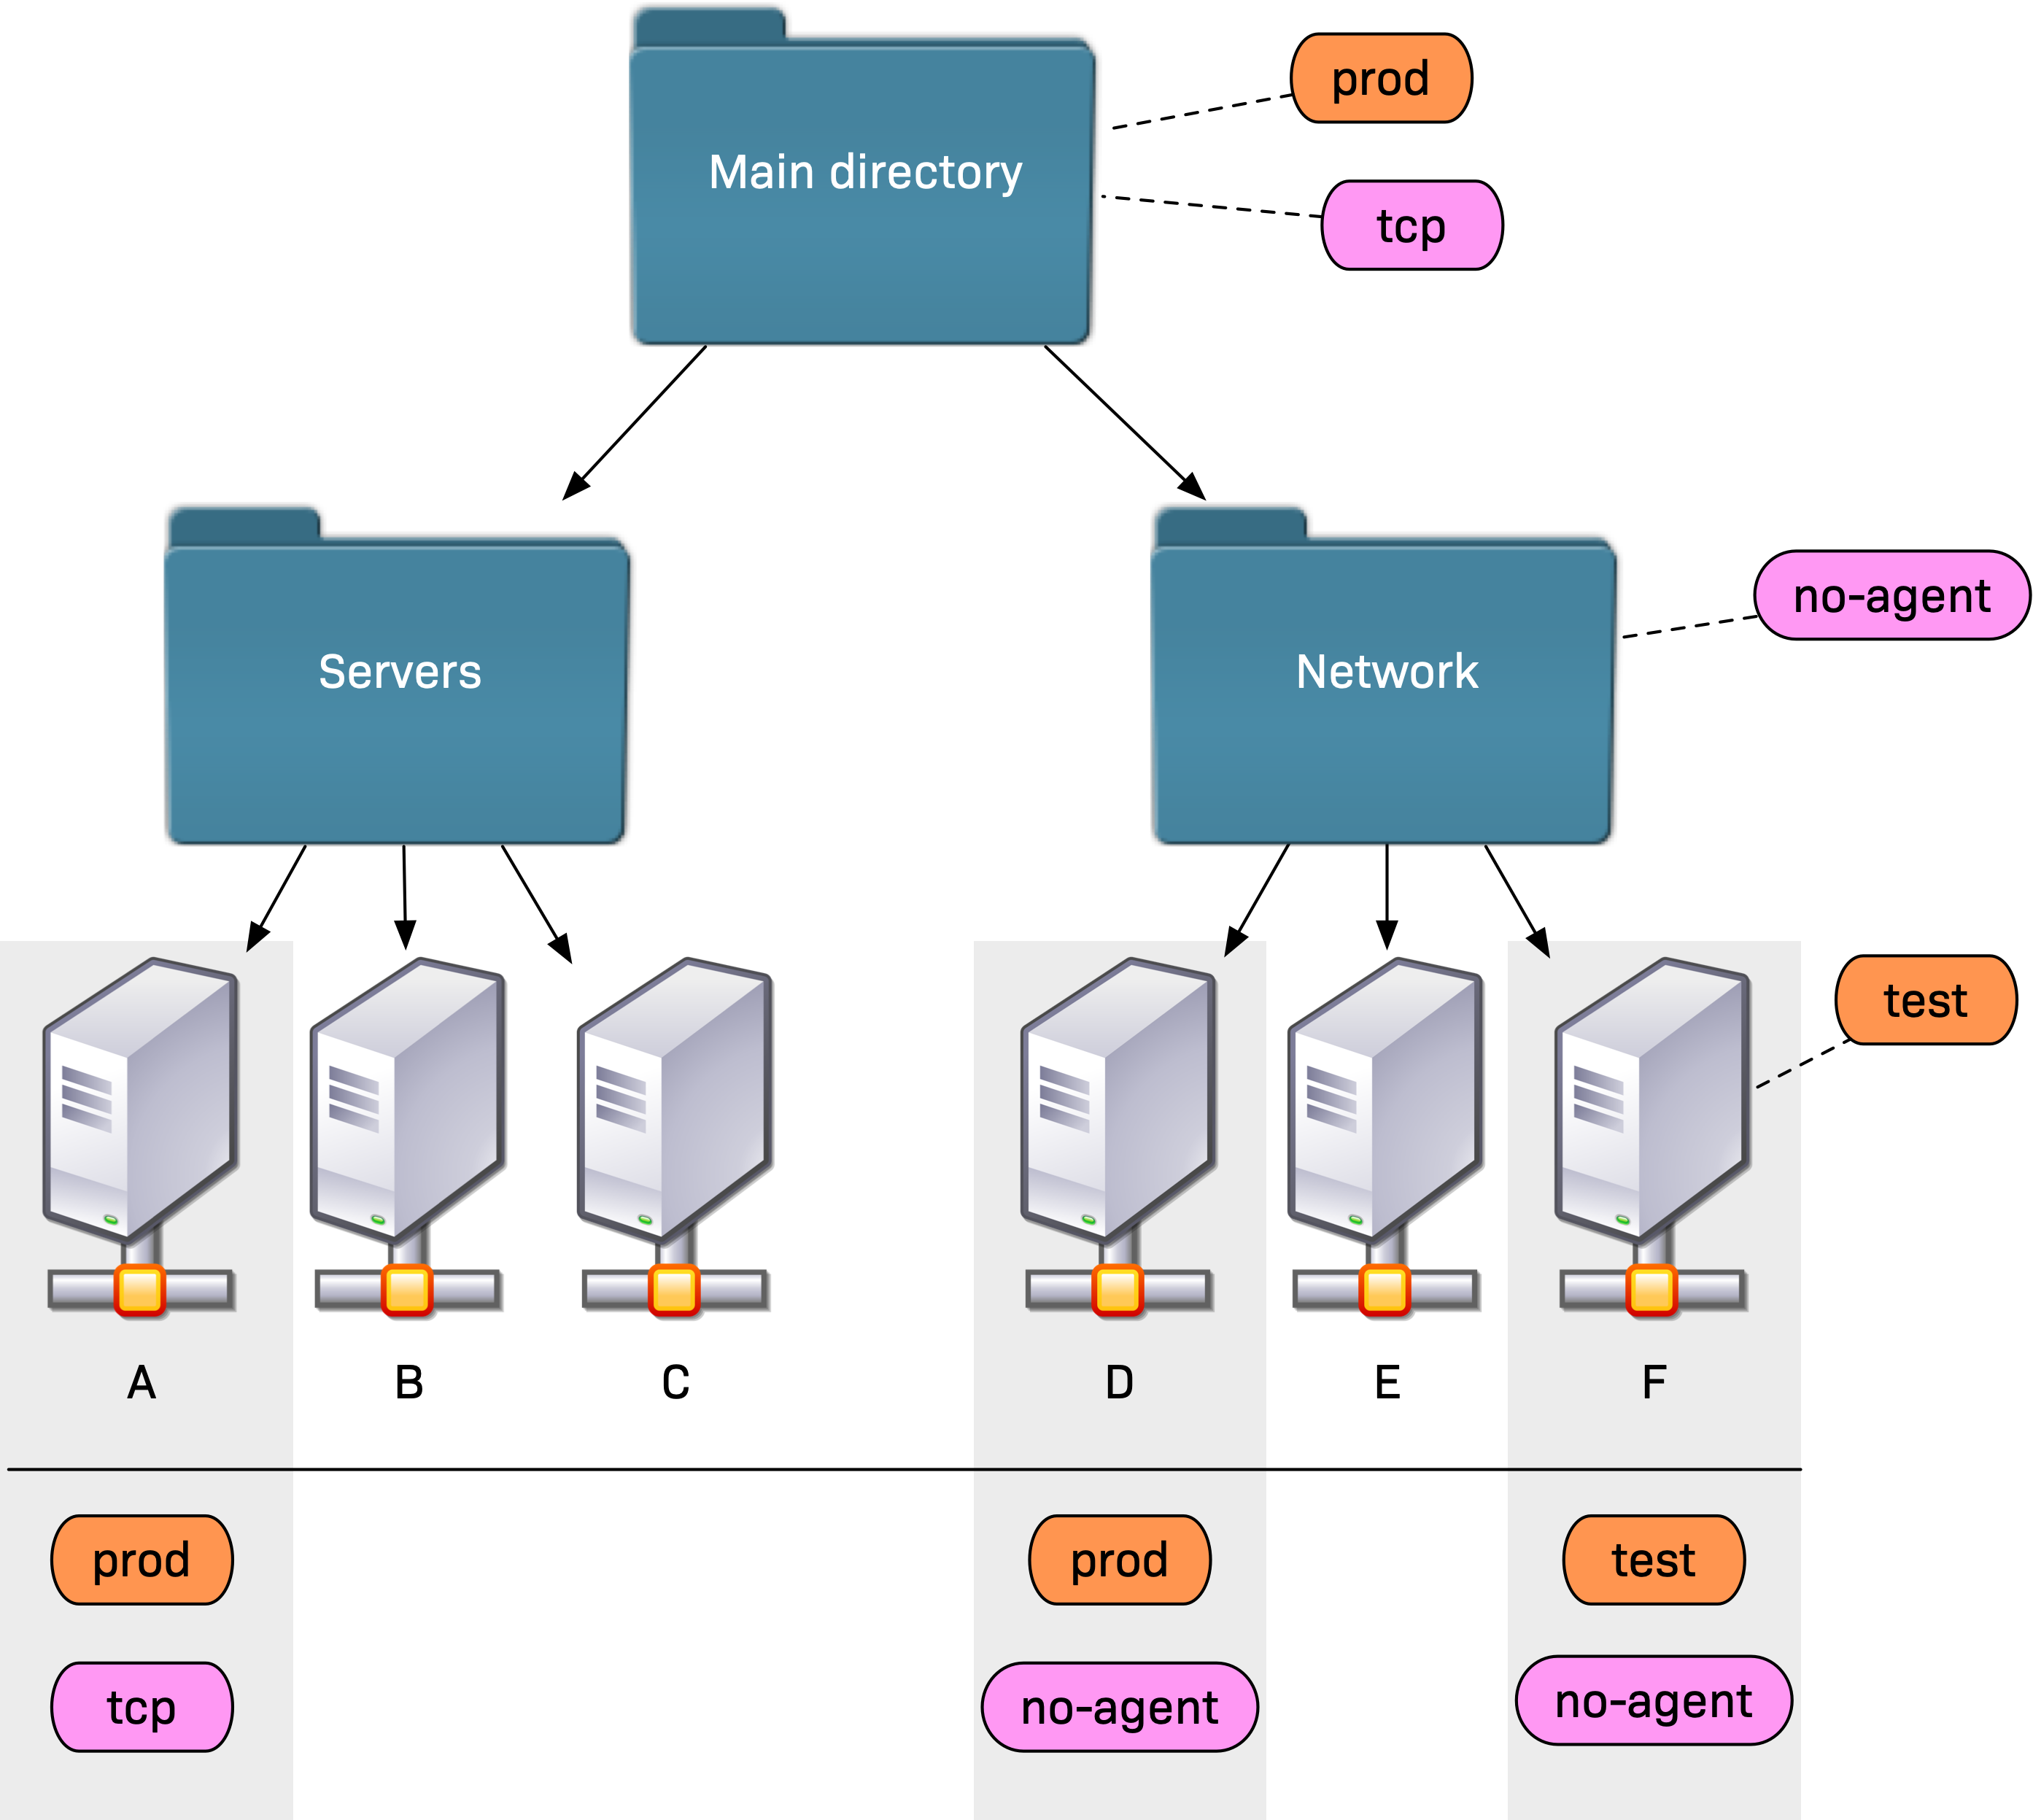
Attributes defined further down the tree always take precedence.
So values defined directly at the host override anything coming from the folders.
In the above example, this results in prod and tcp for host A, prod and no-agent for D, and test and no-agent for host F because of the explicitly assigned attribute.
A major advantage of this scheme over the widely used 'copy & paste' approach of database-oriented configuration systems is that any specified attributes will be received by hosts added in the future. This makes work easier for you and your colleagues: Just drop a new host into the appropriate folder and all the predefined attributes will automatically be correct.
2.3. Creating folders
How to create folders is explained in the Beginner’s Guide.
3. Creating and editing hosts in the Setup menu
To manage folders and hosts, go to Setup > Hosts > Hosts:
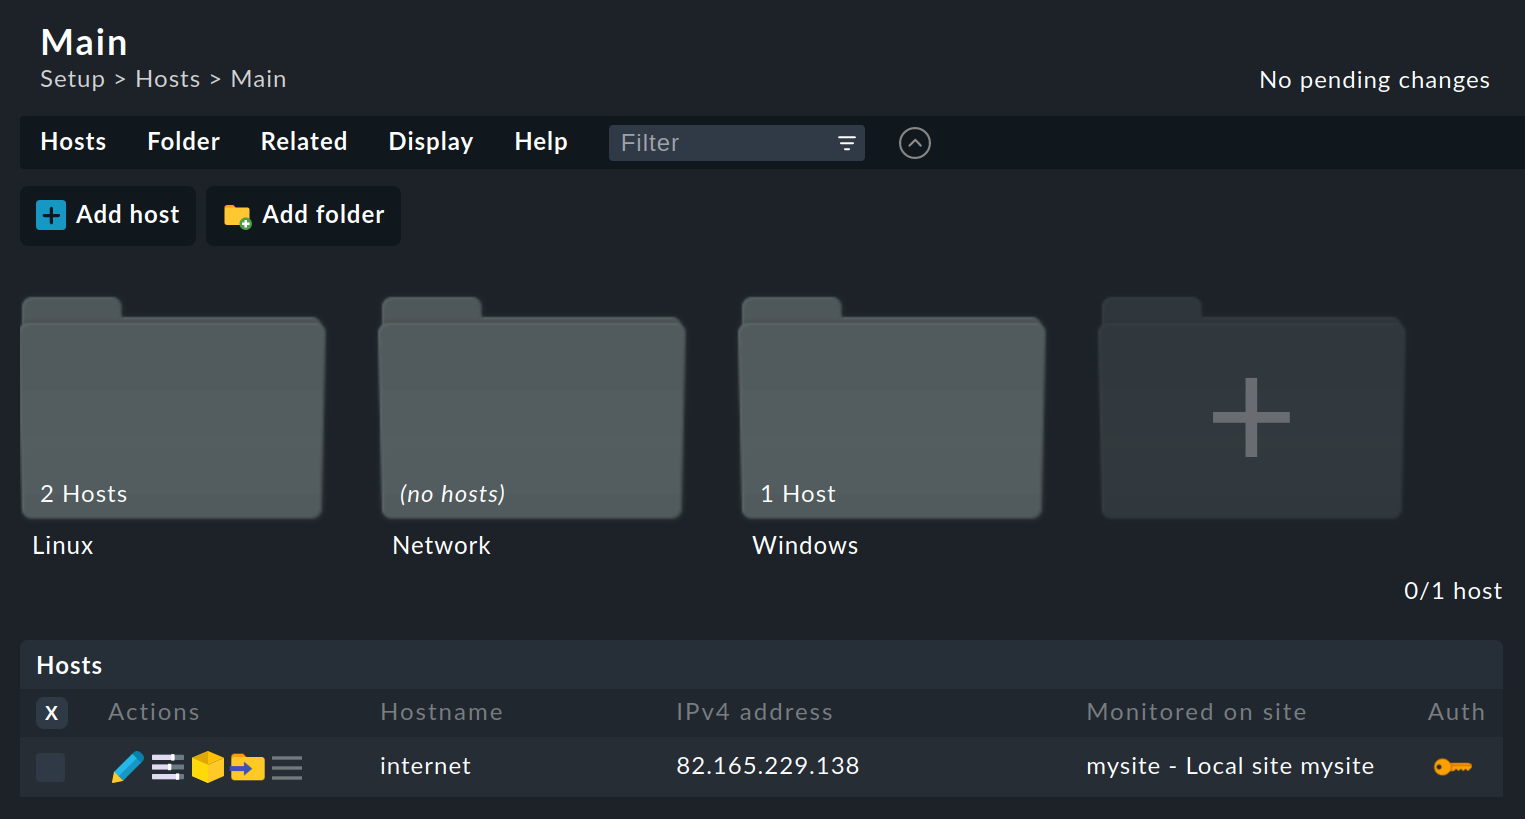
Here in the default view you can see an overview of the folders and below these, in tabular form, the hosts already present in the current folder.
Creating a new host with the ![]() Add host action button, the
Add host action button, the ![]() clone or the
clone or the ![]() edit of an existing host will bring you to the Properties of host page.
This lists the attributes of the host.
These attributes are grouped into several sections, the most important of which we present here.
edit of an existing host will bring you to the Properties of host page.
This lists the attributes of the host.
These attributes are grouped into several sections, the most important of which we present here.
3.1. The host name
The Hostname field is used everywhere within Checkmk to uniquely identify the host. Whenever possible, you should use the host’s DNS name. If the DNS name is too bulky, an easier to recognize alias name can be assigned later. Please note, however, that Checkmk allows a maximum length of 240 characters for the host name.

Changes to the host name are in principle also later possible, however since the host name is used in many places in Checkmk, later changes are more complex and time-consuming when monitoring data has already been accumulated by the time the change is to made.
3.2. Alias and IP address
You can assign an alternative, descriptive name for the host under Alias, which is displayed in many places in the GUI and in reports. If you do not assign an alias, the host name will be used instead.
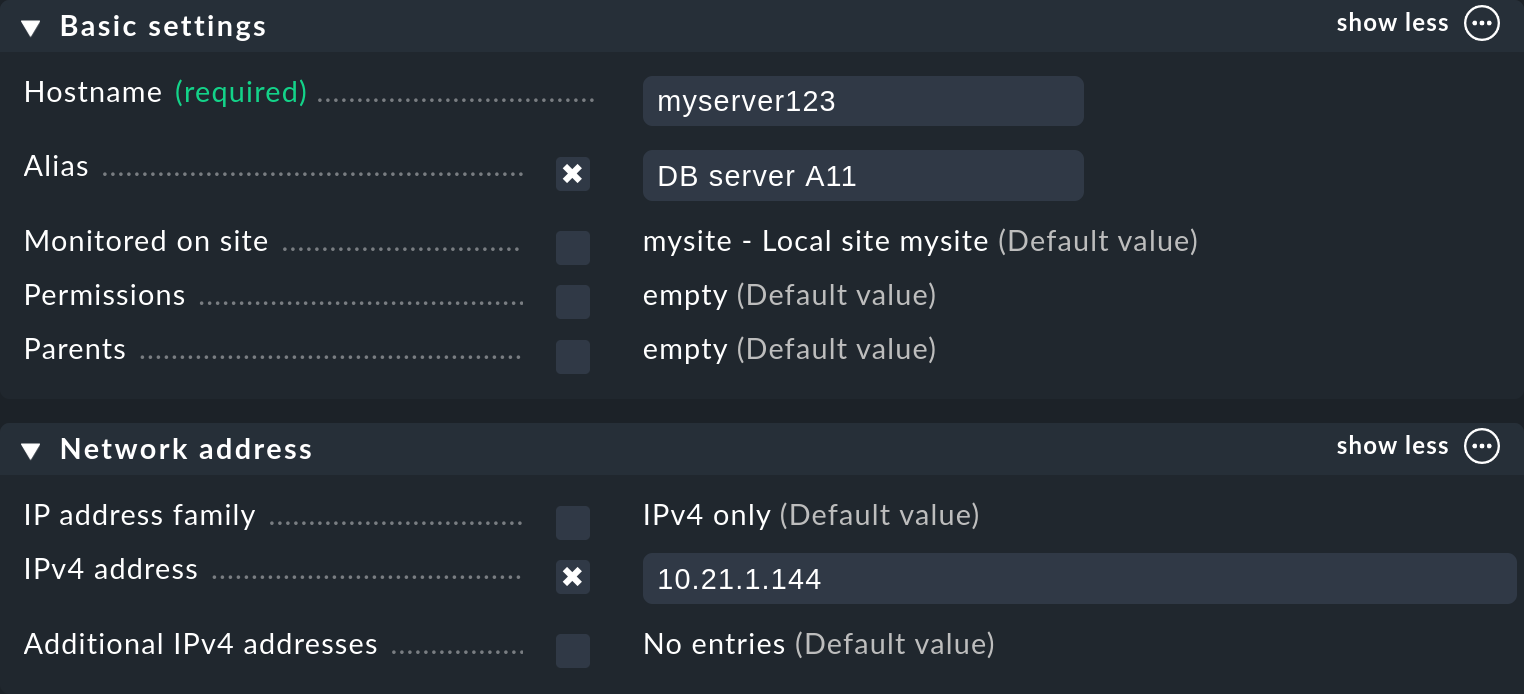
You do not necessarily have to specify an IP address. Four options are available for configuring the IP address, which also determine when the name is resolved:
| Option | Procedure | When to perform name resolution? |
|---|---|---|
1. |
You do not specify an IP address. The host name must be resolvable by DNS. |
|
2. |
You enter an IPv4 address — in the usual dot notation. |
Never |
3. |
Instead of an IP address, you enter an (alternative) host name which is resolvable by DNS. |
When running the checks |
4. |
Use the Hosts with dynamic DNS lookup rule set to specify hosts for a dynamic DNS. The result is analogous to option 3, except that the Hostname field is now used for the DNS query. |
When running the checks |
With the first option Checkmk uses a cache file to avoid repeated DNS requests during the activation of the changes. This cache is very important for speeding up the process, and it also ensures that you can activate a changed configuration even if the DNS fails in an attempt.
The catch is that Checkmk does not immediately notice the change of an IP address in the DNS.
That’s why there is a menu entry Host > Update DNS cache in the host properties.
This will clear the complete DNS cache and force a new resolution the next time the changes are activated.
The corresponding file is located in your site under ~/var/check_mk/ipaddresses.cache.
Deleting this file has the same effect as running Update (site) DNS cache.
Checkmk also supports monitoring via IPv6 — even in dual stack.
The order of resolution here is given by the operating system settings (/etc/gai.conf).
In the Additional IPv4 addresses and Additional IPv6 addresses fields only IP addresses in dot or colon notation are allowed, so alternative DNS names are not permitted.
For some applications it is necessary to set the IP address family to No IP. This applies to hosts queried via a special agent, and to the push mode of the Checkmk agent. You can read more about this in the following section on monitoring agents.
3.3. Monitoring agents
With the Monitoring agents you decide from which sources data is used for monitoring. The default setting provides for the use of the Checkmk agent. Numerous alternative or additional monitoring options are also provided.

In particular, the first Checkmk agent / API integrations entry decides which data to use and which to discard when multiple sources are present.
API integrations if configured, else Checkmk agent |
Monitoring data is supplied by API integrations, that is, by special agents or by piggyback from other hosts. If special agents are configured, all are executed. If no API integrations are configured, the output from the Checkmk agent is accessed. This is the default value. |
Configured API integrations and Checkmk agent |
The output from a Checkmk agent is expected. Data supplied by API integrations will also be used if configured. |
Configured API integrations, no Checkmk agent |
Only data supplied by API integrations will be used for monitoring. |
No API integrations, no Checkmk agent |
With this setting the host will be monitored via SNMP or agentless only with active checks. Rules for active checks can be found in Setup > Hosts > HTTP, TCP, Email, … If you do not define at least one active check, Checkmk will automatically create a PING service. |
Selecting Configured API integrations, no Checkmk agent ensures that both of the services Check_MK and Check_MK Discovery always have the OK state. If you have not entered an IP address for the host, it will assume the DOWN state because no ping can be performed. In this case you must use the Setup > Hosts > Host monitoring rules > Host check command rule to determine how it is to be verified whether the host is evaluated as UP. |
With the Checkmk agent connection mode option you decide whether the Checkmk agent should work in the pull mode or in the push mode.
This option is only available from ![]() Checkmk Cloud onwards, i.e. in Checkmk Cloud and Checkmk MSP, as the push mode is supported only in these editions.
By the way, this option is also available from
Checkmk Cloud onwards, i.e. in Checkmk Cloud and Checkmk MSP, as the push mode is supported only in these editions.
By the way, this option is also available from ![]() Checkmk Cloud onwards in the properties of a folder and is used there to enable hosts to be created automatically via auto-registration.
If you select Push - Checkmk agent contacts the server here, additionally set IP address family to No IP in the Network address box.
This prevents the host’s accessibility from being checked via Smart Ping.
In all other editions, the agent works in pull mode.
Checkmk Cloud onwards in the properties of a folder and is used there to enable hosts to be created automatically via auto-registration.
If you select Push - Checkmk agent contacts the server here, additionally set IP address family to No IP in the Network address box.
This prevents the host’s accessibility from being checked via Smart Ping.
In all other editions, the agent works in pull mode.
Use the following SNMP setting to configure monitoring via SNMP.
After enabling SNMP and selecting the SNMP version, the SNMP credentials field appears, which allows you to specify the SNMP community.
However, since this is usually the same for many hosts, it is more advisable to store this setting in the folder.
If you do not specify anything, public is automatically assumed.
The last field Piggyback refers to the use of piggyback data, which is piggybacked by other hosts and assigned as agent output to this host. Note that the setting made here must match the settings of the first Checkmk agent / API integrations option, otherwise the absence of expected monitoring data may not be noticed. For this reason, one entry is explicitly Always use and expect piggyback data.
3.4. Custom attributes
In the Custom attributes box, you can display any freely-coded text fields that you have previously created as your own custom attributes. By default, Labels and the two predefined host tag groups Criticality and Networking Segment are present here:

You can define custom attributes using Setup > Hosts > Custom host attributes.
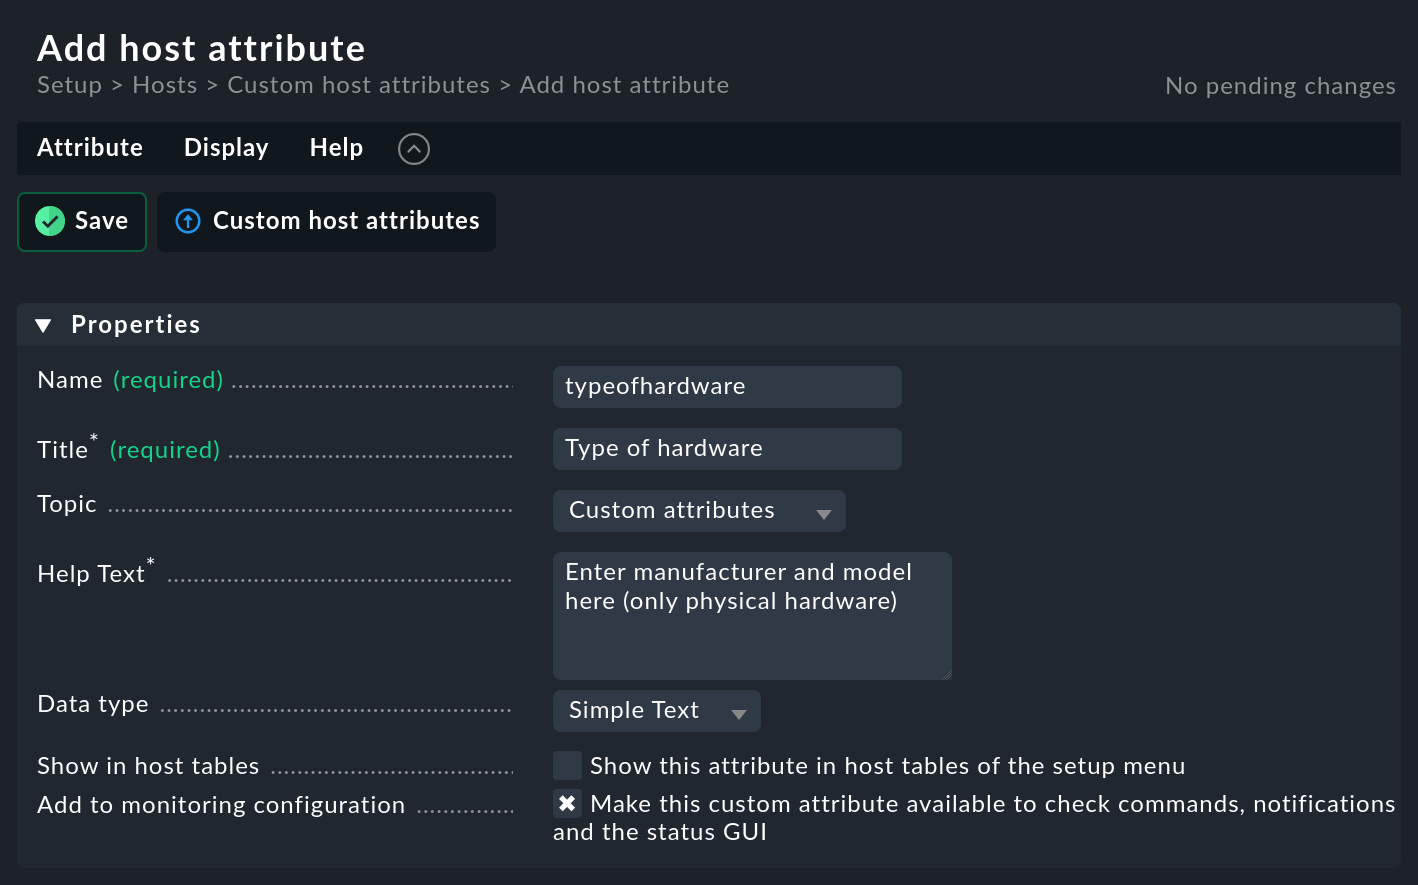
Custom attributes can be, for example, an on-site contact, a branch number, hardware information, inventory numbers, or geographic coordinates. Custom attribute values should primarily help users to keep track, but can also be used in rules and filters when, for example, labels or host tags are too inflexible.
Custom attributes can be assigned to any box in a host’s properties by selecting Topic (topic).
3.5. Management board
The designation management board stands for separate plug-in cards or extended BIOS functionality (such as Baseboard Management Controller/BMC, Management Engine/ME, Lights Out Management/LOM) for monitoring and managing the hardware in addition to the installed operating system. As well as remote control and remote maintenance functions (e.g. for deploying operating systems), such hardware usually also comes with an IPMI or SNMP interface, via which 'health' values (e.g. temperatures and fan speeds) can be viewed.
Enter the IP address and access method here if the host to be monitored has a management board:

Management Boards will no longer be supported as a host property in a future Checkmk version. We therefore recommend creating management boards as separate SNMP hosts or - if available - monitoring them with special agents. |
3.6. Creation / Locking
While most of the details described so far can be edited, the Creation / Locking box contains details that are for informational purposes only at this point.

The time of creation (Created at) and the creator (Created by) are determined by Checkmk. There are three main choices for the creator name:
Username, e.g. cmkadmin: the host was created manually by a user, e.g. in Setup.
Automation username (in the picture above automation): the host was created by an automation user, e.g. using the REST API.
Network scan: The host was found during an automatic network scan.
If the host was created by an automation user, it will be locked by its corresponding site (Locked by). This information can also be used when searching for hosts in Setup.
Locked attributes can no longer be edited in the host’s properties.
3.7. Saving and continuing
When creating or cloning a host, after setting the properties, the next sensible step is Save & run service discovery. This will take you to the automatic service discovery, which we will explain in the next chapter.
In contrast, Save & run connection tests takes you to the connection test. This allows you to first test whether you are getting any data at all from the host with the settings you have specified — be it via an agent or whatever you have previously configured. For details on the connection test, see the article on monitoring agents.
3.8. Bulk actions
You may occasionally want to do things like delete, move, edit, or perform a service discovery for a number of hosts at the same time. Checkmk has the so-called 'bulk actions' for this purpose.
You can find these actions in the Hosts menu page of an open folder in the On selected hosts section:
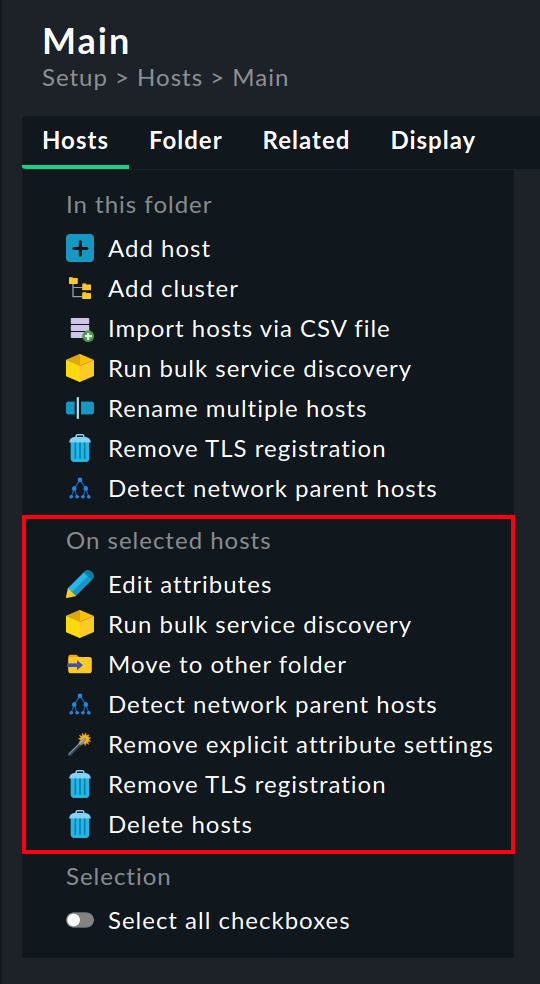
The actions always refer to the hosts that are located directly in the displayed folder — and which have been selected by you. The check boxes in the first column of the host list serve this purpose. If you click the cross in the column title, all hosts will be selected — and deselected by clicking it again.
Here are some notes on the available actions:
-
Edit attributes: Changes one or more attributes of the hosts. The attribute is thereby explicitly entered into the hosts.
Caution: There is a difference between a host inheriting an attribute from a folder and having it explicitly set, as by this action. Why? In the latter case, changing the attributes in the folder will have no effect, since values set directly at the host will always take precedence. For this reason, there is also the following action.
Run bulk service discovery: Perform a service discovery for multiple hosts simultaneously.
Move to other folder: Move the hosts to another folder. After selecting this entry, the existing folders are suggested as possible targets.
Detect network parent hosts: Have parents created by a scan.
-
Remove explicit attribute settings: Removes explicit attributes from hosts and reinstates inheritance. You would accomplish the same thing by selecting each host individually and unchecking the boxes on the relevant attributes.
In general, it is a good idea to use as few explicit attributes as possible. If everything is inherited correctly through the folders, this avoids errors and makes it convenient to add new hosts.
Remove TLS registration: Removes the registration for encrypted communication via Transport Layer Security (TLS). You can find more information on this topic in the articles on the Linux agent and Windows agent.
Delete hosts: Deletes the hosts — after confirming the request.
4. Automated host removal
You can have hosts that no longer exist automatically removed from the configuration environment and the monitoring environment. Upon automatic removal the mutual trust relationship (mTLS) is also deleted, which means that in case of reappearance of a host the registration procedure must be performed again.
The criterion used to decide whether a host is actually still there is the state of the Check_MK service. This service is responsible for the state of the monitoring agent running on the host during operation. If there is no longer a connection to the agent — and thus no current monitoring data — the service will switch to the CRIT state.
Hosts whose Check_MK service has been CRIT for a specified period of time can be removed automatically. This is done with the Automatic host removal rule, which can be found under Setup > Hosts > Host monitoring rules. This rule is simple. You simply define the time period in which the Check_MK service needs to be in the CRIT state before its associated host is removed:

To remove the hosts not only from the Setup but also from the monitoring, the changes are activated automatically. Note that during the automatic activation, any other pending changes will also be activated.
This rule is available in all Checkmk editions.
However, it fits particularly well as a counterpart to the option to have hosts created automatically, which is included in the scope of functions from Checkmk Cloud onwards.
If you want to have automatically created hosts automatically removed again,
you can restrict the rule’s condition to hosts with the |
Note that the dynamic host management also provides the option to have hosts removed automatically. Both options for lifecycle management work independently of each other, i.e. a host will be removed if one of the two conditions is met.
5. Configuring services
The next step after creating a host is to configure the services to be monitored on it. You can learn all the details covering the automatic discovery and configuration of services in the article Understanding and configuring services. We will describe only the most important points here.
The list of a host’s configured services can be accessed in the following ways:
In Setup, via the host list:
Select Setup > Hosts > Hosts. In the host list, click .
.In Setup, via the properties of a host:
Select Setup > Hosts > Hosts. In the host list, click the required host. On the Properties of host page, select Host > Save & run service discovery. If you select Host > Run service discovery from the menu instead, you will also go to the service list — but without saving the host properties.In monitoring, via the list of services of a host:
Select the Host menu, and in the Setup section select the Run service discovery entry. A small gear symbol at the icon shows that this menu entry leads into a page in the Setup. This will take you directly to the service configuration.
Whichever method you choose, the result should look something like this:
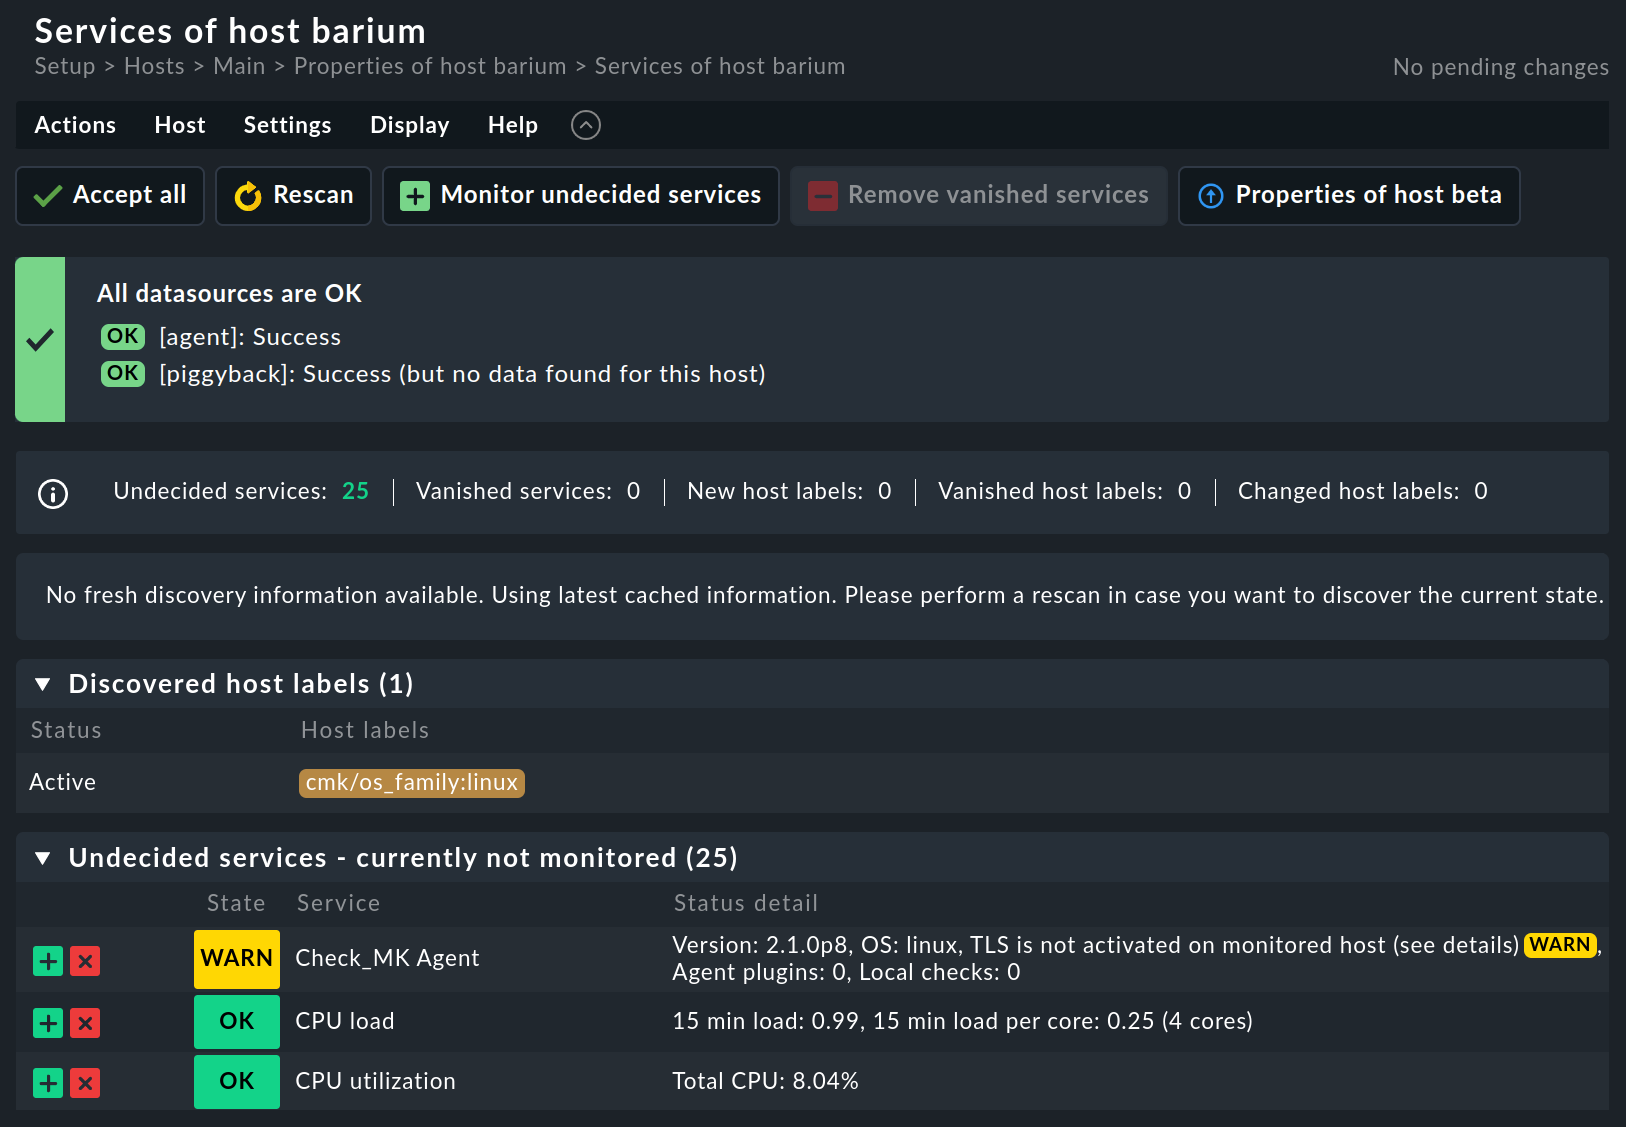
The most important actions are available to you in the action bar, others can be found in the Actions menu. Some notes on the possible actions:
The Accept all button is usually the best action for a new host. This is also the right choice for existing hosts in which services are found that are not currently being monitored. These can be found in the Undecided services (currently not monitored) section. Accept all adds the missing services, removes vanished services and accepts any host labels found.
The Rescan button ensures that fresh, complete data is fetched from the target device. To enable faster page loading, Checkmk works with cached files that are recorded during normal monitoring. For SNMP devices, the button therefore triggers an active search for new check plug-ins and may also find additional services.
The Monitor undecided services button transfers the corresponding services to the monitoring, but without transferring the host labels.
Remove vanished services removes services that no longer exist. This is useful for services that remember a current state on discovery (e.g., the current state of a switch’s ports or of file systems and their mount points).
After each modification an activate changes is required to make them effective.
6. Importing hosts from CSV data
If you want to add a large number of hosts to Checkmk in a single action, you can make the task easier by importing the hosts from a CSV file. This is especially helpful in two usage scenarios:
You want to import hosts from another monitoring system that supports exporting in structured data formats. You can create a CSV file from this source system and use this file for the import to the target Checkmk system.
You want to create many new hosts at the same time. In such a situation, enter the hosts into an Excel spreadsheet, then simply import this list as a CSV file.
Checkmk is quite flexible when importing CSV data. In the simplest case, in each line of the CSV file you simply have a host name that is resolvable by DNS:
myserver01
myserver02
You can also pass additional attributes at the same time during an import. An overview of all possible attributes can be found in the next section. If the CSV file contains the names of the attributes in the first line, Checkmk can even assign these automatically. Checkmk is, as far as possible, tolerant of non-exact spelling (it tries to interpret minor variations). For example, in the following file, Checkmk can automatically map all columns correctly:
hostname;ip address;alias;agent;snmp_ds
lnx17.example.com;192.168.178.48;Webserver;cmk-agent;
lnx18.exmpl.com;192.168.178.55;Backupserver;cmk-agent;
switch47-11;;Switch47;no-agent;snmp-v2
The procedure is as follows:
Select or create a folder into which the import should take place.
Navigate to this folder (Setup > Hosts > …) and in the Hosts menu select the entry ![]() Import hosts via CSV file.
Import hosts via CSV file.
On the following page, use Upload CSV File to upload the file. Alternatively, select Content of CSV File and copy the contents of the file into the text box below the list. You can immediately run an automatic service discovery on the newly imported hosts. To do this, select the Perform automatic service discovery option.

By clicking ![]() Upload you will get to the next page:
Upload you will get to the next page:
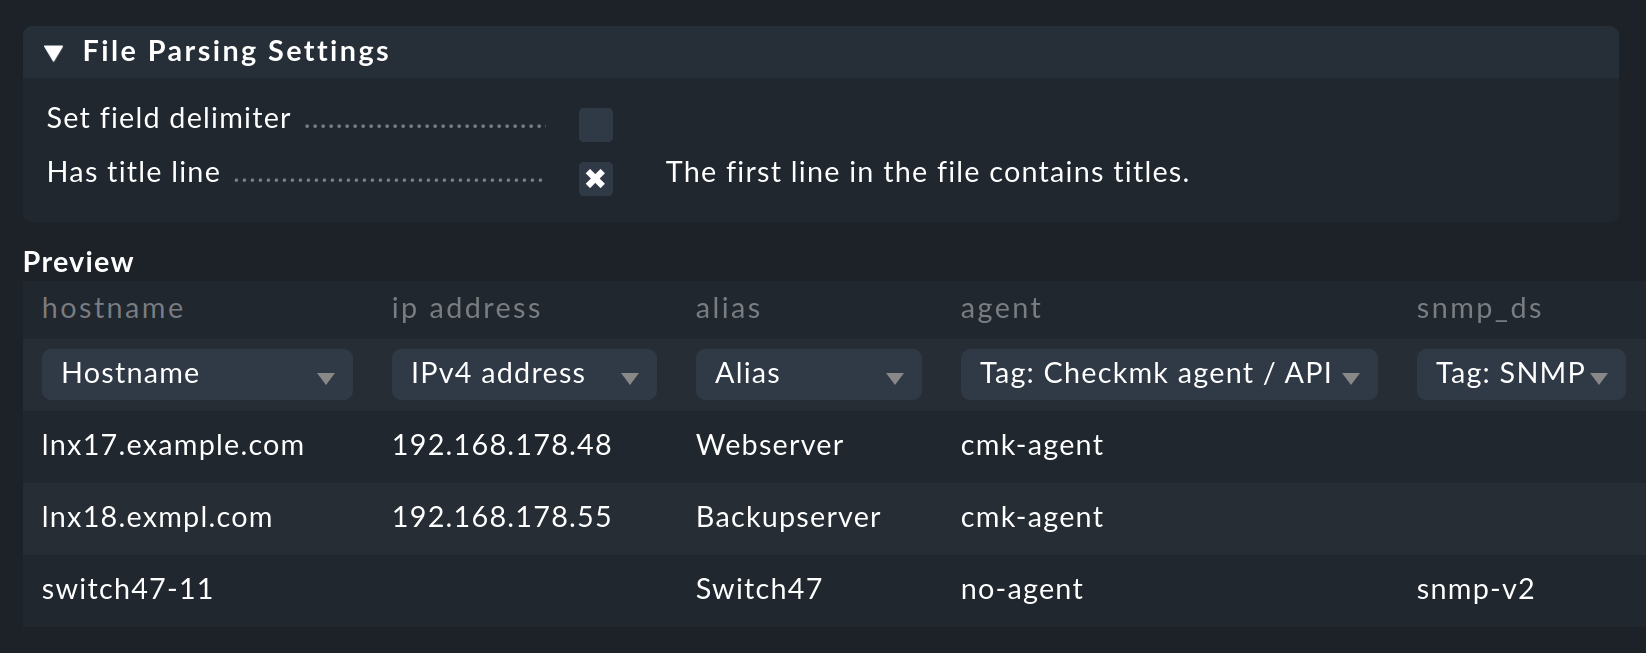
Selecting a delimiter (Set field delimiter) is not necessary for this example, as the semicolon has already been interpreted correctly. Checkmk automatically recognizes common delimiters, such as tab or semicolon. Select the Has title line option here to recognize the headings. Under Preview you can see a preview of the new table.
If the automatic detection of a column does not work correctly, you can also manually select the attribute that is to be assigned.
Use the respective list for this.
For the host tags (those entries that start with Tag) the CSV file must contain the internal ID of the tag (here e.g. cmk-agent and not its title Checkmk agent / API integrations visible in the GUI).
You can see exactly what the internal IDs of the host tags are in Setup > Hosts > Tags.
For the IDs of the predefined (builtin) tags, see the table in the article describing the host tags.
Start the import by clicking ![]() Import.
If you have selected the Perform automatic service discovery option, you will land on the Bulk discovery page and should still edit it.
Once the service discovery has been completed, all that remains is to activate the changes as usual, after which all the new hosts will be in the monitoring.
Import.
If you have selected the Perform automatic service discovery option, you will land on the Bulk discovery page and should still edit it.
Once the service discovery has been completed, all that remains is to activate the changes as usual, after which all the new hosts will be in the monitoring.
6.1. Overview of the attributes for import
| Attribute | Description |
|---|---|
|
Name of the host (maximum 240 characters) |
|
Alias name of the host |
|
Site on which this host is monitored |
|
IPv4 address |
|
IPv6 address |
|
SNMP community |
|
Tag: Criticality |
|
Tag: Network segment |
|
Tag: Checkmk agent / API integration |
|
Tag: Piggyback |
|
Tag: SNMP |
|
Tag: IP address family |
7. Performing a network scan for folders
7.1. The principle
Checkmk provides the ability to automatically and regularly scan your network — or just parts of it — for (new) hosts. This network scan is set up at the folder level in Checkmk’s host administration. A cronjob runs in the background every minute. This checks all folders to see if another scan is due. The cronjob checks the two settings Scan interval and Time allowed. If this interval has expired and the server is within the time allowed for the scan, the scan will be started. Thus, a newly set up network scan would start within a minute of clicking Save, provided you have not changed the Time allowed.
Once a scan starts, basically three things happen:
Checkmk first determines the IP addresses to be scanned. From the configured address ranges, this removes any addresses that are already being used in any folder in your hosts' configurations.
The identified addresses will now be pinged. If there is a response to this ping on an address, an attempt is made to determine a host name.
Finally the hosts in the folder are created. All hosts with names that already exist on the site will be omitted.
7.2. Setting up a network scan
As mentioned above, the network scan is set up at the folder level. First open Setup > Hosts > Hosts. Then navigate to any folder or stay in the Main. folder. Via the Folder > Properties menu you will find the Network Scan box.

Enable the network scan using the corresponding checkbox.
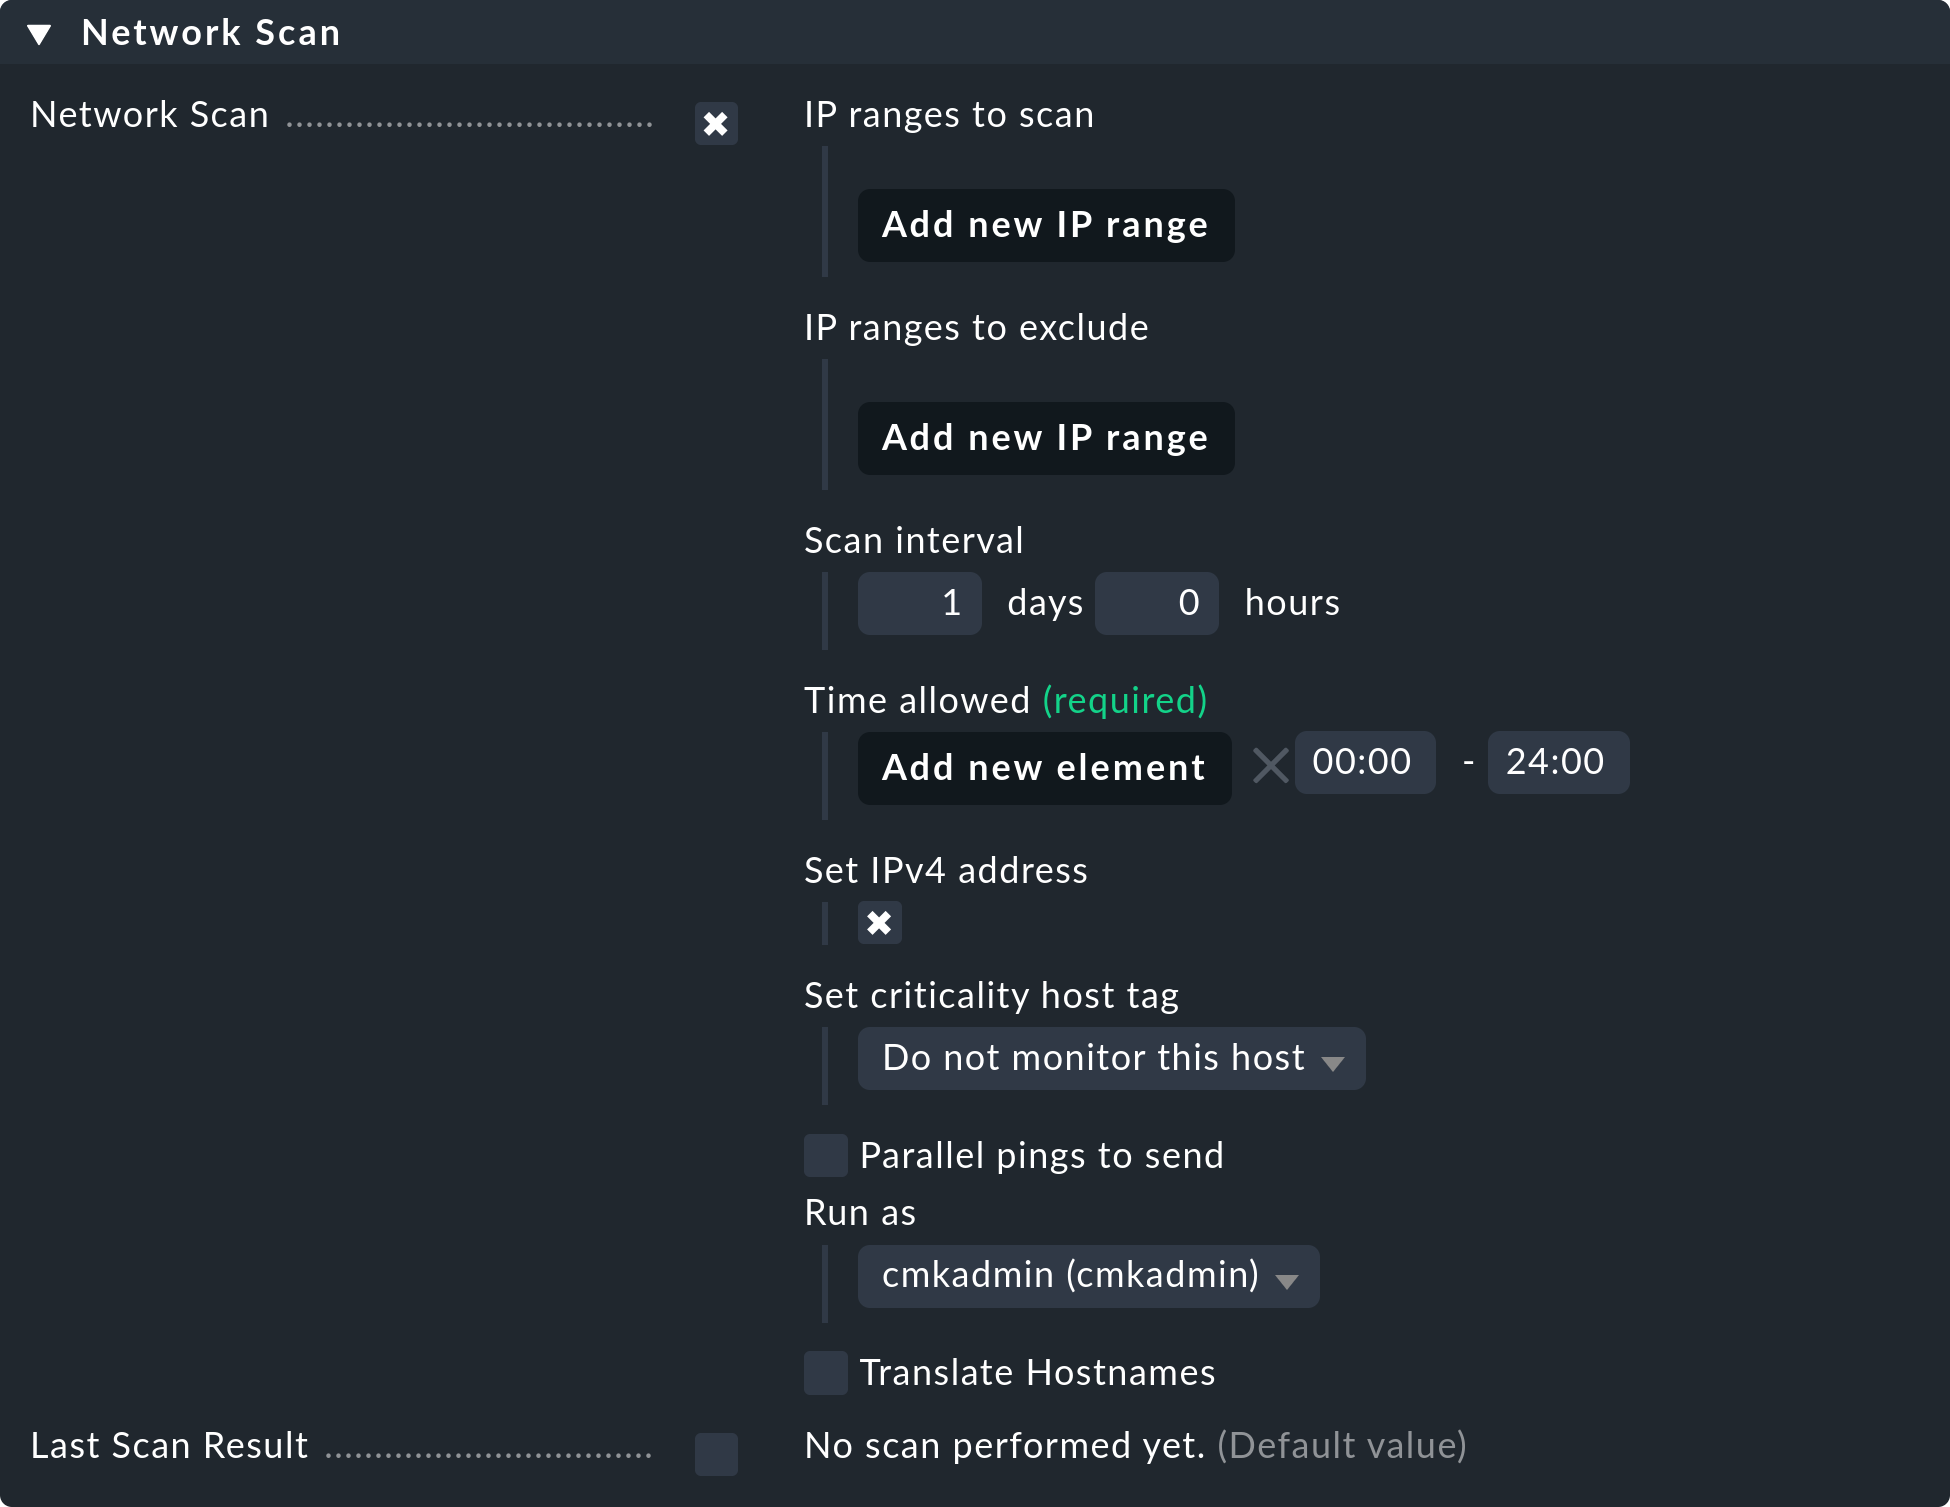
Then, at IP ranges to scan, specify the IP addresses that Checkmk should automatically monitor for you.
For this definition you have the choice between single IP addresses, IP ranges and whole networks.
We recommend not selecting too large an address range, otherwise the network scan may take a very long time.
When choosing a network, we also recommend not to exceed the net mask of /21, which corresponds to 2048 IP addresses.
You should not exceed the number of 2048 IP addresses even when selecting via IP-Range.
Of course, this can only be a rough recommendation, since your (organizations) network may be able to handle larger address ranges without any problems.
The following IP ranges to exclude option allows you to exclude parts from the address range configured above. This option is also useful for excluding hosts or IP addresses from the network scan that are already known and being monitored. In this way, you can prevent duplicate hosts from being created.
The following two options Scan interval and Time allowed allow you to specify how often the scan should run and at what time you want to allow it.
One of the most important considerations when setting up network scanning is how you want to handle any hosts that are found. The Set criticality host tag option plays a central role here:
By default, Do not monitor this host is selected. This specifies that the hosts found are only included in the host administration for the time being. An actual monitoring does not take place. One approach could be to manually move the discovered hosts into your existing host structure — for example using the Move this host to another folder function. After moving, you will then need to customize or remove the Criticality host tag. If you have a large number of hosts, you can use the Remove explicit attribute settings function in Setup > Hosts > Hosts.
If you instead select Productive system as the host tag here, the hosts found — if configured appropriately with the Periodic service discovery rule set — will also be included directly in monitoring.
Before using network scanning, also note the following basic considerations:
The scan runs via a ping. This also means that devices that can only be monitored via SNMP may be found but will not automatically be monitored because the SNMP credentials will not have been configured.
For new Windows hosts, the so-called Echo Request will be deactivated in the firewall unless a corresponding configuration has been defined, e.g. by means of group policies. Such Windows hosts will therefore not respond to the scan and will therefore not be found.
Checkmk can only provide you with clean data for the hosts it finds if your network and site are configured accordingly. Conflicting entries in DNS and your Checkmk site can lead to duplication. A duplicate is created when a host with a name (but without an IP address) has already been set up in Checkmk and is now found under a different name via its IP address.
8. Searching for hosts in Setup
Checkmk provides a convenient way to search in the monitoring environment (in the Monitor menu) and in the configuration environment (in the Setup menu). The results from these searches may differ because the hosts in the monitoring environment are not necessarily the same as in the configuration environment, for example, if you have created a host in Setup without enabling this change, it will not (yet) exist in monitoring.
There is another way to search for hosts in the configuration environment, which has the following advantages:
You can search for hosts by a variety of criteria.
The hosts which are found are listed on a results page from which you can start the bulk actions, as described earlier in this article.
You can find this search under Setup > Hosts > Hosts on the page of an opened folder in the Display > Search hosts menu. Such a search always starts from the current folder, recursively into all its subfolders. To search globally, simply start the search from the Main folder:
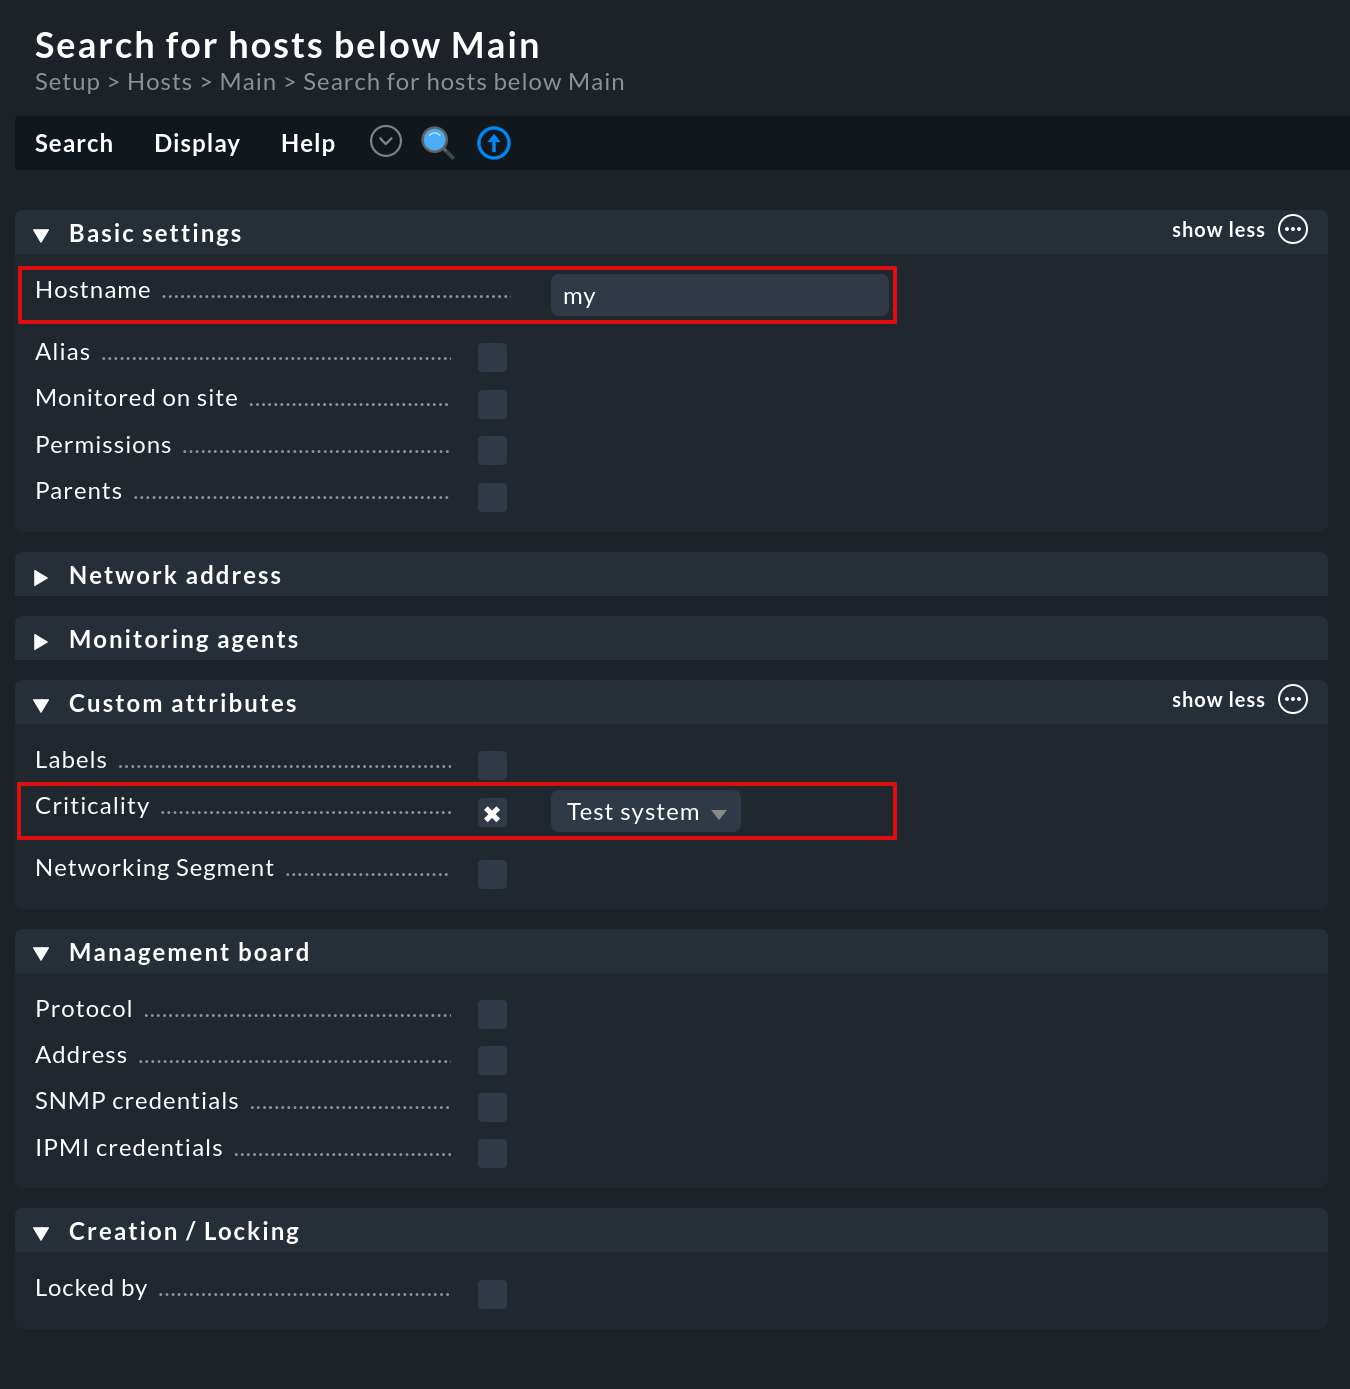
For the Host name field, a partial word search (infix search) is used — the entered text is searched, at any position, in the host name. Furthermore, you can limit the search using other attributes. All conditions are linked with AND. So the example from the above screenshot searches for all hosts with my in their names, and which also have the Test system tag.
You start the search with Submit. The result page can be treated almost like a normal folder. This means that here you can use the bulk actions available in the Hosts menu in the On selected hosts section, e.g. to move all found hosts to a specific folder.
You can further customize and refine the search on the results page with Refine search.
9. Renaming hosts
Renaming hosts may seem like a simple task at first glance, on closer inspection, however, it turns out to be a complex operation. The reason is that Checkmk uses the host’s name as a unique key for the host — and indeed in numerous places. This includes file names, log data, rules, dashboards, reports, BI aggregations, and more. A host’s name also appears in URLs.
Checkmk provides two functions in the Setup for cleanly renaming a host in all of its occurrences. You can either rename a single host (in the host’s properties in the Host > Rename menu) or rename multiple hosts in a folder simultaneously (in the Hosts > Rename multiple hosts menu).
When making changes to multiple hosts and in multiple locations, it is always possible for something to go wrong. Therefore, make sure you have an up-to-date backup of your site — before starting the renaming action. |
The Bulk renaming of hosts allows simultaneous, systematic name matching for multiple hosts:
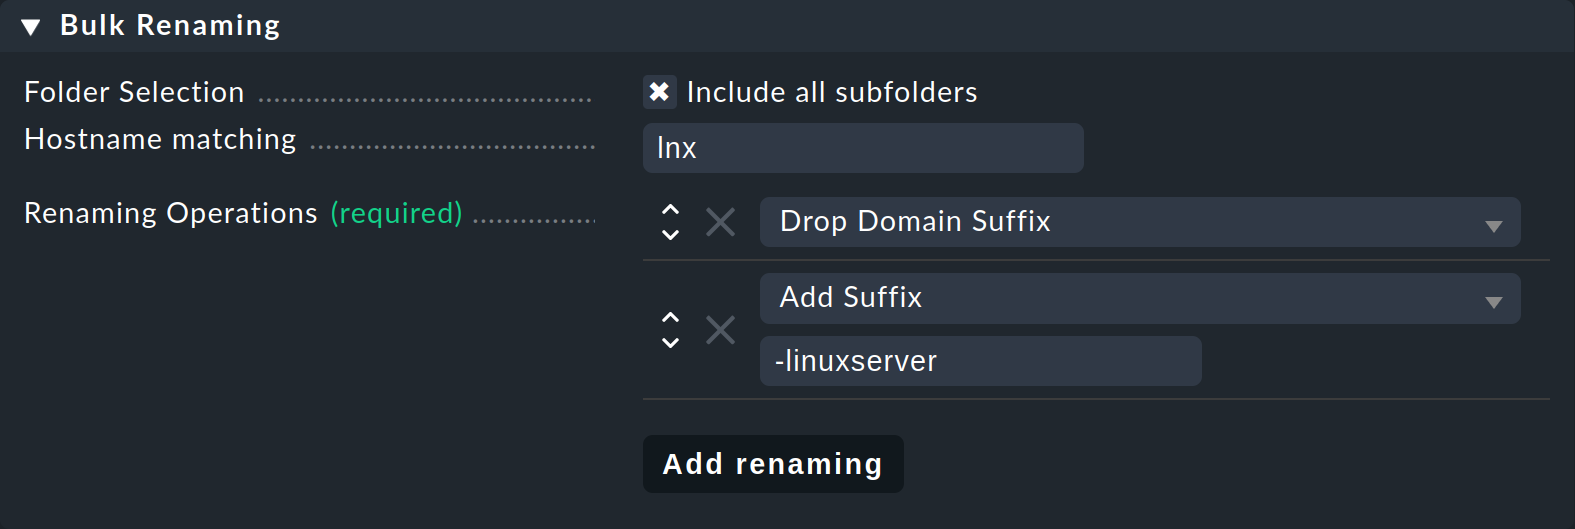
In the Host name matching field, first optionally specify a regular expression that matches the beginning of the host names you want to rename — so here in the example, all hosts whose names start with lnx.
Then add one or more operations with Add renaming. These are applied in sequence to the host names.
In the above example, first Drop Domain Suffix truncates everything following the first . from all host names, and then Add Suffix adds the -linuxserver suffix to the names.
Further operations are available, most of which are self-explanatory. Otherwise you can get more information via the inline help.
After starting the renaming procedure with ![]() Bulk rename and confirming the obligatory "Are you sure…?" question …
Bulk rename and confirming the obligatory "Are you sure…?" question …

… completing the process may take a while. During the renaming process the monitoring will be completely stopped! This is necessary to maintain everything in a consistent state. At the end of the process you will get an overview of exactly where renames were performed:

10. REST API requests for hosts and folders
You can also perform many of the actions described in this article using the Checkmk REST API. This is especially interesting if you have many objects to manage on your site and want to automate actions. For example, you can create many hosts using the REST API and avoid the potential errors that can always occur when entering them manually via the GUI.
If the command line, scripts and APIs are not your tools of choice, at this point it is enough to know that this API exists. This gives you a powerful tool to fall back on when you need it — as an alternative to managing via the web interface.
See the REST API article for an introduction to using this API. You can find the reference documentation in your Checkmk site’s web interface. There you can familiarize yourself with the syntax of the requests and the structure of the responses. You can access all important REST API entries in the Checkmk web interface via the navigation bar in the Help > Developer resources menu.
Finally, see the REST API article for examples which explains how to perform actions on hosts and folders via the command line, such as viewing the folder structure and the hosts in a folder, creating a host in a specific folder, and more.
11. Files and directories
| File path | Function |
|---|---|
|
In this directory the folder structure in the Setup below the Main folder is mapped by a subdirectory structure. If a folder is created in the GUI, a new directory is also created in the file system. Here Checkmk ensures that the names of the directories are unique and only characters that are allowed in the file system are used. For example, a space is replaced by an underscore. |
|
Configuration file for all hosts in the Main folder. For hosts in subfolders of Main, there is a file with the same name in each subdirectory. |
|
This hidden file contains the display name in the GUI (Main) and all other properties of this directory.
A file |
