1. Introduction
In this article we will show you everything on the subject of user management in Checkmk. But before we can go into the details, we first have to clarify a few terms.
In Checkmk, a user is someone who has access to the user interface. A user has one or more roles. These roles are the basis for permissions.
As soon as a user is responsible for specified hosts and services, they are identified as a contact. A contact normally only sees their own hosts and services in the monitoring environment and may be notified of any problems with these.
There are also users who are not contacts.
An example of this is cmkadmin, which is automatically generated when a site is created.
This user is allowed to see all hosts and services, but only because the Administrator role contains the permission See all hosts and services, and not necessarily because they would be a contact for everything.
If a contact was created for the sole purpose of notification (e.g. to forward notifications to a ticket system), then it may be useful to create it in such a way that no login to the interface is possible.
A contact is always a member of one or more contact groups.
The purpose of these groups is to assign contacts to hosts and services.
For example, the contact hhirsch could be in the contact group linux and this in turn could be assigned to all Linux hosts via a rule.
A direct assignment of contacts to hosts or services is not possible and could in fact create difficulties in practice (e.g. when a user leaves the organization).
In summary:
Users can use the user interface.
Contacts are users who are responsible for specific hosts and services.
Contact groups define what a user is responsible for.
Roles define what permissions a user has.
2. User management in the configuration environment
2.1. Overview
The user management page can be found under Setup > Users > Users. In a freshly created site, this page looks like this (only shortened by a few table columns in the image):
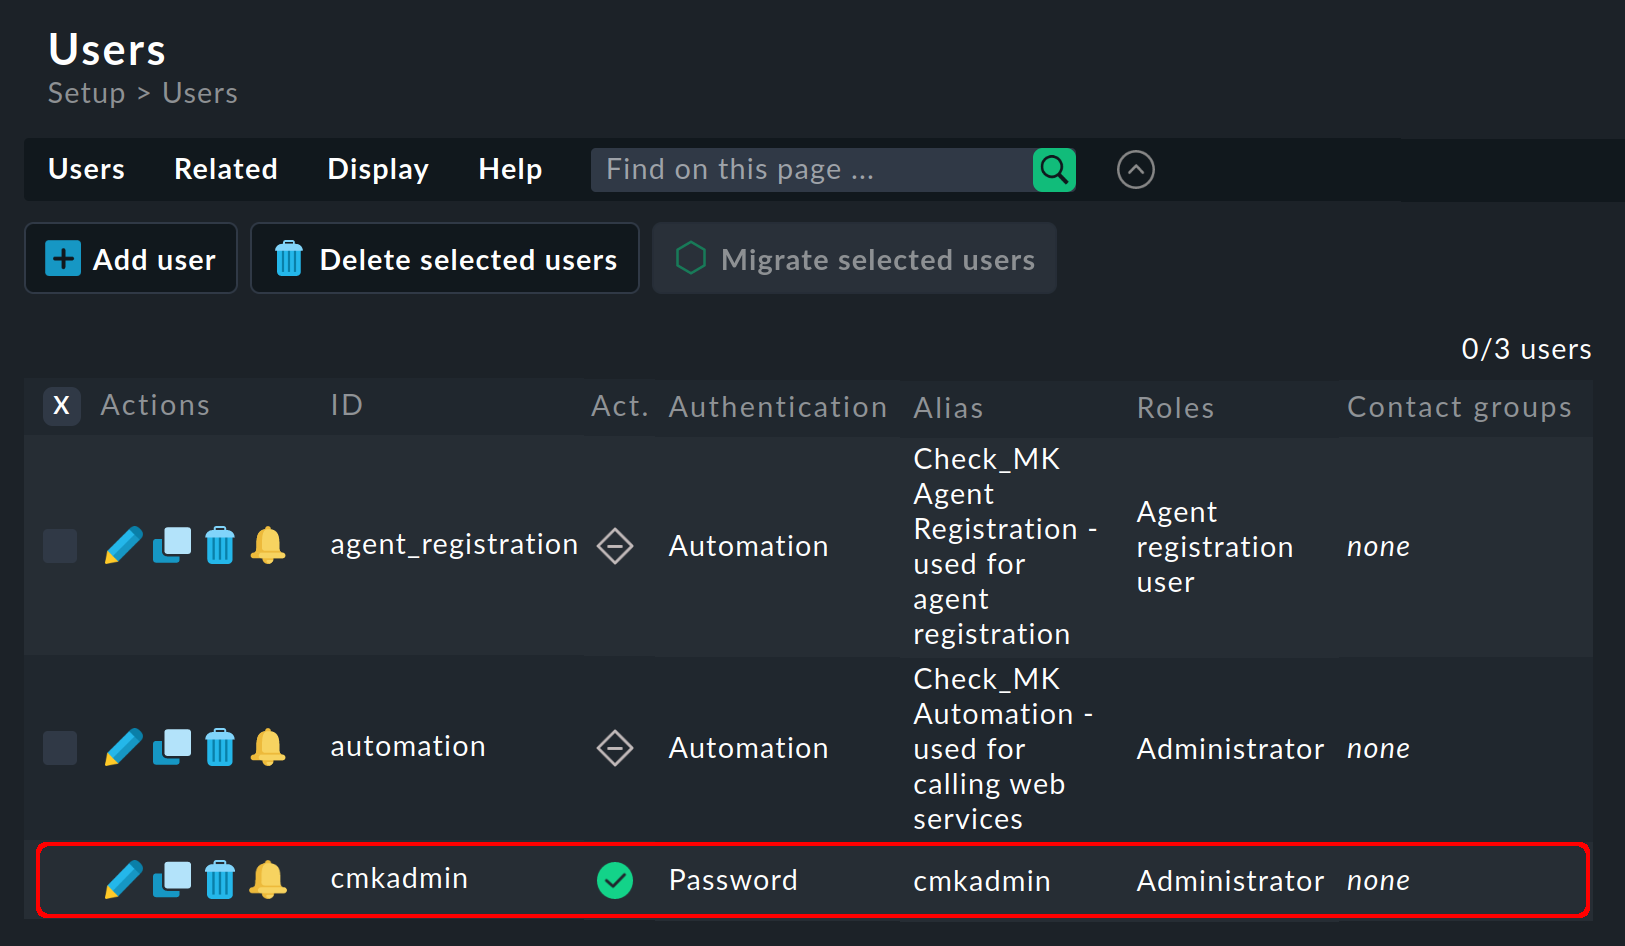
The image above shows all users that were automatically created when the site was created:
An automation user, followed by the single user (cmkadmin) for the interactive login with password.
With the Checkmk appliance, this user can have a different name as you define its name and password yourself.
This cmkadmin user has the following properties:
They have the Administrator role, and therefore all permissions.
They are not a contact for anything and receive no notifications.
They can still see everything (because of their Administrator role).
You choose this user’s password when creating the site. You can also change this password at any time later on.
The form for creating a new user (with ![]() ) or editing an existing user (with
) or editing an existing user (with ![]() ) is divided into five sections.
The first section deals with the identity.
) is divided into five sections.
The first section deals with the identity.
2.2. Identity
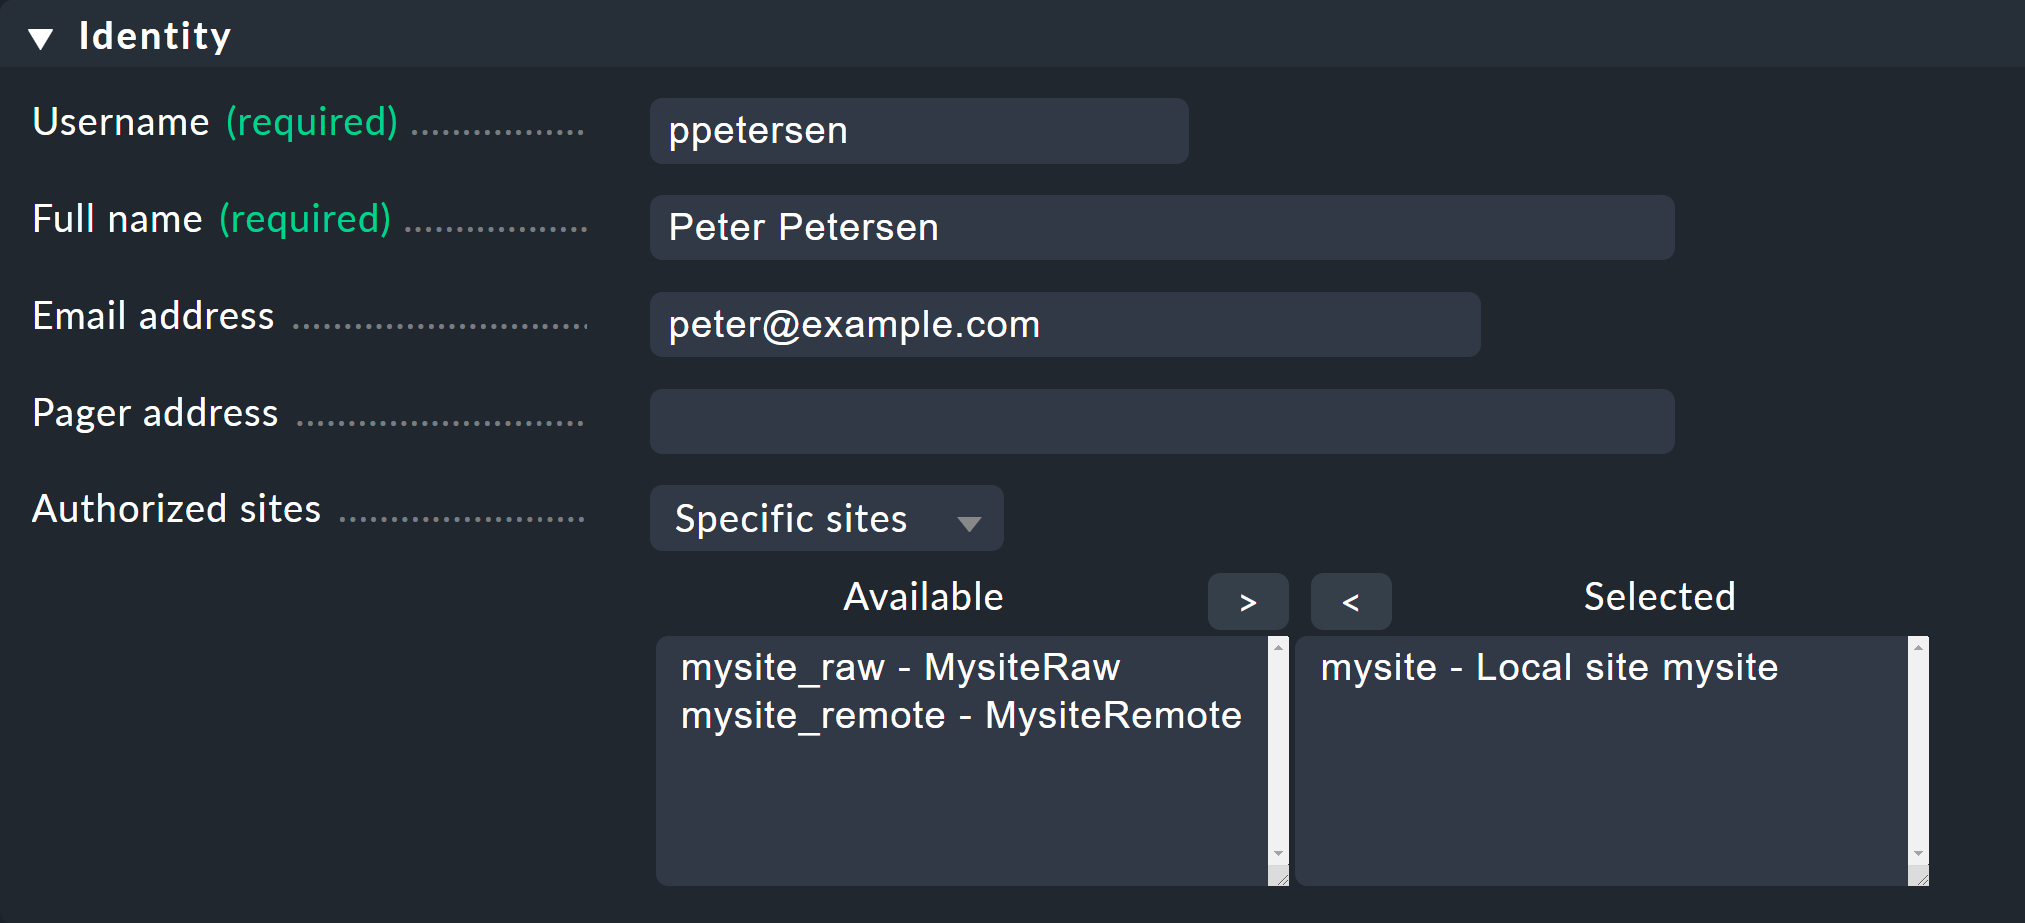
As always in Checkmk, the ID of a dataset (Username) cannot be changed later. It is used for logging-in and also as an internal key in all files and data structures.
The email address is optional and is only required if the user is to become a contact who is to be notified by email (SMTP configuration required). Likewise, the Pager address field is intended for notification via SMS or similar systems. If you write your own notification scripts you can access the values in these fields and use them for any purpose.
With Monitored sites you can optionally restrict which of the existing sites may be accessed. This is particularly practical for very large environments, such as a distributed monitoring with hundreds of sites. If a user only needs a certain number of these sites for his hosts, the GUI will only contact the selected sites to set up views — which in turn greatly improves performance.
2.3. Security
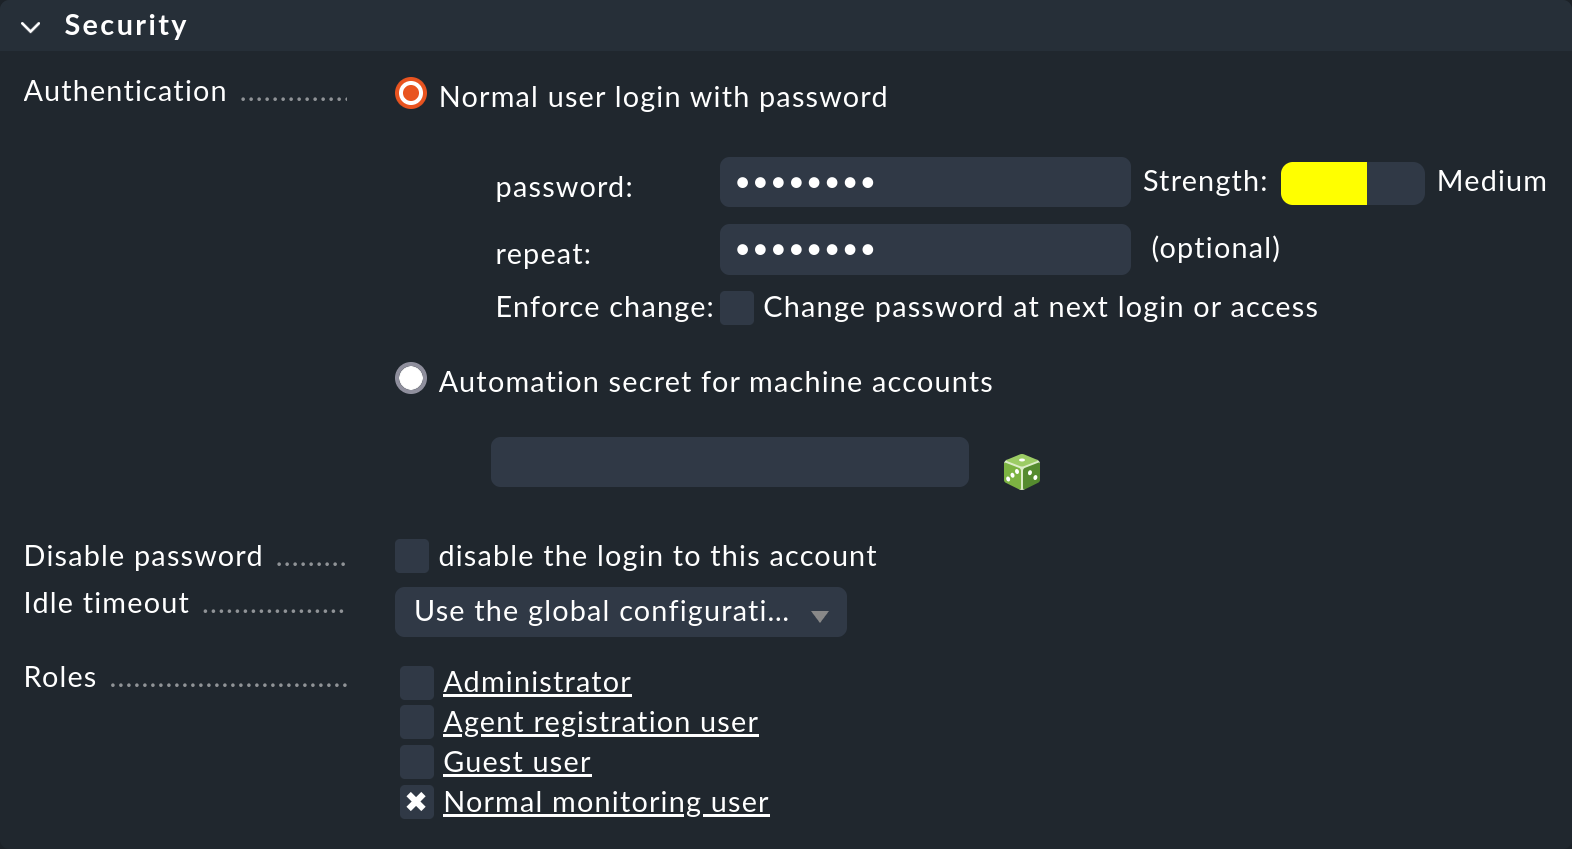
This box is for login and authorization. The Automation secret for machine accounts option is meant for accounts that access Checkmk via HTTP/HTTPS and authenticate themselves via the URL. We will show you how to do this below.
For the roles, you must select at least one. In theory you could give a user multiple roles, and they would then get the rights from all of these roles. With the predefined roles, however, this would make little sense.
If you lock users with the disable the login to this account option, they will be appear in the table with the ![]() icon.
They will no longer be able to log in, but will still remain in the system.
If a user is a contact, the notifications will not be affected and the user will continue to receive emails, etc.
If the user was logged in at the time of the lockout, they will be automatically logged off.
icon.
They will no longer be able to log in, but will still remain in the system.
If a user is a contact, the notifications will not be affected and the user will continue to receive emails, etc.
If the user was logged in at the time of the lockout, they will be automatically logged off.
2.4. Contact groups

As soon as you assign a user to one or more contact groups, this user becomes a contact. When a new site is created, the contact group Everything will also be created, which always contains all hosts and all services. A user in this group will then be automatically responsible for all hosts and services.
2.5. Notifications

In the Notifications box, you can use the Receive fallback notifications option to specify that this contact will receive notifications when no notification rule applies.
2.6. Personal settings
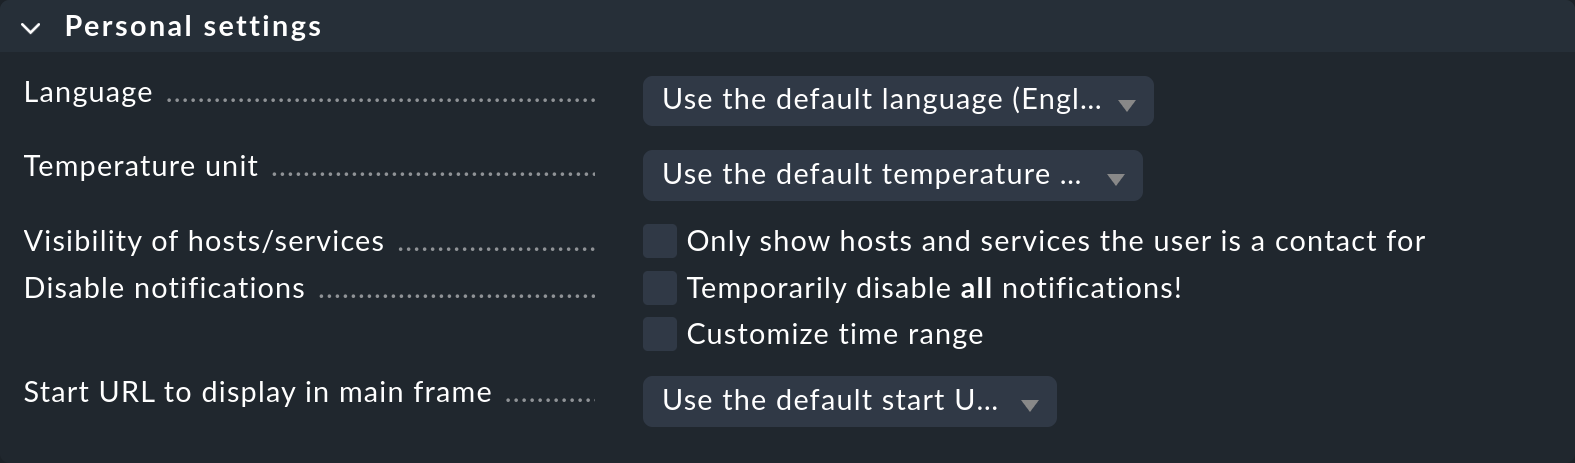
Users can also change all of the settings in this box themselves via User > Edit profile (except with the Guest user role). Apart from the selection of the interface language these settings are rarely required. Details can be found as always in the inline help.
2.7. Interface settings
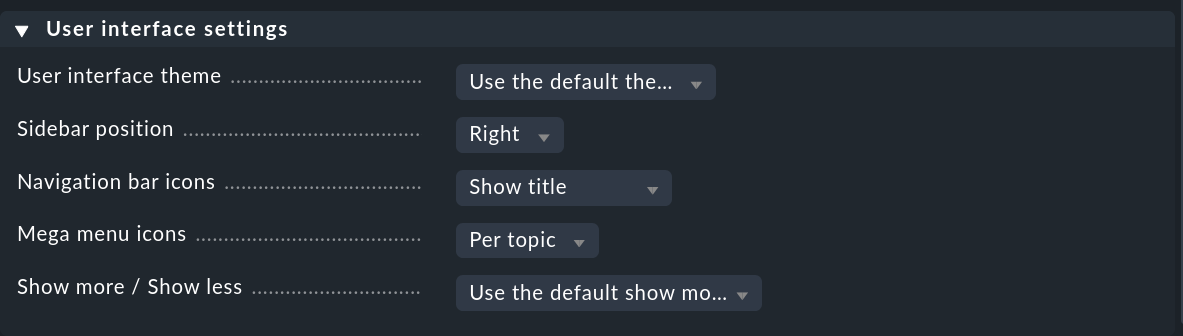
Users can also customize the interface settings themselves using User > Edit profile. Of particular interest is the Show more / Show less option to determine whether Checkmk should show more or show less in the interface. If you always want to see everything, you can force this here with Enforce show more.
3. Contact groups
3.1. Creating and editing contact groups
Contact groups are the link between hosts and services on the one hand and contacts on the other. Each contact group represents a responsibility for a specific area in your IT landscape. For example, the contact group 'SAP' could comprise all persons who maintain SAP systems and be assigned to all hosts and services that provide such services in this environment.
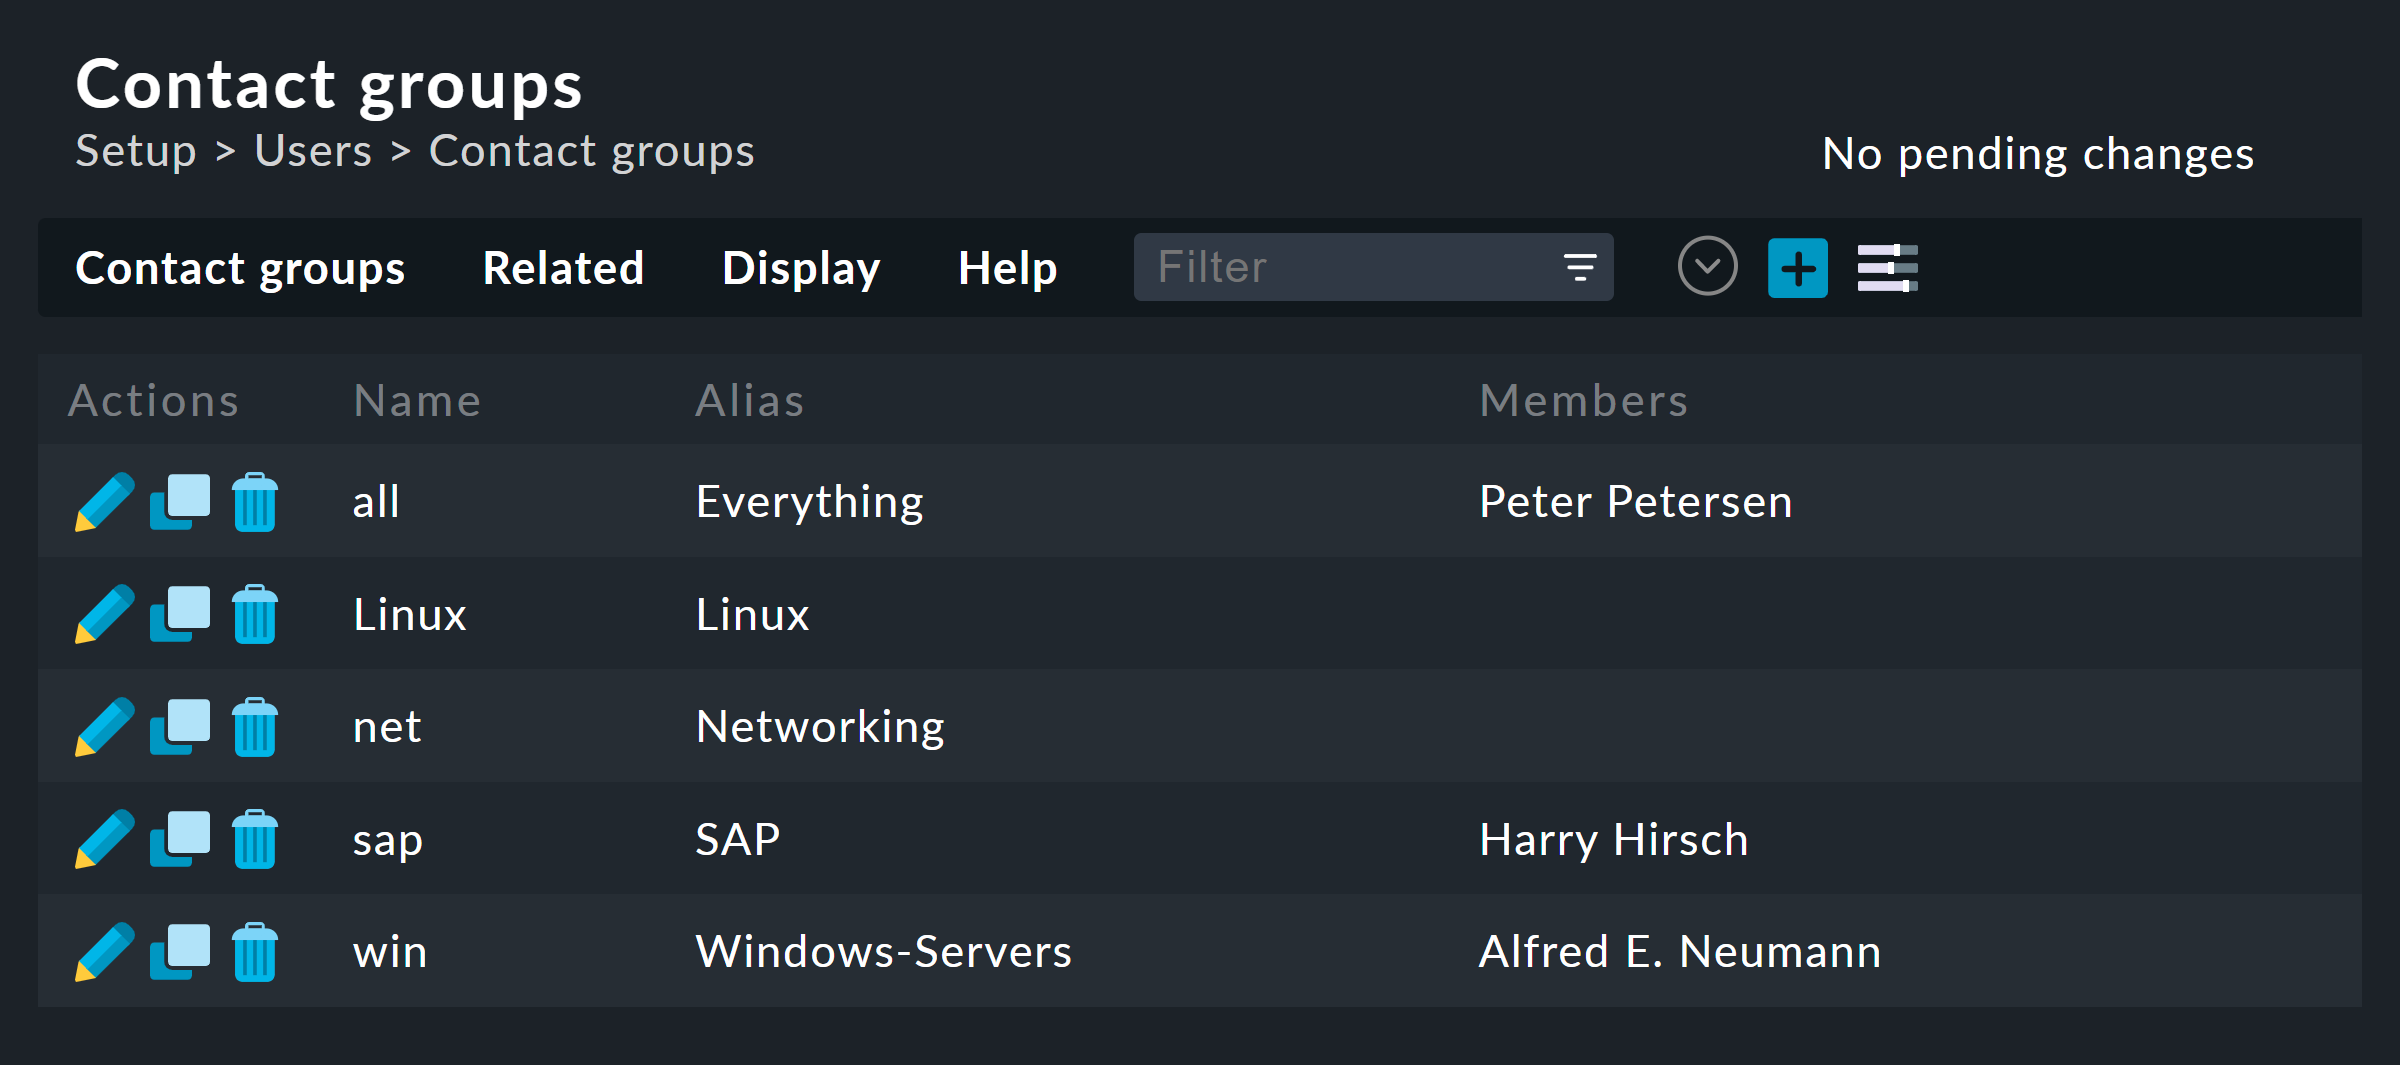
You manage the contact groups via Setup > Users > Contact groups. The following figure shows this module with three manually created contact groups:
Creating a new group is trivial. As always, the ID is permanent and the alias is a display name that you can change later at any time:

The new contact group is empty in two respects — it contains neither contacts nor hosts or services. The assignment of contact groups to contacts is done via the user profiles, as you have already seen when editing the user.
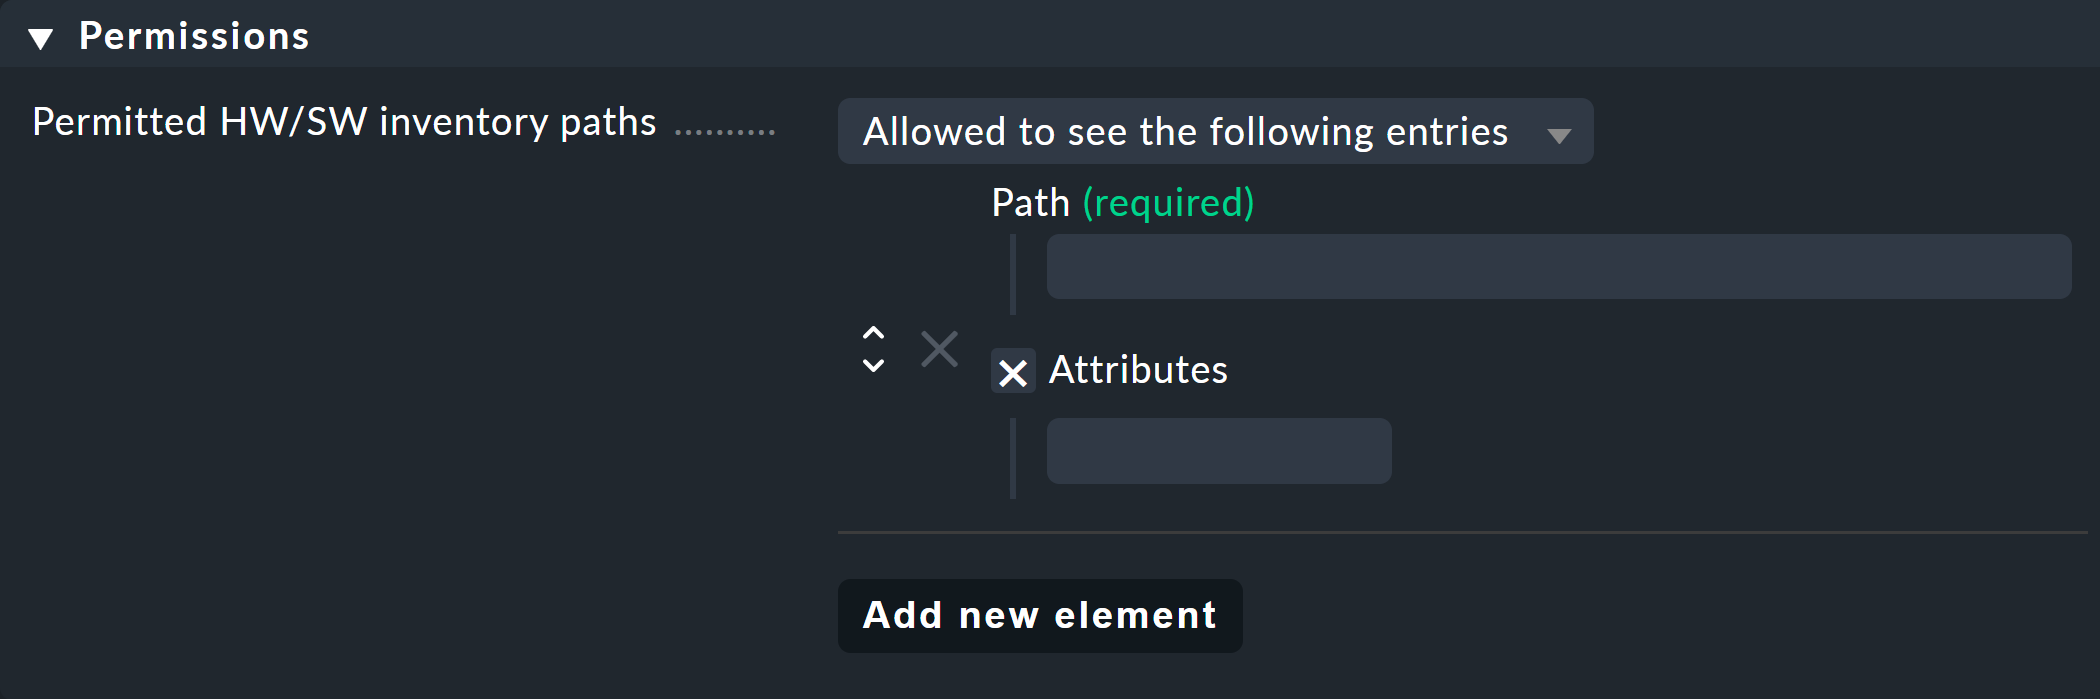
Setting inventory visibility
In addition, you can set the visibility of the inventory found with the HW/SW inventory. By default the complete inventory is visible, but it can also be completely suppressed or selectively enabled with the Allowed to see parts of the tree option and the internal inventory paths:
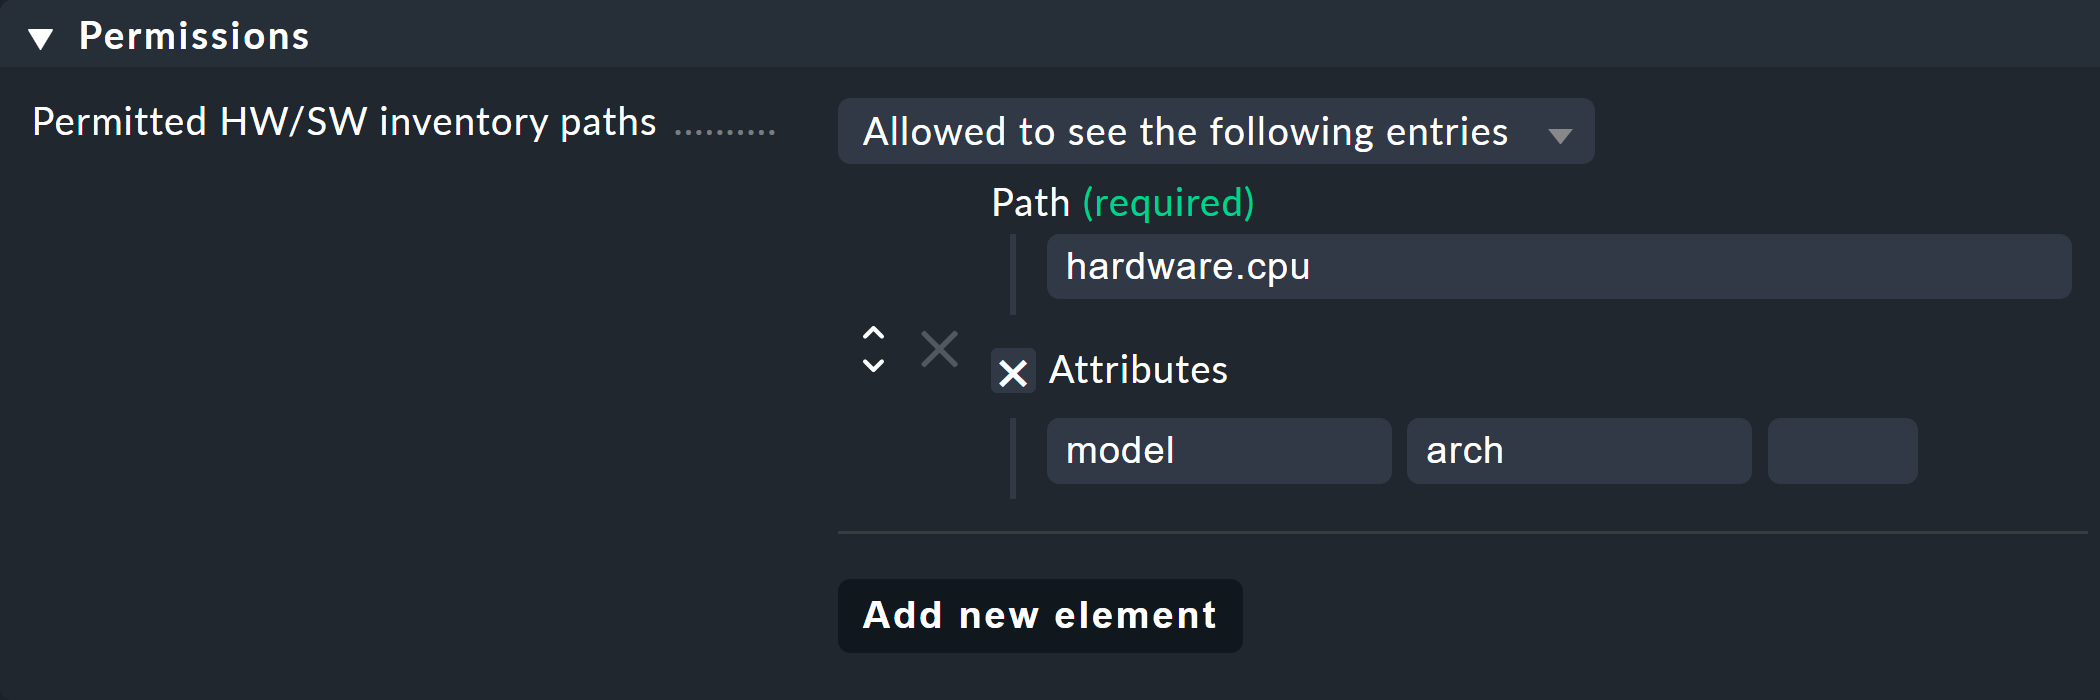
To be able to enter the required path information, you must first read it out of the inventory data. You can then use this information to populate the paths and keys to make, for example, only some selected inventory data of the processor (model and architecture) visible:
3.2. Adding hosts to a contact group
There are two methods for including hosts in contact groups: via folder and via rules. You can also combine both methods. In this case, an aggregation of the respective contact groups will be assigned to the host.
Assigning using folders
You can access the properties of a folder via Folder > Properties while you are in the folder. There you will find the Permissions option. Activate this checkbox to access the selection of contact groups:
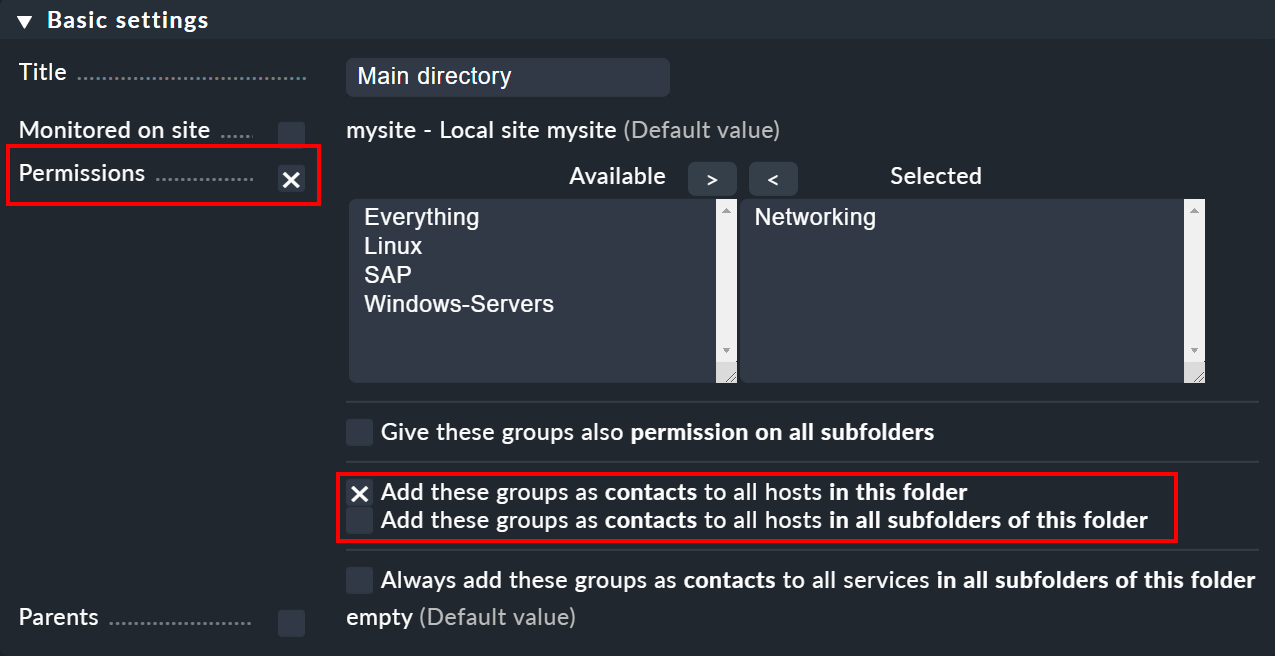
The real point of this option is to set permissions for maintaining hosts, which we explain in detail below.
As soon as you have assigned permissions for specific contact groups, you can in turn enter these groups as contact groups for the hosts in the monitoring. In doing so, you can decide whether the assignments should also apply to hosts in subfolders and whether these hosts' services should also explicitly receive these groups. Services without explicit assignments inherit all of a host’s contact groups — even those assigned by rules.
The inheritance of the Permissions attribute over the folders is overridden at this point. This allows you to add more contact groups to subfolders. The assignment is therefore also done cumulatively via all parent folders, if in these parent folders the Add these groups as contacts to all hosts in all subfolders of this folder option has been activated. |
By the way, you can also find the contact group options in a simplified form directly in the details for a host. This means that you can also use them to assign contact groups to individual hosts. However, as this can quickly become quite confusing, you should only do this in exceptional cases, and, if it becomes necessary, you may prefer to work with rules.
Assigning using rules
The second method — assigning contact groups via rules — is a little more cumbersome, but much more flexible. And it is very useful if you have not set up your folder structure according to structured organizational principles and therefore cannot clearly assign folders to contact groups.
The Assignment of hosts to contact groups rule set required for this can be found via Setup > Hosts > Host monitoring rules. In this rule set, you will find a predefined rule that was generated when the site was created, and which assigns all hosts to the Everything contact group.
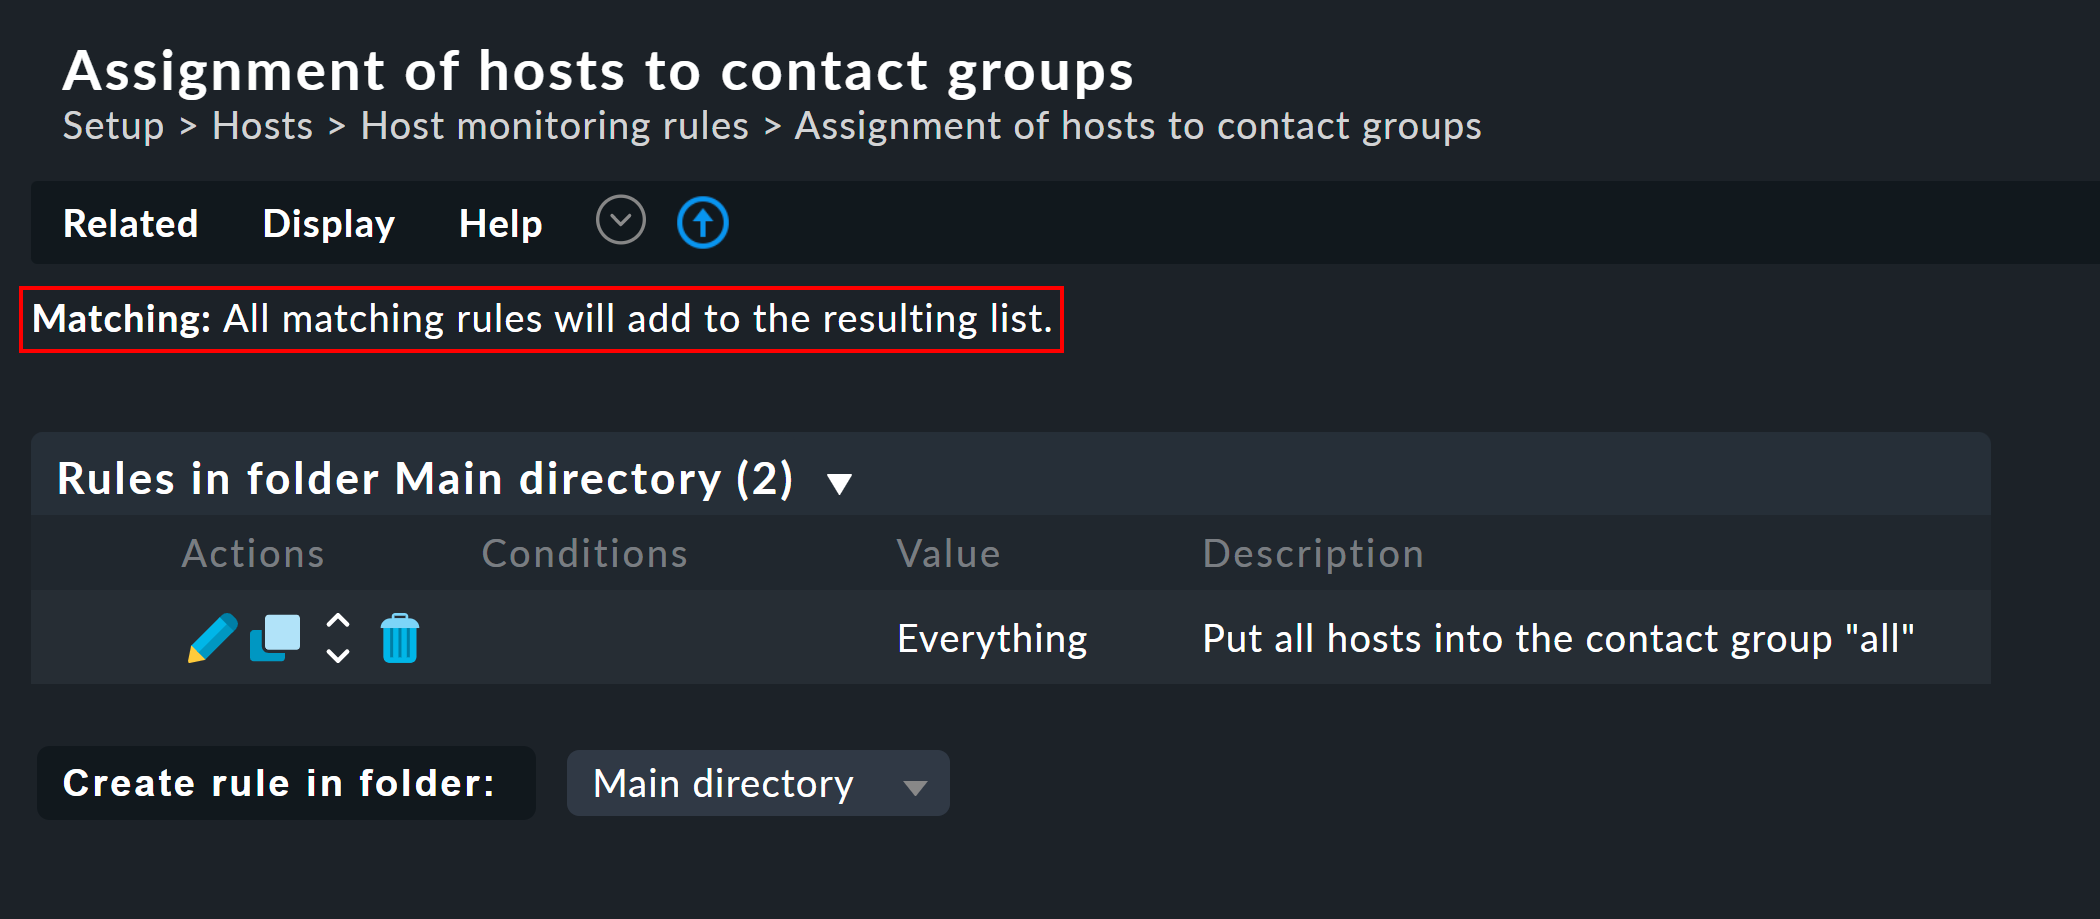
Note that this rule set is defined in such a way that all of the applicable rules are evaluated and not only the first one! It can useful that a host belongs to more than one contact group. In such a case you will need a rule set for each assignment.

3.3. Including services in contact groups
It does not always make sense for a service to be in the same contact groups as its host. You can therefore use the Assignment of services to contact groups rule set — independently of the host’s contact groups. The following rules apply:
If a service is not assigned a contact group, it automatically receives the same contact groups as its host.
As soon as at least one contact group is explicitly assigned to a service, it no longer inherits the contact groups from the host.
In a simple environment, it is therefore sufficient if you only assign contact groups to the hosts. As soon as you need more differentiation, you can also create rules for the services.
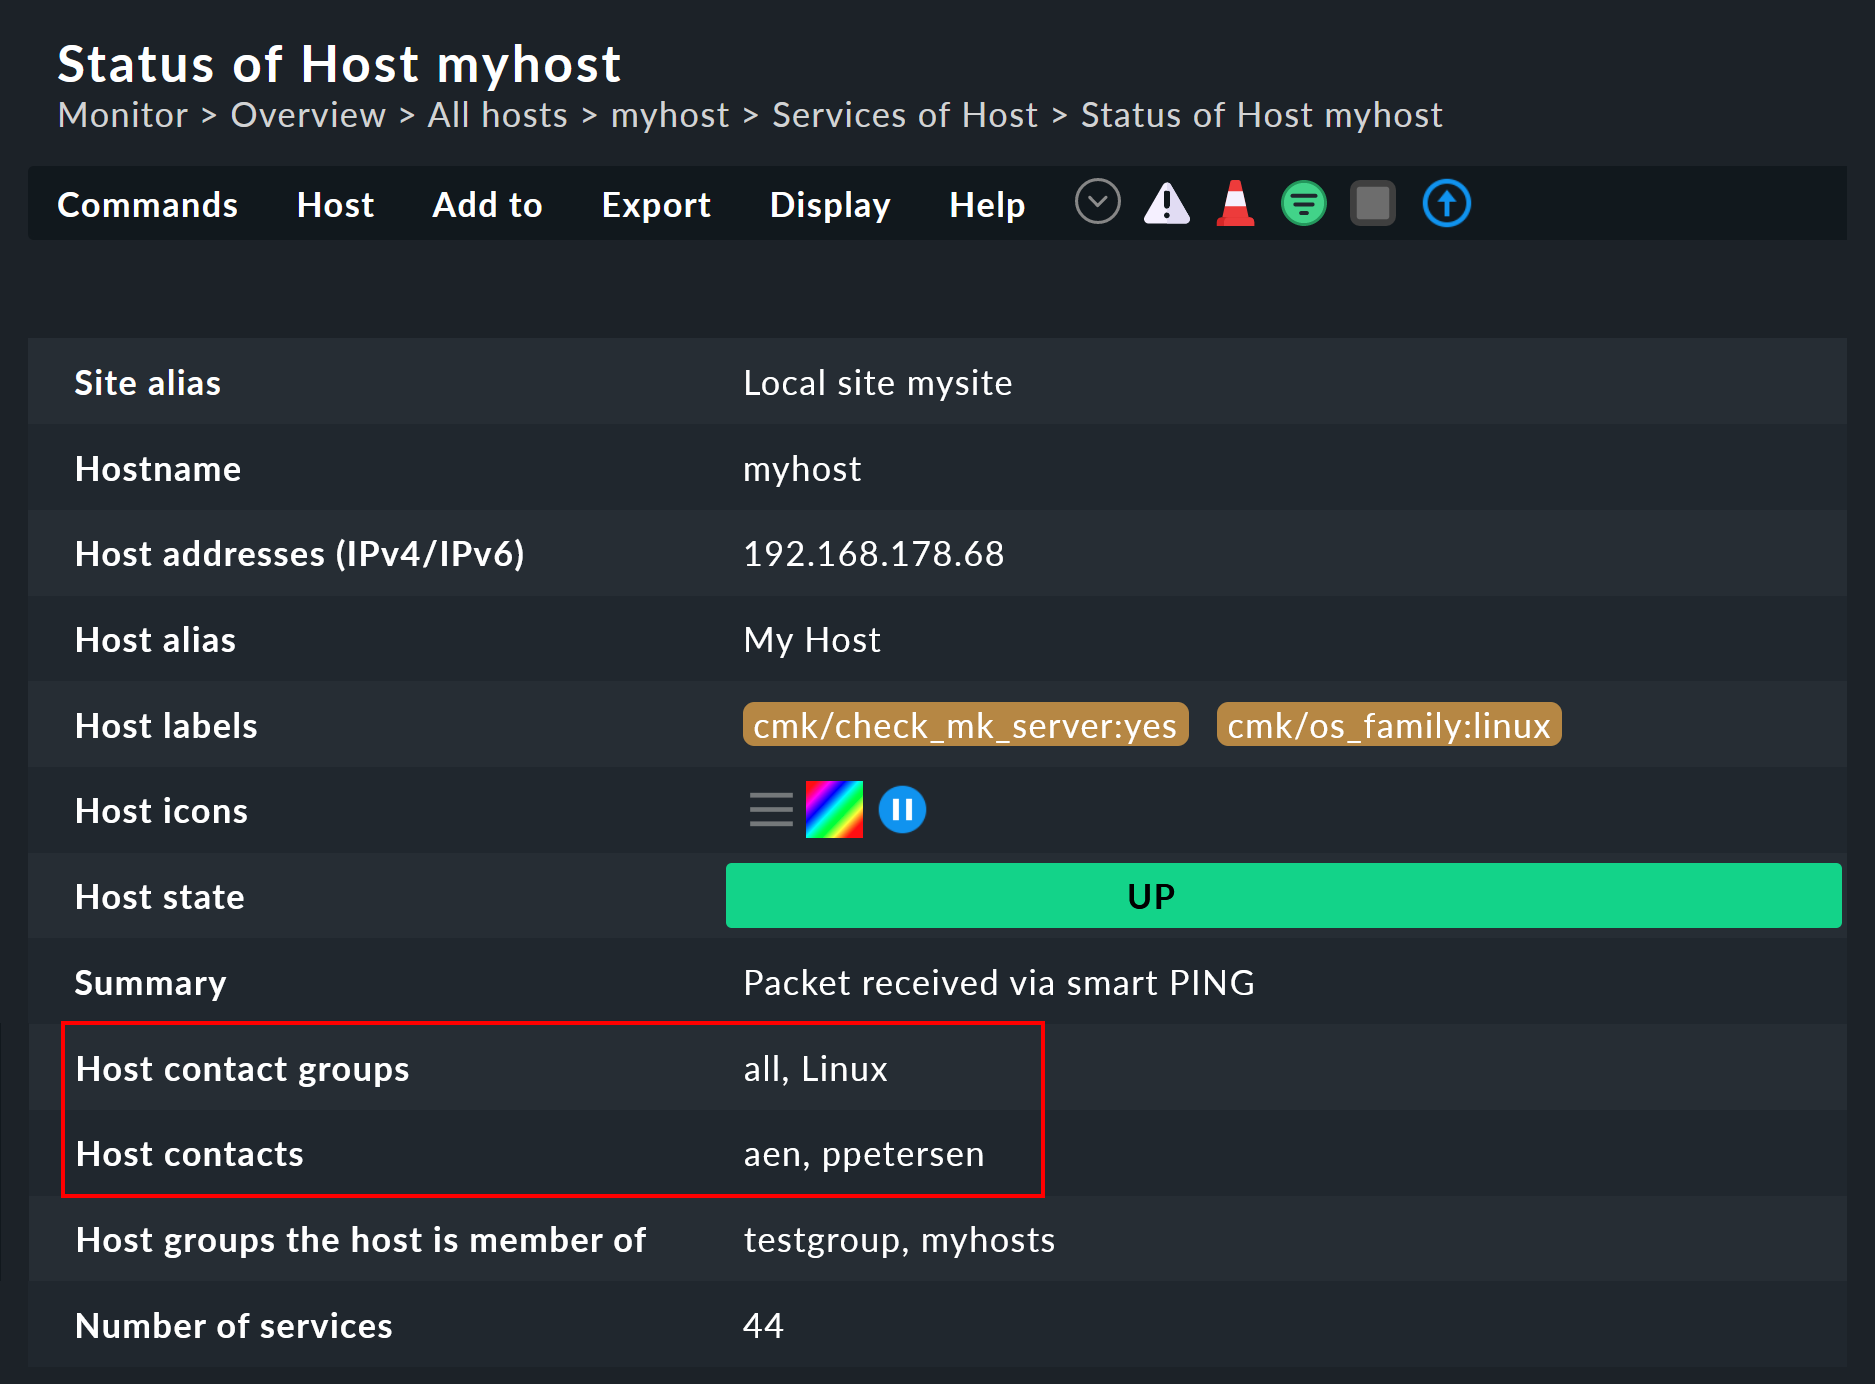
3.4. Controlling the assignments
You can check whether you have correctly configured all rules and folders by looking at the details for a host or service in the monitoring environment. There you will find the entries Host contact groups and Host contacts (or Service contact groups and Service contacts respectively), which list the actual assignments for this object:
4. Visibility of hosts and services
4.1. Overview
The fact that normal users (the Normal monitoring user role) only see those objects for which they are a contact is all the more important the larger your monitoring environment is. This not only provides an uncluttered overview, but also prevents users from intervening where they have no business.
As an administrator (the Administrator role) you are of course always allowed to see everything. This is controlled via the See all host and services permission. In your personal settings you will find at Visibility of hosts/services the checkbox Only show hosts and services the user is a contact for. With this you can voluntarily give up see all and only display the hosts and services for which you are a contact. This option is intended for dual roles — that is, for someone who is both an administrator and also a normal user.
The Guest user role is preset so that its users can also see everything. Intervention or personal settings are disabled here.
For normal users, the visibility in the monitoring environment is implemented in such a way that the hosts and services for which you are not a contact for do not appear to even exist in the system. Among other things, the following elements take visibility into account:
4.2. Visibility of services
As we have shown above, it can be possible that you are a contact for a host but not for all of its services. Nevertheless, in such a case you will be able to see all of the host’s services in the GUI.
This exception is set by default because it is usually useful. In practice, this means, for example, that the colleague who is responsible for the actual host can also see any services that are connected to that host — they do not however receive any notifications for the services!
If you do not like this approach, you can change it in the commercial editions via Global settings > Monitoring core > Authorization settings. If you there change the Services setting to Strict - Visible if user is contact for the service, users will only be able to see services if they have been directly-assigned as a contact for the service.

By the way, all of this has nothing to do with the fact that a service inherits the contact groups of its host if no contact groups of its own have been assigned to the service, since then you would be be a contact for the service, and thus receive its notifications.
4.3. Host and service groups
The second option in the global Authorization settings concerns host and service groups. You can normally see a group whenever you can see at least one element of the group, however the group will then look as if it contains only the elements that are visible to you.
Switching to Strict - Visible if all members are visible will hide all groups for which you are not a contact for at least one host or service.
Note that these two visibility settings have no influence on the notifications.
5. Notifications
Contact assignments also have an influence on the notifications. Checkmk is preset so that all contacts for the affected host or service are notified in the event of a problem. This is done by a global notification rule that is automatically generated when new sites are created. This is a very sensible feature.
Nevertheless, if necessary, you can adapt a rule or supplement it with further rules, so that in extreme cases notifications can be made completely independently of the contact groups. A common reason for this is that a user wishes not to receive certain notifications, or vice versa, to be informed about problems with individual hosts or services, even if they are not directly responsible for them (and therefore not an explicit contact).
Details on the global notification rule provided by Checkmk can be found in Beginner’s Guide.
6. Roles and permissions
6.1. Predefined roles
Checkmk always assigns permissions to users via roles — never directly. A role is nothing more than a list of permissions. It is important that you understand that roles define the level of permissions and not a reference to any hosts or services. That is what contact groups are for.
Checkmk comes with the following predefined roles, which can never be deleted, but can be customized as desired:
| Role name | Alias | Permissions | Function |
|---|---|---|---|
|
Administrator |
All permissions — especially the right to change permissions. |
The Checkmk administrator who maintains the monitoring system itself. |
|
Normal monitoring user |
May only see their own hosts and services, make changes in the web interface only in shared folders for these, and generally may not do anything that affects other users. |
The normal Checkmk user who accesses the monitoring and reacts to any notifications. |
|
Agent registration user |
The permission to register a host’s Checkmk agent with the Checkmk server for TLS-encrypted data transmission — nothing else. |
This role is assigned to the automation user |
|
Guest user |
May see everything but not change anything. |
Guest is intended simply for 'looking', for which all guests share a common account. Also useful for 'public' status monitors hanging on a wall. |
|
Empty template for least privilege roles |
Cannot do anything. |
This role is not intended for direct assignment. Instead, it can be used to create new roles with only the minimum required permissions. Should new permissions be added or existing ones change in future Checkmk versions, you can still be sure that a role derived from no_permissions will not receive any new, unexpected permissions. |
The roles are managed via Setup > Users > Roles & permissions:
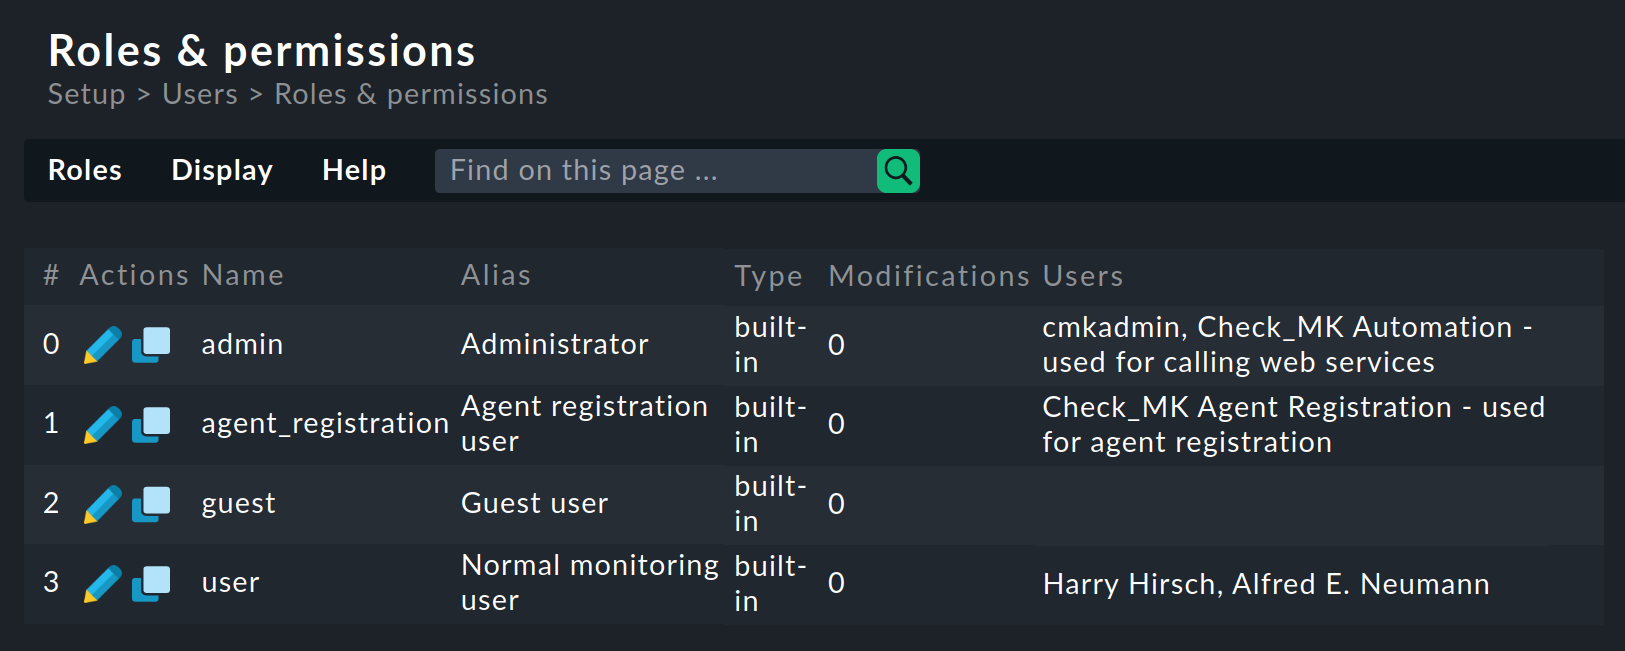
By the way, when creating a new Checkmk site, only one user (cmkadmin) with the Administrator role is created for the login to the Checkmk interface.
The other possible roles will not be used for the time being.
If you require a guest user, you must create this yourself.
6.2. Customizing existing roles
As usual, the ![]() takes you to the edit mode for a role:
takes you to the edit mode for a role:
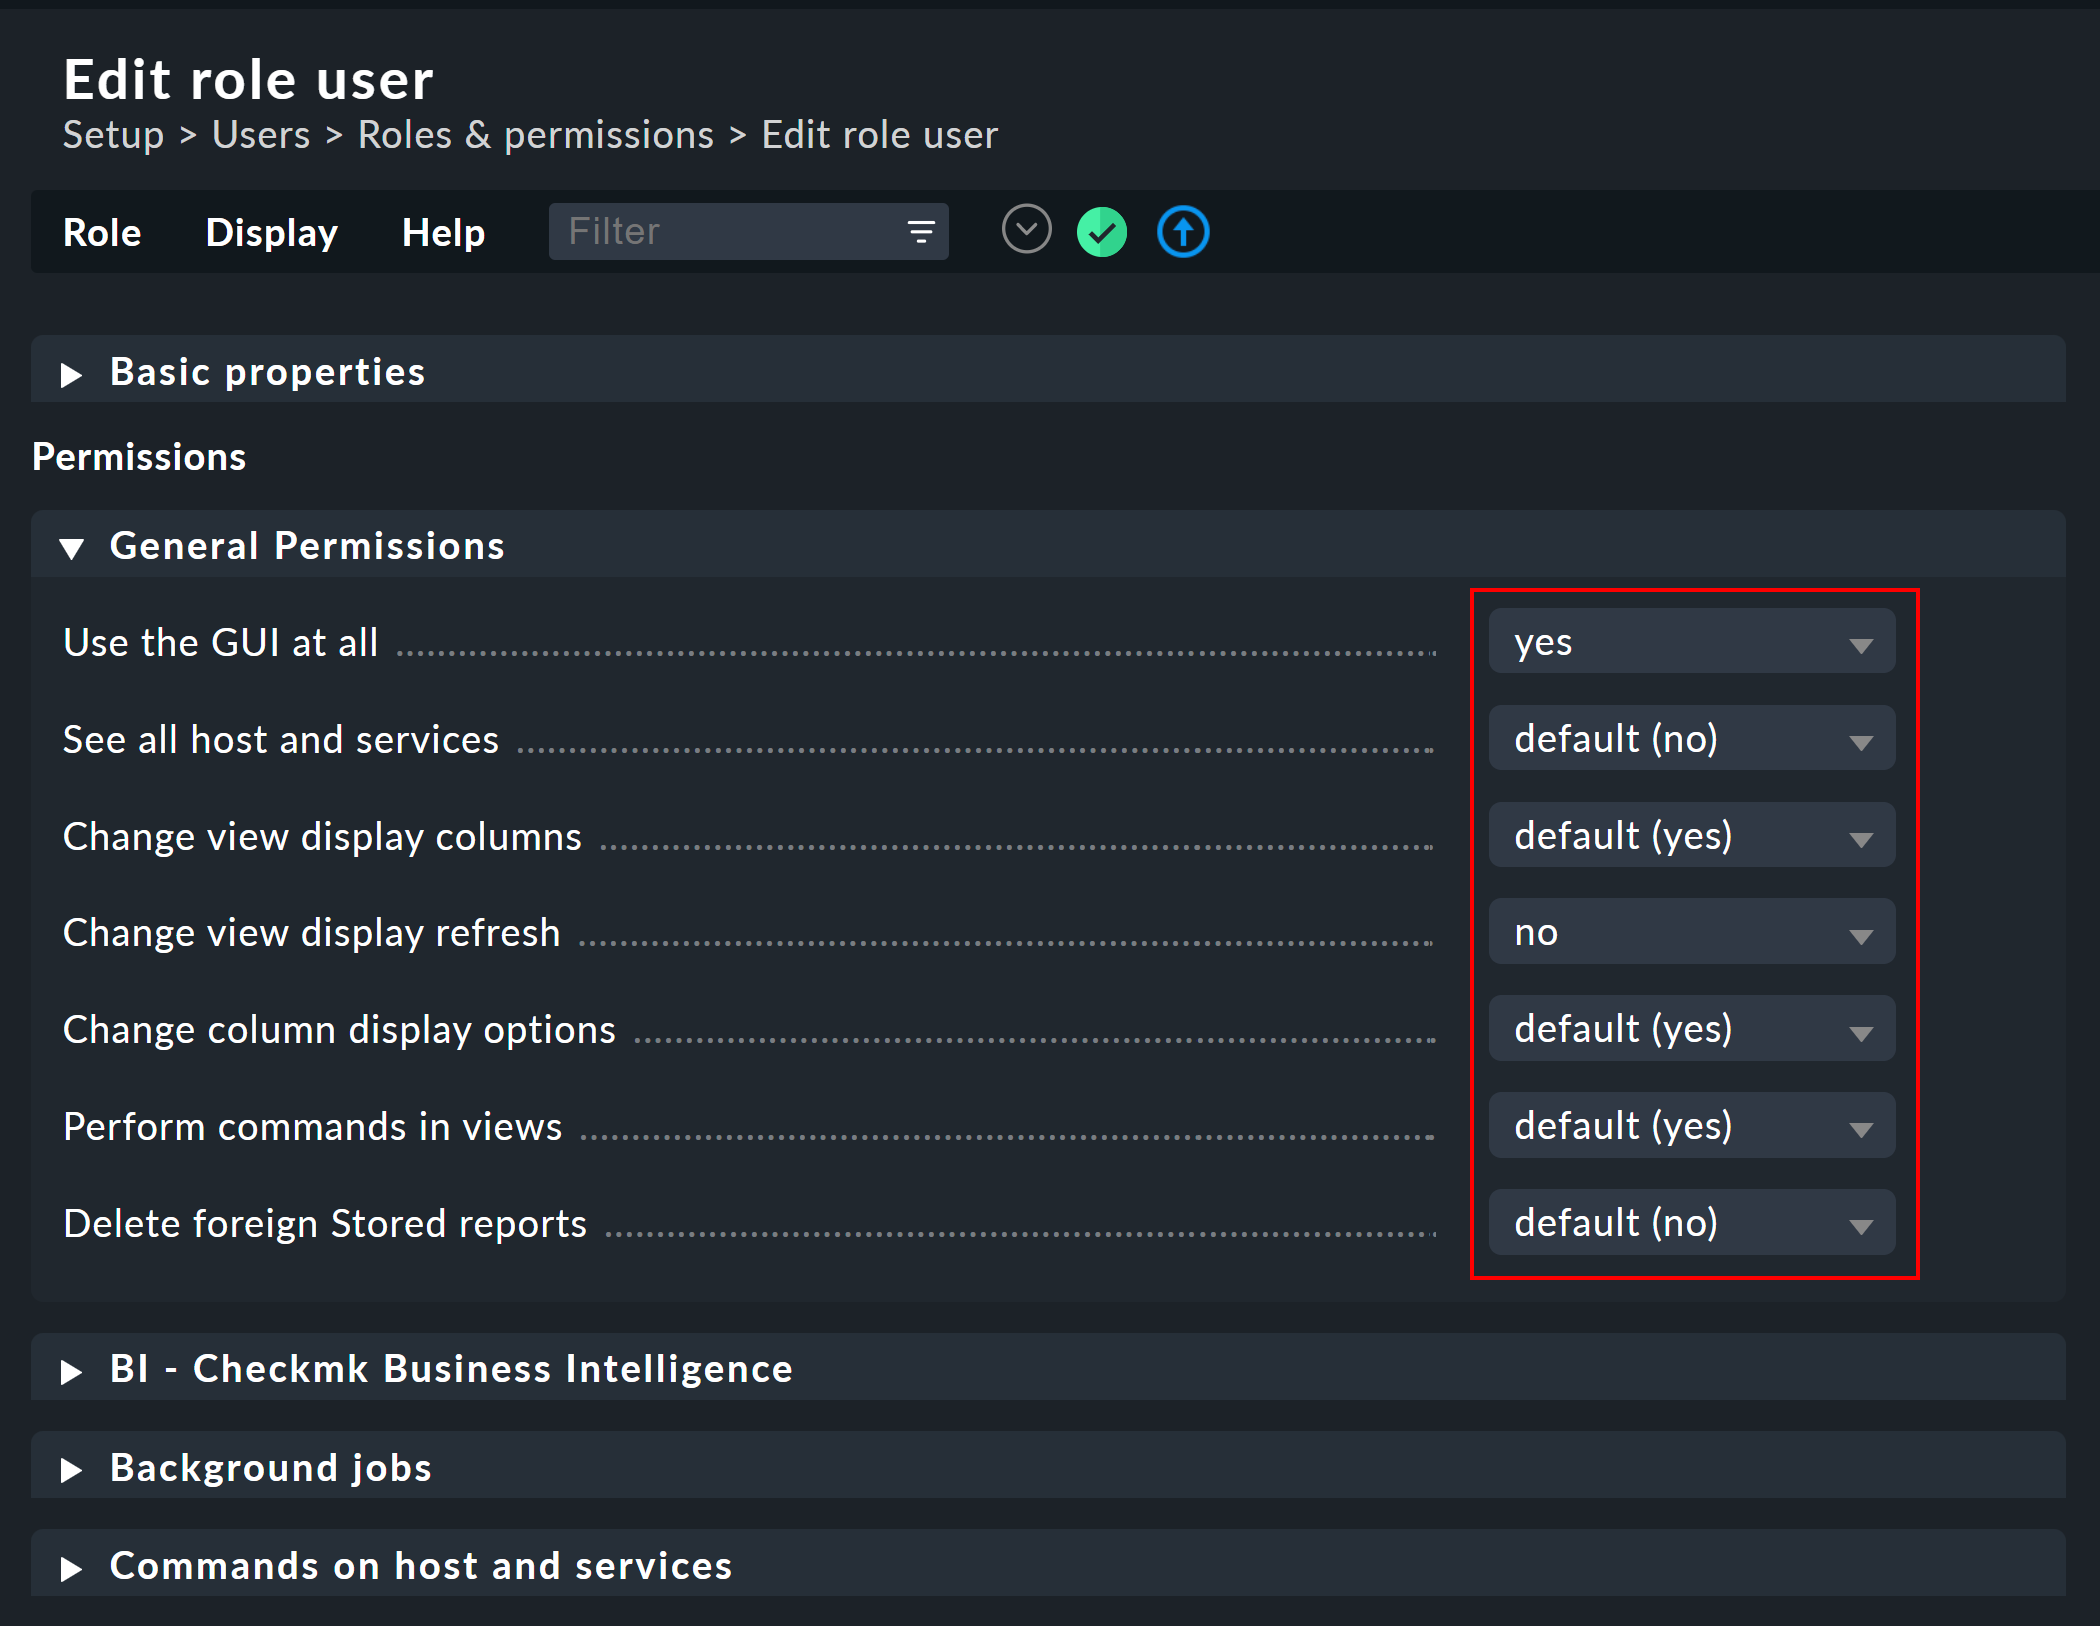
You can find out what the various permissions mean (shown here in excerpts) from the inline help.
The special feature here is that for each permission there are three choices: yes, no and default (yes) or default (no). At installation all values are set to default. For the authorization itself it makes no difference whether you have set yes or default (yes). It is however possible that installing a new version of Checkmk can change a default value (even if this happens very rarely). A setting you have explicitly made would then not be affected by the installation.
In addition, this principle allows you to very quickly recognize where your Checkmk installation might have deviated from the standard.
6.3. Defining own roles
You may be surprised that there is no button for creating a new role.
There is a deliberate reason for this.
You create new roles by deriving them from existing roles using ![]() Clone.
The new role is not simply created as a copy, but retains its relationship to the original role (Based on role):
Clone.
The new role is not simply created as a copy, but retains its relationship to the original role (Based on role):

This connection has an important function. Because all permissions for the cloned role that are not set explicitly (i.e. are still set to default) will be inherited from the source role. Subsequent changes in the source role will be carried-over to the new cloned role. This is very practical if you consider how many permissions there could be in the original role. With a simple copy, you could easily lose track of what is actually special about your own role that you have defined for yourself.
This derivation function also solves another problem: Since we continue to develop Checkmk new permissions are continually being added. Each time we then decide in which of the three roles Administrator, Normal monitoring user and Guest user the new permission should take. Since each of your own roles is derived from one of the predefined roles, the new permission is automatically preset to a sensible value. It would be very impractical if, for example, you defined your own user role and new permissions were always missing there. You would have to adapt your role for every new feature, in order for your users to be able to use them.
6.4. Comparing roles with the matrix view
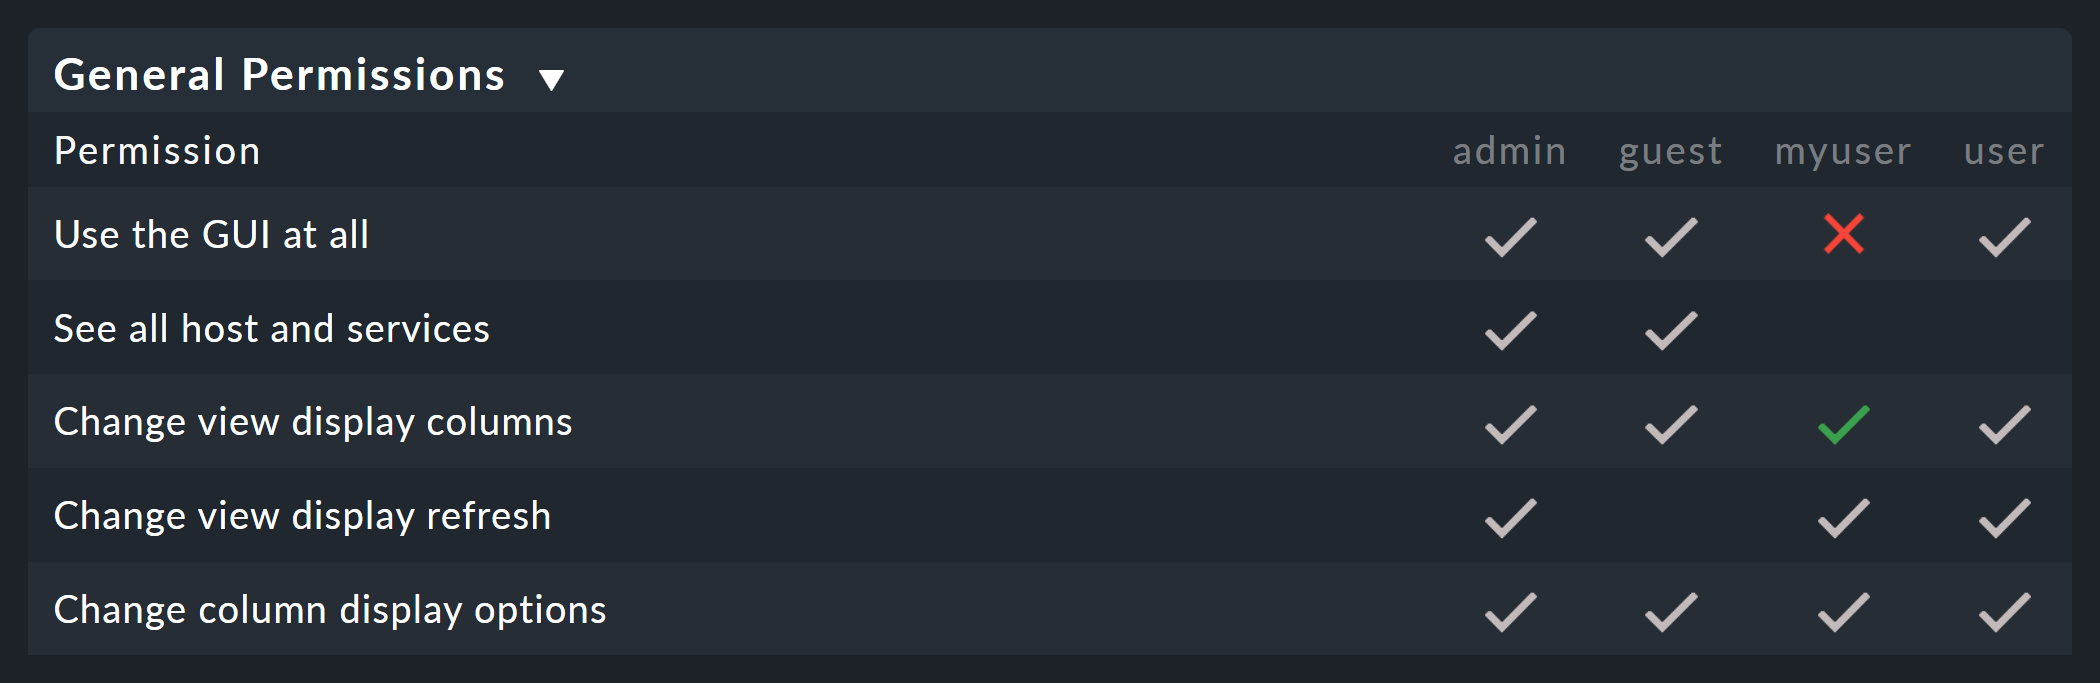
If you want to compare the permissions in the individual roles, you can be assisted by the matrix view, accessible via Setup > Users > Roles & permissions > Roles > Permission matrix.
This menu option creates the following view, in which you can not only compare the permissions of the individual roles,
but also see where permissions have been explicitly set (![]() ) or removed (
) or removed (![]() ).
).
7. Personal settings
Each user can manage a small number of the user settings for their own profile. A detailed description of all of the available options can be found in the article on the user interface.
An additional note for distributed monitoring: In a distributed environment, any new settings are immediately transferred to all monitoring sites. This is the only way to ensure that, in particular, a newly-assigned password also works immediately everywhere — and not only following the next activation of changes. However, this only works for sites that are accessible via the network at that time. All other sites receive the updates at the next successful activation of changes.
8. Special users
Up to this point, we have described how to create a 'normal user’. However, for various reasons, there are also individual users who have special rights or functions.
These include, for example, administrators and automation users. We will go into their special features below.
8.1. Administrator
When installing Checkmk, an administrator is created by default — as already mentioned above.
This administrator is named cmkadmin.
You can now continue to work with this administrator as you wish, however you may not want to use this default administrator.
For example, due to internal company regulations, because you want to define multiple administrators, or to comply with security recommendations such as the OWASP Application Security Verification Standard (ASVS).
First of all, an administrator is a user like any other. It is therefore created as described in the chapter User administration in the configuration environment. However, the rights that are assigned to the user via the selected role are decisive.
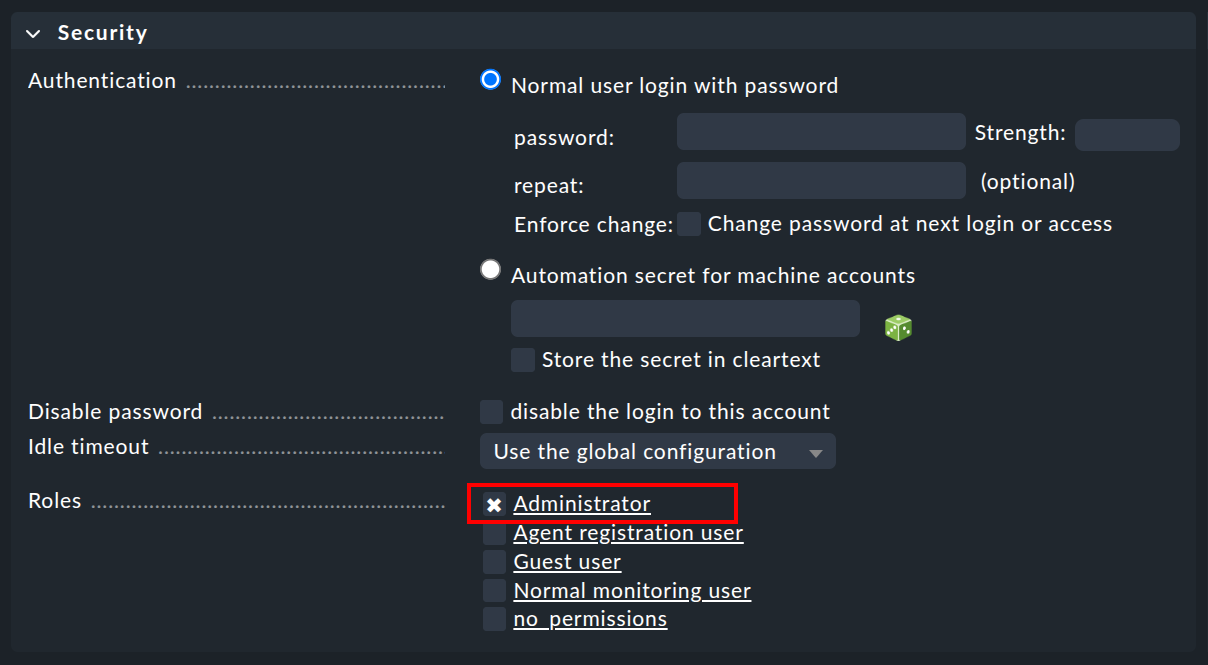
Select the Administrator role when creating the user. All further settings are also made for the administrator according to personal preferences or internal company specifications.
8.2. Automation user (for web services)
When connecting Checkmk to other systems, there is often a desire to automate certain activities that normally take place via the GUI. Some examples are:
Setting and removing scheduled downtimes using a script.
Managing hosts via REST API.
Retrieving data from views in CSV or JSON formats for further processing.
Retrieving the current status of BI aggregations to create them as a service.
In such situations, external software must be able to retrieve certain URLs from the Checkmk interface automatically. This of course raises the question of how the user logs in. The usual way via the login dialog is cumbersome and requires the retrieval of several URLs in succession and the saving of a cookie.
To simplify this, Checkmk provides the concept of automation users. These users are exclusively for remote control and do not allow a normal login via the GUI. Authentication is done here via HTTP basic authentication.
An automation user is already set up in each Checkmk site: for registering the agent with the Checkmk server for TLS-encrypted data transfer.
For other tasks, you can create additional automation users, usually with the role administrator.
You create an automation user like a normal user, but do not assign a normal password, but instead an automation password (Automation secret).
You can have this password created automatically with the ![]() cube:
cube:
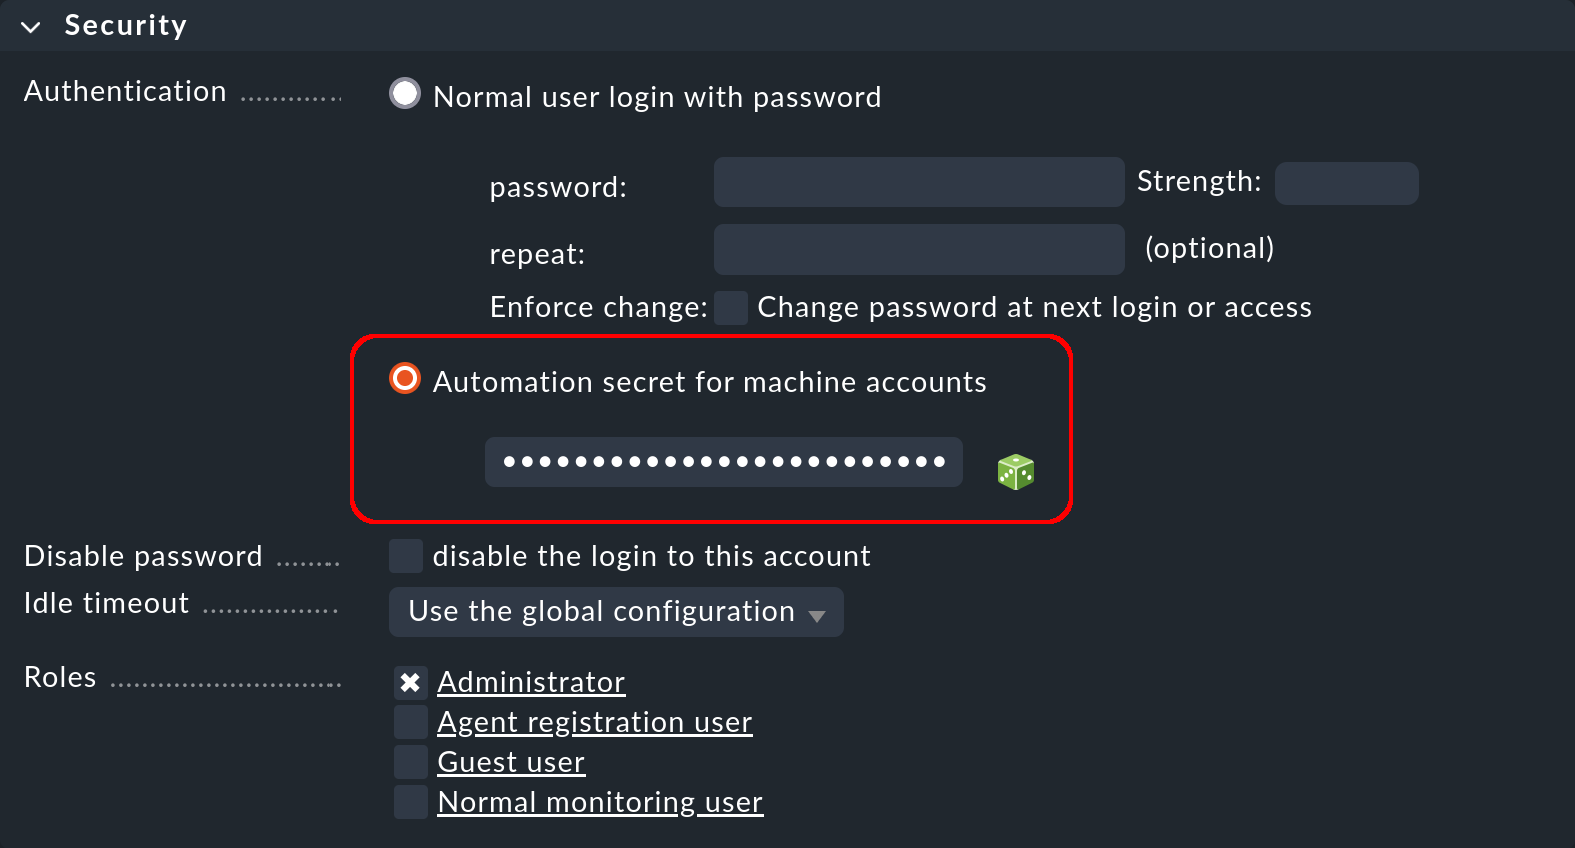
HTTP basic authentication requires the automation password in plain text by default.
To do this, set the option Store the secret in cleartext.
The password is then saved in the site directory under |
An automation user has a role just like a normal user and can also be a contact. This means that you can restrict the permissions and visibility of hosts and services as required.
For the automatic retrieval of web pages, you then enter the header of the HTTP basic authentication, which basically looks like this: Authorization: Basic 1234567890abcdef.
The character string is the Base64-encoded form of username:password.
Here is an example of retrieving a view in the JSON format with the automation user automation and its automation password — the Base64 encoding is done by curl:
If the script that retrieves the URL runs directly in the monitoring site, you can read the automation password for the user directly from the file system.
This is not a security vulnerability, but is intended to be so:
You can write automation scripts that do not need to contain the automation password and do not need a configuration file.
To do this, read the file ~/var/check_mk/web/myuser/automation.secret:
You can easily store the contents of this file in a variable in the shell, for instance so that it can be read out with a script later on:
9. Automatic login via the URL
The automatic login via the URL in the browser described below has been disabled for security reasons since Checkmk 2.2.0, because the credentials (username and password) passed via URL are stored in the log files of the site-specific Apache (see Werk #14261). If you want to use automatic login via the URL despite this security risk, you must explicitly enable this with the global setting Setup > General > Global settings > User interface > Login via GET requests. |
As we have seen, you can use automation users to retrieve any URLs using a script, without the need to log in. In situations that require a real login to the browser, however, this does not work, because the login data for any included links (e.g. to images and iframes) are not passed on.
The best example of this is the desire to hang a monitor that continuously shows a specific Checkmk dashboard on a wall. This monitor is to be controlled by a computer that automatically opens the browser on start-up, logs on to Checkmk and calls up the required dashboard.
To achieve this, it is best to first create a special user for this purpose. The Guest user role is well-suited for this function because it grants all read rights, but does not allow any changes or interventions.
Construct the URL for an automatic login as follows:
Start with:
http://mycmkserver/mysite/check_mk/login.py?_origtarget=Determine the actual URL to be displayed (e.g. that of the dashboard) with your browser — preferably without navigation — which can be done by switching off Display > Show page navigation.
Append this URL, leaving out everything before the
/mysite/part.To the URL append the two variables
_usernameand_passwordin the following form:&_username=myuser&_password=mysecret.Add another
&_login=1.
Here is an example of such a URL:
http://mycmkserver/mysite/check_mk/login.py?_origtarget=/mysite/check_mk/dashboard.py?name=mydashboard&_username=myuser&_password=mypassword&_login=1Note:
In the example, replace the values
mycmkserver,mysite,myuserandmypasswordwith your appropriate values. You cannot use the automation user asmyuser, as logging in via the GUI is not permitted for this user.If the special characters
&or%appear in one of these values or in the value of_origtarget, you must replace them as follows:&with%26and%with%25.
Test the whole thing by logging out of your browser from Checkmk, and then copying the constructed URL into the address bar of your browser. You must then go directly to the target page — without a login dialog. At the same time you will be logged in and can directly call the links contained in the page.
You can also try out the finished URL with curl on the command line.
If you have done everything correctly, you will receive the HTTP status code 302 FOUND and be redirected to the specified Location, as in the following abbreviated output:
If you do not get the desired view in the browser despite this message confirming success, check the URL given under Location — even if this is incorrect, curl will return the HTTP status code 302 FOUND.
If the login data is incorrect, you will receive the HTTP status code 200 OK,
but only see the HTML code for the login page, as in the following abbreviated output:
10. Assigning permissions for folders
10.1. Function of the Normal monitoring user role
If you have a somewhat larger monitoring environment to manage, then you will want to involve fellow administrators in the configuration and especially in the management of hosts and services. So that you retain control of who is permitted to make changes, and what they are allowed to do, and so that people don’t get in each other’s way, you can assign permissions for the Checkmk Setup on the basis of folders.
The first step to this is to have your administrator colleagues work with their own users based on the Normal monitoring user role.
This role basically has authorization for the configuration environment, but with some important restrictions:
Only changes to hosts, services, rules and BI aggregations are allowed.
Hosts, services and rules can only be managed in shared folders.
BI aggregations can only be managed in shared BI packs.
Anything that has global implications is not allowed.
As long as you have not yet released any folders or BI packs, this means that users with the Normal monitoring user role cannot initially make any changes. The simple Setup menu looks like this for normal monitoring users:
10.2. Allowing users to manage hosts
A user receives the authorization to create, edit and remove hosts via contact groups. The procedure is as follows:
Add the user to a contact group.
Designate one or more folders for which the user is to be authorized.
Activate the Permissions property for these folders and select the contact group here.
The following example shows the properties of a folder in which all of the users of the contact group Linux are allowed to manage hosts.
The option has been activated to allow this in subfolders as well.
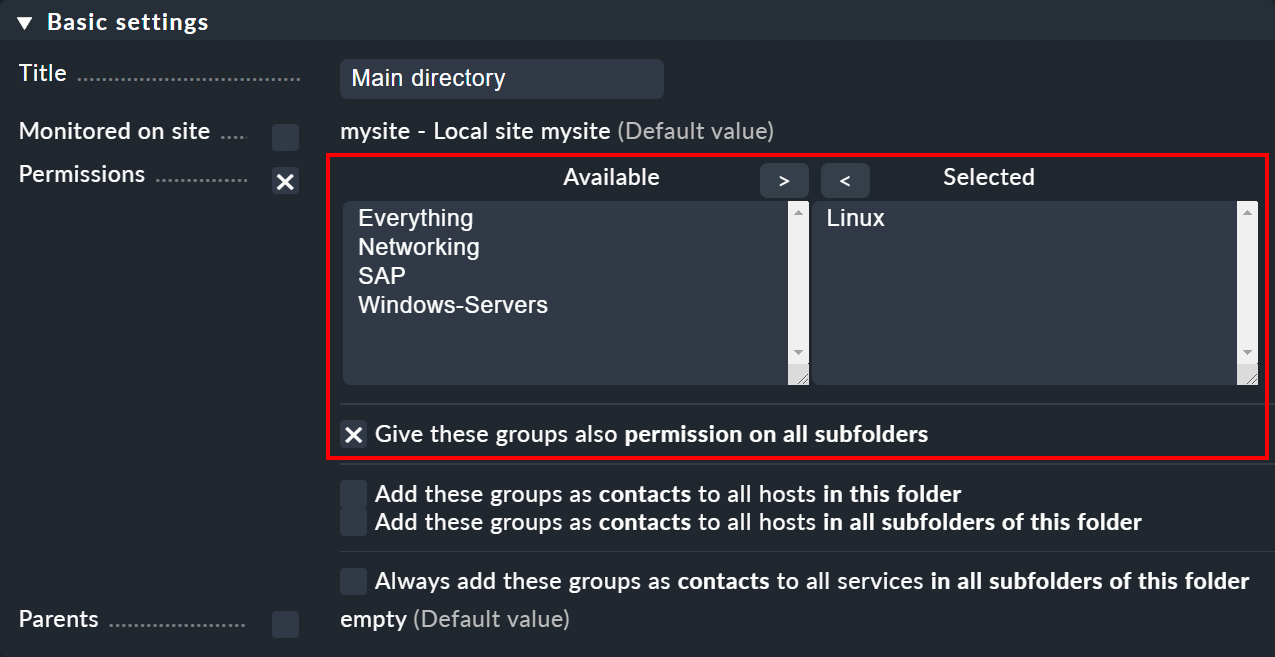
Whether you want to automatically include the hosts in the contact group is up to you.
In this example the option Add these groups as contacts to all hosts in this folder has not been set and the hosts will not be added to the contact group Linux.
This means that in the monitoring environment they will not be visible to the Linux contact group (unless a rule takes care of this).
So, as you can see, the visibility (and responsibility in the monitoring) and the authorization for the configuration environment can be separately regulated.
11. Passwords
11.1. Password security
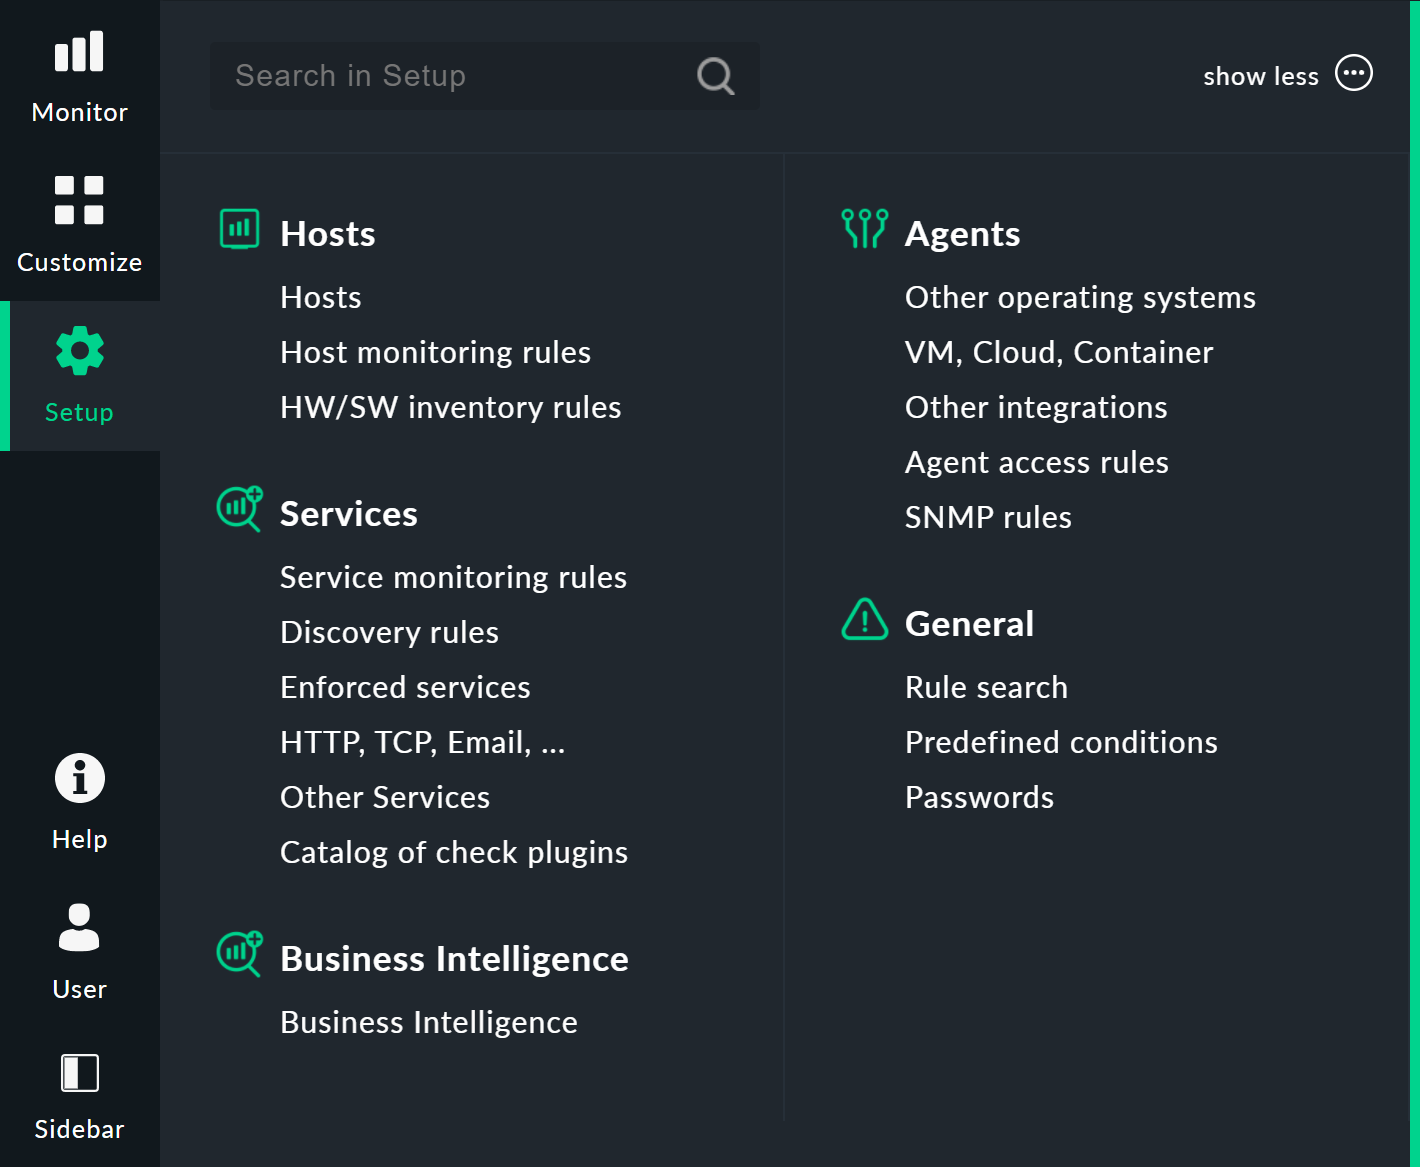
Security is a high priority these days. Therefore, in some companies there are general guidelines on how to deal with passwords. Checkmk offers several settings to enforce such defaults. Some of them can be found under Global settings > User management > Password policy for local accounts:
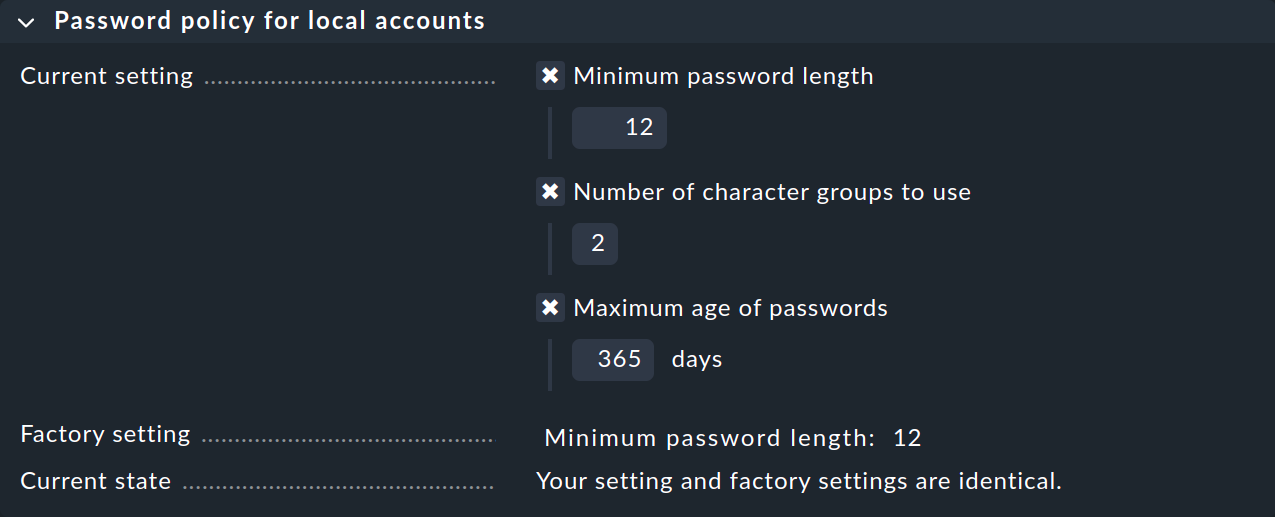
The first option Minimum password length is to ensure the quality of the password.
For the second option Number of character groups to use there are a total of four character groups:
lower case letters
upper case letters
digits
special characters
If you enter a 4 here, a password must contain at least one character from each of the above groups.
With a 2 it at least ensures that the password does not, for example, consist only of lower case letters.
These settings are checked each time the password is changed.
The third option Maximum age of passwords forces the user to change their password at regular intervals. Once the time has come, the next page access will present the user with the following prompt:

Users may continue only after changing their password.
You can require a change of the initial password at the first login. This is done with the Enforce change: Change password at next login or access option in the Security section in the properties for the respective user.
11.2. Login policies
Under Global settings > User management you will find further global settings that regulate user logins.
Locking following invalid logins
With the Lock user accounts after N logon failures setting, you can lock an account after a series of failed login attempts:

Unlocking is then only possible by a user with the Administrator role.
As an administrator, you can unlock other users via Setup > Users > Users and then the properties of the locked user.
Note that administrator accounts can also be locked!
If you are permanently locked out as the last or only admin, you can only unlock your account via the command line.
To do this, edit the ~/etc/htpasswd file as a site user and remove the exclamation mark from the line of the affected user, here myuser:
Then you can log in again.
Automatic logouts
In the Session management box, you can specify two different ways of ending a session and combine these with each other: on the one hand depending on the session duration, on the other hand depending on the user activity.
Maximum session duration ensures that the session is ended automatically after a set period of time. Among other things, this reduces the risk of external use of the session, as it does not remain active indefinitely:
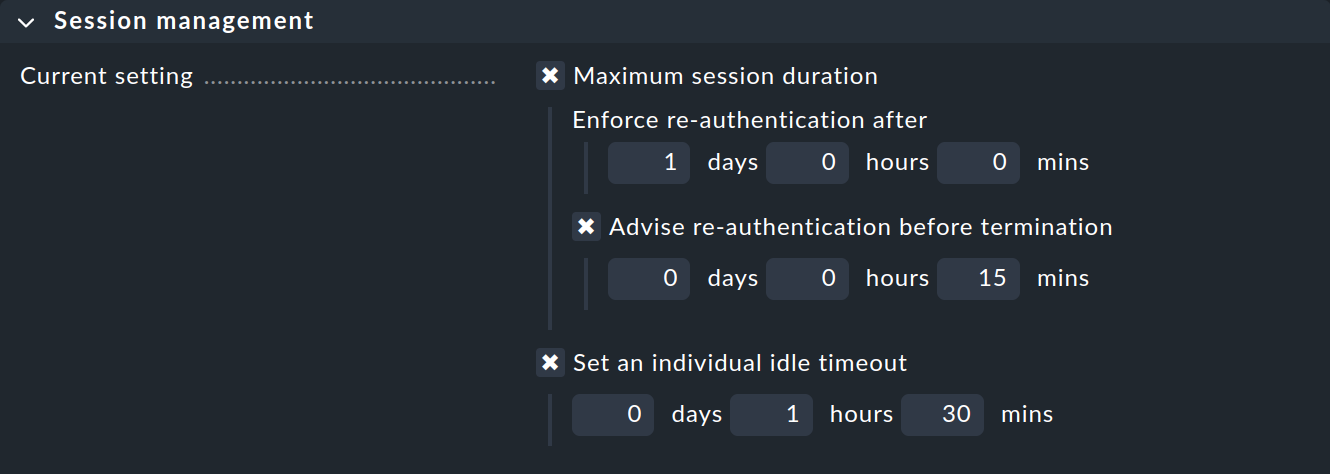
Once the defined session duration has expired, the user must log in again, regardless of whether they were active at the end of the session or not. At the same time, you can use Advise re-authentication before termination to specify when the user should be notified to save their entries, log out and log in again before a 'hard' termination of their session:

The Set an individual idle timeout setting ensures that a session is ended if a user does not actively use the GUI for a longer period of time, for example, if they have temporarily left their workstation without logging out in Checkmk. This timeout can be stopped by actively using the GUI. However, it is not enough just to have a view open that reloads itself regularly.
Preventing multiple logins
The Limit login to single session at a time setting prevents a user from logging in to Checkmk with two browsers at the same time:
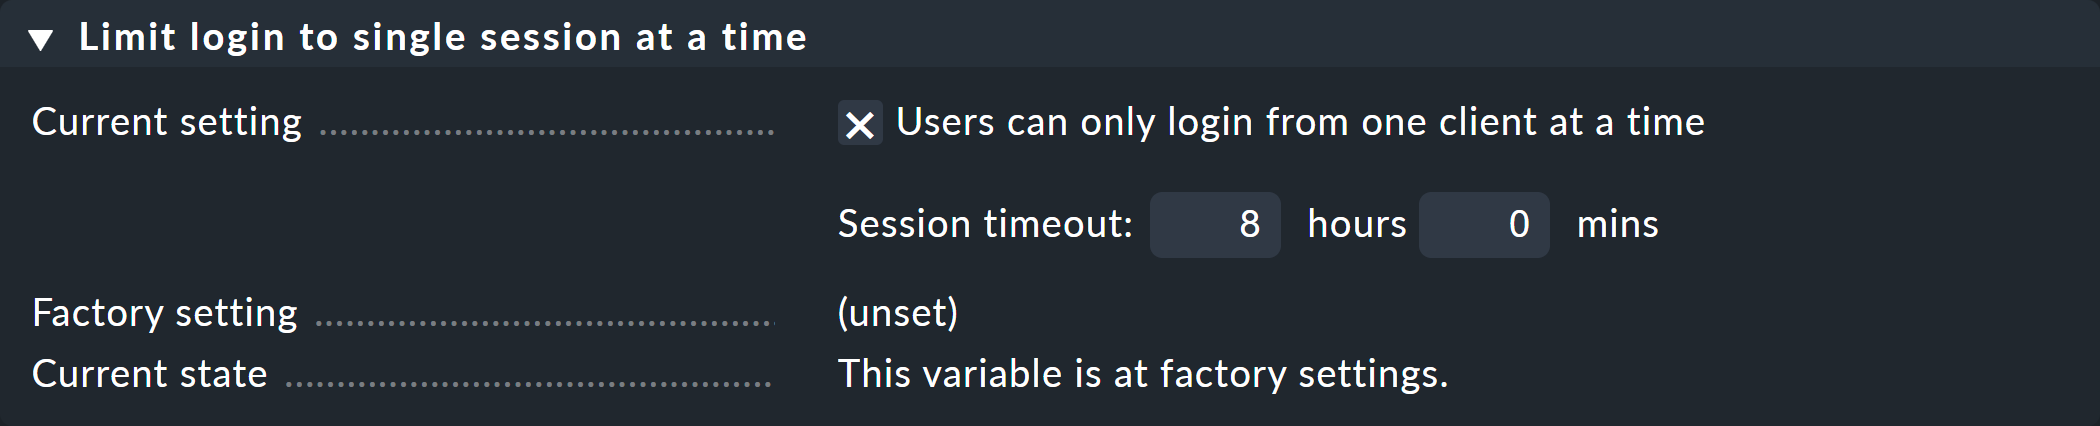
This option is also linked to a timeout for an automatic logout in the event of inactivity. This feature also makes sense. Let’s assume, you have forgotten to log off at your workstation before closing the browser. In this situation, without a timeout, you would not be able to log on from home while you are on call, since closing the browser or shutting down the computer does not automatically trigger a logout!
When attempting a second login in parallel, you will then see the following error message:
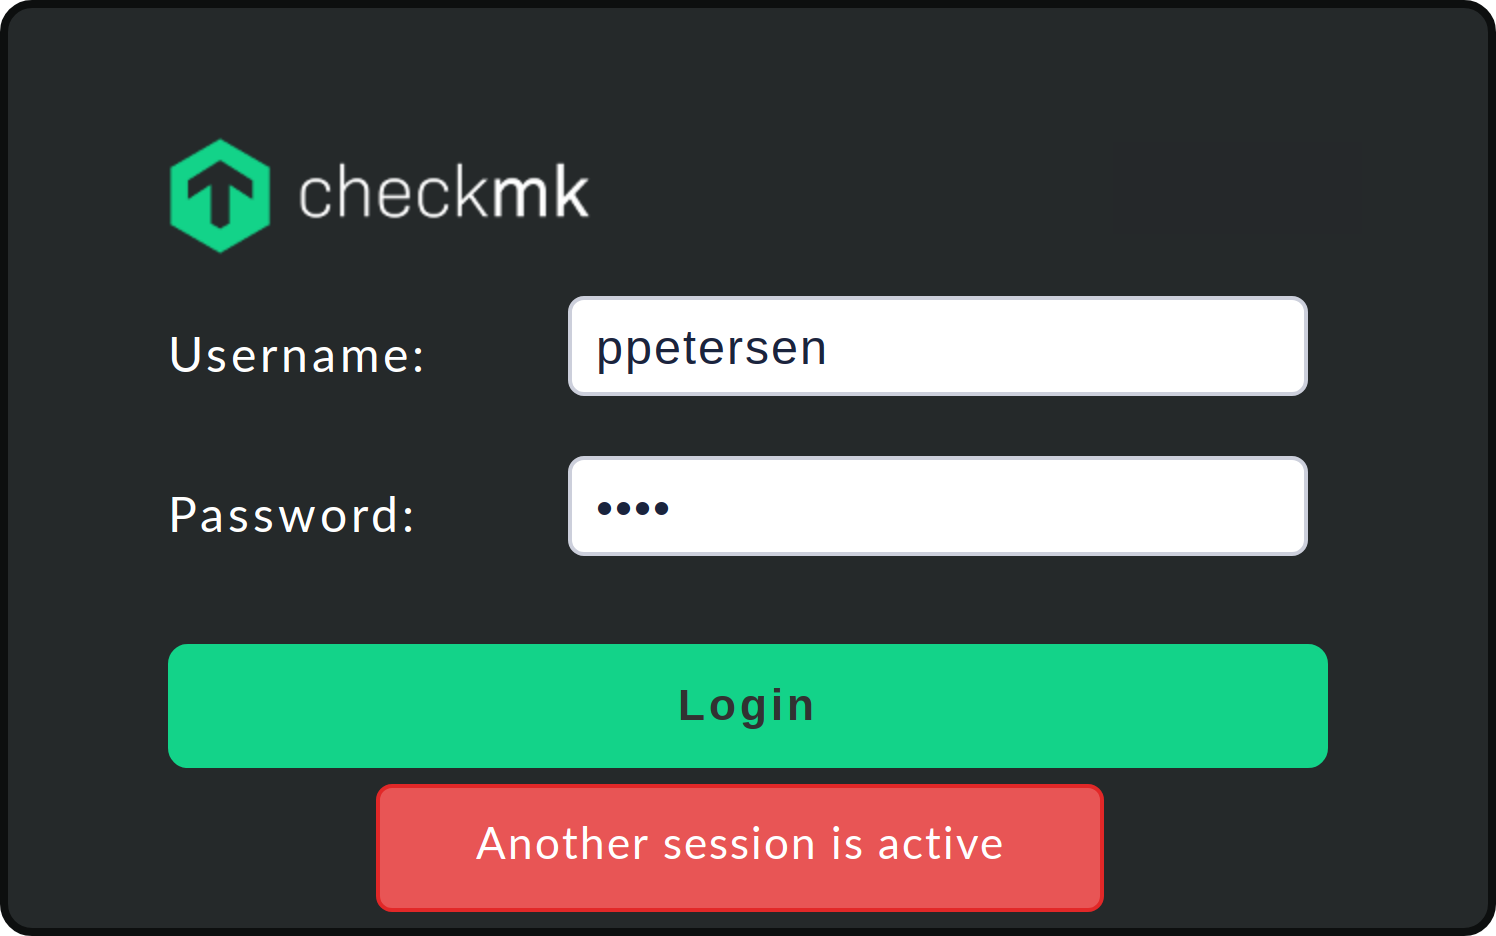
In this case, the login can only be carried out if you actively terminate the existing session or wait for it to timeout.
11.3. Two-factor authentication
To improve the security of your Checkmk sites, Checkmk provides the feature of two-factor authentication for each user. This two-factor authentication is based on the FIDO2/WebAuthn Internet standard. Authentication is conventionally based on knowledge (a password) and possession (an authenticator).
You can use any FIDO2-compatible hardware supported by your browser and operating system. USB or NFC tokens such as the YubiKey are the most widely used. Alternatively, it is possible to use authenticator apps (for example, on the smartphone) that generate a time-based one-time password (TOTP).
Requirements for the Checkmk server
Due to the specifications of the WebAuthn standard, there are three prerequisites for the use of two-factor authentication:
The Checkmk web interface is secured with HTTPS.
The web address is specified as a simple host name or as a fully qualified domain name — in any case as a valid domain address.
The URL is always entered in the same format, e.g. always
https://www.mycompany.com/mysite.
Setup
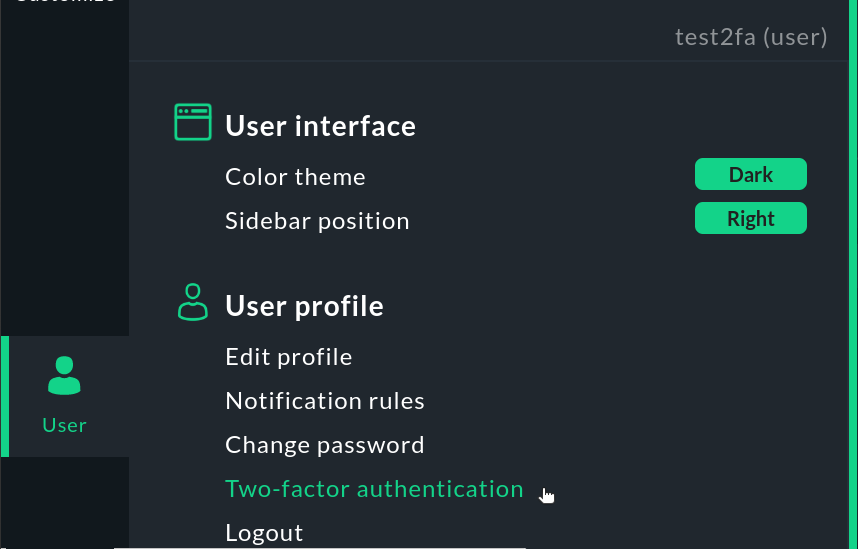
Access two-factor authentication from the User menu:
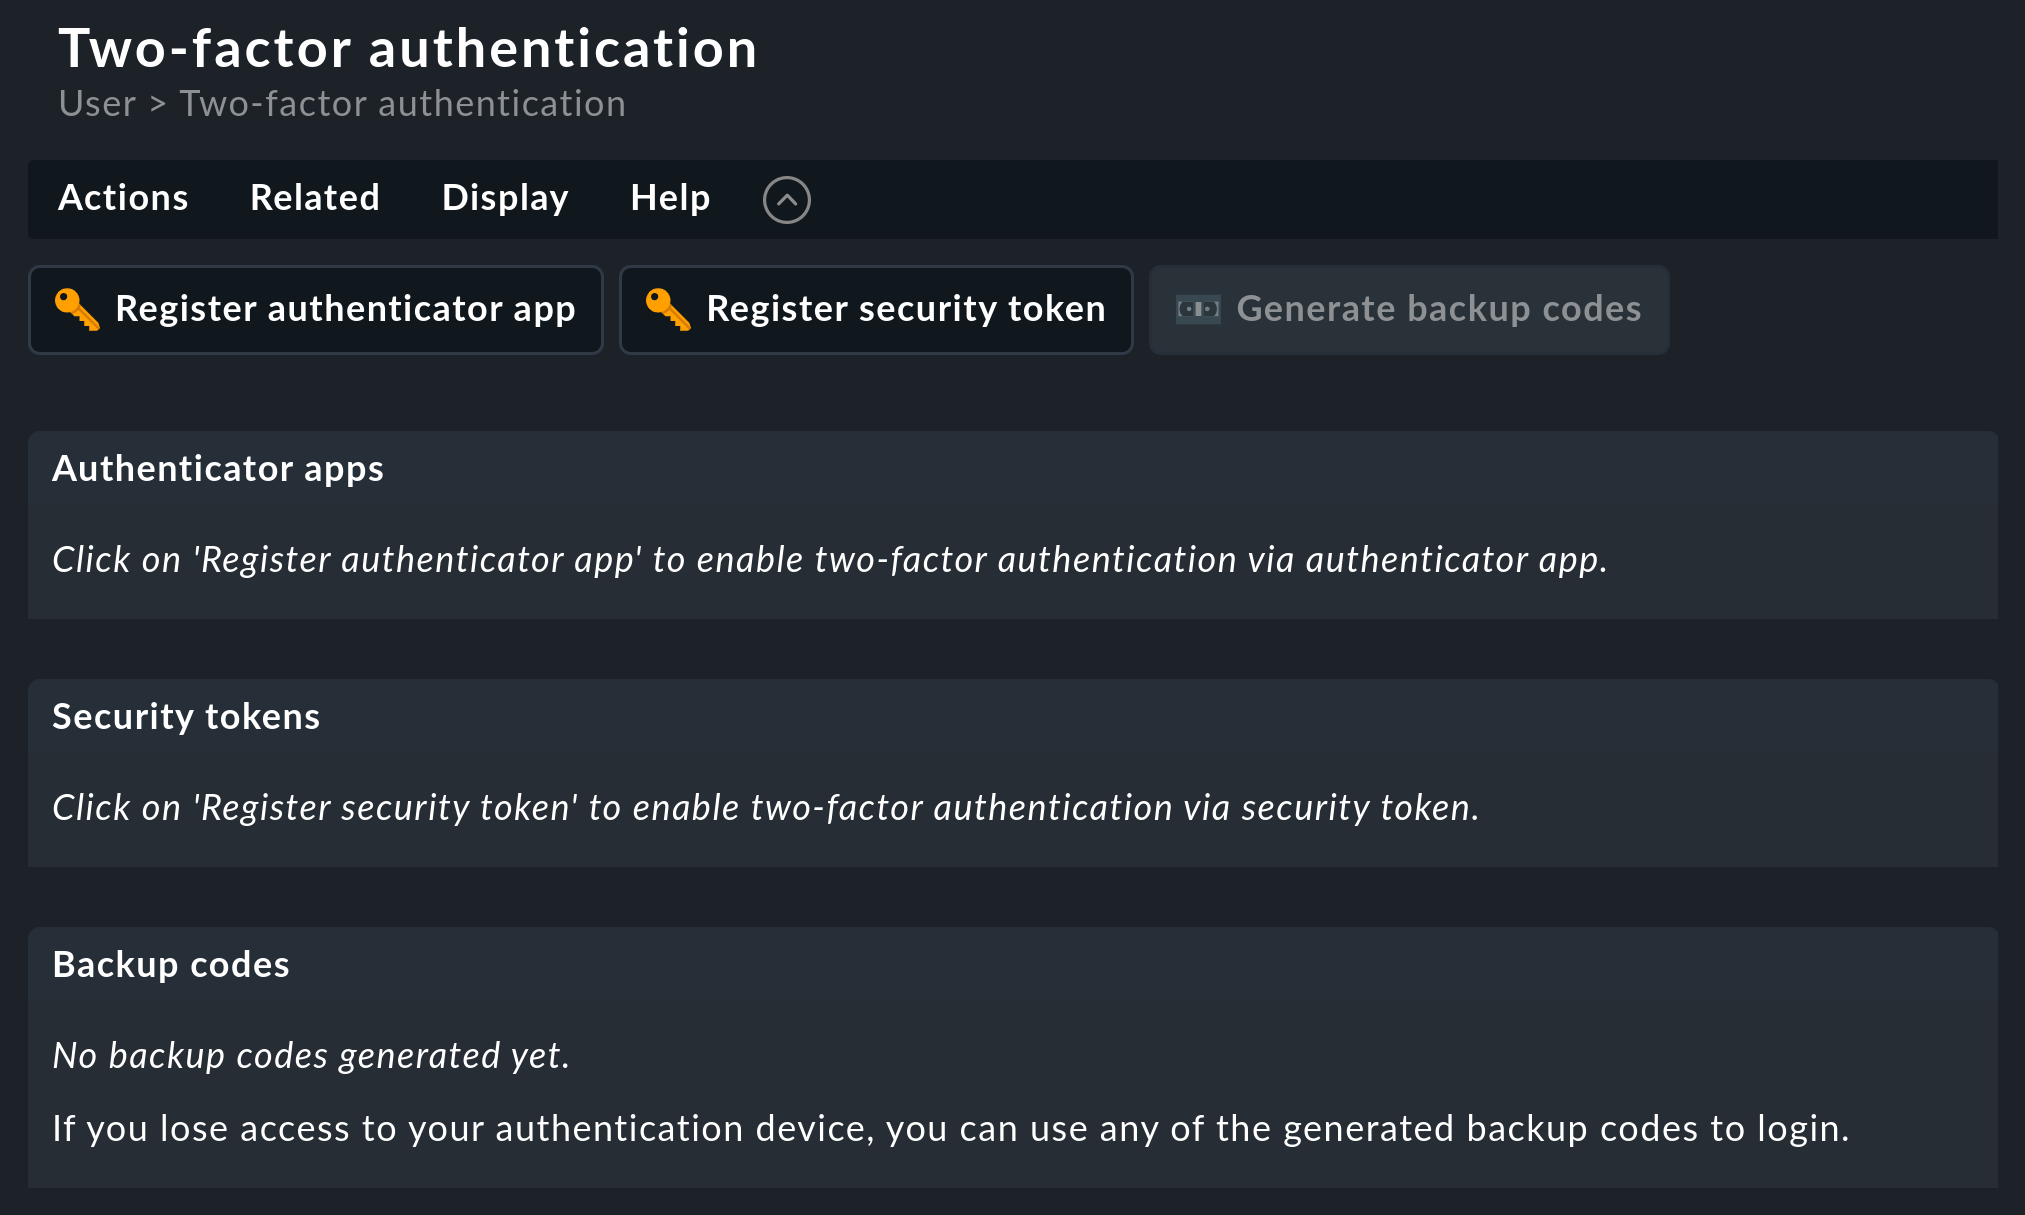
You will now be given two options marked with the key icon ![]() to add the second factor:
Register authenticator app for configuring an app that generates one-time passwords, and Register security token for using a hardware token.
to add the second factor:
Register authenticator app for configuring an app that generates one-time passwords, and Register security token for using a hardware token.
Checkmk recognizes the authentication options available on your computer. A small dialog opens in the browser window in which you specify the authenticator. If you are using a hardware token, the setup is completed when you touch the button. When using one-time passwords, first scan the displayed QR code with the authenticator app and enter a code that you generate with the app for confirmation. The session will continue seamlessly in both cases.
Login
Two-factor authentication will then be active in Checkmk for future login attempts. First, enter your username and password as usual. Then a second login dialog appears:
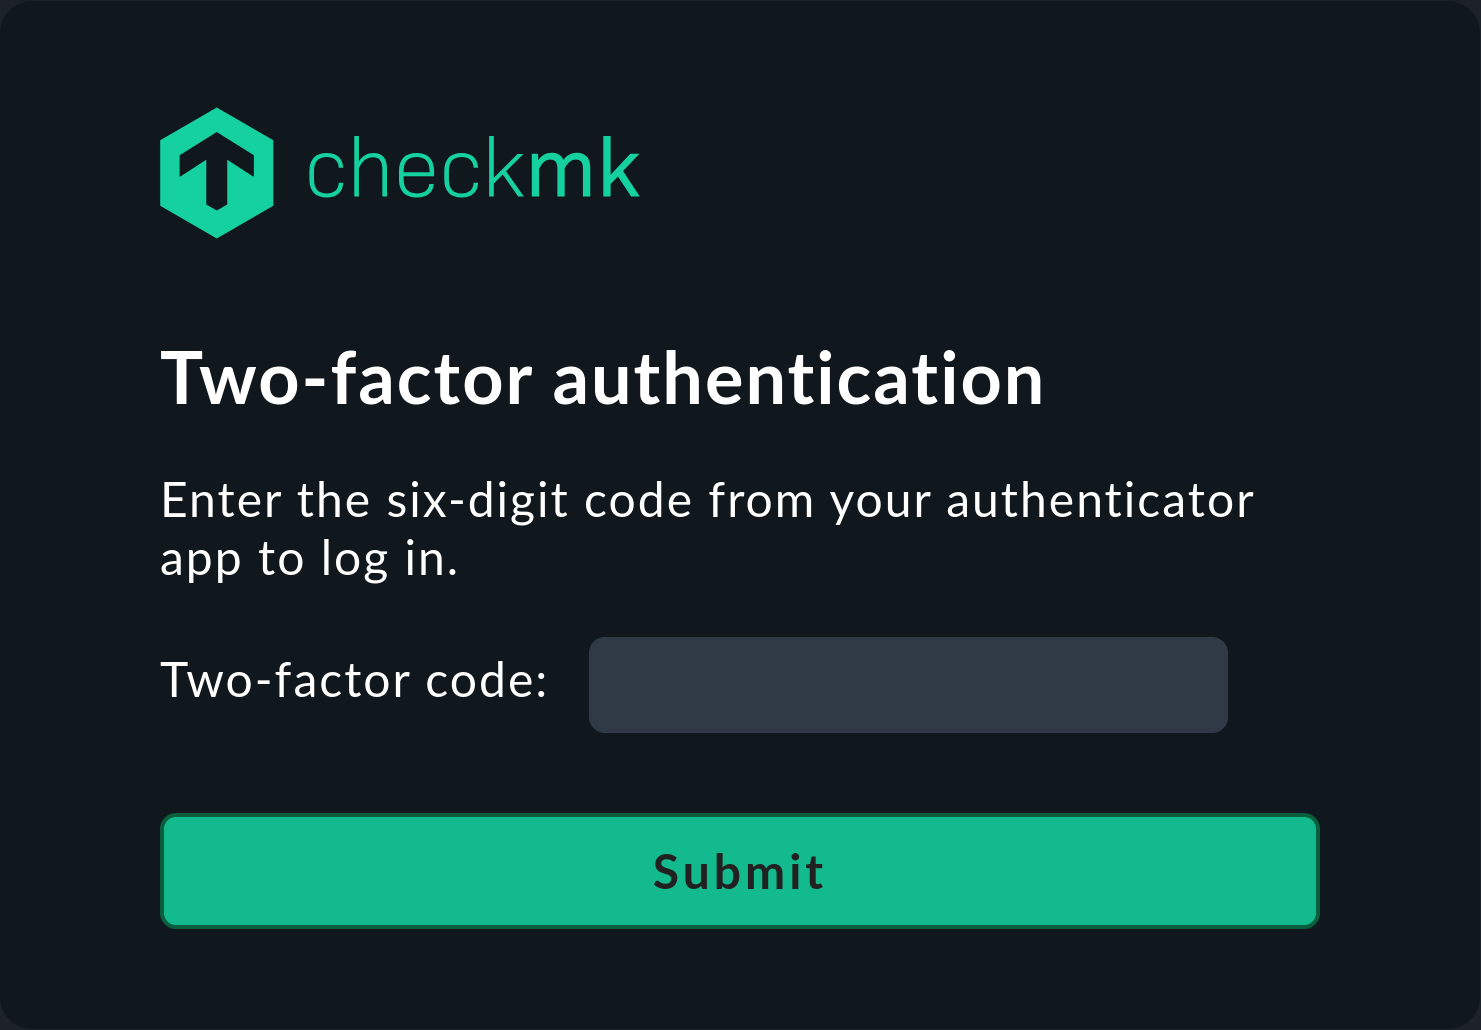
After activating the authenticator, you can work with Checkmk as usual.
Creating and using backup codes
In case you do not have your authenticator at hand, you can alternatively enter a backup code.
To do this, create a list of backup codes in advance on the User > Two-factor authentication page using ![]() Generate backup codes:
Generate backup codes:
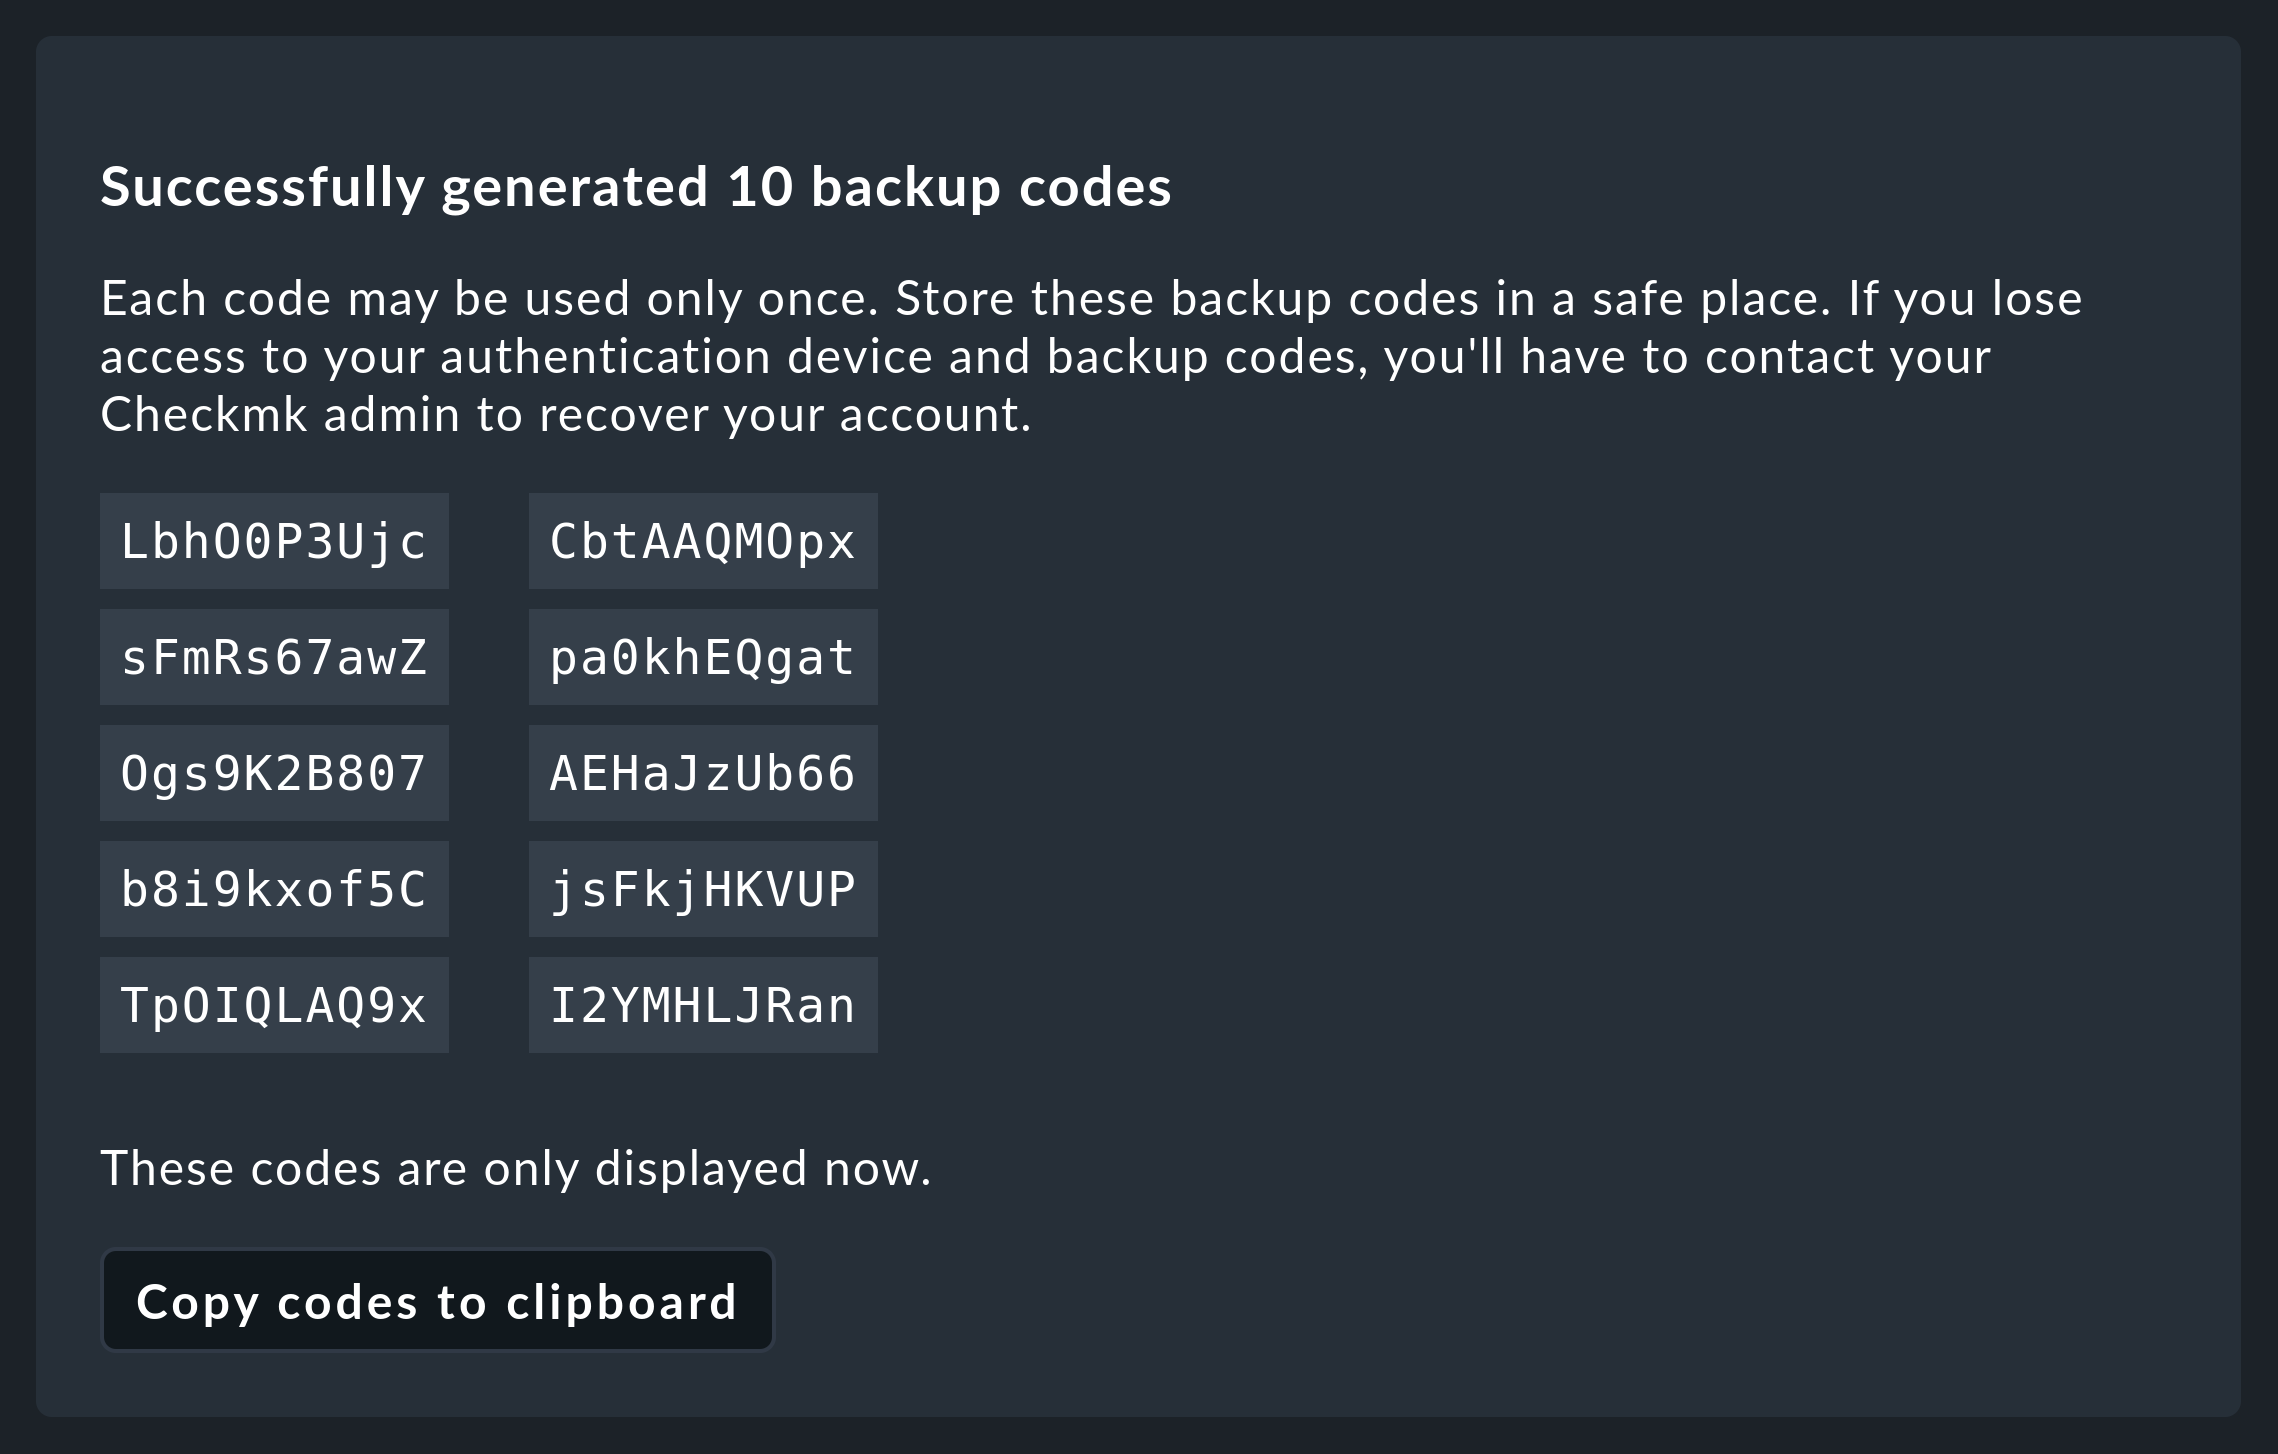
Keep these codes in a secure place.
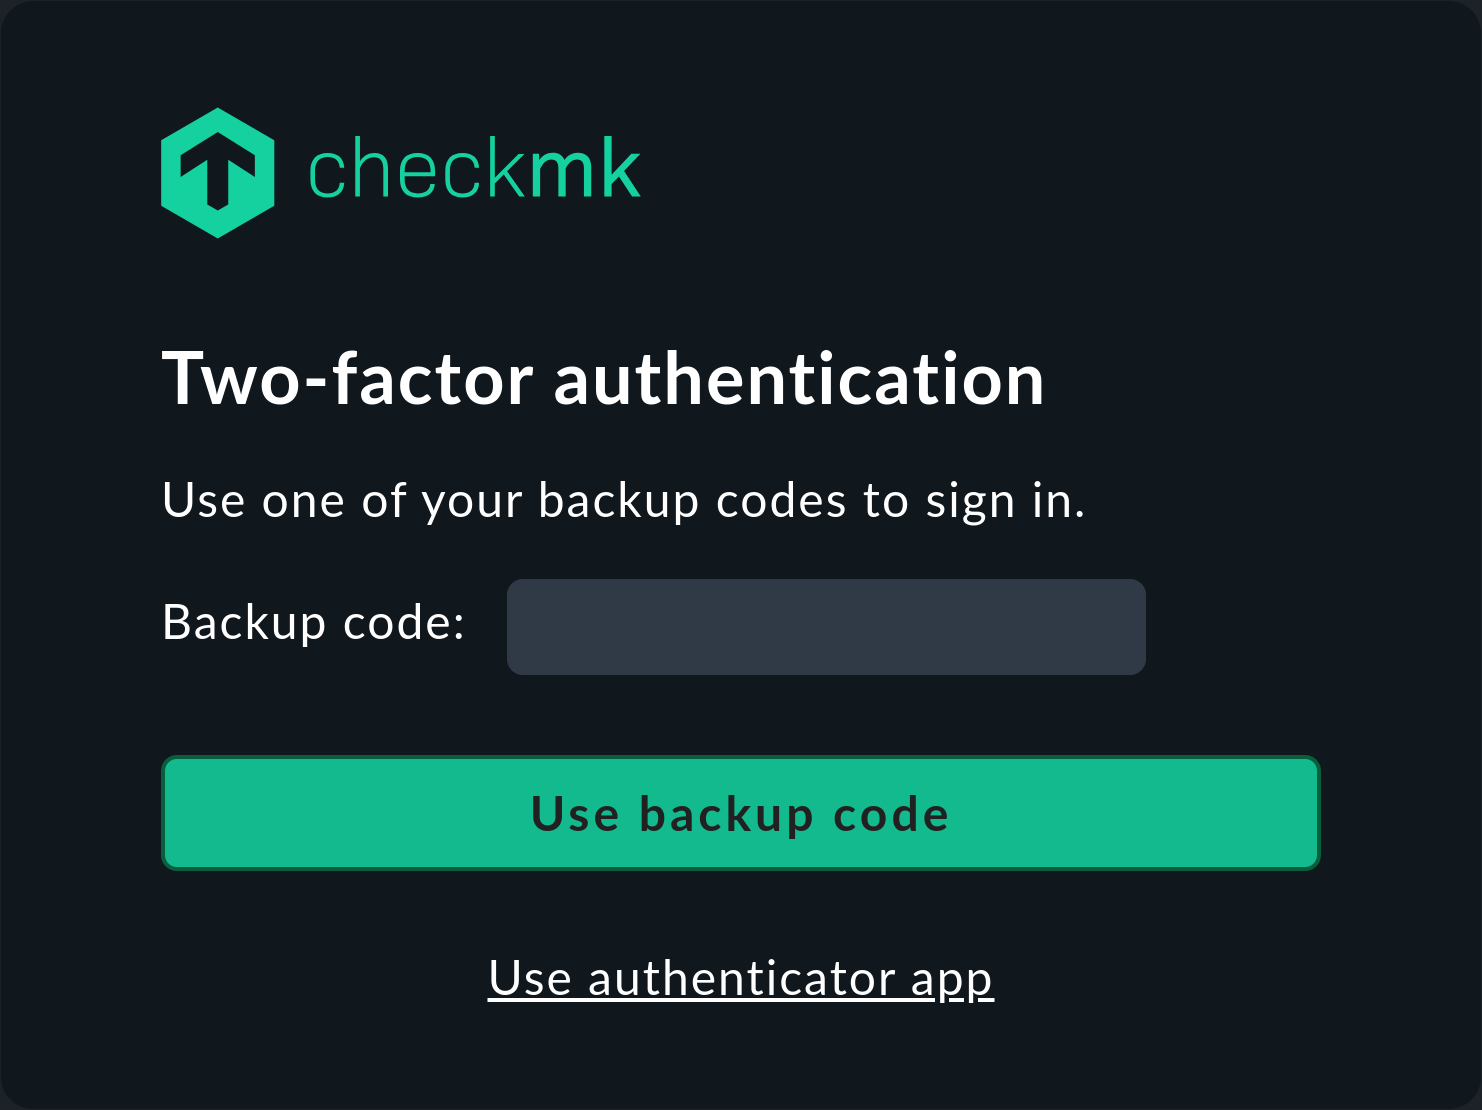
After you have generated backup codes, the additional option Use backup code is displayed in the second login dialog Two-factor authentication. Click on this if you want to log in to Checkmk with a backup code. The second login dialog will be replaced so that you can enter a backup code there:
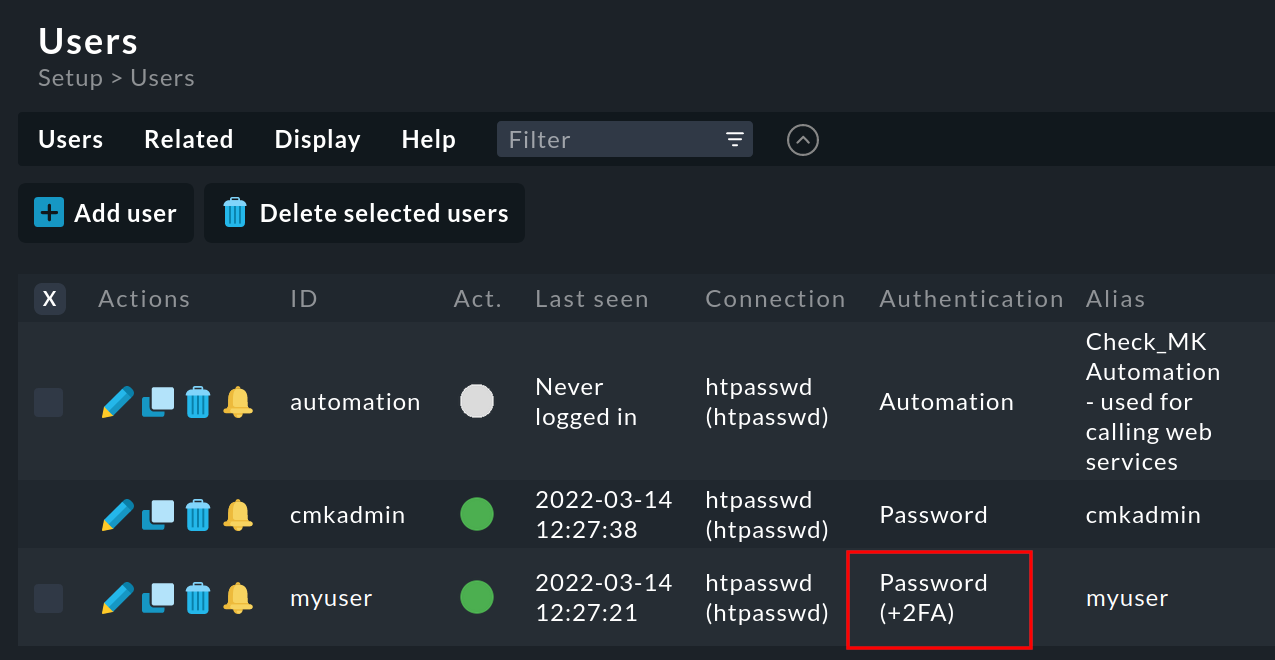
Checking and overriding two-factor authentication as an administrator
As an administrator, in the user management (Setup > Users > Users) you can see which users have had a two-factor authentication set up by looking at the entry in the Authentication column.
If one of these users no longer has access to Checkmk — if they have lost or damaged their hardware token, for example — you can remove the two-factor authentication for this user.
To do this, open the relevant entry in the user management by clicking on ![]() .
Remove the two-factor authentication for this user with User > Remove two-factor authentication.
.
Remove the two-factor authentication for this user with User > Remove two-factor authentication.

After your approval of the confirmation dialog, the user will be able log in to the Checkmk web interface again using 'only' the username and password.
Forcing two-factor authentication as administrator
As you have read in the Setup section, every user can activate two-factor authentication for their own Checkmk account. Administrators have the option to make this optional feature mandatory for the users under their control. Two-factor authentication can be enforced for all users of a role, or even for all users — with the Enforce two factor authentication option.
To force two-factor authentication for a role, open Setup > Users > Roles & permissions, click on the role’s pencil icon ![]() and activate the Enforce two factor authentication checkbox in
Basic properties.
This option can be found for all Checkmk users in Setup > General > Global settings > User management.
Activation as a global setting overrides a role-based setting.
and activate the Enforce two factor authentication checkbox in
Basic properties.
This option can be found for all Checkmk users in Setup > General > Global settings > User management.
Activation as a global setting overrides a role-based setting.
A user who should activate two-factor authentication but does not yet have it will be redirected to the Two-factor authentication page when logging in after entering the username and password:
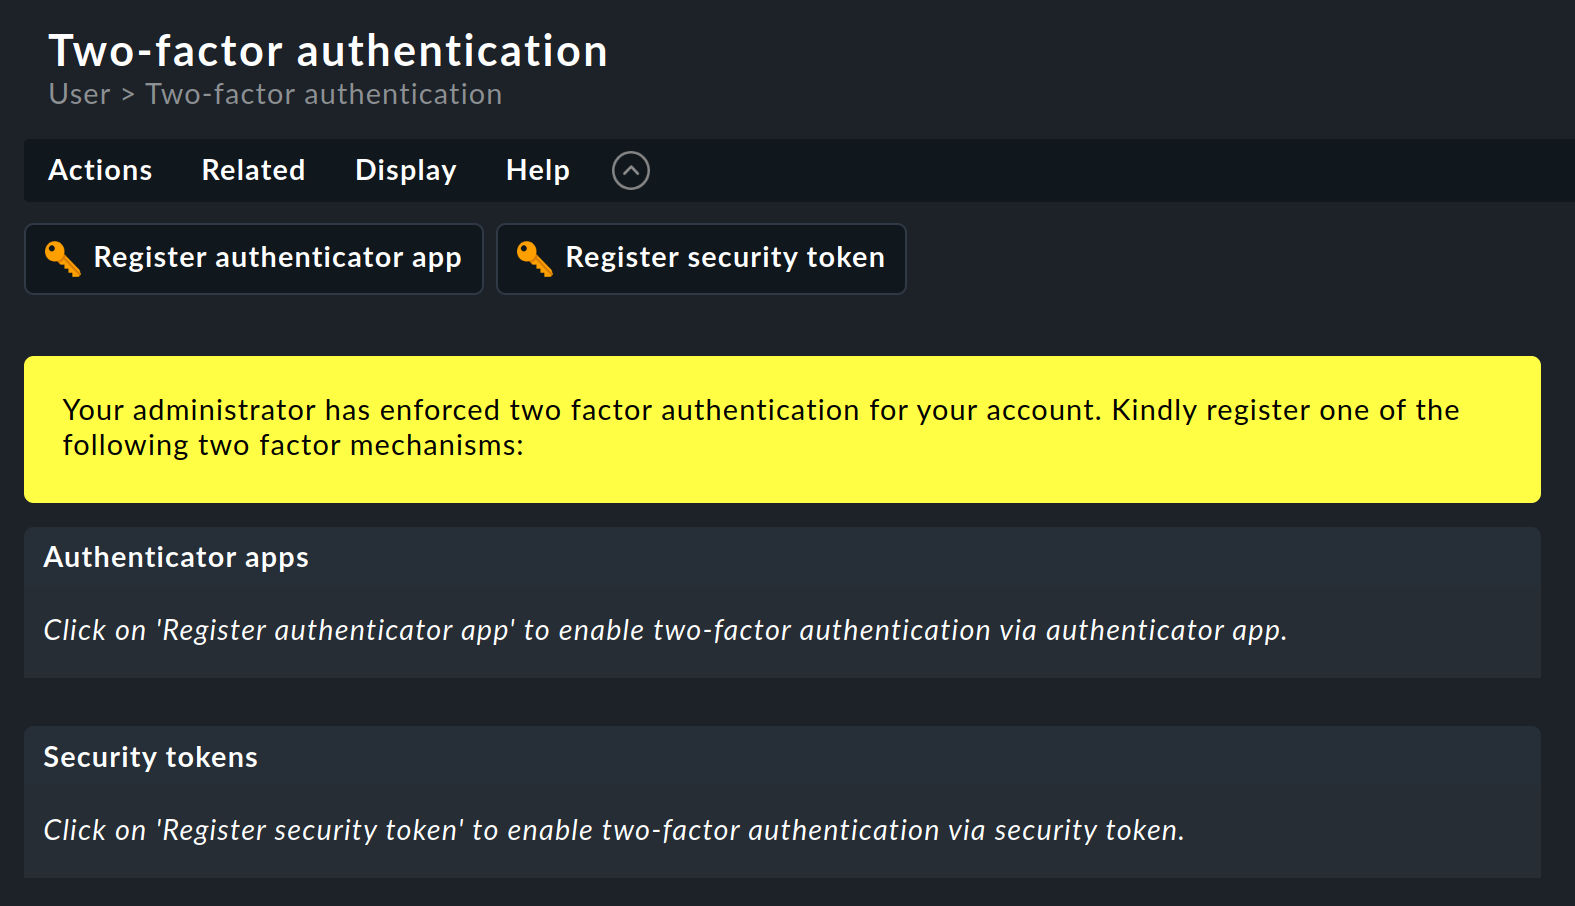
The user is only redirected to the Checkmk user interface when one of the two options available for the second factor has been set up.
11.4. Changing a password using the command line
In an emergency, you can also change a password via the command line.
This saves you in a situation in which you have lost the password for cmkadmin.
The prerequisite is, of course, that it is still possible to log in as a Linux user on the Checkmk server and that you can become a site user with omd su mysite.
The passwords are stored in the ~/etc/htpasswd file, as already described above.
Changing passwords is accomplished with the cmk-passwd command.
This will not ask you for the existing password.
cmk-passwd will always choose a secure encryption method to store your passwords in a current version of Checkmk.
Currently cmk-passwd uses bcrypt for this.
Unencrypted and weakly encrypted passwords (e.g. with MD5) do not allow login to the GUI.
12. Custom user attributes
In addition to the field for the email address, the field Pager address is also available for notifying users. If this is not sufficient and you would like to store more information about a user, you can create your own fields via Setup > Users > Custom user attributes > Add attribute, which can then be filled with individual values for each user.
Creating such a new attribute opens the following dialog:
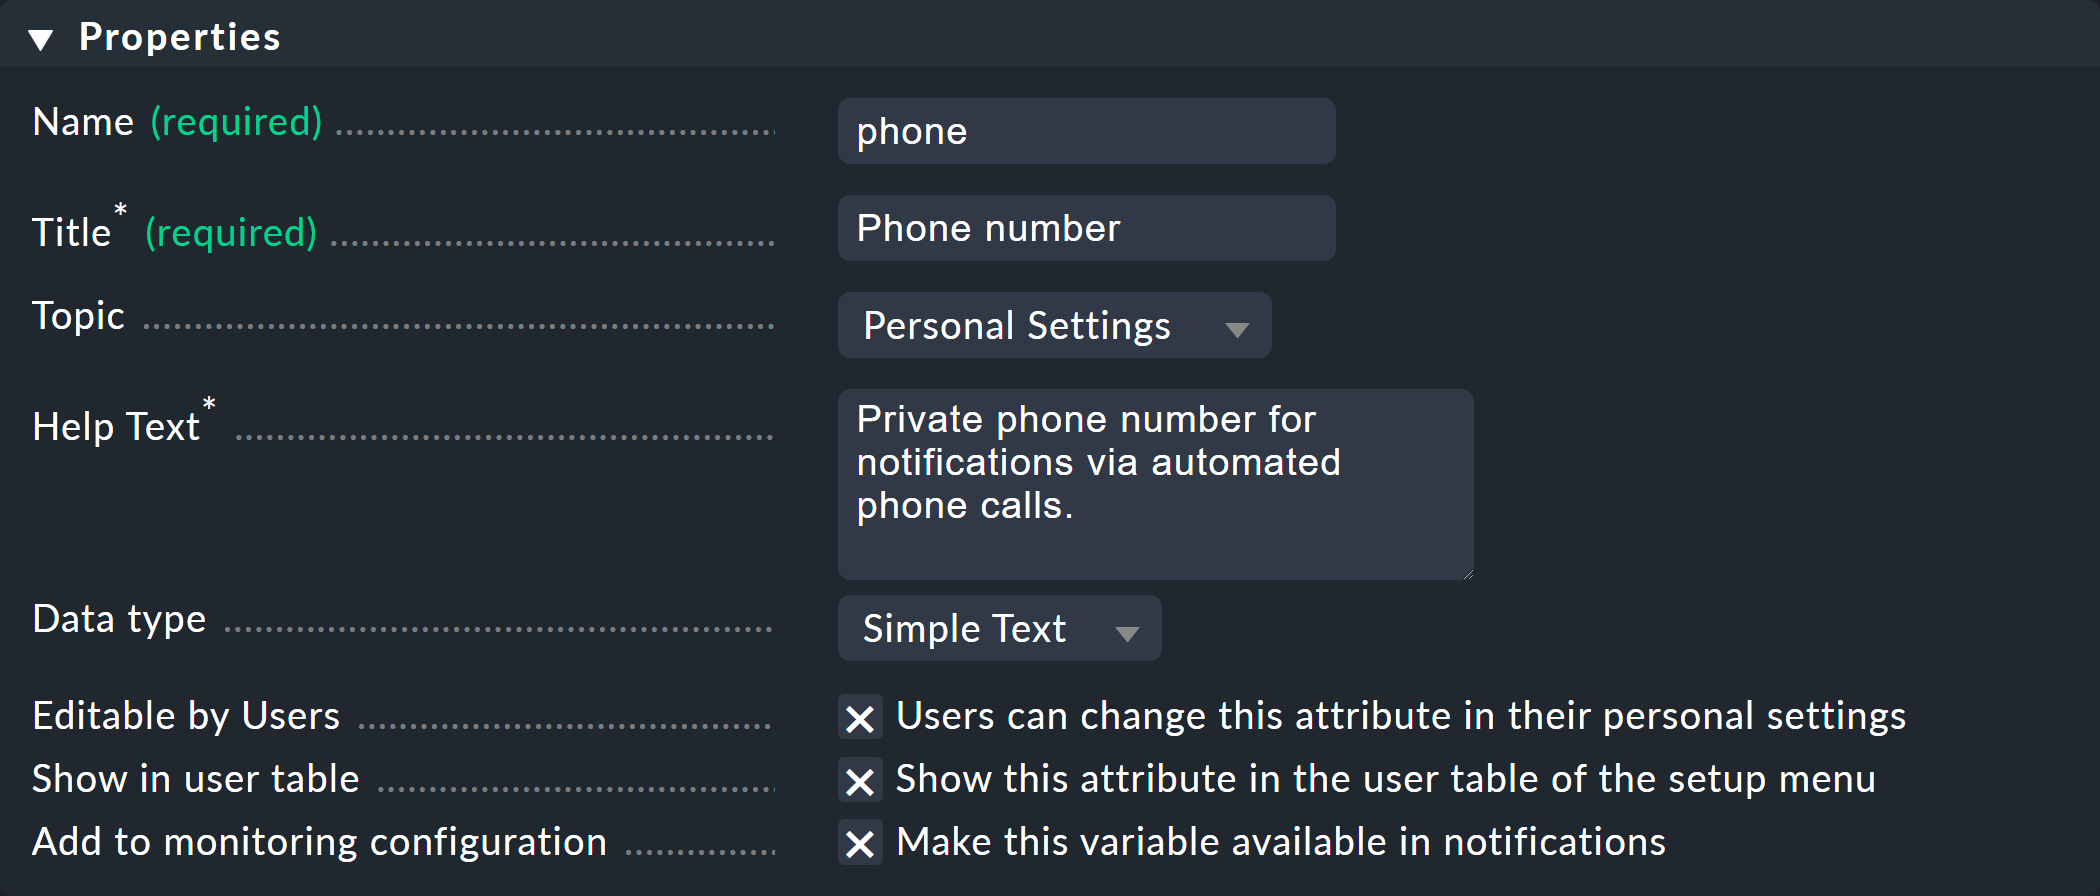
As always, the ID (Name) cannot be changed later, but the title (Title) can. The Topic determines in which section of the user settings the new field will be sorted. Furthermore, you can decide whether users can edit the field themselves (it will then appear in their personal settings) and whether the value should be displayed directly in the Setup user table.
Only if you activate the checkbox at Make this variable available in notifications can you also use this value in notifications. For this, the value must be assigned to the monitoring core (e.g. CMC) in a variable (a so-called 'custom macro').
The name of the custom variable is derived from the ID you have chosen.
This is converted to capital letters and is prefixed by a CONTACT_. A phone then becomes CONTACT_PHONE.
Note that when the variable is passed via environment variables the variable will be prefixed with NOTIFY_.
With your own notification script the variable will arrive as NOTIFY_CONTACT_PHONE.
13. Writing messages to users
In the article describing notification rules, we go into great detail about how Checkmk can inform contacts about problems with hosts or services. However, sometimes you may want to notify all users (even those who are not contacts) of internal organizational matters, for example, maintenance of the Checkmk system itself.
For such purposes Checkmk offers a small built-in message tool, which is completely separate from the notifications. You can find the tool via Setup > Users and there in Users > Send user messages. Here you have the facility to send a message to all or some of your users.
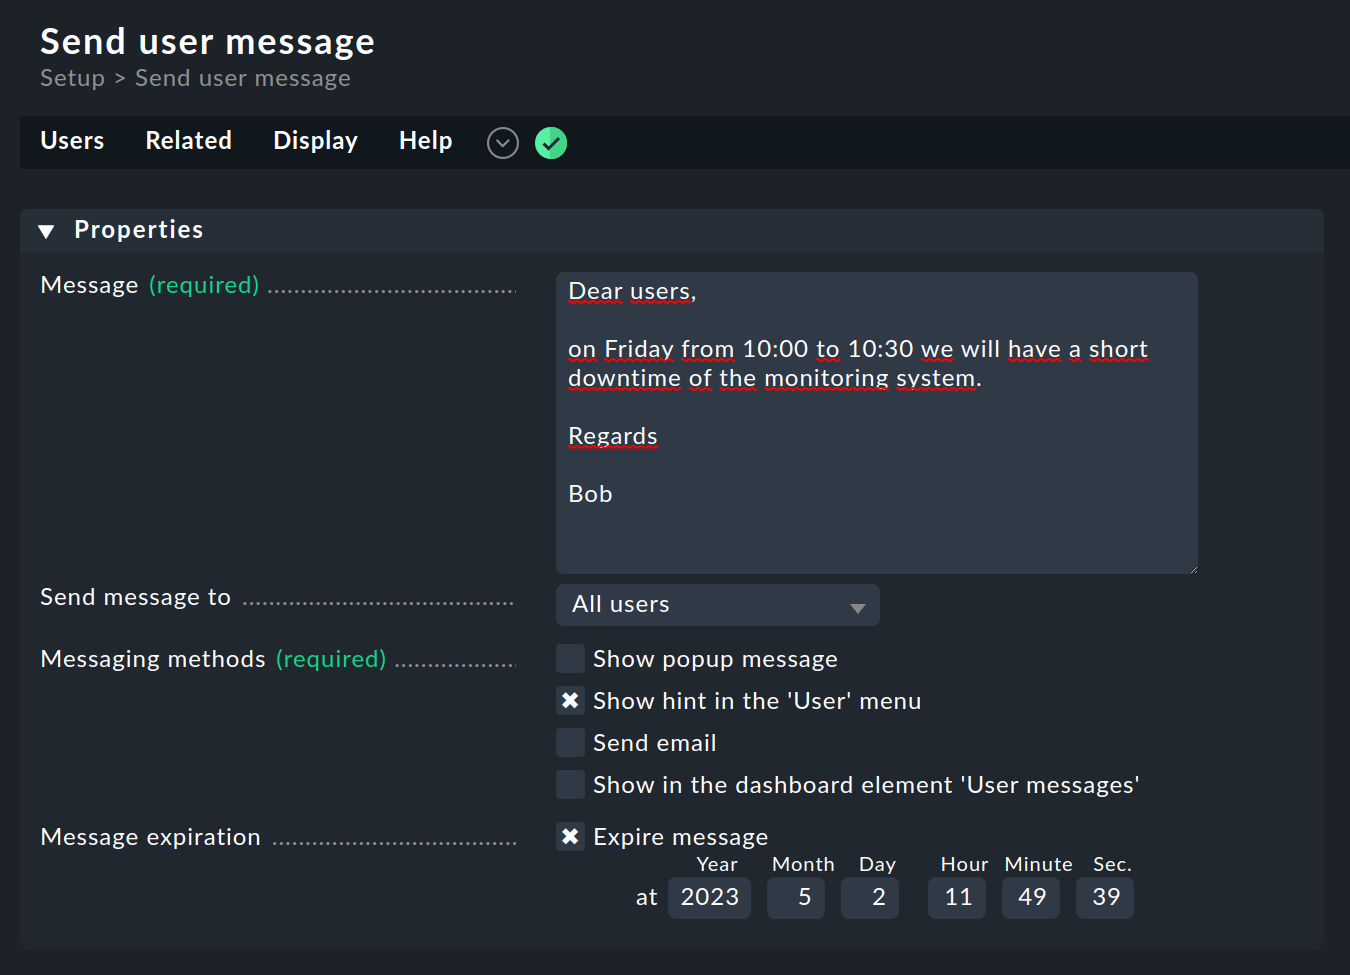
You can choose between four message types:
Show popup message |
The next time the user opens the page, a popup window with the message will be opened. |
Show hint in the 'User' menu |
The user is pointed to the message by a number symbol in the User menu of the navigation bar. |
Send email |
Sends an email. However, this will only reach users who also have an email address configured. |
Show in the dashboard element 'User messages' |
The message is displayed in an widget of the type User messages. |
With Message expiration you can easily delete messages that have not yet been retrieved as soon as they are no longer relevant.
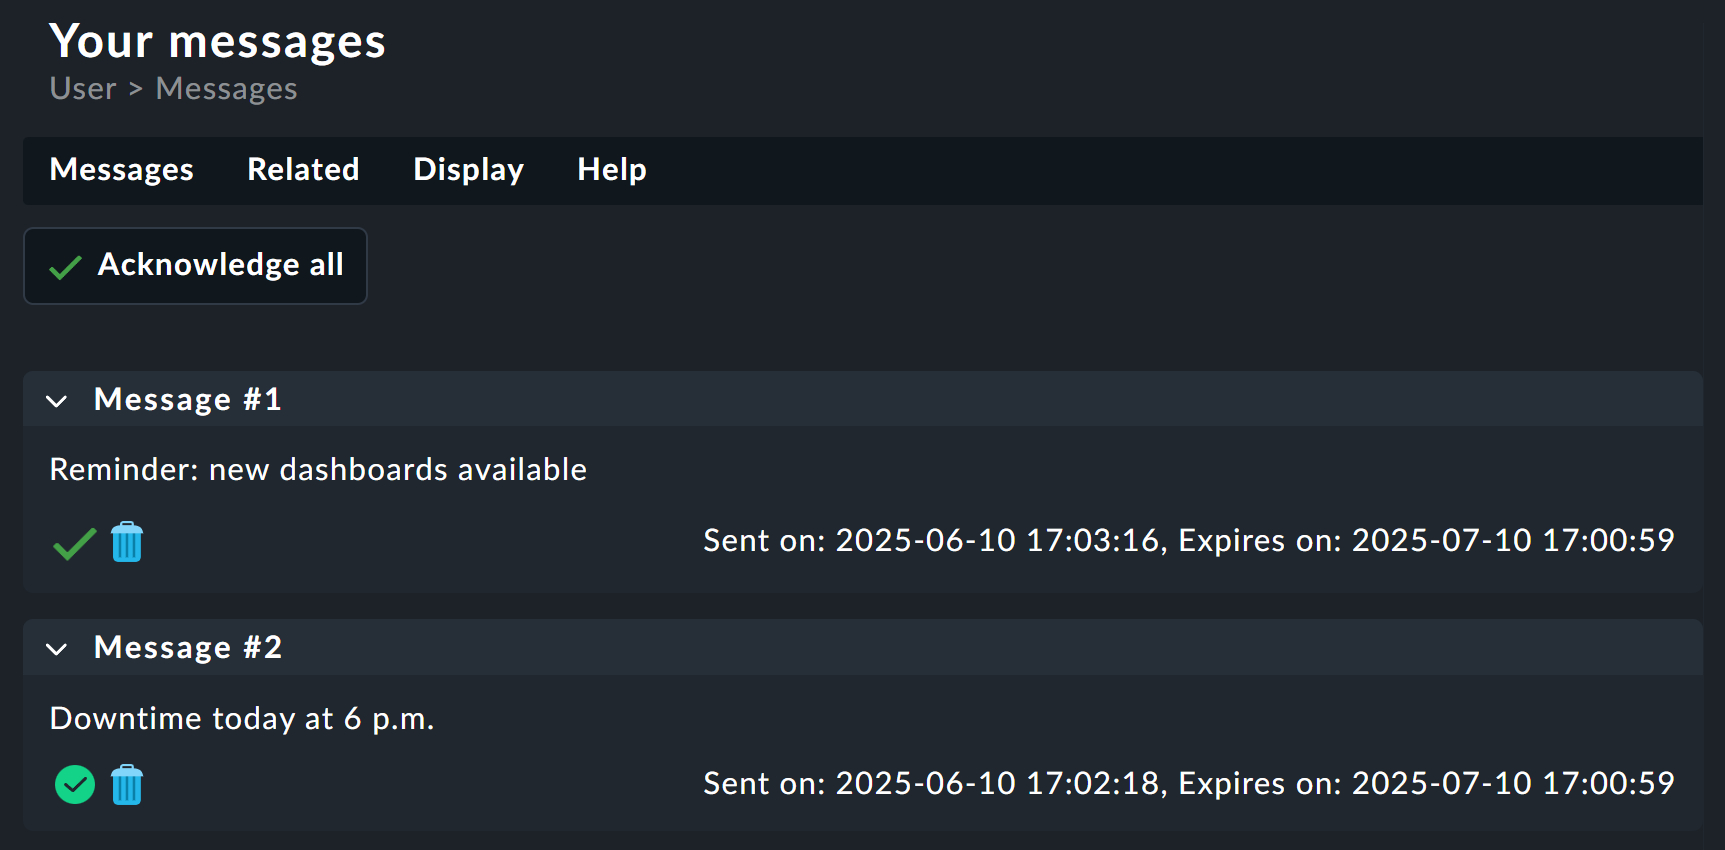
A special feature of the option Show hint in the 'User' menu: Via User messages > Received messages users can find their collected messages and acknowledge and/or delete them.
Checkmk automatically notifies users of security-relevant alterations to their accounts. These include changes to the password and two-factor authentication (activation, deactivation, login via backup code, and the creation and revocation of backup codes). If an e-mail address is stored for the user, notifications are sent by e-mail, otherwise they are sent via the message tool.
Security messages are triggered only by actions within the Checkmk GUI. They cannot be deleted by the user, however the display duration of these messages can be configured via Setup > General > Global settings > User management > User security notification duration. By default, the display duration is 7 days.
14. Further topics
Checkmk supports more methods of logging in:
Connection of an LDAP/Active Directory
Authentication with SAML
Authentication with Kerberos
Authentication in a setup with reverse proxy
Authentication with HTTP basic authentication
15. Files and directories
The following list shows which files and directories on the Checkmk server are concerned with user management.
As always all entries here are relative to the site directory (e.g. /omd/sites/mysite).
| Path | Function |
|---|---|
|
Passwords for users in Apache |
|
This file contains a random secret used to sign login cookies.
In distributed environments, this file should be the same for all sites — and will be so if you set everything up with the web interface.
If this file is changed, all logins are immediately invalidated and users must log in again.
This file is privileged |
|
Serial numbers of passwords per user. Any change of the password increments the serial number and thus invalidates all current sessions. This ensures that a password change reliably logs a user out. |
|
Contains the users set up with the configuration environment. Only the data on the users who deal purely with the GUI is stored here. Manual changes in this file take effect immediately. |
|
Contact information for the users set up with the configuration environment.
All data relevant to the configuration of the monitoring core is stored here.
Only users who are also contacts are listed here.
For manual changes to take effect here, the new configuration must be loaded into the core — e.g. with |
|
Every user who has logged in to the GUI at least once has a subfolder here where things like custom views and reports, the current sidebar configuration and much more are stored in small individual files with the extension |
|
Log file of the user interface. Here you will find error messages regarding authentication and LDAP connections. |