1. Introduction
![]() If you use one of the commercial editions that exceed the limits of the 'Free' license state, you must, no later than the end of the trial period—that is, at the start of the first licensing phase:
If you use one of the commercial editions that exceed the limits of the 'Free' license state, you must, no later than the end of the trial period—that is, at the start of the first licensing phase:
verify your license with Checkmk and
regularly provide Checkmk GmbH/Inc. with an overview of the usage of Checkmk in your company.
Once you have completed the initial setup Checkmk can completely handle the rest of this administrative work for you. We therefore recommend—whenever possible—using this online verification. Only if this is technically impossible for you—e.g., because the system on which your Checkmk runs is not allowed to have internet connection—do you have to carry out the communication offline (manually).
Checkmk collects the current service metrics for all connected Checkmk sites at a random time each day. These are displayed clearly and transparently in the license usage report. Checkmk stores this information for a period of 400 days. Older data is removed.
2. Obtaining licensing credentials from the customer portal
You must first obtain the licensing credentials. To do this, open the Checkmk Customer portal. Log in there to generate the Licensing Credentials.
Note: When you purchased a Checkmk edition, you received the login credentials for the Checkmk customer portal. If you do not have them (anymore), please contact the Checkmk Sales.
Select your license. The view will then look like this, for example:
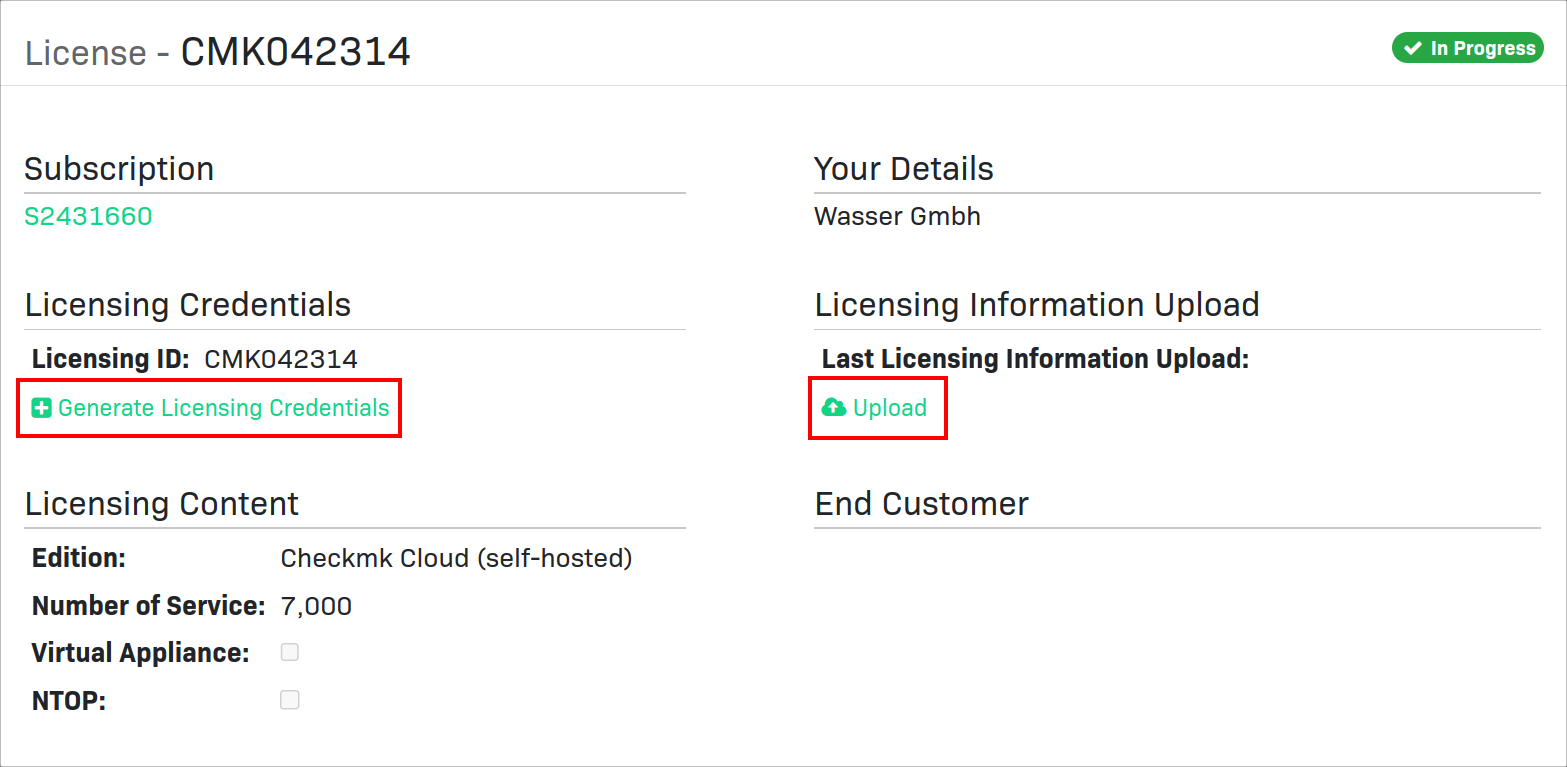
If you do not see the highlighted buttons, your user account may not have the appropriate permissions in the Checkmk customer portal. In this case, please contact the administrator responsible for license renewal at your company. |
Now click Generate Licensing Credentials to initiate the password generation process. First, you will see a security notice that you must confirm by clicking Generate & Show Credentials:

After that, the Licensing ID and Password will be displayed:

Copy both one after another into Checkmk, as described below. Afterwards, you can close this window by clicking Done.
3. Licensing in Checkmk
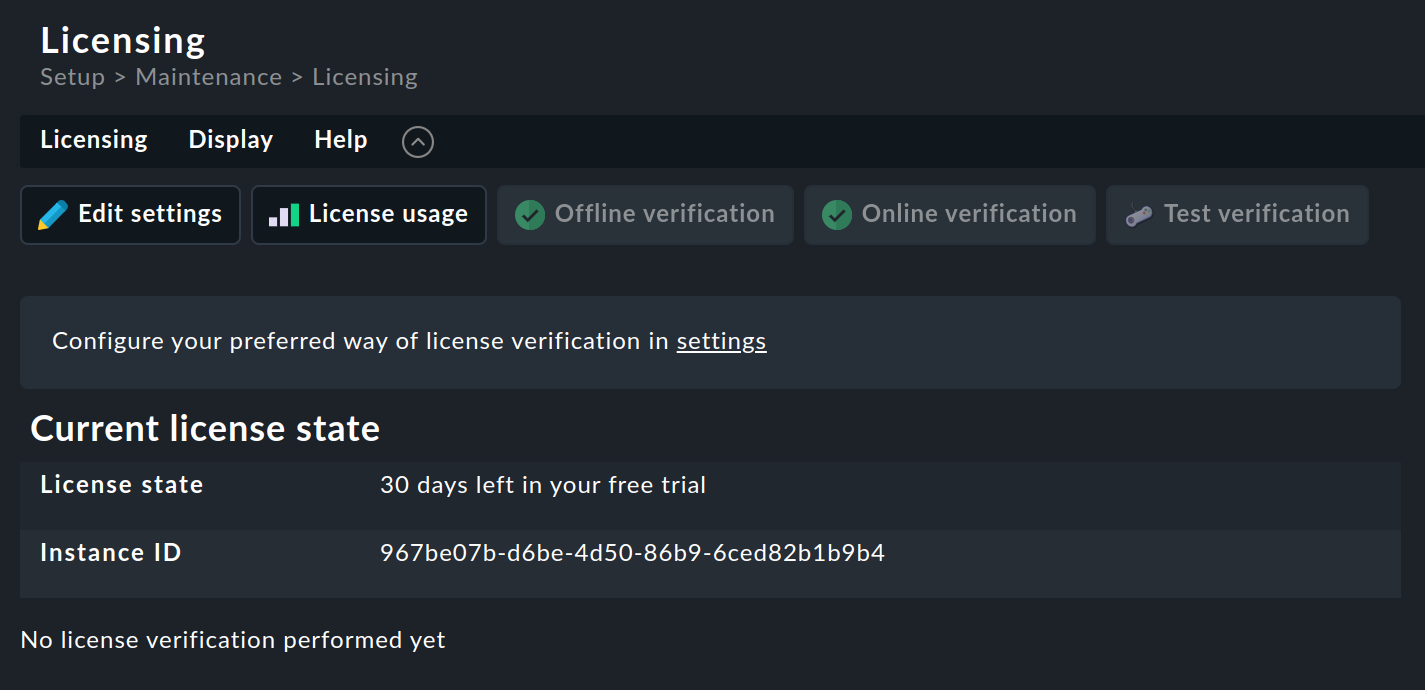
As a Checkmk administrator, open Setup > Maintenance > Licensing. The page will remain blank until license information has been entered.
Use the Edit settings button to open the page of the same name:
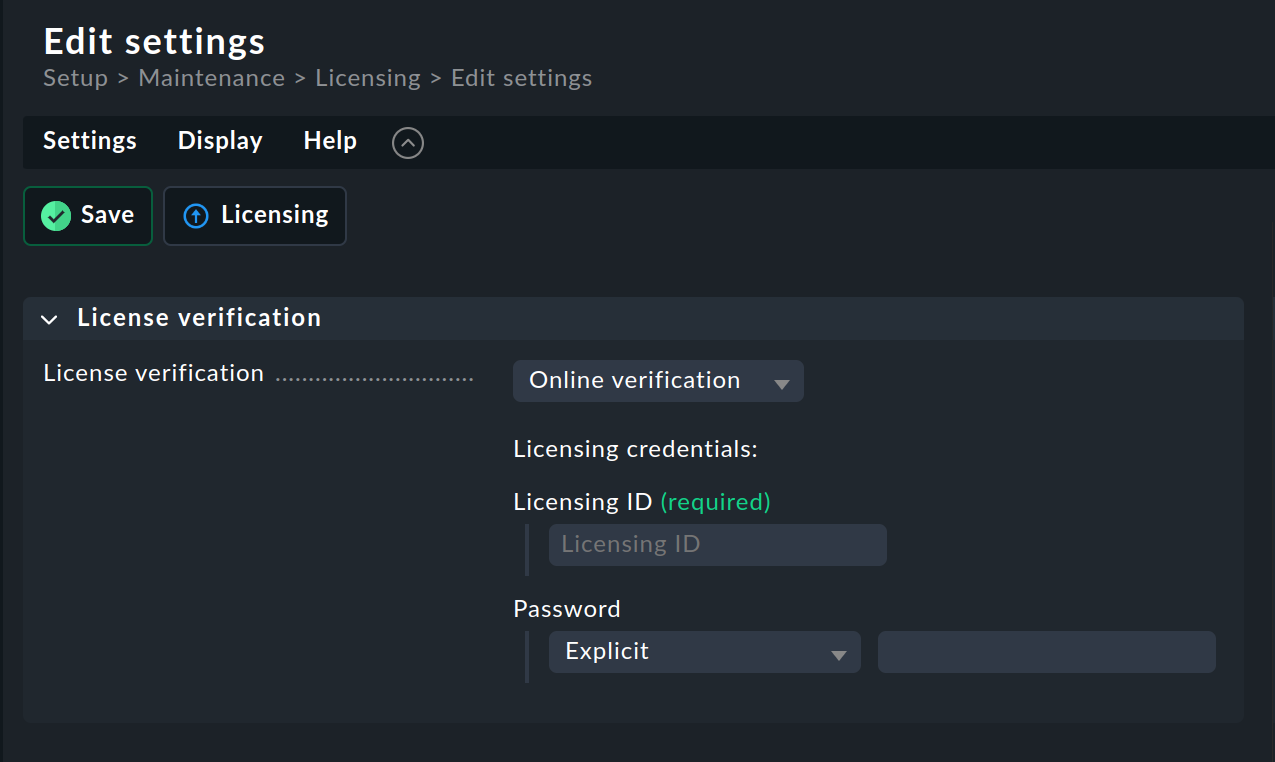
Now choose whether you want to submit the license information online or offline. We recommend using online submission. Then Checkmk can handle all further licensing activities for you, as described in the section Have information automatically submitted online. For online submission, fill in the fields Licensing ID and Password with the information from the customer portal.
If you are using a proxy, you can use the setting Auto-detect proxy settings for this network. Checkmk will then use the settings configured on the server running Checkmk. If you want or need to specify a proxy explicitly instead—for example, because your company requires the use of a dedicated corporate proxy for this data flow—select Globally configured proxy and enter the information for your HTTP proxy in the global settings.
Finally, click Save to save your settings.
If you are required to submit your data offline, please refer to the section Submitting information offline.
3.1. Have information automatically submitted online
Your license information is always transparently available for you to view. The information displayed on the License usage and Edit settings pages is used.
The licensing data must have been entered in Checkmk before the first transmission.
As a precaution, please verify that your Checkmk server can contact the customer portal. For information on the required ports, see the article of the same name. |
The necessary data will be automatically transferred when you save, and you will receive a success message in Checkmk:
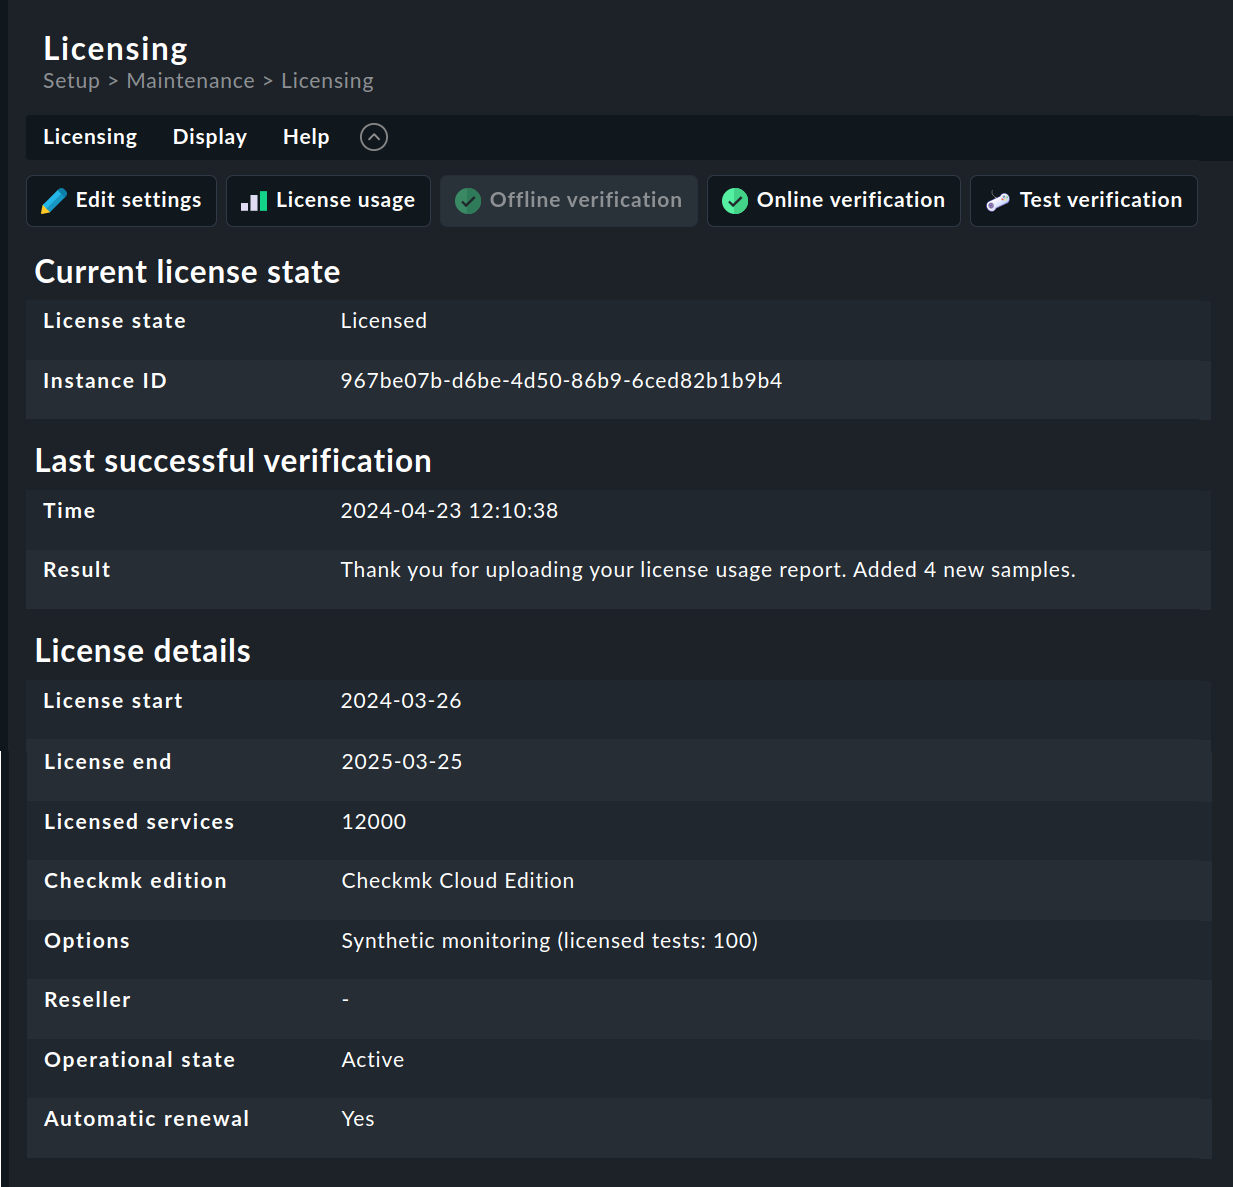
Your Checkmk site has now been activated for licensed use.
From now on, Checkmk will regularly report your current license usage to Checkmk GmbH/Inc. After each successful transmission, you can see a confirmation and a summary of the information sent. As part of this process, Checkmk will also automatically retrieve new license information from the Checkmk customer portal if you have expanded or renewed your license in the meantime.
You can trigger a resynchronization of your data with the Checkmk customer portal at any time by clicking the Online verification button.
Please note: If you want to switch the edition, simply changing the license key is not enough. You must also install a matching edition of Checkmk and activate it for the affected sites. In this case, please also refer to the article on upgrades to learn how to perform edition upgrades or downgrades. |
3.2. Submitting information offline
It is also possible to manually upload your license usage information to the customer portal. However, since this is more time-consuming, we recommend that you only use this option if you are required to do so for technical reasons.
To do so, open Setup > Maintenance > Licensing.
After clicking the ![]() Offline verification button, you will be taken to the following page:
Offline verification button, you will be taken to the following page:
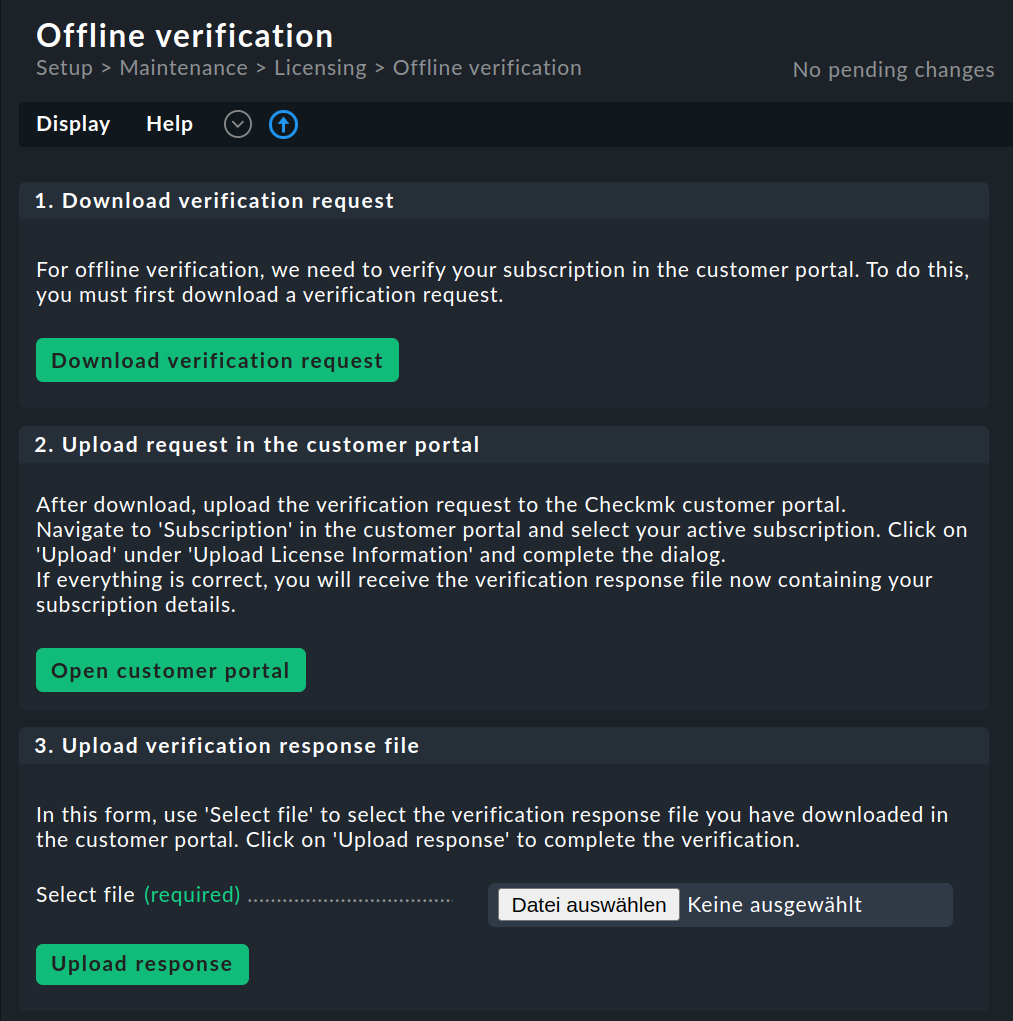
Follow the instructions on this page:
Download the required data from Checkmk.
Next, upload the corresponding file to the customer portal.
Then upload the response file you receive to Checkmk to complete the process.
Please note: If you want to switch the edition, simply changing the license key is not enough. You must also install a matching edition of Checkmk and activate it for the affected sites. In this case, please also refer to the article on upgrades to learn how to perform edition upgrades or downgrades. |
3.3. Distributed monitoring and license transmission
In a distributed monitoring system with central setup, license verification and the reporting of license usage for all connected sites are handled by the central site. When you add a new remote site, the license for that site is also automatically verified via the central site. Online verification then automatically handles communication between Checkmk and the central site. With offline verification, you must renew the license on the central site and report usage from there each time you renew your license.
In the case of distributed monitoring without a central setup, license verification and the reporting of license usage must be handled for each site. This means that transfers to and from the customer portal are not only necessary on the central site but must also be performed on all remote sites. When you add a new remote site, you must explicitly perform the license verification for that site once (online or offline). Online verification will then automatically handle both tasks for the entire license term. Only with offline verification you need to ensure, with each license renewal, that all sites renew the license and report usage.
A site newly created with a commercial edition has the 'Trial' license state for the first 30 days. Once the distributed monitoring has been set up—whether with or without a central setup—you can therefore enter the licenses one by one within this period. Be sure to license each newly added site before the end of its trial period. |
3.4. Renew licenses
What happens when your license period is nearing its end? Checkmk will remind you in the monitoring system about the upcoming renewal of your license. Meanwhile, your monitoring will continue as usual, and notifications will be sent out regularly. Once your license period has expired, the ability to activate changes will be disabled—after a "grace period" that we will grant you.
The following applies to license renewals:
If you have enabled online verification and completed the renewal process, you do not need to take any further action. Checkmk handles the necessary processes entirely on its own; you will not notice anything during ongoing monitoring.
If offline verification is enabled, you must renew the license via the customer portal. Then perform an offline transmission to update the license expiration date.
4. Displaying license usage information
Checkmk begins displaying license-related information in the form of a color-coded chart as soon as you start using the software.
Once the license management has been running for at least two full days, you will see a chart like this:
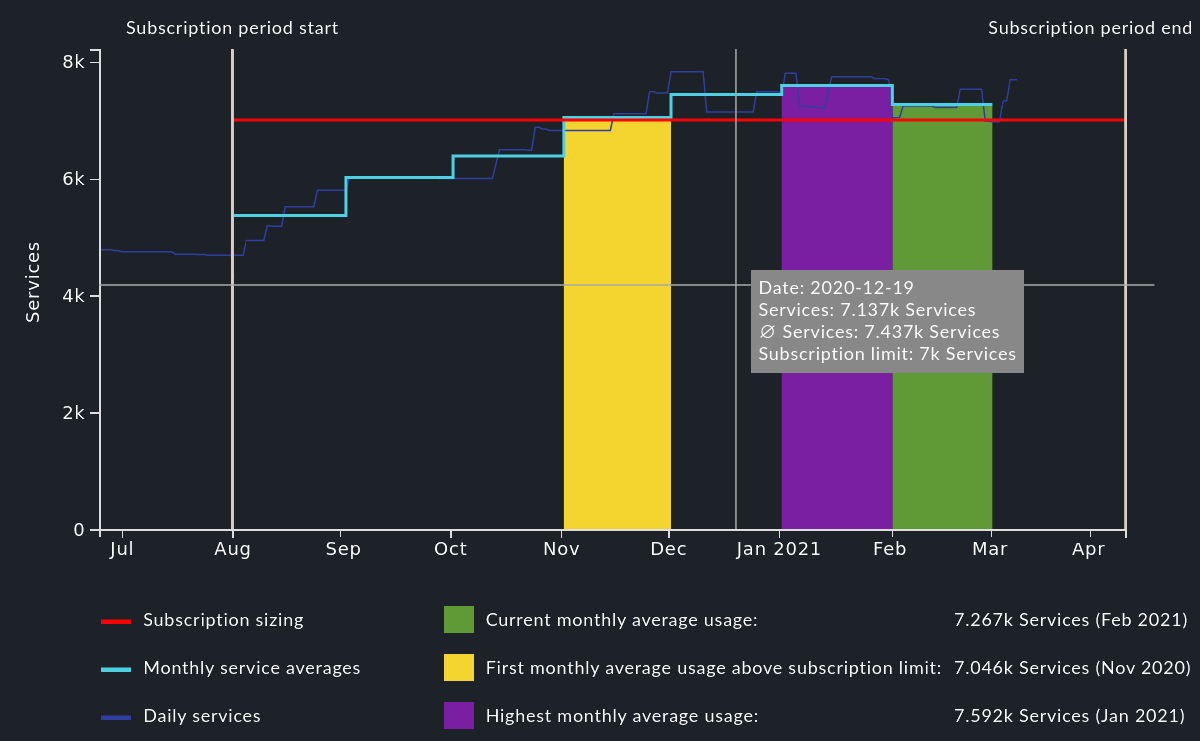
The different colored elements allow you to see the following:
The red line shows the currently contractually agreed-upon license limit. This makes it easy to identify sites in which the number of services exceeds the limit.
The light blue line shows the average number of services per month. This smooths out spikes caused, for example, by a misconfiguration.
The dark blue line shows the total number of monitored services across all connected sites for each day.
The green bar shows the average number of services in the current month.
The yellow bar shows the first month in which the license limit was exceeded.
The purple bar shows the month with the highest license overage.
The table below this chart provides an overview of the services and hosts as reported to Checkmk GmbH:

Licensing distinguishes between:
Licensable services / Hosts |
Number of services or hosts used to determine the license size. |
Excluded services / Hosts |
Services or hosts that are not included in the license size calculation. These are intended for sites used to test new features, configuration changes, or similar aspects of Checkmk. To mark services or hosts as excluded, set labels of the type |
Shadow services / Hosts |
Services or hosts that are automatically created as shadow services or hosts for technical reasons. They are not included in the license calculation. |
Cloud services / Hosts |
Cloud-based services or hosts that are used to determine the size of the license calculation. |