1. Introduction
Host tags are keywords that can be assigned to hosts in order to structure and organize them, for example by importance, IP address family, or the way the host receives its data. For instance, host tags will be inherited via the folder structure in Checkmk and can be selected as a condition in rules for targeting hosts.
Host tags are useful not only for performing a configuration, but also for the monitoring. For example, there is a filter for host tags in views and the Virtual host tree snap-in can arrange your folders in a tree diagram based on the tags.
Likewise, on the command line, for many commands with the @foo syntax you can select all hosts with the foo tag.
To ensure sure that everything makes sense, you should create your own host tag structure that best fits your environment and which matches the other options in the structuring hosts procedure. Once set up, subsequent changes to host tags are possible, but should be avoided — since renaming the ID of a tag will require manual rework in most cases.
But before we show you how to define your own host tags in the Setup, let’s first clarify some terms.
1.1. Host tag groups
Host tags are organized in groups known as host tag groups. There are two different types of tag groups. This distinction is very important for the overall structure of your host tags. There are tag groups that contain multiple tags, and there are tag groups that contain only one tag: the checkbox tags.
Groups with multiple tags
A good example of such a host tag group is Data center with the possible tags Data center 1 and Data center 2.
This would then assign each host to precisely one of these two data centers.
If you want to create hosts that are not in either data center, you will need a third selection option, Not in a data center for example.
Each host in Checkmk gets exactly one tag from this tag group.
This is why setting the default value is important.
The default value is set when a host is not explicitly assigned a tag from the group.
When creating a tag group, the first tag in the list is the default value.
For the Data center example, the Not in a data center tag will likely be the appropriate default value.
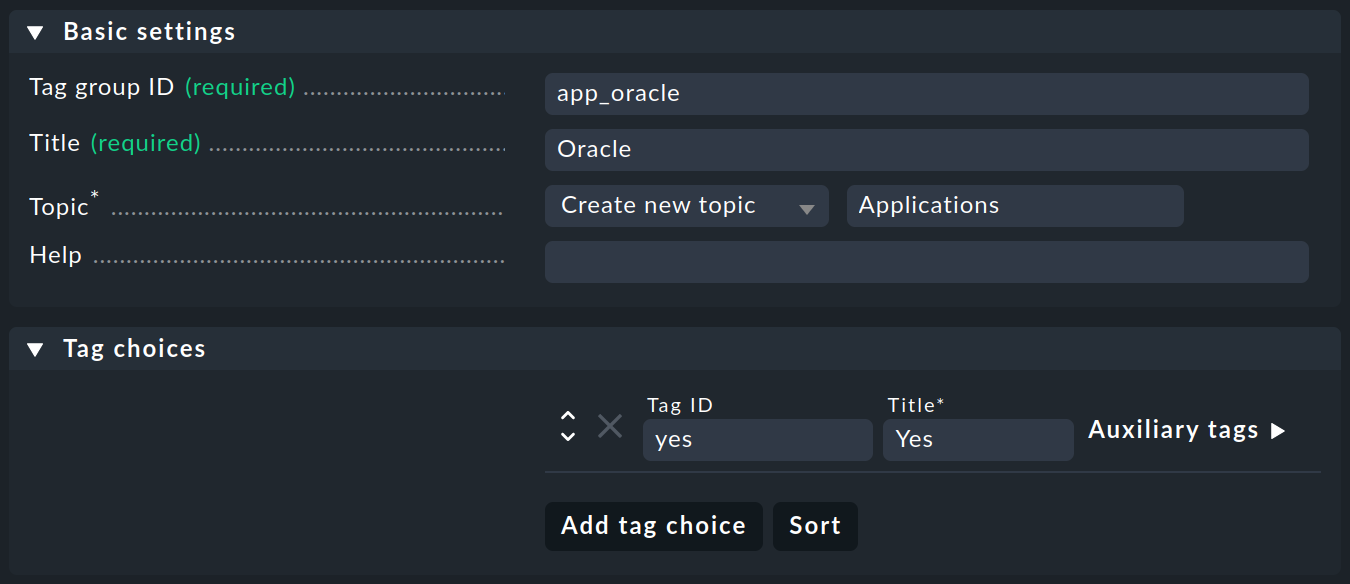
Some users have tried to map the application running on a host into a tag group.
For example, the group was called Application and had the tags Oracle, SAP, MS Exchange, etc.
This will work fine until the day comes when a host has two applications — and that day is sure to come!
The proper solution for assigning applications to hosts is different:
Create a separate tag group per application which provides only two options (in other words, tags): Yes or No.
And if you can do without a tag like No altogether and just want to activate or deactivate a tag, then simply use the checkbox tags in Checkmk.
Checkbox tags
Checkmk allows you to create tag groups with only a single tag, the so-called checkbox tags.
For the above example of an application, you can then create a tag group Oracle with the single tag Yes — i.e. you can omit the No.
A checkbox tag is not displayed on a list in the host tags, but instead as a checkbox.
Checking the checkbox sets the tag, otherwise the tag will be omitted.
In contrast to tag groups with multiple tags, where exactly one tag is always set or activated, checkbox tags remain deactivated by default.
1.2. Topics
To avoid confusion when you have a large number of host tag groups (e.g. because you have a large number of different applications), you can combine the tag groups into topics. All tag groups with the same topic
are grouped together in a separate box in the host properties and
show the name of the topic before that of the tag group in the conditions for a rule, for example Applications / Oracle.
The topics thus have 'only' a visual function and have no effect on the actual configuration.
1.3. Auxiliary tags
Auxiliary tags solve the following problem:
Imagine that you define a host tag group Operating System, with the four tags Linux, AIX, Windows 2019, and Windows 2022.
Now you want to define a rule that should apply to all Windows hosts.
One way to do this is to define an auxiliary tag named Windows.
Assign this auxiliary tag to both Windows 2019 and Windows 2022.
A host that has either tag will then always automatically receive the auxiliary tag Windows from Checkmk.
In the rules, Windows will appear as a separate tag for resolving conditions.
This solution has the great advantage that it can be very easily extended at a later date to include new versions of Windows.
For instance, as soon as Windows 3.0 appears in 2030, you simply create a new tag Windows 3.0 and also assign the auxiliary tag Windows to it.
All existing rules that use this auxiliary tag will then automatically apply to the hosts with the new tag.
This saves you having to check and edit each individual rule.
2. Predefined tag groups
You can get started configuring the host tags via Setup > Hosts > Tags:
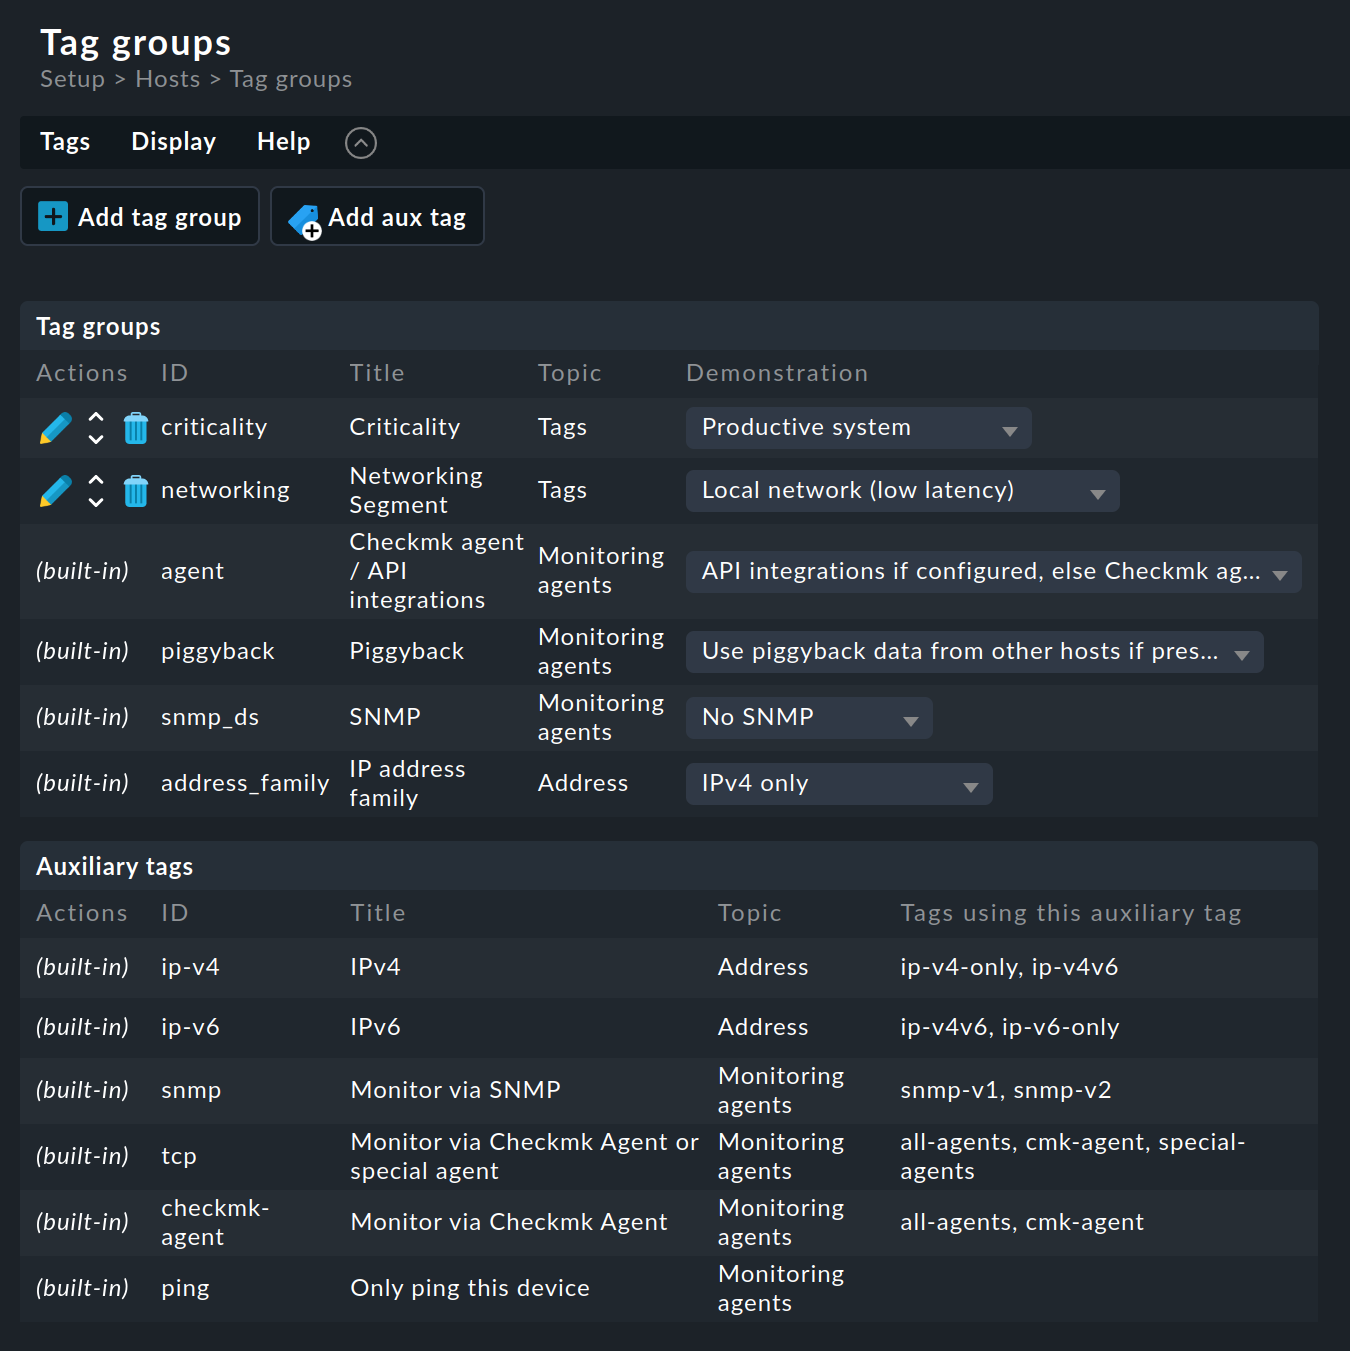
Checkmk sets up multiple host tag groups during an installation:
| Group ID | Group Title (Name) | Function | Possible tag | Tag ID |
|---|---|---|---|---|
|
Criticality |
System criticality. For the |
Productive system |
|
Business critical |
|
|||
Test system |
|
|||
Do not monitor this host |
|
|||
|
Networking Segment |
Take this tag group as an example only. For the |
Local network (low latency) |
|
WAN (high latency) |
|
|||
DMZ (low latency, secure access) |
|
|||
|
Checkmk agent / API integrations |
Specifies how the data is fetched from the host. |
API integrations if configured, else Checkmk agent |
|
Configured API integrations and Checkmk agent |
|
|||
Configured API integrations, no Checkmk agent |
|
|||
No API integrations, no Checkmk agent |
|
|||
|
Piggyback |
This tag determines whether and how piggyback data is expected/processed for the host. |
Use piggyback data from other hosts if present |
|
Always use and expect piggyback data |
|
|||
Never use piggyback data |
|
|||
|
SNMP |
This specifies whether data should (also) be collected via SNMP. |
No SNMP |
|
SNMPv2 or v3 |
|
|||
SNMPv1 |
|
|||
|
IP address family |
Determines whether the host should be monitored by IPv4 or IPv6 or both. 'No IP' is relevant for hosts queried via a special agent. |
IPv4 only |
|
IPv6 only |
|
|||
IPv4/IPv6 dual-stack |
|
|||
No IP |
|
You can customize predefined tag groups as long as they are not marked as built-in (in the Actions column).
The built-in tag groups are required internally by Checkmk when generating configurations and are therefore not modifiable.
In contrast, changes in Criticality or Network Segment are not problematic.
These are provided as examples only.
3. Creating tag groups
You start the creation of custom host tags on the Tag groups page, which again can be accessed via Setup > Hosts > Tags.
Before you can create host tags, you must first create the host tag group that will contain the tags.
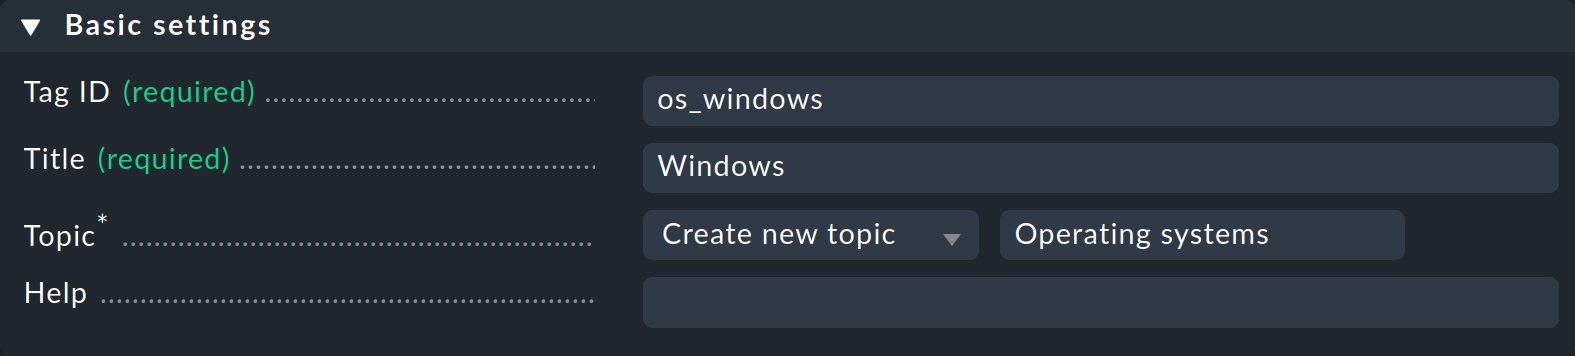
Creating a new tag group is done with the ![]() Add tag group button, which opens the Basic settings box with the following fields:
Add tag group button, which opens the Basic settings box with the following fields:
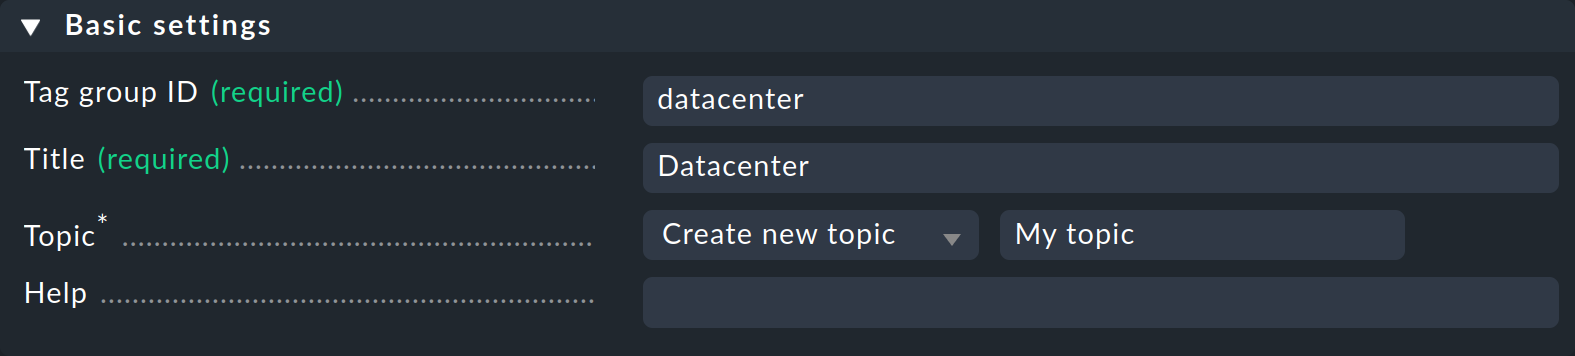
The Tag group ID is used internally as the ID for the tag group. It must be unique and cannot be changed later. The usual rules for permitted characters apply (letters, digits, underscore only).
The Title is used everywhere in the GUI where the tag group is concerned. Since this is a display only text, it can be changed at any time without affecting the existing configuration.
You can leave the Topic empty.
Your tag group will then be displayed together with the supplied Criticality and Networking Segment groups in the Custom attributes box of the host properties.
You can also create your own topics and use these to consolidate your tag groups neatly together.
Most importantly, the next box — Tag choices — is where you specify, one by one, all of the host tags for the new tag group:
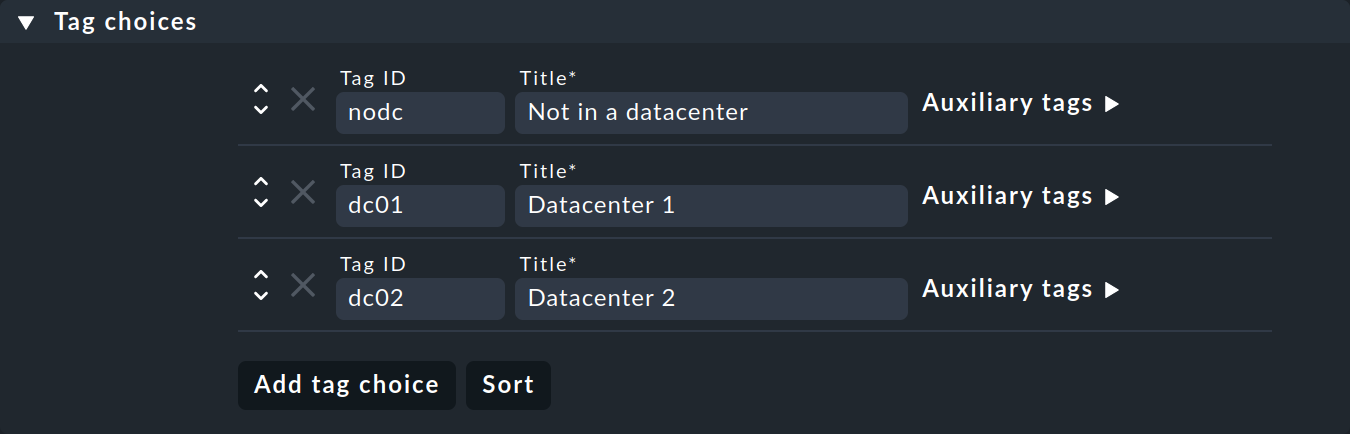
For this the Tag ID must be unique within the group.
The order, which you can change as usual with the ![]() button, has not only an optical function:
The first tag in the list is the default value!
This means that all hosts that do not have an explicit setting for this tag group are automatically set to this value.
button, has not only an optical function:
The first tag in the list is the default value!
This means that all hosts that do not have an explicit setting for this tag group are automatically set to this value.
Under Auxiliary tags, you can assign auxiliary tags to each host tag to be automatically added to the host when the host tag is selected.
You create a checkbox tag in the same way, by creating a tag group but containing only one tag:
In the host properties, this tag will then be displayed like this:

4. Creating auxiliary tags
In addition to the predefined host tag groups, Checkmk also sets up matching auxiliary tags, which are listed under the groups on the Tag groups page.
You can create new auxiliary tags with ![]() Add aux tag.
Add aux tag.
With the fixed ID and a descriptive title, all of the settings required for an auxiliary tag will be defined. The assignment of auxiliary tags to host tags is done in the tag groups.
5. Changing and deleting tag groups and tags
Modifying an existing tag group configuration may look like a simple operation at first glance, unfortunately this is not always the case, as it can have a major impact on your existing configuration.
Changes that only affect the display or only add new options are not problematic and do not affect the existing hosts and rules:
Changing the title or subject of tag and tag groups.
Adding another tag to an existing tag group.
Any other changes may affect existing folders, hosts and rules that use the affected tags. When doing so, Checkmk does not simply prohibit such changes, but tries to modify your existing configuration for you, so that everything will again make sense. The exact results will depend on the type of operation.
Checkmk can show you which host and auxiliary tags are currently in use in folders, hosts and rules: To do this, on the Tag groups page, select the Tags > Tag usage menu item. |
5.1. Deleting tag groups
Deleting a tag group removes the information for the affected tag from all hosts. If the tag group is used as a condition in existing rules, you will receive the following warning:
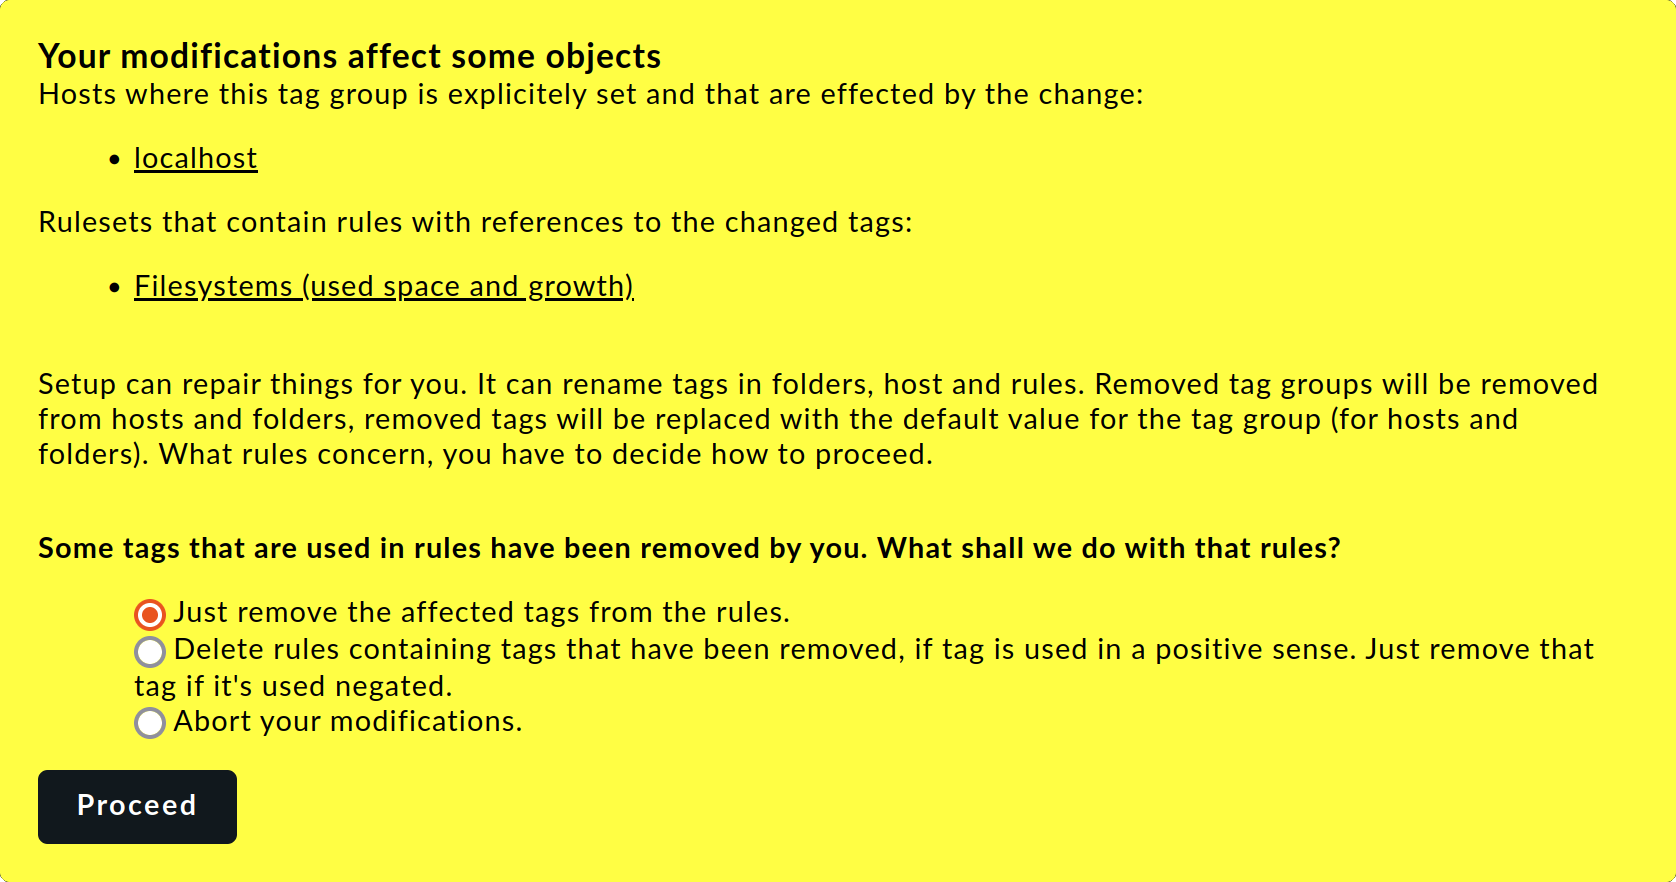
Here you have to decide whether you want to delete the conditions from the existing rules for the affected host tags, or whether you want to delete the entire rules. Both of these approaches can be useful, but Checkmk cannot decide which is better for your operation.
You select rules to be deleted with the Delete rules containing tags that have been removed, … button.
However, a rule will only be deleted if it has a positive condition with a tag in the tag group.
Rules that have a negative condition with such a tag simply lose that condition, but the rule will still exist.
For example, if you have created a rule for all hosts that do not have dc02 tag, and you remove dc02 tag completely from the configuration, then obviously this condition is
also redundant.
If you are not sure, you should go through the rules (listed in the warning) and manually remove or modify all conditions for the affected tag group.
5.2. Deleting tags
You can delete a tag by editing the group, removing the tag and then saving the changes. Doing so may result in a similar warning as when removing a tag group.
Hosts that had the affected tag set will be set to the default value automatically. This will always be the first tag in the list, as described for Creating a tag group.
For rules that contain the tag to be deleted as a condition, the procedure is the same as described in the previous section for deleting tag groups.
5.3. Deleting auxiliary tags
You can only delete an auxiliary tag if it is not assigned to a host tag.
5.4. Renaming tag IDs
Unlike tag groups, you can actually change the IDs of tags at a later time. This is an exception to the Checkmk principle that IDs are immutable once they have been assigned. This exception can be useful, however, if you want to prepare data to import from another system, for example, and need to adapt the existing different Checkmk tag structure for this action.
To rename a tag ID, edit the tag group and simply change the tag ID there.
Important: Do not change the tag’s title when doing this.
Before Checkmk proceeds with the configuration modifications, you will be warned of the consequences:
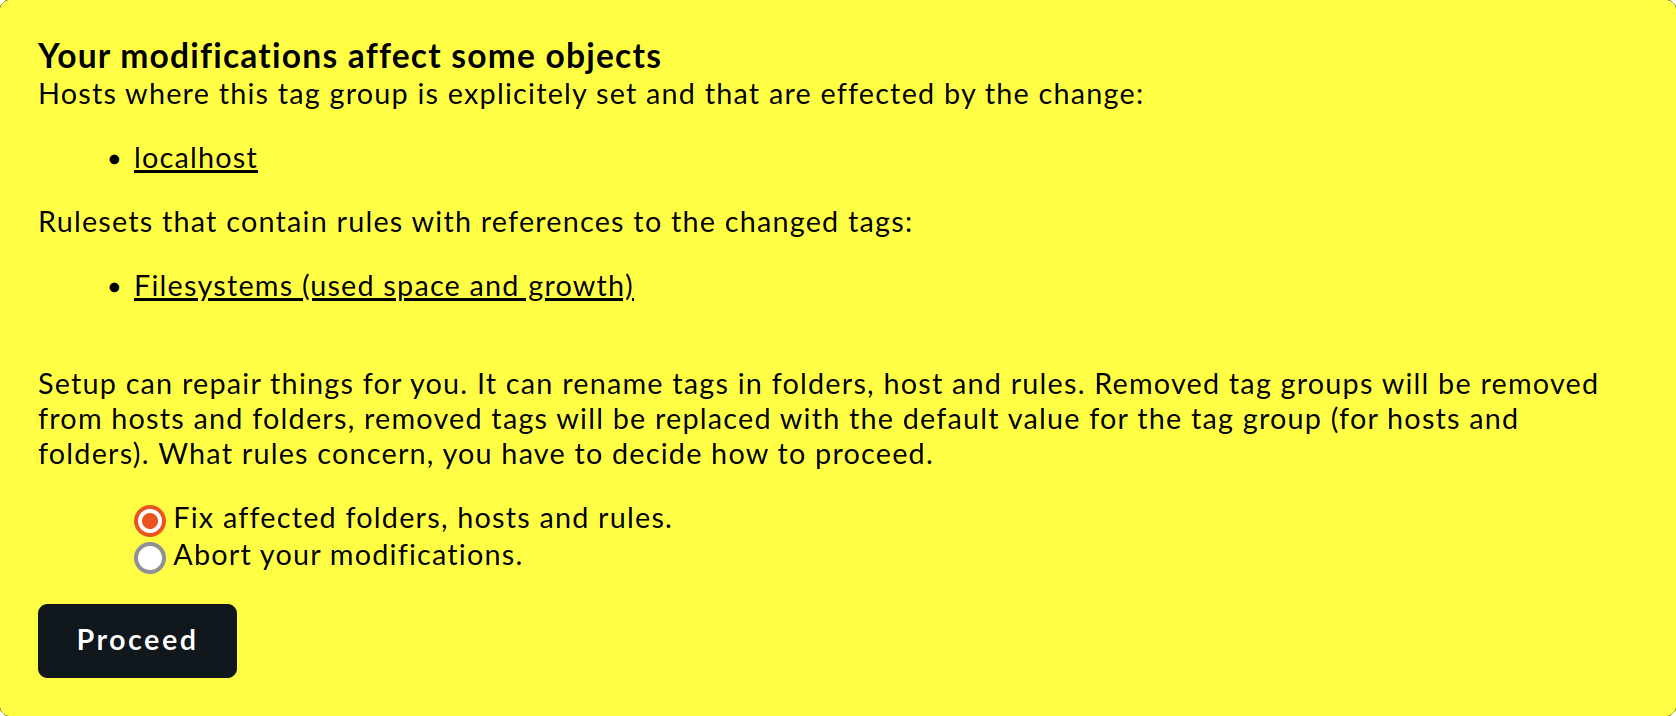
Checkmk will now modify all of the affected folders, hosts, and rules accordingly.
Note that there may still be situations where you need to manually tweak in other places. For example, tag IDs are included in URLs that call views, which filter by tags. Checkmk cannot customize these URLs for you. In addition, filter configurations in reports and dashboards cannot be automatically customized.
6. Displaying host tags in monitoring
Hosts are usually organized into folders in Checkmk. You can display the resulting hierarchy as a tree view in the sidebar at the bottom of the snap-ins Tree of folders and from there call the default view for hosts filtered per branch. The snap-in adds filtering options for topics and options for alternative views for this tree.
You can also create such a tree view from host tags and thus map a 'virtual' hierarchy — using the Virtual host tree snap-in. In addition to the host tags, you may also include the folder structure in such trees, whereby both the number of virtual trees and the respective branches are unlimited.
Let’s assume you use the three tag groups Criticality, Data center and Operating systems for your hosts.
You will then get a selection by system at the top tree level, by data center below that, and finally by operating system.
Each hierarchy level takes you directly to a view of all hosts with these tags.
To create a Virtual host tree, first add the snap-in to it via the ![]() button at the bottom of the sidebar:
button at the bottom of the sidebar:

Click on the link in the text that points to the missing configuration, or manually access the page in the global settings via Setup > General > Global Settings > User interface > Virtual host trees:

Next, create a new tree with the Create new virtual host tree configuration button:
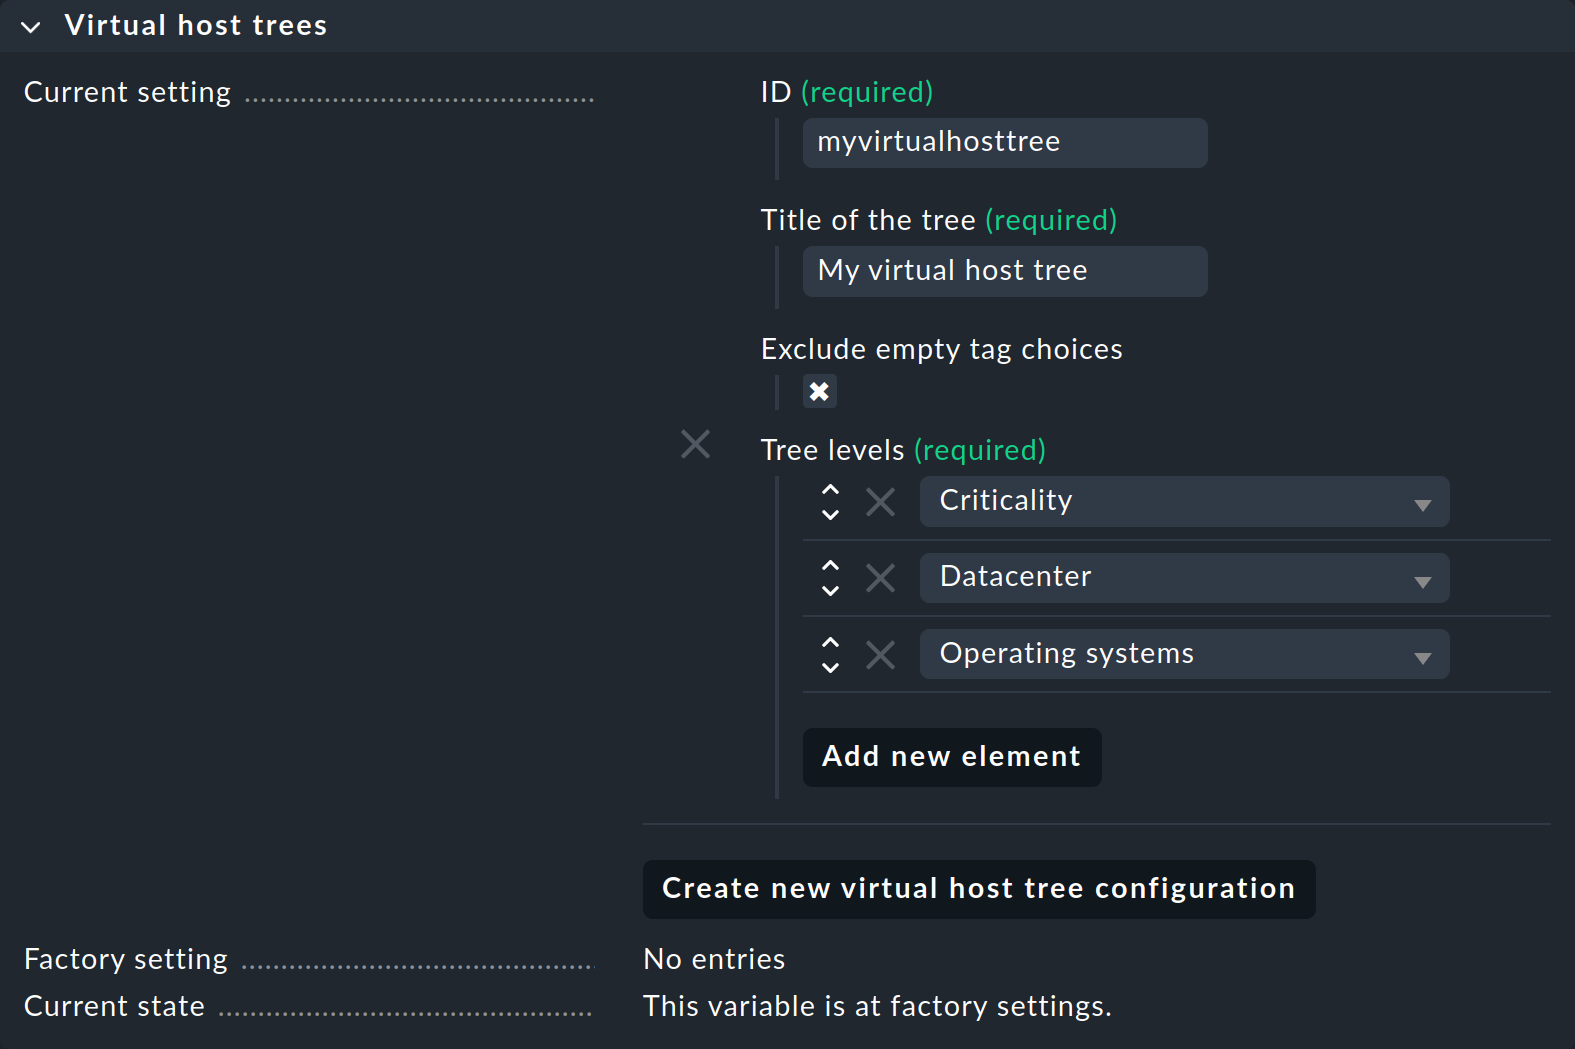
First assign an ID and a Title to the tree.
You can optionally exclude the display of empty tree branches by checking Exclude empty tag choices.
Then add the desired tag groups in the desired order via Add new element.
You can also include the folder hierarchy via Folder tree.
You can change the order for the hierarchy as usual with the ![]() button.
button.
After saving, the snap-in will now show the selected hierarchy as a tree structure:
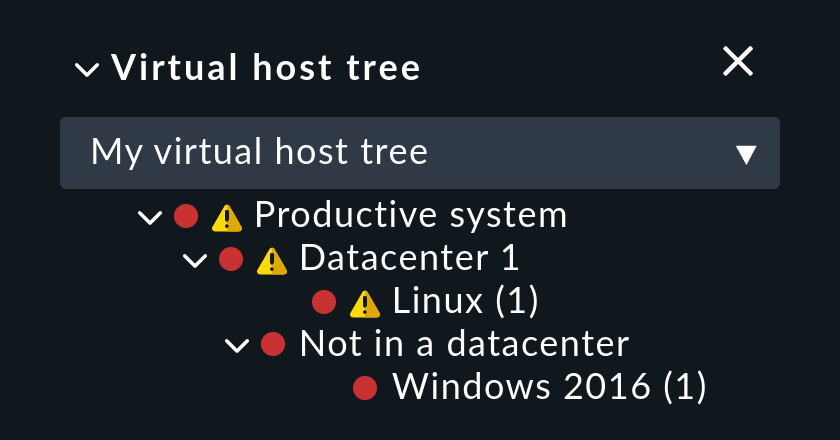
The branches and leaves of the tree are the host tags from the tag groups selected in the configuration. The numbers in parentheses alongside the 'leaves' show how many hosts have those tags.
7. Files and directories
| File path | Function |
|---|---|
|
These files contain the definitions of all host tags. |