1. Introduction
A useful feature in Checkmk’s notification system is the one with which users — even without administrator rights — can customize notifications. Users can:
Add notifications they would not otherwise receive (‘subscribe’)
Delete notifications they would otherwise receive (if not restricted)
Customize notification parameters
Completely disable their notifications altogether
2. Controlling notifications with personal rules
The entry point from the user’s point of view is the User menu, and there the entry Notification rules. On the Your personal notification rules page, a new rule can be created with Add rule.
The content of personal notification rules is similar to that of global notification rules — with one difference: they do not contain a contact selection. The user himself is automatically selected as the contact. This means that a user can only add or delete their own personal notifications.
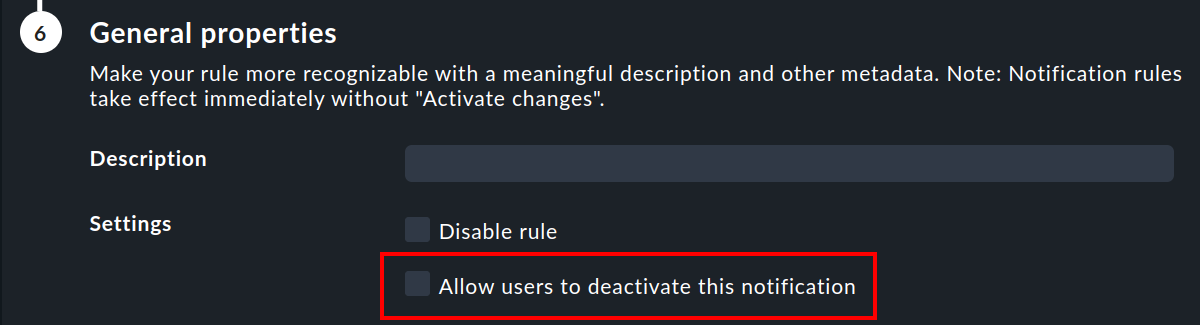
However, the user can only delete notifications if the Allow users to deactivate this notification option is activated in the (global) rule that creates them:
In the order of notification rules, the personal rules always come after the global rules and so can adjust the notification table that has been generated so far. So, except for the deletion blocking just described, the global rules always apply as the default setting that can be customized by the user.
Changes to notification rules do not require activation of the changes, rather they take effect immediately. |
2.1. Structure of the notification rules
In the following, we present the general structure of the personal notification rules with the definitions of general properties, notification method and conditions.
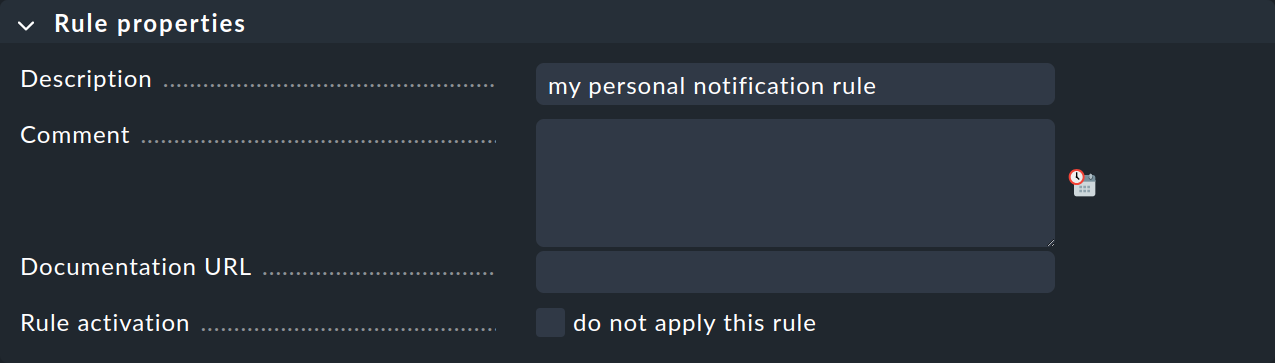
General properties
As with all rules in Checkmk, here you can include a description and a commentary for the rule, or even temporarily deactivate the rule.
Notification method
The notification method specifies the technique to be used for sending the notification., e.g. with HTML email.

Each method is realized using a script. Checkmk includes a number of scripts. You can also quite easily write your custom scripts in any desired programming language in order to implement special notifications — for example, to redirect a notification to your own ticket system.
A method can include parameters — such as allowing the method that sends ASCII and HTML emails to explicitly set the sender’s address (From:) for example.
Before making settings directly in the notification rule, one should know that parameters for the notification methods can also be specified via rules for hosts and services: Under Setup > Services > Service monitoring rules, in the Notifications section, you will find a rule set for each notification method, which you can use to define the same settings — and as usual, can be dependent on the host or service.
Parameter definitions in notification rules enable these settings to be varied in individual cases. So you can, for example, define a global subject for your email, but also define an alternative subject with an individual notification rule.
Instead of parameters you can also select Cancel previous notifications — with which all of this method’s notifications from prior rules will be deleted. For more on this, see the topic deleting notifications.
For many notification methods for forwarding to other systems, you will find more detailed information in separate articles. The list of articles can be found in the chapter on notification scripts. When using a ticket system, a messenger or an event engine as notification method, you should also observe the notes on these special cases. |
Conditions
Conditions determine when a rule will be used. For comprehension it is important to remember that the source is always a monitoring event on a concrete host or service.
The conditions address
the object’s static attributes — e.g., whether the service name contains the
/tmptext or whether a host is in a specific host group,with the current state or the change of the state, e.g. whether the service has just changed from OK to CRIT,
or with completely different things, e.g., whether the 'working time' time period is currently active.
There are two important points to consider when setting the conditions:
If no conditions have been defined the rule will take effect for every monitoring event.
As soon as you select even a single condition, the rule takes effect only if all conditions are met. All selected conditions are linked with AND. There is only one exception to this important rule, which we will discuss later and not consider now.
This means that you should pay very close attention to whether the conditions you have chosen can be met at the same time so that a notification is triggered for the desired case.
Let’s say you want a notification to be triggered when a monitoring event occurs for a service starting with the name NTP on a host in the Main folder:
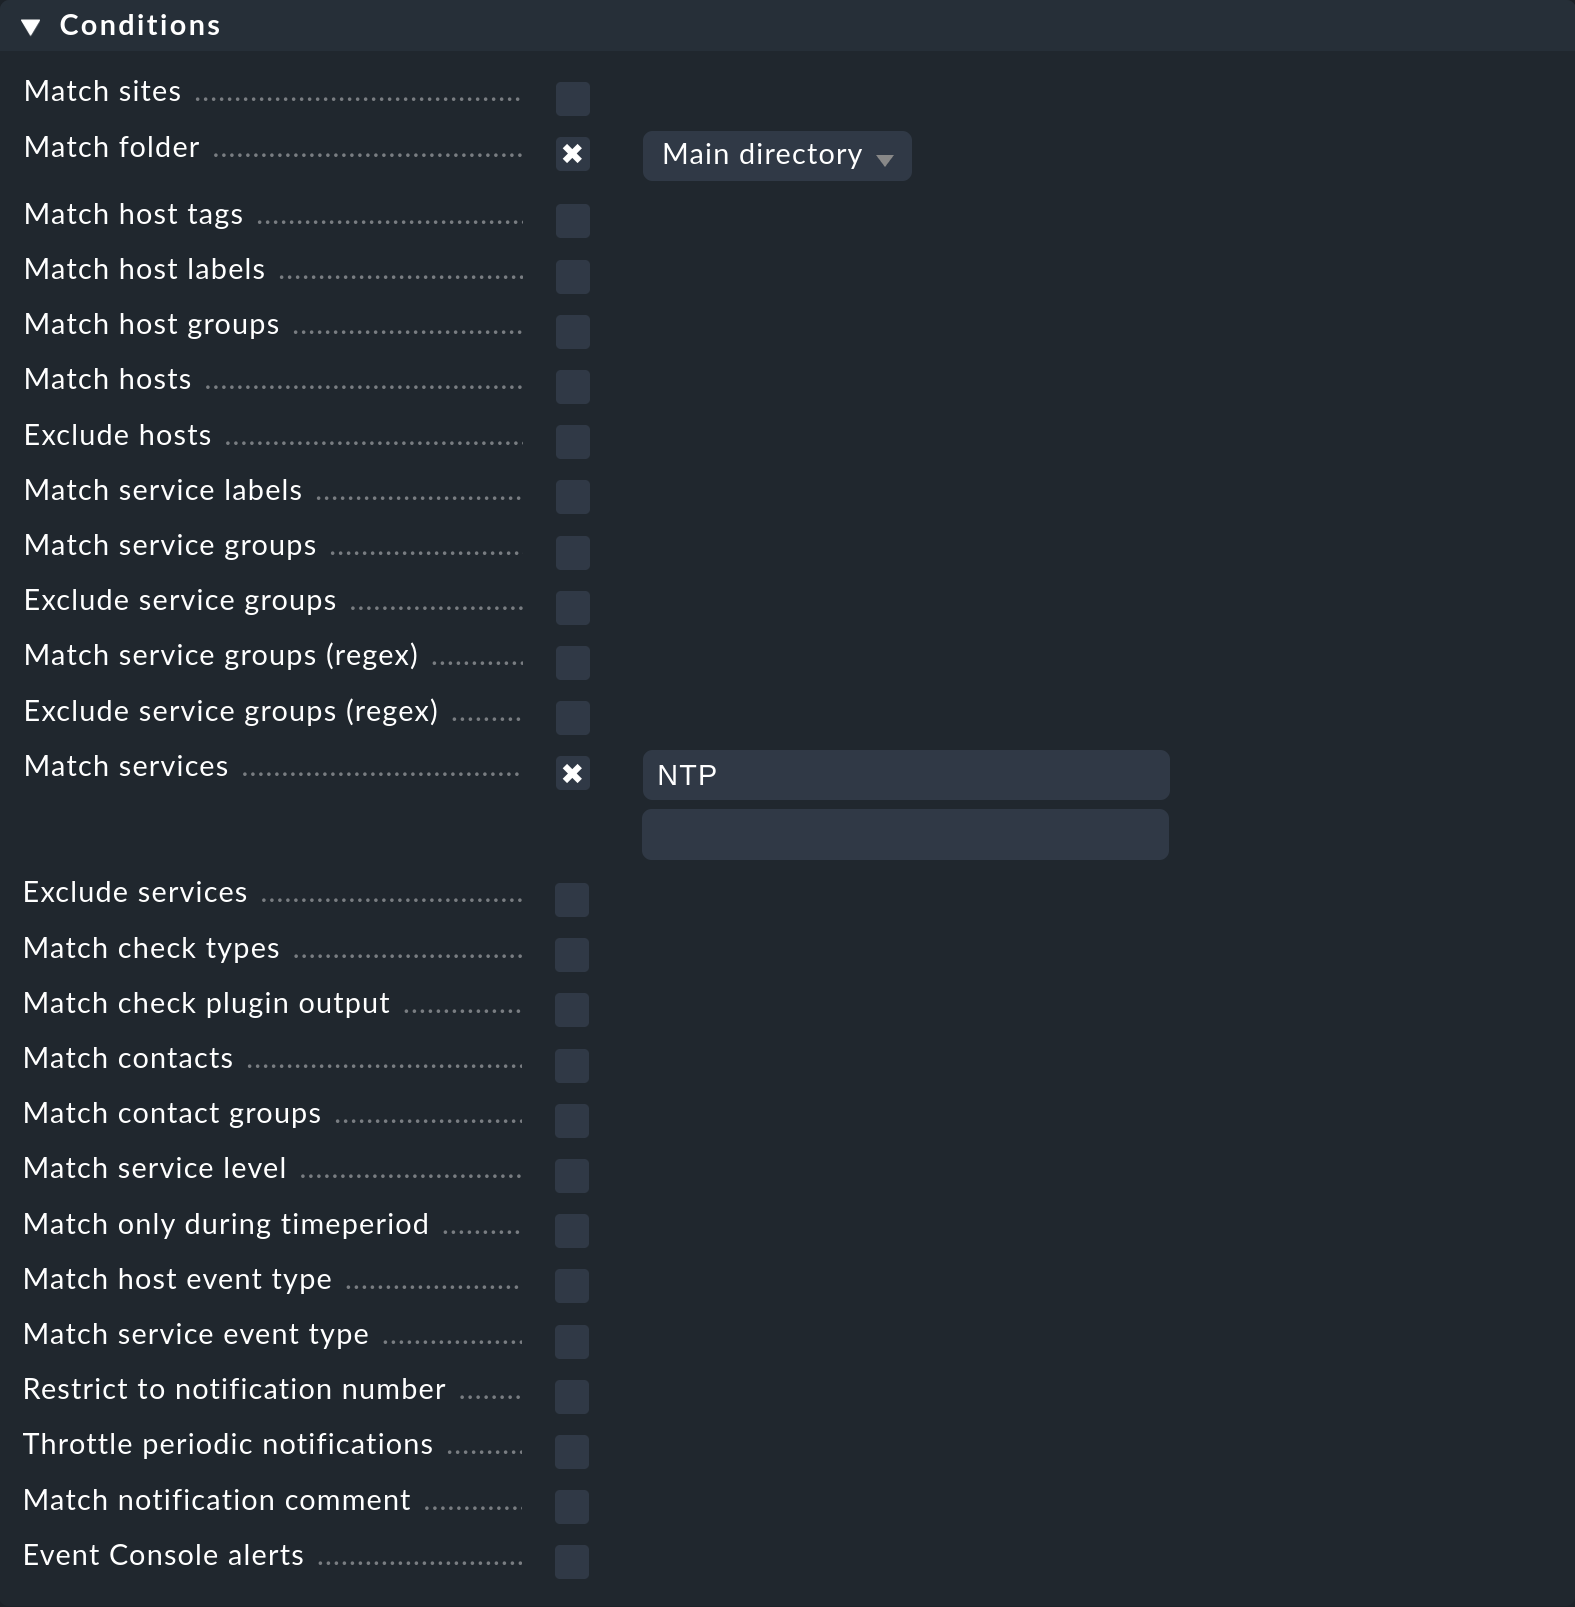
Suppose further that this condition is now extended by also notifying all state changes of a host to the DOWN state:
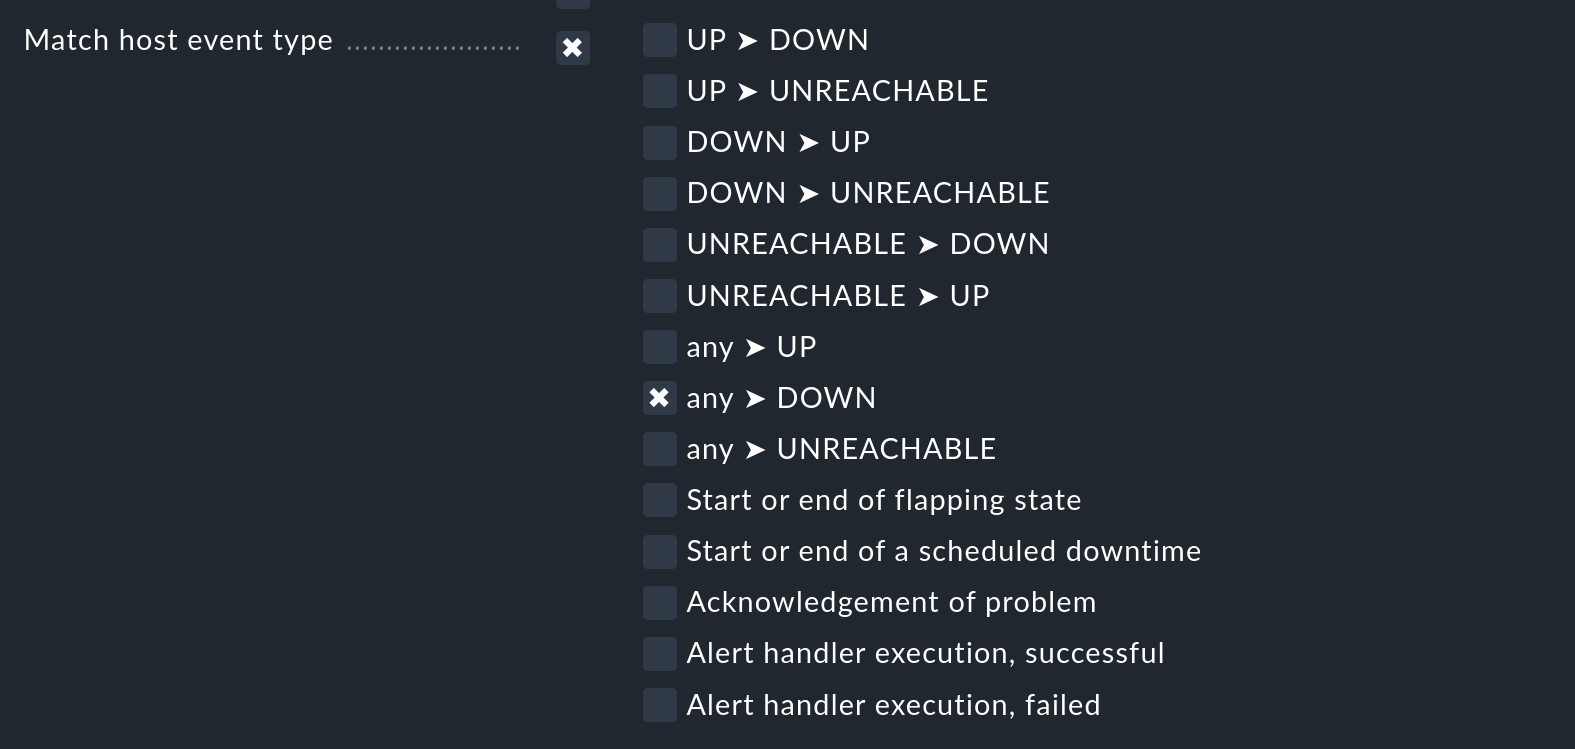
The result of this notification rule with the three single conditions is that never a notification will occur, because no monitoring event will contain the state change of a host and the service name with NTP.
The following note is repeated in this User Guide from time to time. However, in connection with the configuration of your notifications, it should be emphasized again: Show the inline help with Help > Show inline help to get details about the effect of the various conditions. The following excerpt from the inline help for the Match services option illustrates the behavior very well: "Note: Host notifications will never match this rule, if this option is being used."
The exception to the AND operation
Only if a monitoring event satisfies all configured conditions, the notification rule will apply. As mentioned above, there is one important exception to this general rule: for the Match host event type and Match service event type conditions:
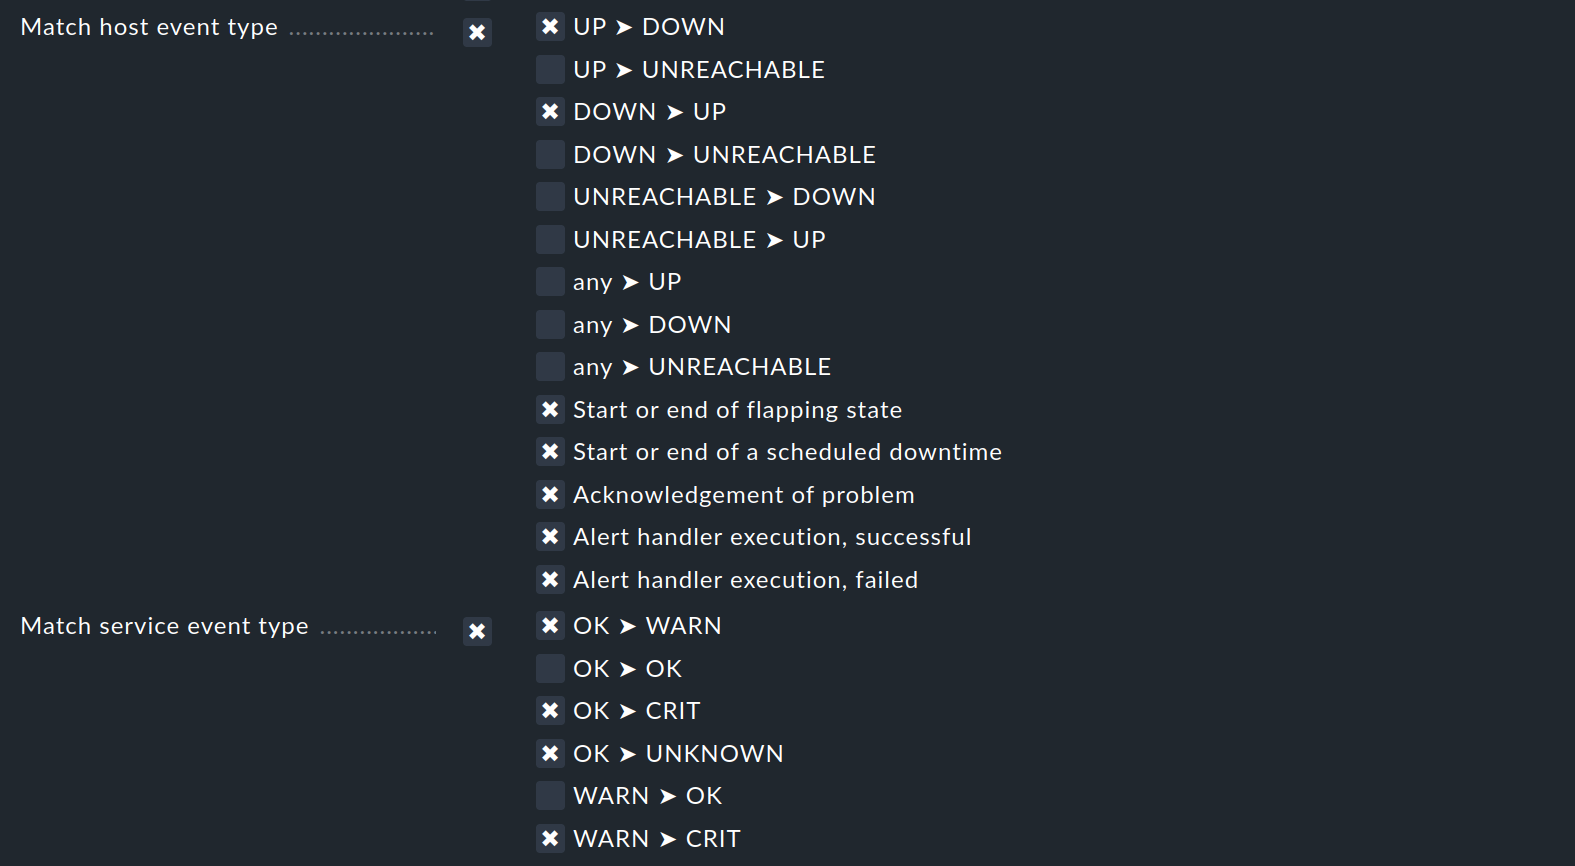
Should you select only Match host event type, the rule will match no single service event. Similarly, this applies to the selection of Match service event type and host events. Should you activate both conditions however, the rule will match if the event type is activated in any of the two checkbox lists. In this exceptional case these conditions will thus not be linked with a logical AND, but rather with an OR. In this way you can simply administer host and service notifications with a single rule.
A further tip regarding the Match contacts and Match contact groups conditions:
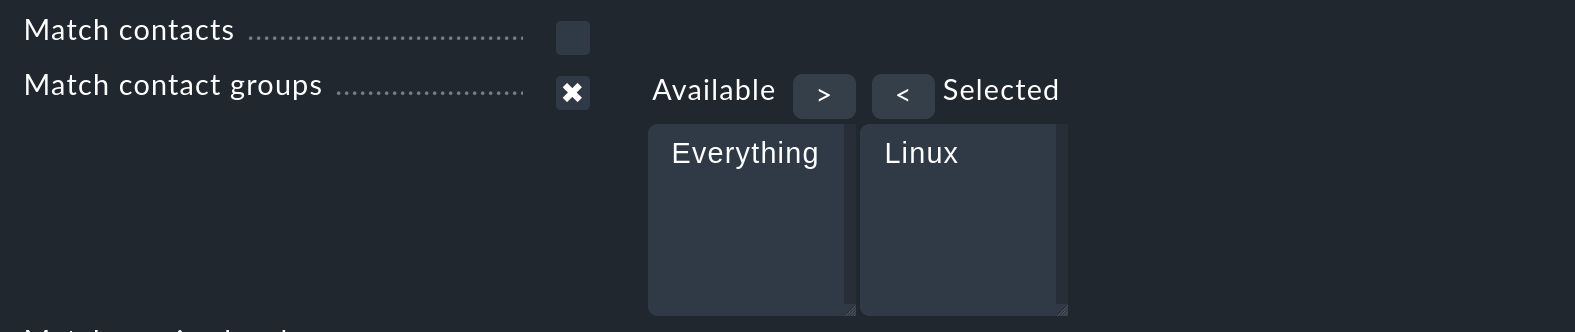
The condition checked here is whether the host/service in question has a certain contact assignment. This can be used to implement functions such as "Host notifications in the contact group Linux should never be sent by SMS". This has nothing to do with the contact selection described above.
2.2. Deleting notifications by rules
As already mentioned in the selection of the notification method, you will also find the Cancel previous notifications option. In order to be able to understand the functioning of such a rule, it is best to visualize the notification table.
Let’s assume that some rules for a specific monitoring event have already been processed. This has generated two notifications for our user, one by email and one by SMS.
Now comes the next rule with the method SMS and the selection Cancel previous notifications. As a result of this rule, the SMS notification to our user will be removed, and only an email will be generated.
Should a subsequent rule again define an SMS notification for Bruno, then this rule will have priority and the SMS will be added anew to the table.
To summarize:
Rules can suppress (delete) specific notifications.
Deletion rules must come after the rules that create the notifications.
A deletion rule does not actually ‘delete’ a preceding rule, rather it suppresses the notifications that are generated by (possibly multiple) preceding rules.
Subsequent rules can reinstate the previously suppressed notifications.
2.3. Synchronous delivery for HTML emails
You can select and configure the traceable delivery via SMTP for the notification method HTML email by entering the smarthost (with name and port number) and the access data and encryption method:
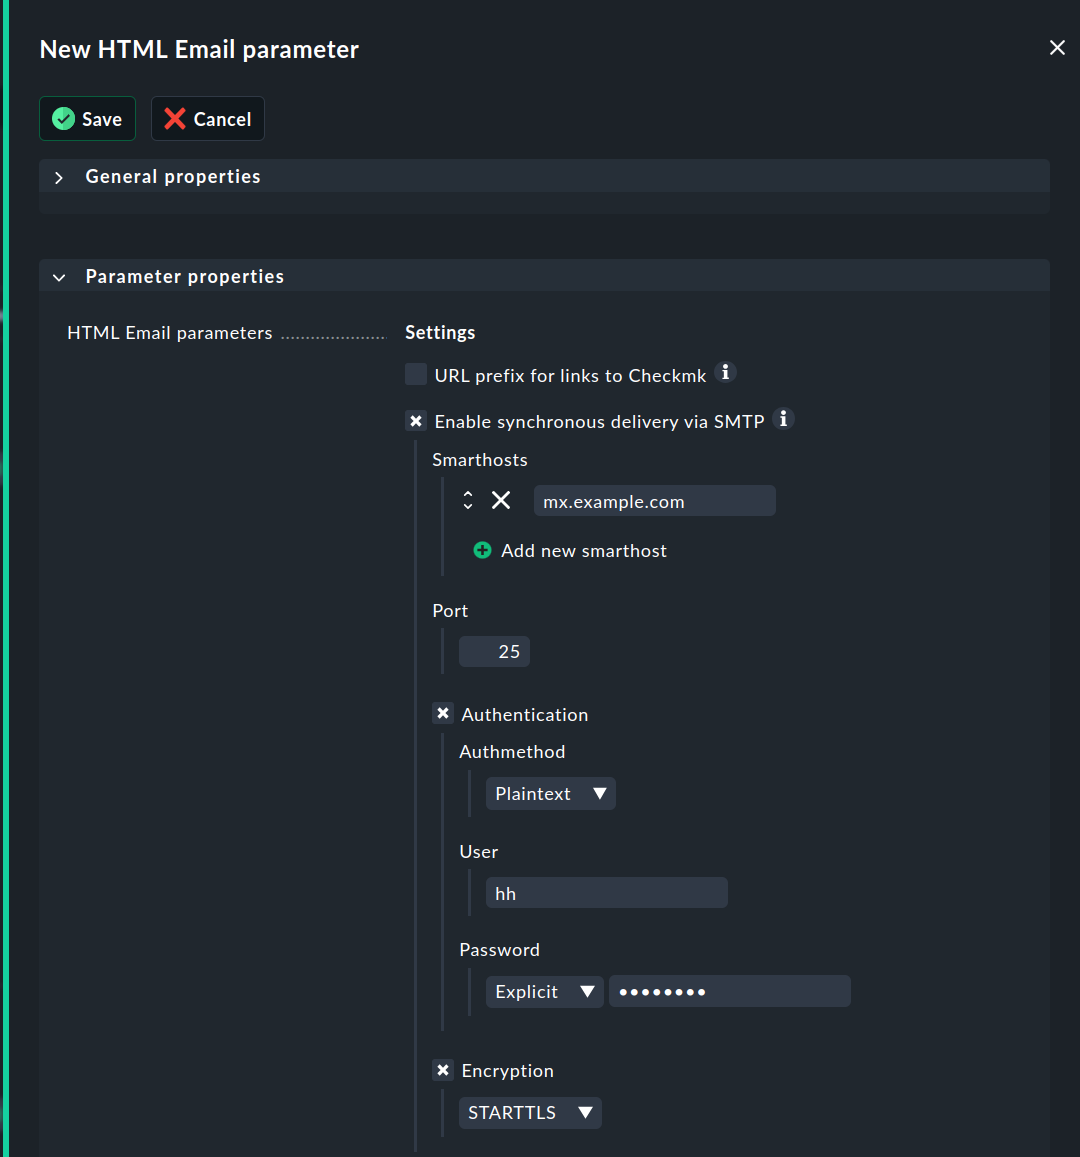
For more information on how to track successful or failed delivery in the Checkmk user interface and in log files, refer to the global notification rules article.
Important: Traceable notifications are not available for bulk notifications!
3. Bulk notifications
3.1. Overview
Everyone who works with monitoring has experienced an isolated problem setting off a veritable flood of (successive) notifications. The principle of the parent hosts is a way of reducing these under specific circumstances, but unfortunately it doesn’t help in all cases.
You can take an example from the Checkmk project itself: Once each day we build Checkmk installation packages for every supported Linux distribution. Our own Checkmk monitoring is set up so that we have a service that is then only OK if the right number of packages have been correctly constructed. It can occasionally happen that a general error in the software hampers the packaging, causing 43 services to go into a CRIT state simultaneously.
We have configured the notifications in such a way that in such a case only a single email listing all 43 notifications in sequence will be sent. This is naturally clearer than 43 single emails, and it also reduces the risk that ‘in the heat of the battle’ one misses a 44th email belonging to quite another problem.
The mode of operation of this bulk notification is very simple. When a notification occurs, at first it will be held back for a short time. Subsequent notifications that occur during this time will be immediately added into the same email. This collecting can be defined for each rule. So, for example, during the day you can operate with individual emails, but overnight with a bulk notification. If a bulk notification is activated you will generally be offered the following options:
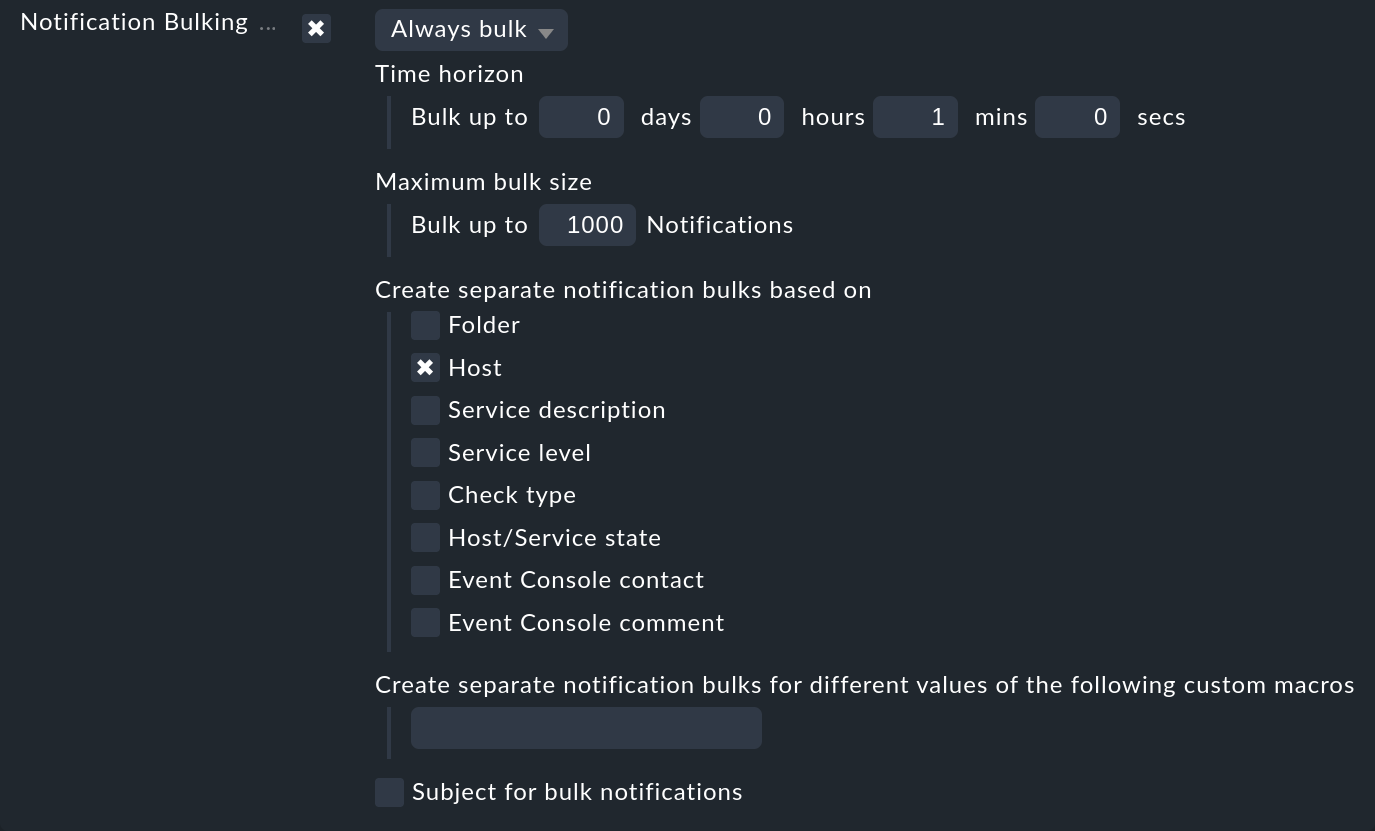
The waiting time can be configured as desired. In many cases one minute suffices as by then at the latest all related problems should have appeared. You can of course set a longer time, but that will result in a fundamental delay to the notifications.
Since it naturally makes no sense to throw everything into a single pot, you can specify which groups of problems should be notified collectively. The Host option is very commonly used — this ensures that only notifications from the same host are bundled.
Here are a few additional facts about bulk notifications:
If the bundling is activated in a rule, the activation can be deactivated by a subsequent rule – and vice versa.
The bulk notification always takes place per contact. Each contact has their own 'private collection pot' in effect.
You can limit the size of the pot (Maximum bulk size). Once the maximum is reached the bulk notification will immediately be sent.
3.2. Bulk notifications and time periods
What happens when a notification is within the notification period, but the bulk notification that contains this notification — and which comes somewhat later — is outside the notification period? The reverse situation is also possible…
Here a very simple principle applies: all configurations that restrict notifications to time periods are valid only for the actual notification. The subsequent bulk notification will always be delivered independently of all time periods.
4. Administrator settings
4.1. Temporarily disabling notifications
The complete disabling of notifications by a user is protected with the permission General Permissions > Disable all personal notifications, which is set to no for the user role user by default.
A user will only see the corresponding checkboxes in his personal settings if you explicitly assign this right to the user role:
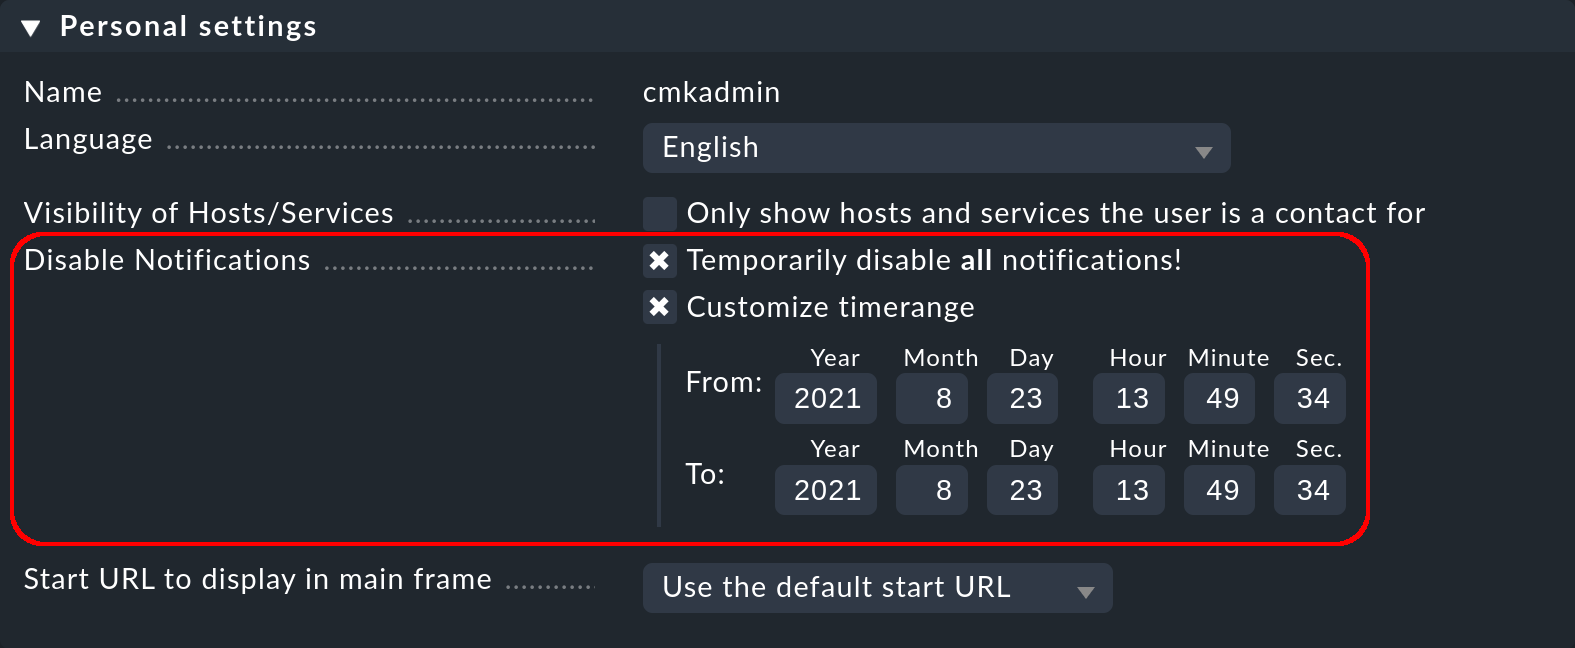
As an administrator with access to the user’s personal settings, you can carry out disablement actions on the user’s behalf — even if the permission as described above is not present. You can find this setting under Setup > Users > Users and then in the properties of the user profile.
With this, for example, you can very quickly silence a holidaying colleague’s notifications — without needing to alter the actual configuration.
4.2. Preventing user-defined customizations
If you want to prevent customization altogether, you can revoke the permission General Permissions > Edit personal notification settings of the user role.
As an administrator, you can display all user rules by selecting Setup > Events > Notifications, and then the Display > Show user rules menu entry:
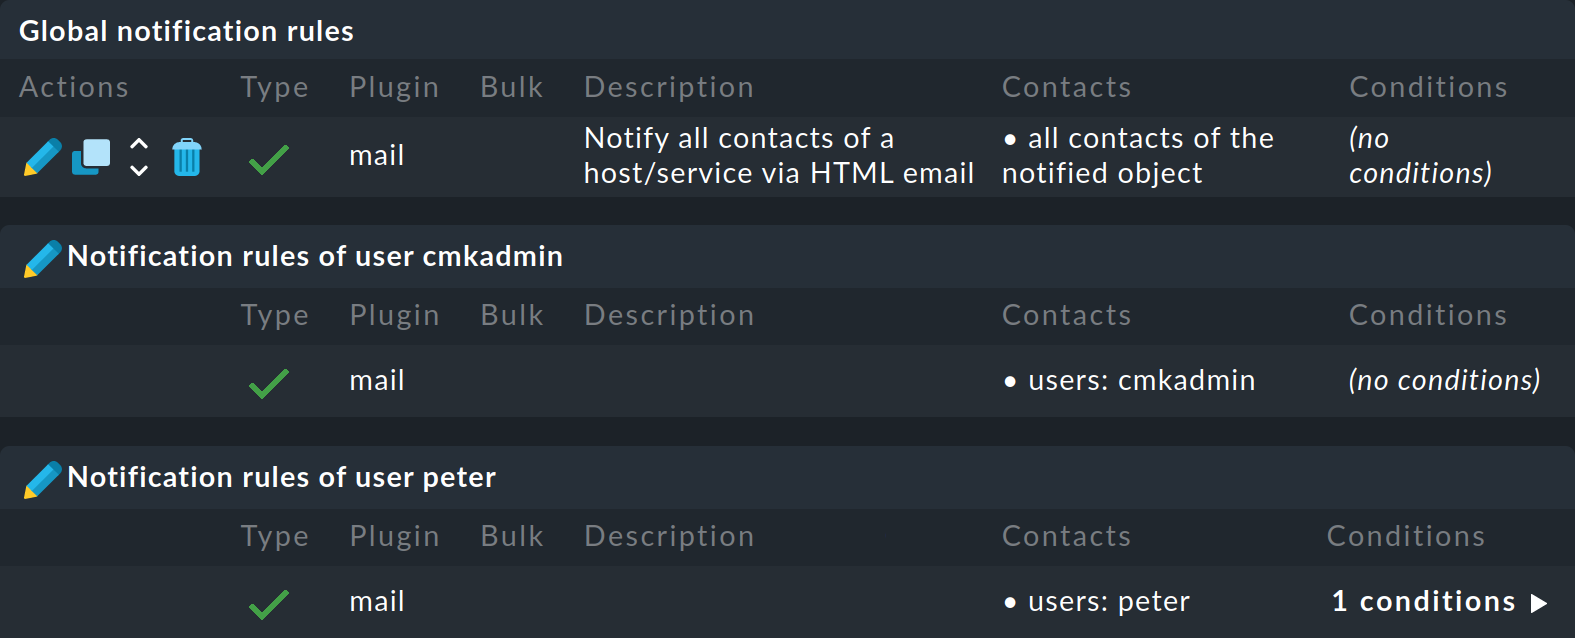
After the global rules, the personal rules are listed, which you can also edit with ![]() .
.