1. Introduction
1.1. Should the monitoring intervene?
One would think it obvious that a monitoring system should never intervene in events — but rather that it should, well, monitor. And it’s probably a good idea to leave it at that.
It is however an admittedly attractive notion that a system which can reliably identify problems could also correct these, provided that it could function automatically.
A few suitable examples can be easily imagined:
Restarting a service that has crashed.
The triggering of a garbage collector if a Java-VM is running out of memory.
The rebuilding of a VPN channel if it is definitely dead.
If one can accept this, then one must think differently about monitoring. From a system that simply observes and is 'not necessary' for operations, a step by step process leads to monitoring becoming a vital organ in the data center.
But correcting problems is not the only thing that monitoring can do automatically when it identifies a problem. Very useful, but also harmless is the collection of additional diagnostic data at the moment of a failure. You could no doubt offhand think of numerous further issues with which one could use alert handlers as a starting point.
1.2. Alert handlers in Checkmk
![]() Alert handlers are scripts you write yourself, that are run for you by Checkmk in the commercial editions if a problem is detected
- or more precisely — if a host or service changes its status.
Alert handlers are scripts you write yourself, that are run for you by Checkmk in the commercial editions if a problem is detected
- or more precisely — if a host or service changes its status.
Alert handlers are very similar to notifications and are similarly configured, but there are a few important differences:
Alert handlers are independent of scheduled downtimes, notification periods, acknowledgments and similar controls.
Alert handlers will be activated by the first retry (if multiple check attempts have been configured).
Alert handlers are independent of users and contact groups.
Alert handlers are only available in the commercial editions.
One can also say that alert handlers are very 'low level'. As soon as a host or service changes its status, your configured alert handlers will be immediately activated. In this manner an alert handler can even perform a repair successfully before an actual alert is generated.
You can naturally - as always in Checkmk - use rules to define the conditions for which a particular handler should be executed. You can find out how to do this and everything else about alert handlers in this article.
![]() A tip for
A tip for ![]() Checkmk Raw users:
you can also have the monitoring execute actions automatically.
Use Nagios’s 'event handlers' for this.
Configure this with manual configuration files in Nagios syntax under
Checkmk Raw users:
you can also have the monitoring execute actions automatically.
Use Nagios’s 'event handlers' for this.
Configure this with manual configuration files in Nagios syntax under ~/etc/nagios/conf.d/.
The event handlers are well documented.
Information can be found simply via Google.
2. Setting up alert handlers
2.1. Saving scripts in the correct directory
Alert handlers are scripts that are run on the Checkmk server.
They must be stored in the ~/local/share/check_mk/alert_handlers/ directory, and may be coded in any Linux-supported language, e.g., BASH, Python or Perl.
Do not forget to make the scripts executable with chmod +x.
If a comment is inserted into the second line of the script (with a # hash), this will appear as the script’s name in the rule’s selection list:
#!/bin/bash
# Foobar handler for repairing stuff
...
2.2. A simple alert handler to try out
As with notifications the script obtains all information for the host or service as environment variables, all of which begin with the ALERT_ prefix.
To test exactly which environment variables appear in the script, you can use the following alert handler for a test:
#!/bin/bash
# Dump all variables to ~/tmp/alert.out

env | grep ^ALERT_ | sort > $OMD_ROOT/tmp/alert.outenvoutputs all environment variables.grep ^ALERT_selects those that begin withALERT_.sortsort the resulting list alphabetically.
2.3. Activating the alert handler
The handler activation is performed using Setup > Events > ![]() Alert handlers.
Alert handlers.
Proceed as follows:
Save the script in
~/local/share/check_mk/alert_handlers/debug.Make it executable with
chmod +x debug.Call up the configuration page via Setup > Events > Alert handlers.
There, define a new rule with Add rule.
The form for selecting the alert handler allows direct access and shows the title which is logged in the second line of the script.
Additionally you may add arguments, which you enter in the text fields.
These will be interpreted as command line arguments in the script.
On your shell you may access them with $1, $2, etc.

Important: After saving the rule the alert handler will be immediately active and will run with every change of status for any host or service!
2.4. Test and fault diagnoses
To test, manually set a service, for example, Fake check results to CRIT. Now the file should have been created with the variables. Here are its first twenty lines:
OMD[mysite]:~$ head -n 20 ~/tmp/alert.out
ALERT_ALERTTYPE=STATECHANGE
ALERT_CONTACTNAME=check-mk-notify
ALERT_CONTACTS=
ALERT_DATE=2016-07-19
ALERT_HOSTADDRESS=127.0.0.1
ALERT_HOSTALIAS=myserver123
ALERT_HOSTATTEMPT=1
ALERT_HOSTCHECKCOMMAND=check-mk-host-smart
ALERT_HOSTCONTACTGROUPNAMES=all
ALERT_HOSTDOWNTIME=0
ALERT_HOSTFORURL=myserver123
ALERT_HOSTGROUPNAMES=check_mk
ALERT_HOSTNAME=myserver123
ALERT_HOSTNOTESURL=
ALERT_HOSTNOTIFICATIONNUMBER=1
ALERT_HOSTOUTPUT=Packet received via smart PING
ALERT_HOSTPERFDATA=
ALERT_HOSTPROBLEMID=0
ALERT_HOSTSHORTSTATE=UP
ALERT_HOSTSTATE=UP
A log file for the alert handler’s (non-)execution will be found
in ~/var/log/alerts.log.
The section for the execution of handler debug,
for the service Filesystem / on host myserver123
will look something like this:
2016-07-19 15:17:22 Got raw alert (myserver123;Filesystem /) context with 60 variables
2016-07-19 15:17:22 Rule ''...
2016-07-19 15:17:22  -> matches!
2016-07-19 15:17:22 Executing alert handler debug for myserver123;Filesystem /
2016-07-19 15:17:22 Spawned event handler with PID 6004
2016-07-19 15:17:22 1 running alert handlers:
2016-07-19 15:17:22 PID: 6004, object: myserver123;Filesystem /
2016-07-19 15:17:24 1 running alert handlers:
2016-07-19 15:17:24 PID: 6004, object: myserver123;Filesystem /
2016-07-19 15:17:24 Handler [6004] for myserver123;Filesystem / exited with exit code 0.
2016-07-19 15:17:24 Output:
A couple of further useful tips:
Texts produced by alert handlers on the standard output appear in the log file alongside
Output:.The script’s exit code will also be logged (
exited with exit code 0).Alert handlers really become useful when they execute a command on the target host. Checkmk offers a ready solution for Linux that will be explained later.
3. Rule-based configuration
As shown in the introductory example, which events should trigger alert handlers are defined via rules. This functions completely analogous to notifications, only somewhat simplified. In the example we specified no conditions, which is naturally unrealistic in practice. The following example shows a condition that an alert handler defines for specific hosts and services:
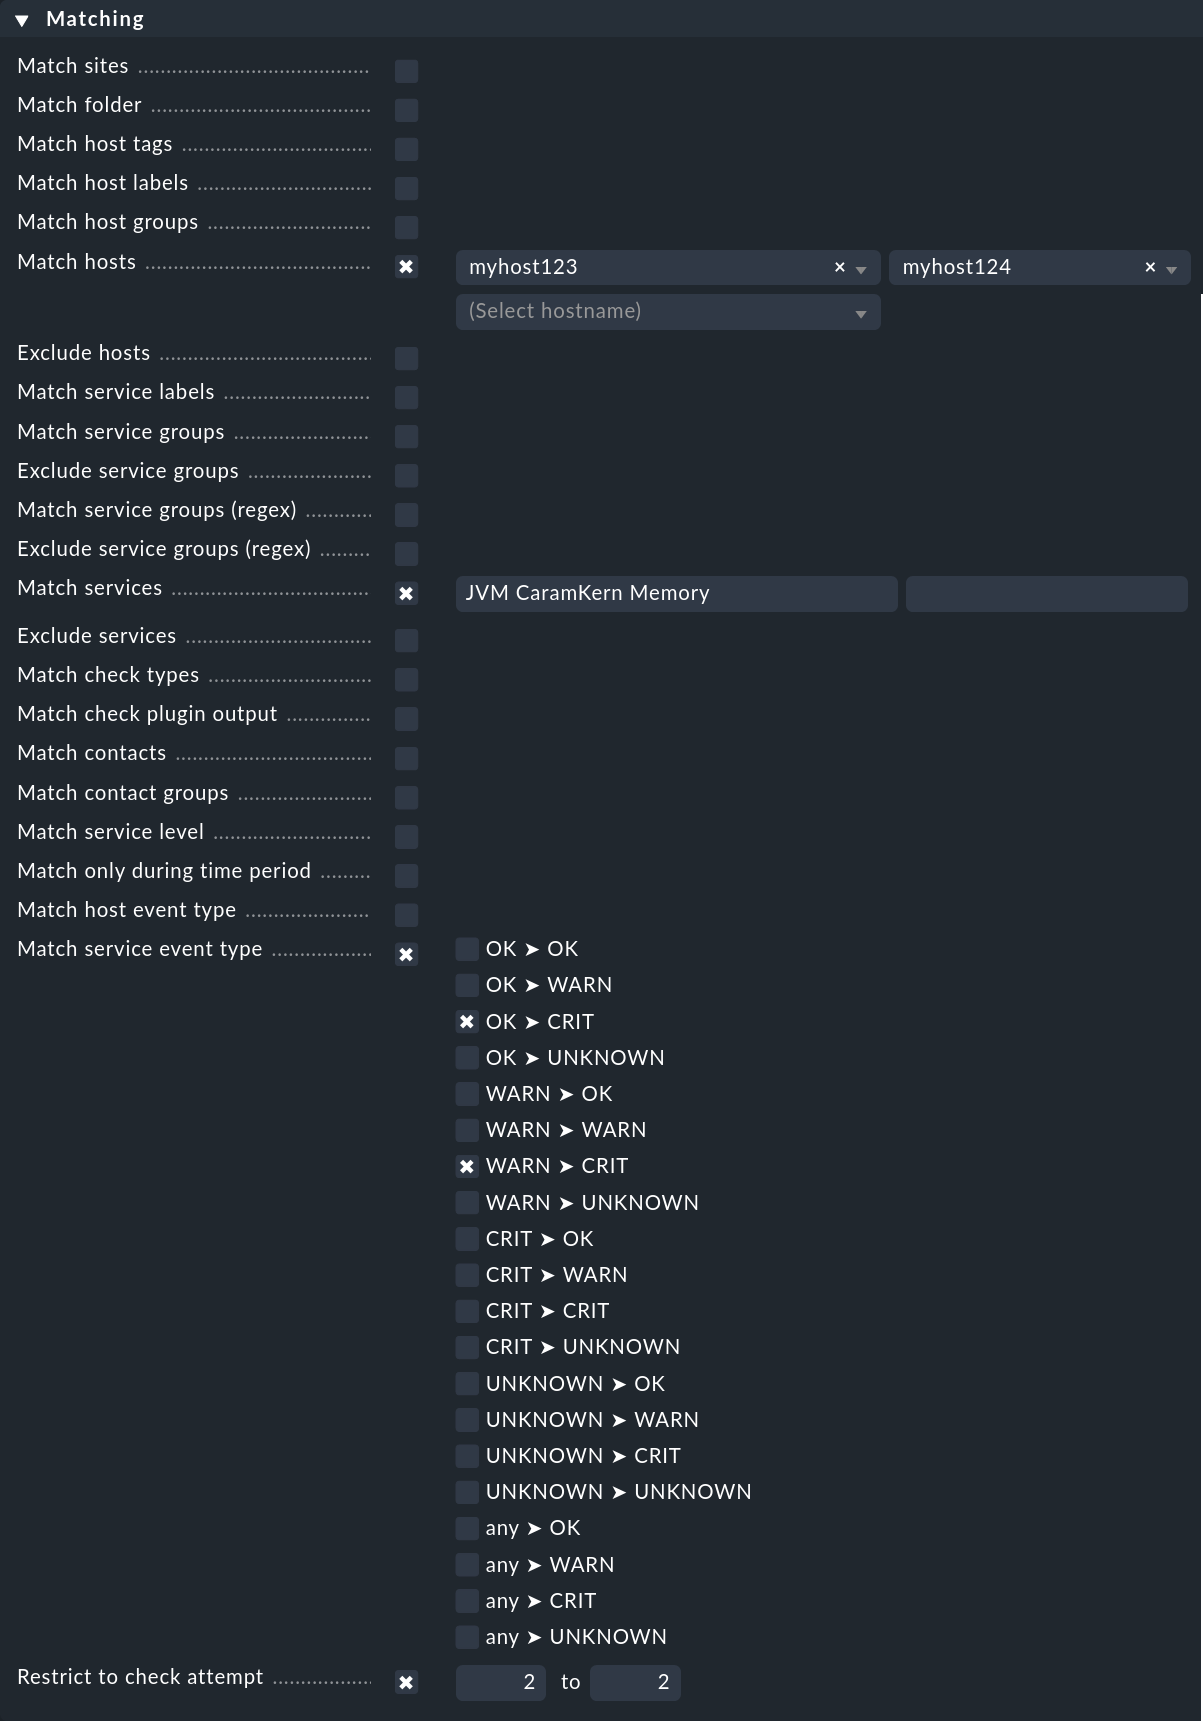
The alert handler will only be triggered
for the hosts
myhost123andmyhost124,for the service
JVM CaramKern Memory,if the state changes from OK or WARN to CRIT,
and then only at the second check attempt.
In order for the handler to be triggered, in this example it is necessary to use a rule Maximum number of check attempts for service to set the minimum number of check attempts at 2. In order to suppress a notification in the case of a successful garbage collector the number should be set to 3 — since if the handler can solve the problem directly following the second attempt, the third attempt should detect an OK state and therefore no further notification will be necessary.
Note: Unlike other places in Checkmk every alert handler rule will be executed if the conditions are matching. Even if two rules calling the same handler these handler will indeed run two times. The alert helper (explained in the next chapter) will suppress the second execution with an error message since the same handler must not run multiple times at the same time. Still it is recommended to set up the rules that this case will not appear.
4. How alert handlers are executed
4.1. Asynchronous execution
Alert handlers are very often used to log in to an affected machine remotely using SSH or another protocol, and once there execute a script-controlled action. Since this machine is experiencing a problem, it cannot be excluded that connecting takes a long time or even goes into a timeout.
So that the monitoring is not allowed to stand still, or other alert handlers stalled during this time, as a matter of principle alert handlers are run asynchronously.
An auxiliary process - the alert helper — is responsible for this function, and it is started by the CMC.
To reduce overhead, this only occurs if a minimum of one alert handler rule has been created.
In the cmc.log you will then see the following line:
2016-07-19 15:17:00 [5] Alert handlers have been switched onWith every change of state for a host or service, the alert helper receives a notification from the CMC containing all information relevant to the event. It then evaluates all alert rules and determines whether a handler should be triggered. If yes, the appropriate script will be started and run in the background as an external process.
4.2. Stopping the monitoring core
When you stop the CMC (e.g. via omd stop or by shutting the monitoring server down), all alert helpers still running will be aborted.
These will not be repeated later - since who knows when 'later' will be?
It’s possible that restarting a service or similar may be more damaging than useful!
4.3. Timeouts
In order to protect itself from too many processes being started in the case of an error situation, when an alert handler is running a 60 second (settable) timeout is in force.
At the end of this time the handler will be stopped.
In detail, this means at the end of a timeout a Signal 15 (SIGTERM) will be sent to the handler.
In this way it has the possibility to stop itself cleanly.
After a further 60 seconds (double timeout) it will then be 'terminated' finally with a Signal 9 (SIGKILL).
4.4. Overlaying
Checkmk precludes the simultaneous running of alert helpers if they apply to the same host/service and would run the same script with the same parameters. Such a situation indicates that the first handler is still running and that it would make no sense to start a second copy of the same handler — the second handler would be instantly canceled and identified as 'failed'.
4.5. Exit codes and output
The alert handler’s outputs and exit codes are reliably evaluated and returned to the core where it is saved in the monitoring history. Furthermore you can trigger a notification (see below).
4.6. Global settings
There are a number of global settings for executing alert handlers:

The Alert handler log level influences the logging in the alert helper log file (~/var/log/alerts.log).
4.7. Master control
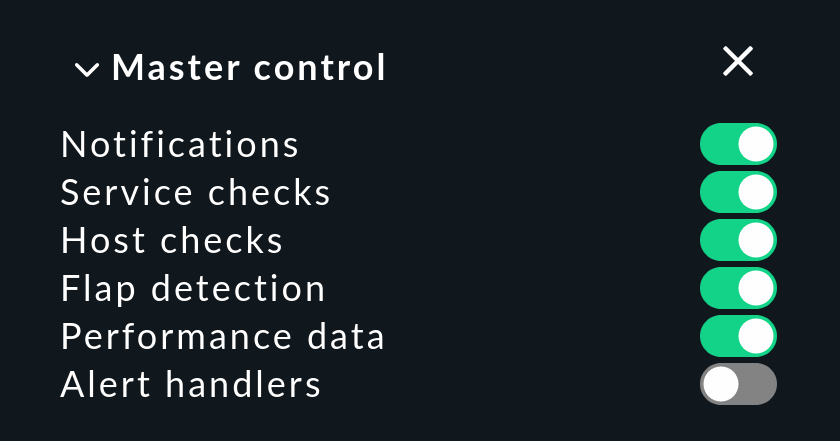
With a click in the Master control snap-in you can deactivate alert handlers globally. Currently running handlers will not be affected and will run to completion.
Do not forget to reset the small switch to green as soon as practicable!
Otherwise you could be deceived by a false sense of security that the monitoring is fixing everything…
5. Alert handlers in the history
Alert handlers create entries in the monitoring history.
With this you have a better traceability compared to only having the alerts.log log file.
An entry is created as soon as an alert handler starts and another when it ends.
The alert handlers are thus regarded in the same way as typical monitoring plug-ins — that means they should produce one line of text and return one of the four exit codes 0 (OK), 1 (WARN), 2 (CRIT) or 3 (UNKNOWN). All errors that from the outset prevent a handler’s execution (abortion due to duplicate execution, script missing, timeout, etc.) are automatically flagged with UNKNOWN.
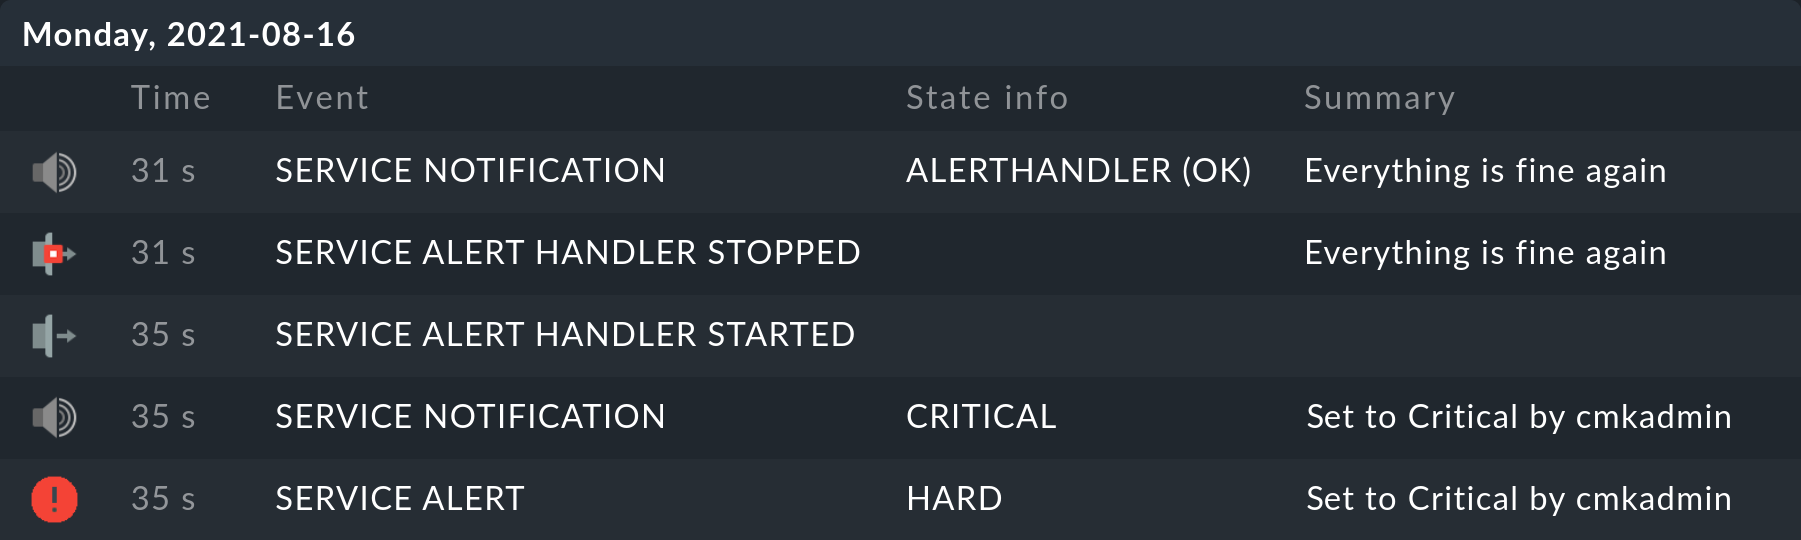
For example - calling this very simple handler…
#!/bin/bash
# Dummy handler for testing

sleep 3
echo "Everything is fine again"
exit 0
... produces a result as above in the relevant service’s history (as always the newest message is at the top):
There is also a generic view Monitor > System > Alert handler executions, which provides a global display of all executing alert handlers.
6. Notification via alert handlers
The execution of an alert handler — or more exactly, the completion of an execution — is an event that triggers a notification. This way you can be informed that a handler has completed its task. There are two types of event that you can filter in a notification rule:
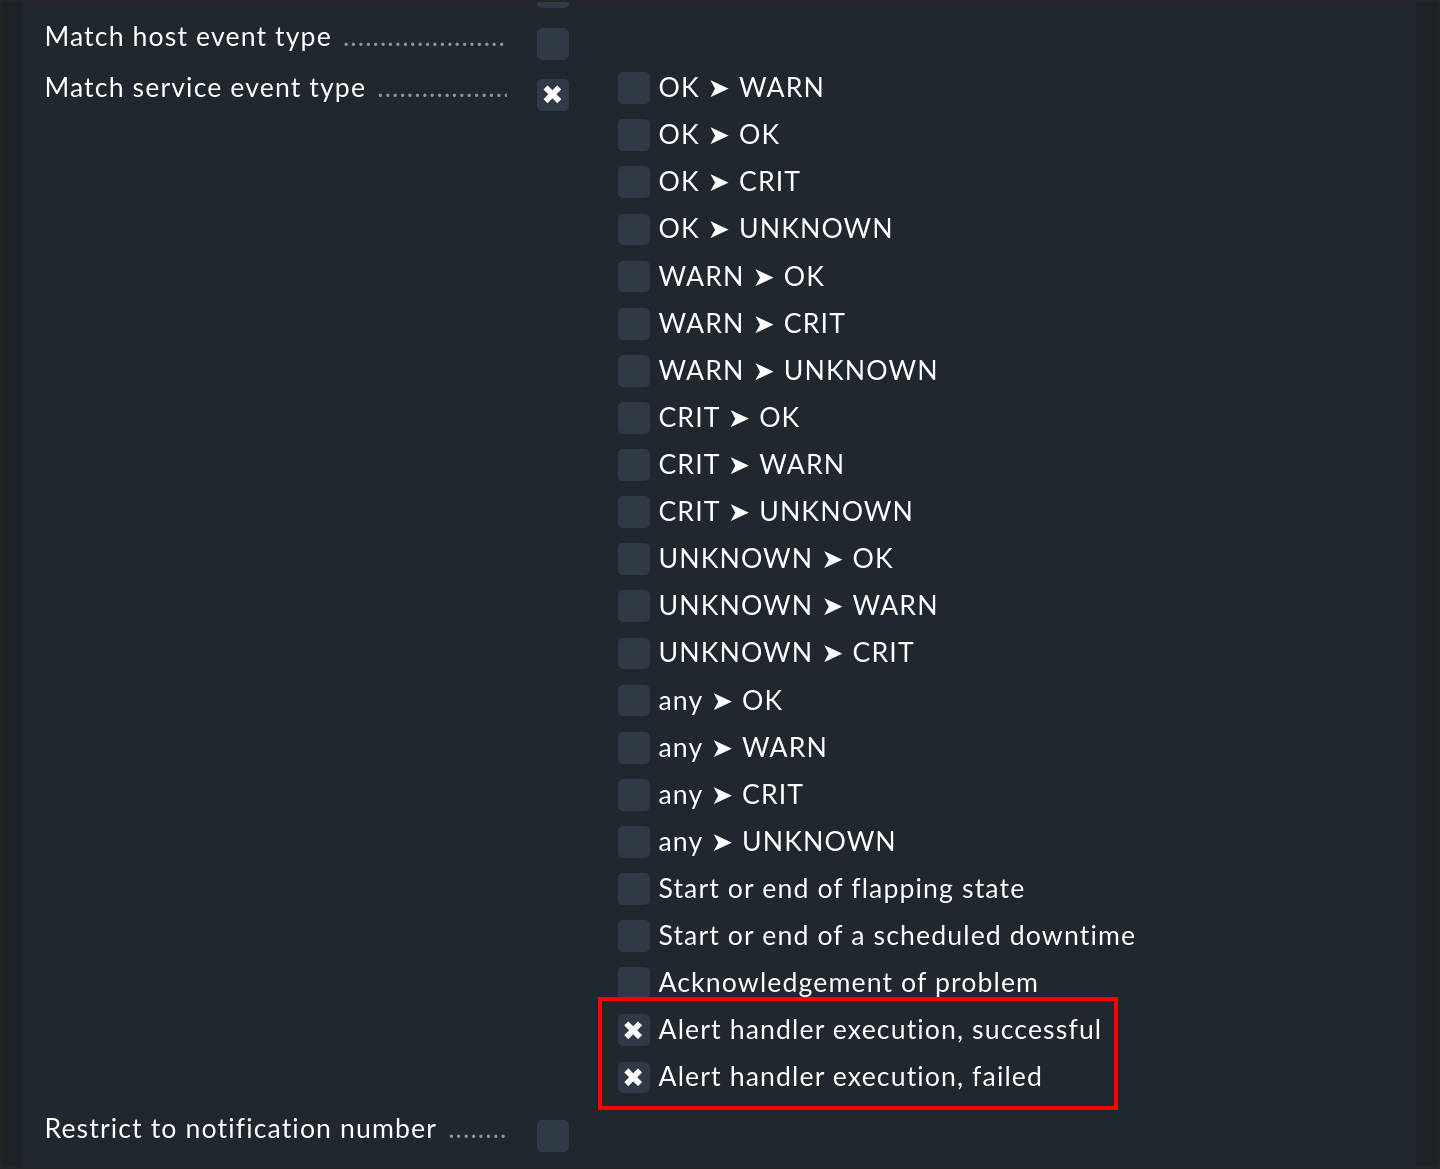
You can thus differentiate between successfully executed handlers (exit code 0 - OK), and failures (all other codes). The email notification from Checkmk does not show the output of the check, but the output of the alert handler.
7. Alert handler for every check execution
Alert handlers are normally only called up when the state of a host or service changes (or during retry attempts when handling problems). Simple check executions without a change of state trigger no alert handlers.
With Global settings > Alert handlers > Types of events that are being processed > All check executions! you can arrange exactly that. Every execution of a check can potentially trigger an alert handler. You can, for example, use this to transfer data from the active monitoring to other systems.
Be careful with this setting! Starting processes and calling up scripts consumes a lot of CPU resources. Checkmk can easily run 1000 checks per second - but Linux certainly could not handle 1000 alert handler scripts per second.
In order to make this usefully possible, Checkmk provides the option to write alert handlers as Python functions, which then run inline - without process creation. Such inline handlers can be saved in the same directory as the normal handler scripts. The following functioning example shows the structure of an inline handler:
#!/usr/bin/python
# Inline: yes

# Do some basic initialization (optional)
def handle_init():
    log("INIT")

# Called at shutdown (optional)
def handle_shutdown():
    log("SHUTDOWN")

# Called at every alert (mandatory)
def handle_alert(context):
    log("ALERT: %s" % context)
This script has no central function, rather it simply defines three functions,
although only the handle_alert() function is required.
This is called up following every check execution and in its argument context receives a Python dictionary with variables such as "HOSTNAME", "SERVICEOUTPUT", etc.
These represent the environment variables that the normal handlers also receive - however here without the ALERT_ prefix.
The above example can be used in order to view the contents of context.
All outputs produced by the log() auxiliary function are saved to ~/var/log/alert.log.
Both of the global variables omd_root and omd_site are based on the home directory and the Checkmk site’s name respectively.
The handle_init() and handle_shutdown() functions are called up by Checkmk when starting or stopping the monitoring core and enable an initialization — for example when establishing a connection to a database.
Additional information:
Note the
# Inline: yesin the second line.The core must be restarted after every change in the script (
omd restart cmc).importcommands are permitted.The Checkmk alert helpers call up your functions synchronously. Make sure that no wait states occur!
8. Remote execution under Linux
8.1. Basic principles
Every Checkmk version includes a built-in alert handler that enables the reliable execution of scripts on monitored Linux systems. The most important features of this solution are:
The scripts are called up using SSH with command restriction.
No arbitrary commands may be used, rather only those defined by you.
This can all be implemented using the Agent Bakery.
The Linux remote alert handlers consists of the following individual elements:
The
linux_remotealert handler with the titleLinux via SSHon the Checkmk server.The
mk-remote-alert-handlerscript on the target system.The scripts ('remote handlers') written by you on the target system.
Entries in
.ssh/authorized_keysfor those users on the target system who will execute them.Rules in Setup > Agents > Windows, Linux, Solaris, AIX > Agent rules > Linux Agent > Remote alert handlers (Linux) that generate SSH keys.
Alert handler rules that call up
linux_remote.
8.2. Setting up
Assuming one wants to run the /etc/init.d/foo restart script on the myserver123 Linux system whenever the Process FOO service becomes critical (which we have already set up).
Proceed as follows:
Coding the remote handler
Next, write the script to be executed on the target system.
Since we are working with the Agent Bakery, install the script on the Checkmk server (not on the target system!).
The correct directory for this is ~/local/share/check_mk/agents/linux/alert_handlers.
Here as well the comment in the second line provides a title for selection in the user interface:
#!/bin/bash
# Restart FOO service

/etc/init.d/foo restart || {
    echo "Could not restart FOO."
    exit 2
}
Make the script executable:
OMD[mysite]:~$ cd local/share/check_mk/agents/linux/alert_handlers
OMD[mysite]:~$ chmod +x restart_foo
Our example script is so constructed that in the case of an error it ends with a Code 2 so that the alert handler assesses it as CRIT.
Preparing agent package with the handler
Here we will describe the procedure with the Agent Bakery. Tips for installing by hand can be found further below.
Define a rule under Setup > Agents > Windows, Linux, Solaris, AIX > Agent rules > Linux Agent > Remote alert handlers (Linux).
In the properties, the remote handler Restart FOO service you have just defined can be seen.
Select this for installation:
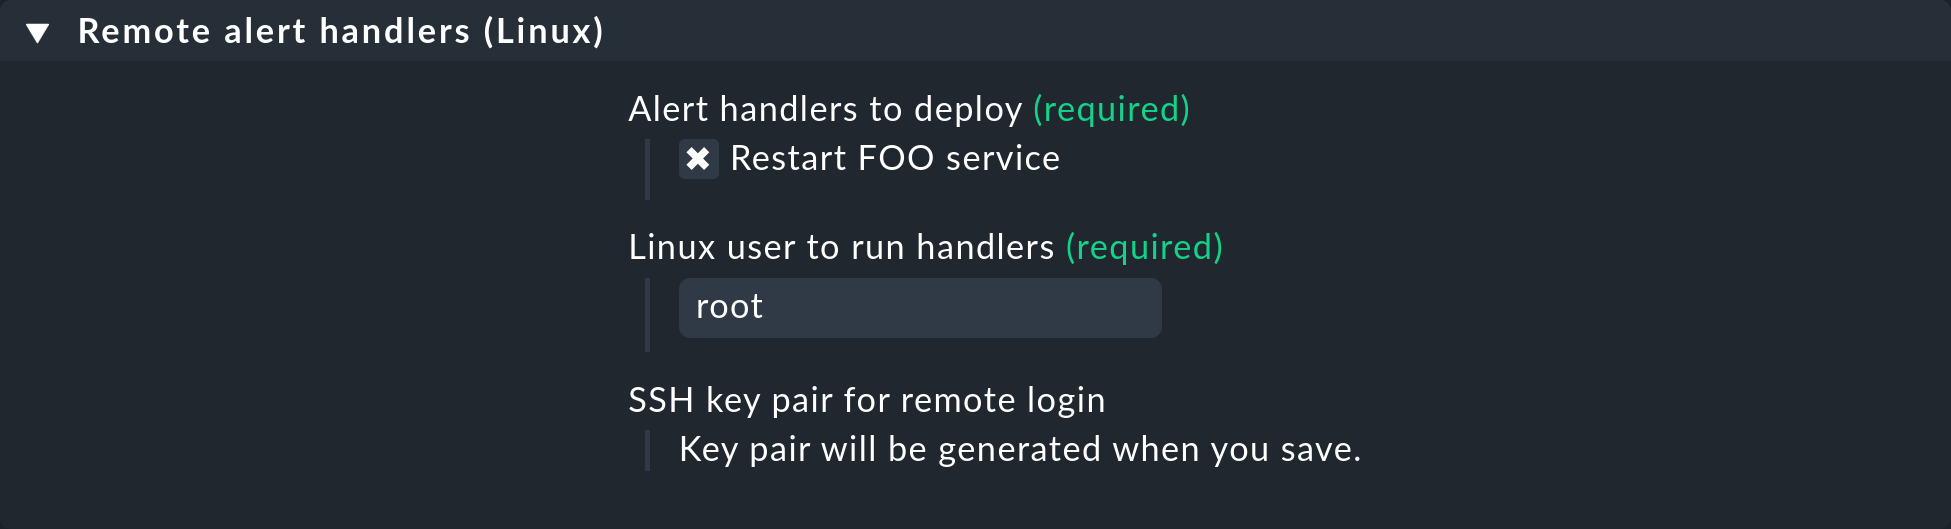
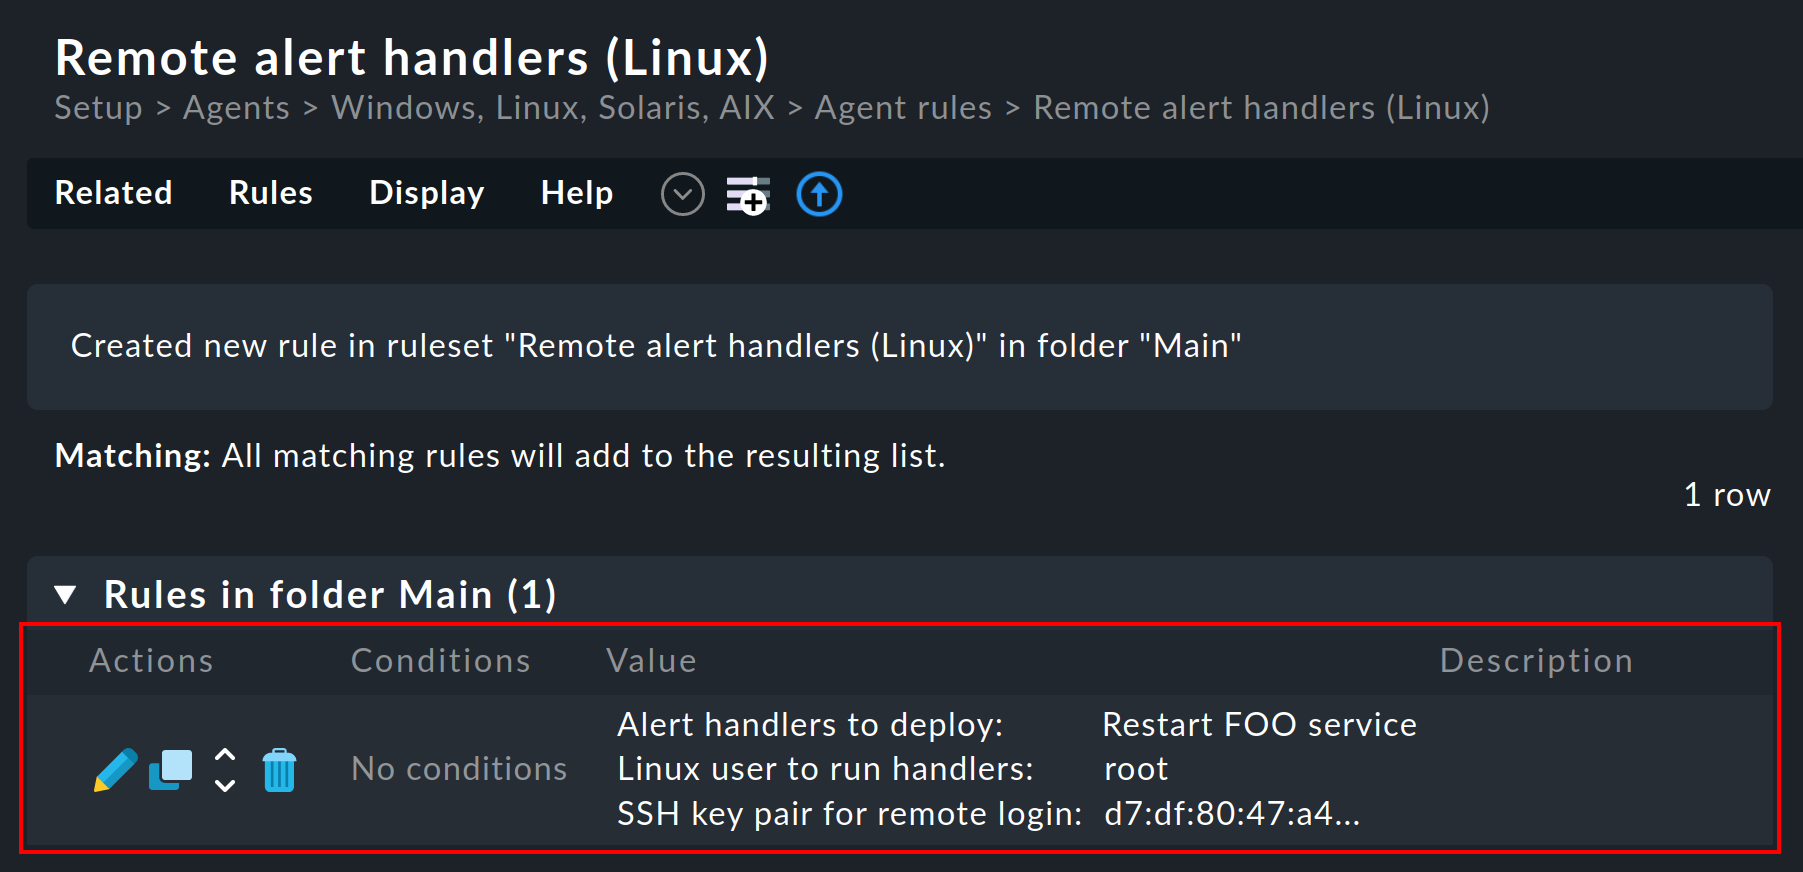
Once you have saved it you will see the rule in the list: an SSH key pair for calling up the handler was automatically generated and the fingerprint of which will appear in the rule. The fingerprint itself has been shortened to fit the width in this screenshot:
The public key is intended for the agent. The private key will later be required by the Checkmk server so that a script installed in this way can be called up without needing to enter a password.
One can also utilize another user as root - naturally only when they have the appropriate rights for the required action.
The Checkmk agent will only install the SSH key on systems where this user already exists.
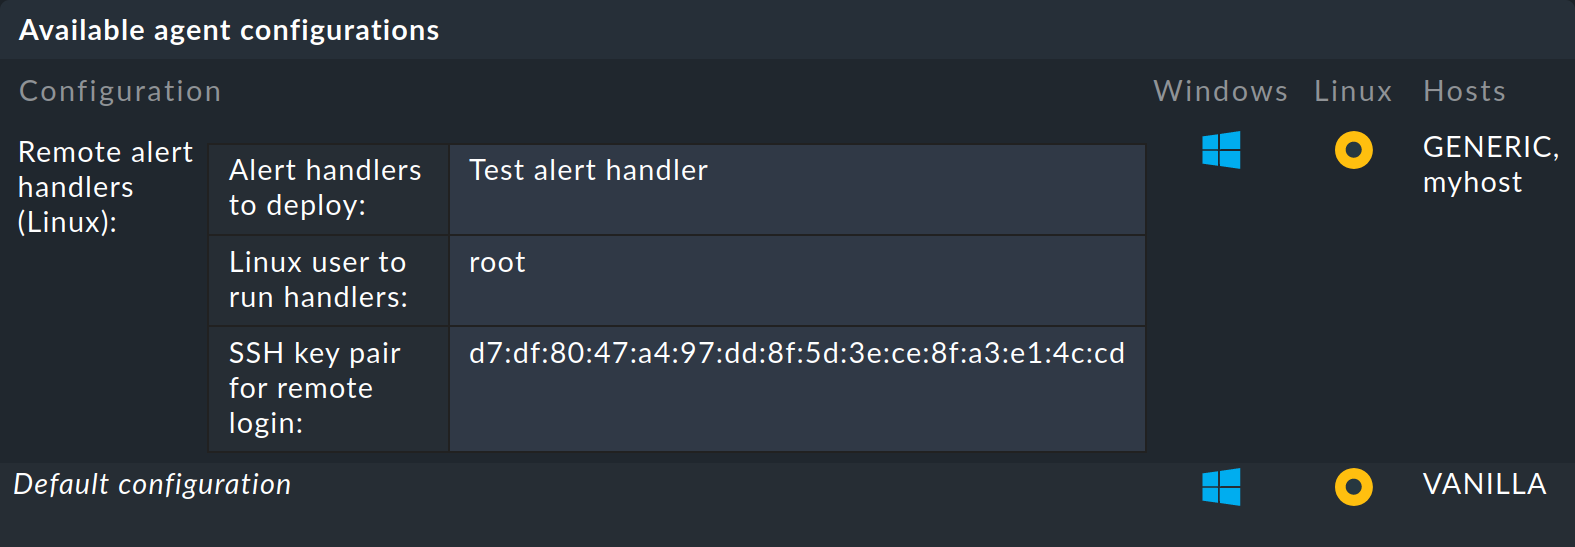
Baking agent
Now bake new agents with ![]() .
In the list of ready agents an entry should now appear in which your remote handler and SSH key can be seen.
The screenshot has also been shortened here. This time by the amount of possible packages that may be downloaded:
.
In the list of ready agents an entry should now appear in which your remote handler and SSH key can be seen.
The screenshot has also been shortened here. This time by the amount of possible packages that may be downloaded:
Install agent
Next, install the RPM or DEB package on your target system (the installation of the TGZ archive cannot setup the SSH key and is thus incomplete). With the installation the following things occur:
Your remote handler script will be installed.
The
mk-remote-alert-handlerauxiliary program will be installed.For selected users (here
root) an entry will be made inauthorized_keysthat will enable the handler’s execution.The
.sshdirectory and theauthorized_keysfile will be created as necessary.
With an installation via DEB it will look something like this:
root@myserver123:~# dpkg -i check-mk-agent_2016.07.19-9d3ab34905da4934_all.deb
Selecting previously unselected package check-mk-agent.
(Reading database ... 515080 files and directories currently installed.)
Preparing to unpack ...check-mk-agent_2016.07.19-9d3ab34905da4934_all.deb ...
Unpacking check-mk-agent (2016.07.19-9d3ab34905da4934) ...
Setting up check-mk-agent (2016.07.19-9d3ab34905da4934) ...
Reloading xinetd...
 * Reloading internet superserver configuration xinetd                            [ OK ]
Package 9d3ab34905da4934: adding SSH keys for Linux remote alert handlers for user root...
A look into the SSH configuration for root reveals:
root@myserver123:~# cat /root/.ssh/authorized_keys
command="/usr/bin/mk-remote-alert-handler restart_foo",no-port-forwarding,no-x11-forwarding,no-agent-forwarding ssh-rsa  AAAAB3NzaC1yc2EAAAADAQABAAACAQCqoDVNFEbTqYEmhSZhUMvRy5SqGIPp1nE+EJGw1LITV/rej4AAiUUBYwMkeo5aBC6VOXkq78CdRuReSozec3krKkkwVbgYf98Wtc6N3WiljS85PLAVvPadJiJCkXFctbxyI2xeF5TQ1VKDRvzbBjXE9gjTnLWbPy77RC8SVXLoOQgabixpWQquIIdGyccPsWGTRgeI7Ua0lgWZQUJt7OIKQ0X7Syv2VHKJNqtW28IWu8y2hBEY/TERip5EQoNT/VclhHqjDG2y3F45PswcXD5in6y30EnfHGcwk+PD6fgp7jPGbO2+QBUwYgW67GmRpbaVQ97CqXFJvORNF+C6+O8DNweyH3ogspjfKvM7eN+M4NIJzjMRyNBMzqF3VmrMeqpzRjfFj2BS/8UbXGgHzZRapwrK3+GXX1pG49n77cIs+GWos9xb1DxX1pEu2tgQwRBBhYcTkk2eKkH18LKzFUyObxtQmf40C24cdQOp6USbwzsniqehsLIHH2unQ7bW6opF/GiaEjZamGbgsPOe8rmey5Vcd//e8cS+OsmcPZNybsTJpBeHpes+5bw0e1POw9GD9qptylrQLYIO5R467Ov8YlRFgYKyaDFHD40j5/JHPzmtp4vjH8Si7YZZOzvTRgBYEoEgbLS5dgdr/I5ZMRKfDPCpRUbGhp9kUEdGX99o5Q== mk-remote-alert-handler-9d3ab34905da4934
Be aware that your system could be set up so that an SSH access as root is not generally possible.
In this case you can go via another user and there work with sudo, which is so configured that the desired command can be executed without a password.
Calling the handler using a rule
We have almost reached our objective.
The agent is ready.
Now all that is missing is a rule to actually summon the alert handler.
The procedure is as described at the beginning of this article and is achieved through the creation of an appropriate rule.
This time choose Linux via SSH as the handler, enter the user for whom the SSH key should be installed, and select your remote handler:
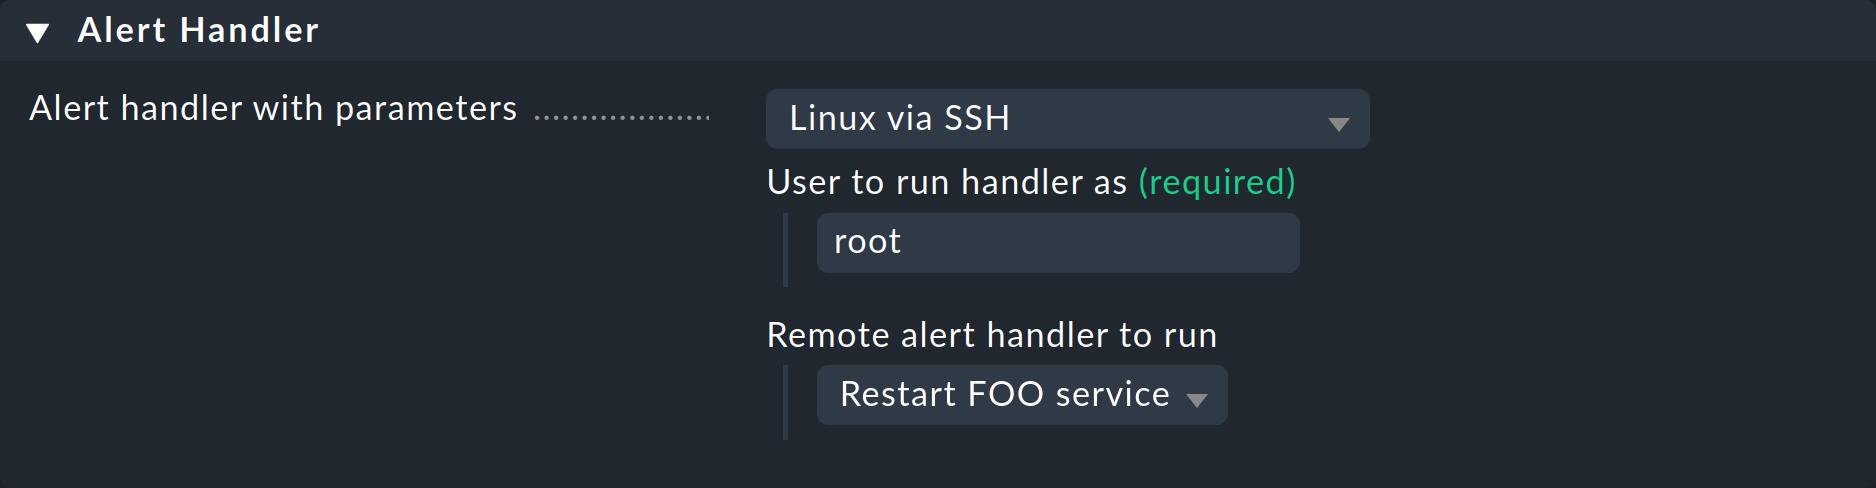
Set also a sensible condition in the rule, otherwise an SSH connection will be attempted with every service alert!
Testing
When, e.g., you now set the relevant service manually to CRIT, in the service’s history you will shortly see:
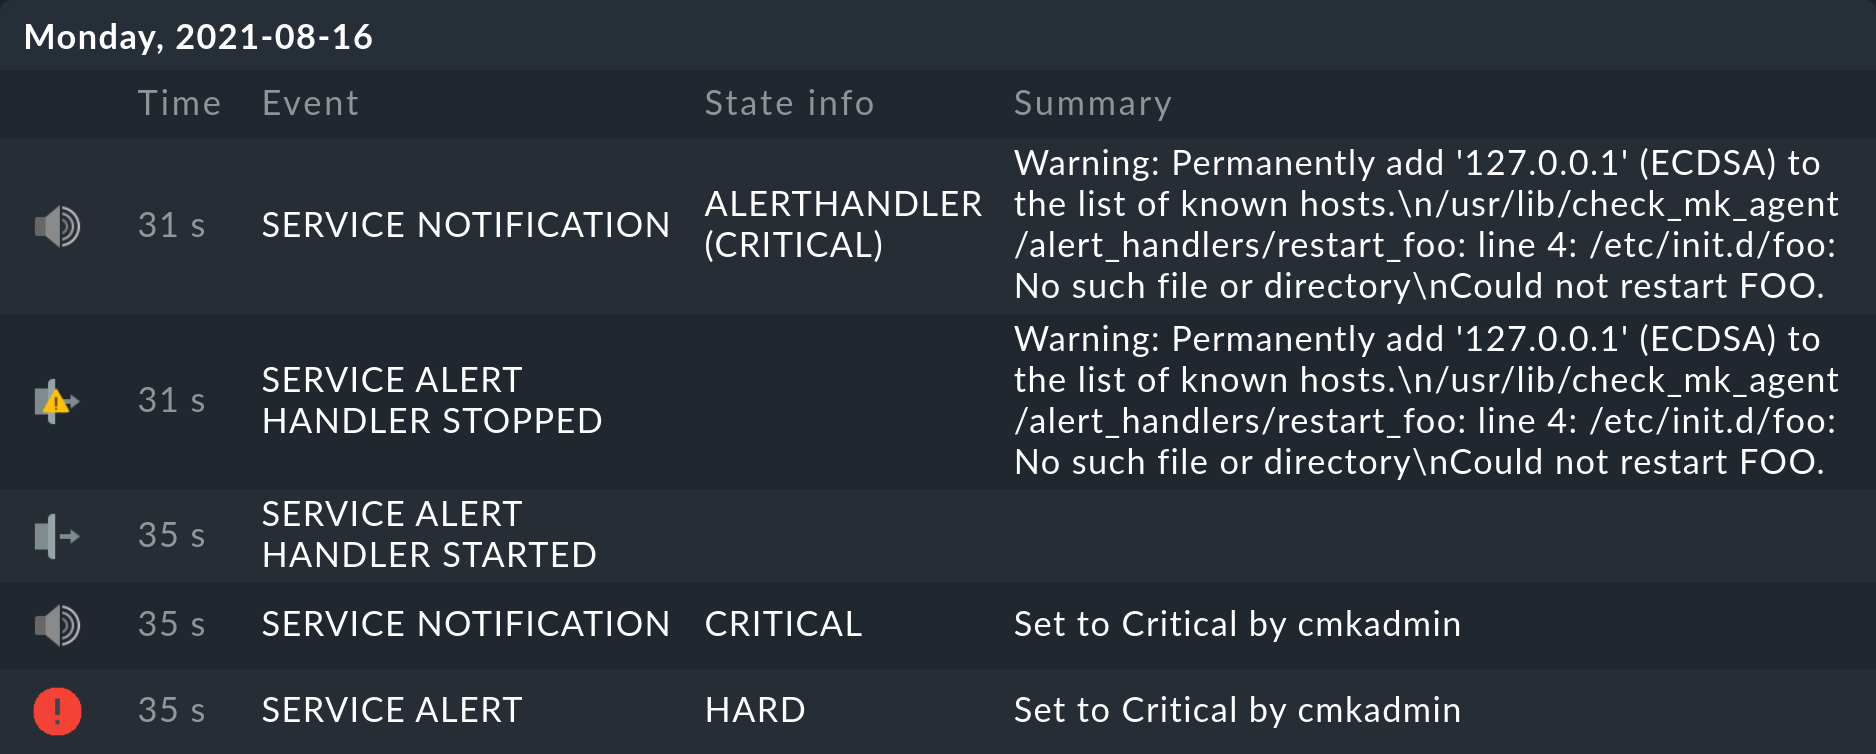
Naturally if no foo service exists, then /etc/init.d/foo restart also cannot work.
It can however be seen that this command has been processed and also that the error status has been correctly reported.
Likewise that Checkmk has triggered a notification which was stopped by an alert handler.
The Warning: Permanently added '127.0.0.1' (ECDSA) to the list of known hosts. message is harmless by the way and only appears on first contact with the host.
To avoid the time-consuming manual exchange of the host key, SSH is called with -o StrictHostKeyChecking=false.
At the first connection the key will be stored for future use.
8.3. Setting up without Agent Bakery
Of course manually preparing an agent also works. In such a case we recommend performing the Agent Bakery procedure on a test system, then examine the relevant data and replicate it manually on your own system. A list of the file paths can be found here.
Here in this case it is also important that in the Agent Bakery you create a rule for installing the remote handler — because in this rule the SSH keys will be generated for the access and also for use by the alert handler!
The public key for the installation in authorized_keys can be found in the ~/etc/check_mk/conf.d/wato/rules.mk configuration file (or in a subfolder in rules.mk).
9. Files and directories
9.1. Paths on the Checkmk server
| Path | Function |
|---|---|
|
Log file with all events relevant to the alert handler (logged by the alert helper). |
|
Log file for the core. Some alert handler information is also stored here. |
|
Save your self-written alert handlers here. |
|
Here the monitoring history’s log file is stored and also evaluated by the core. |
|
Remote alert handlers to be run on Linux systems. |
9.2. Paths on the monitored Linux host
| Path | Function |
|---|---|
|
Auxiliary script for executing the remote handlers. |
|
Remote handlers written by you. |
|
SSH configuration for the |
|
SSH configuration for a user |