1. Introduction
For a monitoring system to receive more information from an endpoint other than that it is simply accessible, help is required from the target system. For example — how else can Checkmk know how full a server’s storage volume is without that system somehow providing the information? The component that provides this information is always an active piece of software — namely a monitoring agent, usually just referred to as an agent. An agent collects data relevant to monitoring from a host at specified intervals and transmits that data to the monitoring server.
For servers and workstations, Checkmk provides its own agents, these are known as Checkmk agents. Checkmk agents are available for a wide variety of operating systems — from the commonplace such as Windows and Linux to exotics such as OpenVMS. The agents are passive and listen on TCP port 6556. Only on receiving a Checkmk server query will these agents be activated and respond with the required data.
All of the Checkmk agents can be found via the web interface in the Setup menu. From there you can download the agents and install them on the target system. You can learn how to install, configure and extend Checkmk agents in this article.
However, there are situations where one does not need to install an agent for monitoring — since one that can be used is already present. The best example is SNMP: All manageable network devices and appliances have a built-in SNMP agent. Checkmk accesses this SNMP agent and retrieves details about the system state with active queries (GET).
Some systems however allow neither an agent installation, nor do they support SNMP in a usable form. Instead of these they offer application programming interfaces for management, so-called APIs, based on Telnet, SSH or HTTP/XML. Checkmk queries such interfaces via these so-called special agents running on the Checkmk server.
Finally, a special scenario is the monitoring of network services such as HTTP, SMTP or IMAP.
In the case of a network service the obvious procedure is to query and to monitor the service over the network.
For this Checkmk sometimes uses its own, sometimes existing plug-ins originally developed for Nagios.
These are also called active checks.
For example, check_http is very popular for querying websites.
But even in this case there is usually an additional agent in use which provides supplementary server data to the monitoring.
The following image shows the various ways that Checkmk can access systems to be monitored:

Until now we have only discussed active monitoring — Checkmk’s showpiece discipline. There is also the reverse method: namely that by which the target system itself sends messages to the monitoring, for example, via syslog or SNMP traps. For these functions Checkmk has its Event Console which is described in its own article.
2. The Checkmk agent
To monitor a server or workstation you need a small program, the Checkmk agent, which must be installed on the host.
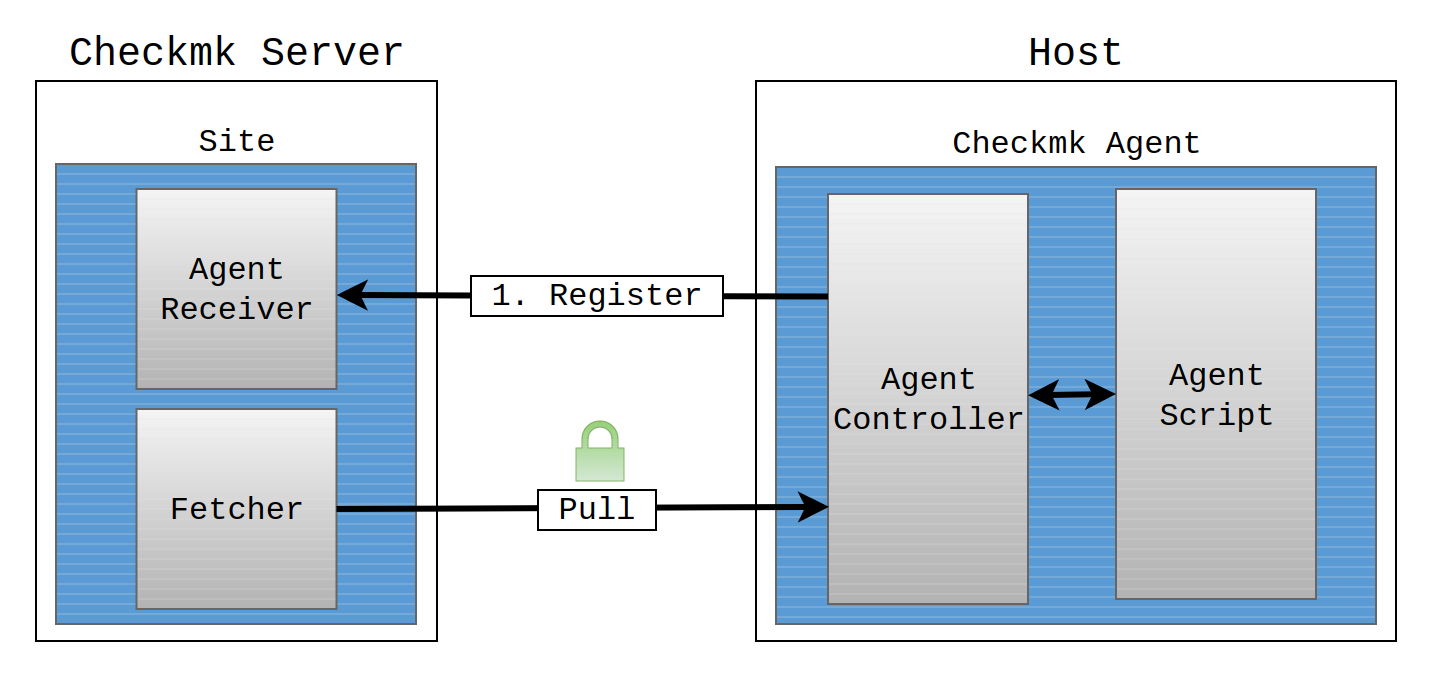
The agent is a simple shell script that is minimalistic, secure, and easily extendable. From Checkmk version 2.1.0, there is a new agent that extends the shell script. More precisely, the agent script is joined by a new component: the Agent Controller. The Agent Controller precedes the agent script, queries it and communicates with the Checkmk server on the script’s behalf. To do this, the Agent Controller registers with the Agent Receiver, which is also a new process running on the Checkmk server.
This architecture is identical for both the Linux agent and the Windows agent. Only the technical implementation is specific to each operating system.
The agent script is:
minimalistic, since it only needs minimal resources of RAM, CPU, disk space and network.
secure, because it does not allow any access from the network.
easily extendable, because you can write plug-ins in any programming or scripting language and have them executed by the agent script.
The Agent Controller is the component within the agent that is responsible for transporting the data collected by the agent script. It listens on TCP port 6556 for incoming connections from the Checkmk site and queries the agent script.
So why is the Agent Controller needed — the system has been working just fine without it up until now? Well, the software architecture of the agent is the prerequisite for providing new features that cannot be implemented with the minimalistic design of the agent script, such as encryption of the communication via Transport Layer Security (TLS), data compression and reversal of the communication direction. Until now, it was always the Checkmk server that initiated the communication and requested the data from the agent — in what is known as pull mode.
Adding the Agent Controller satisfies the prerequisite for a future implementation of the push mode, in which a transfer is initiated by an agent. Push mode is required for a cloud-based configuration and in some compartmentalized networks. In both cases, the Checkmk server cannot access a network in which the hosts to be monitored are located. The agent therefore periodically sends the data to the Checkmk server on a standalone basis. The Agent Controller and Agent Receiver are already prepared for push mode, even though this mode will be available only with the next Checkmk version for the new Checkmk Plus Edition (CPE).
The Agent Receiver is the Checkmk server component that serves as the general endpoint for the Agent Controller’s communication, e.g. for registering a connection. It will continue to receive data sent by the Agent Controller in push mode. In pull mode, data is exchanged with the fetchers on the site, in the Enterprise Editions these are the Checkmk Fetchers.
TLS encryption and data compression are achieved via the Agent Controller and Agent Receiver, i.e. both the Checkmk server and agent must be of version 2.1.0 or higher. The first step after an installation is the registration of the Agent Controller with the Checkmk site’s Agent Receiver, which establishes a trust relationship. The TLS encryption of the communication process will be set up during this registration.
3. Downloading the agent from the download page
Agents for eleven different operating system families are currently maintained in the Checkmk project. All of these agents are components in Checkmk, and are available for downloading via the Checkmk server’s web interface. These agents are accessed via via Setup > Agents.
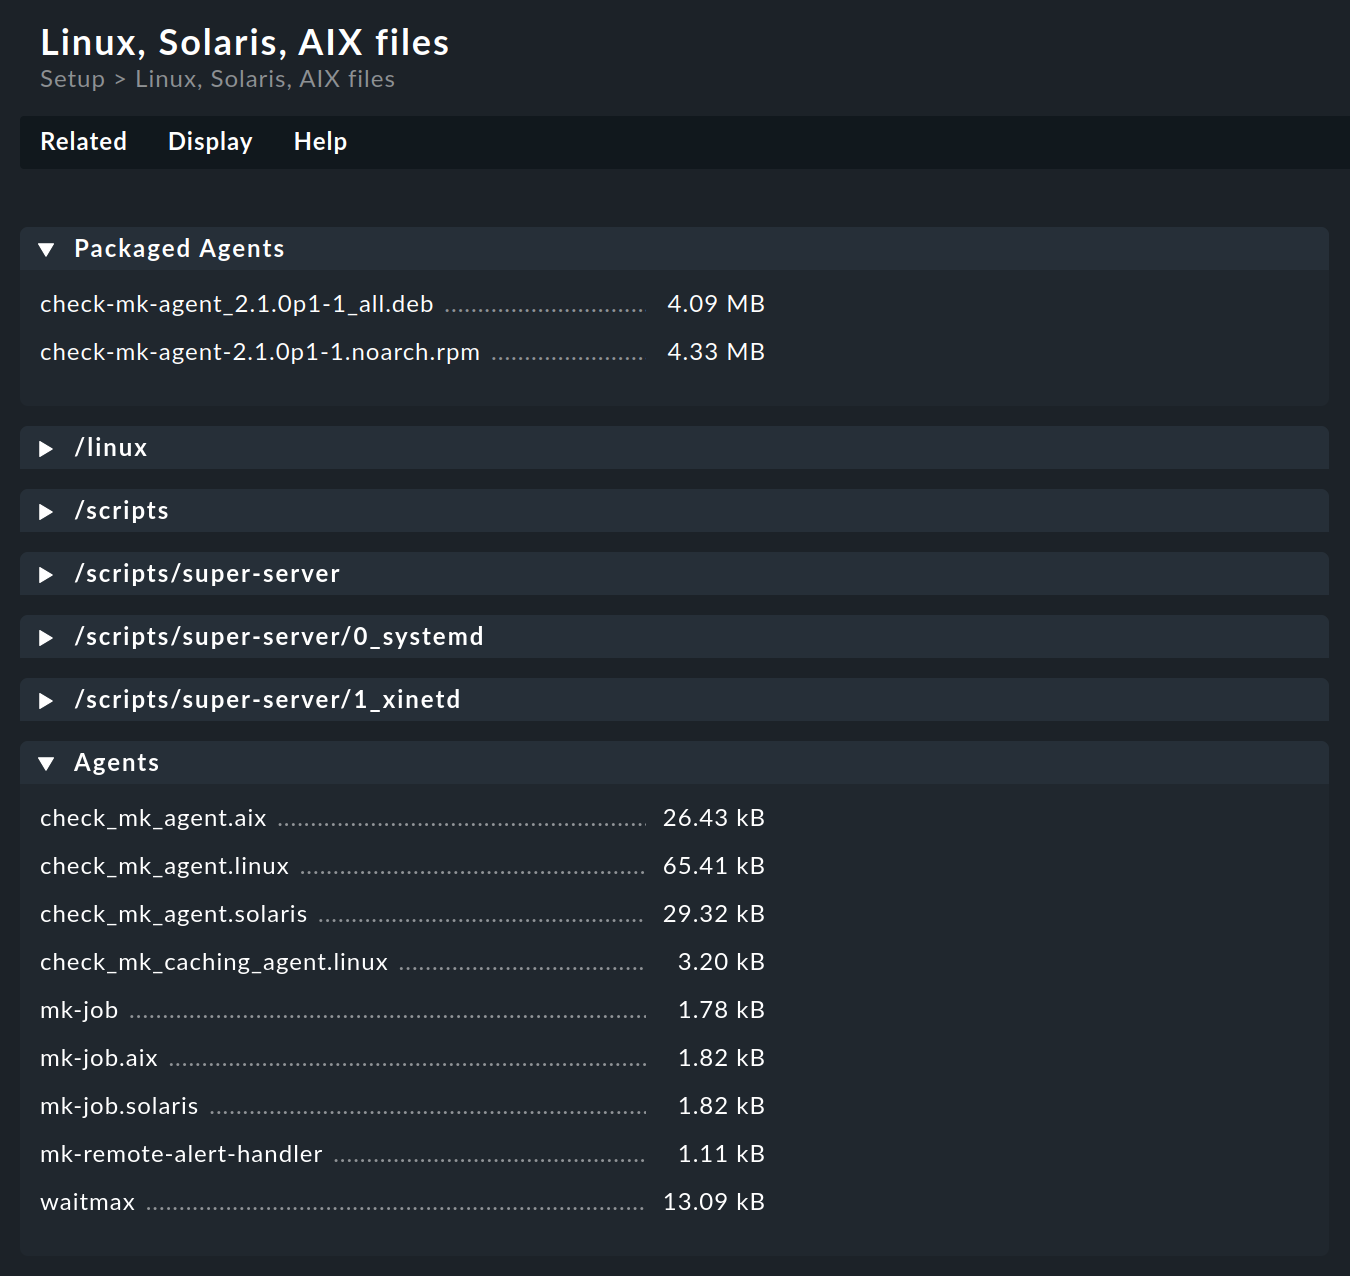
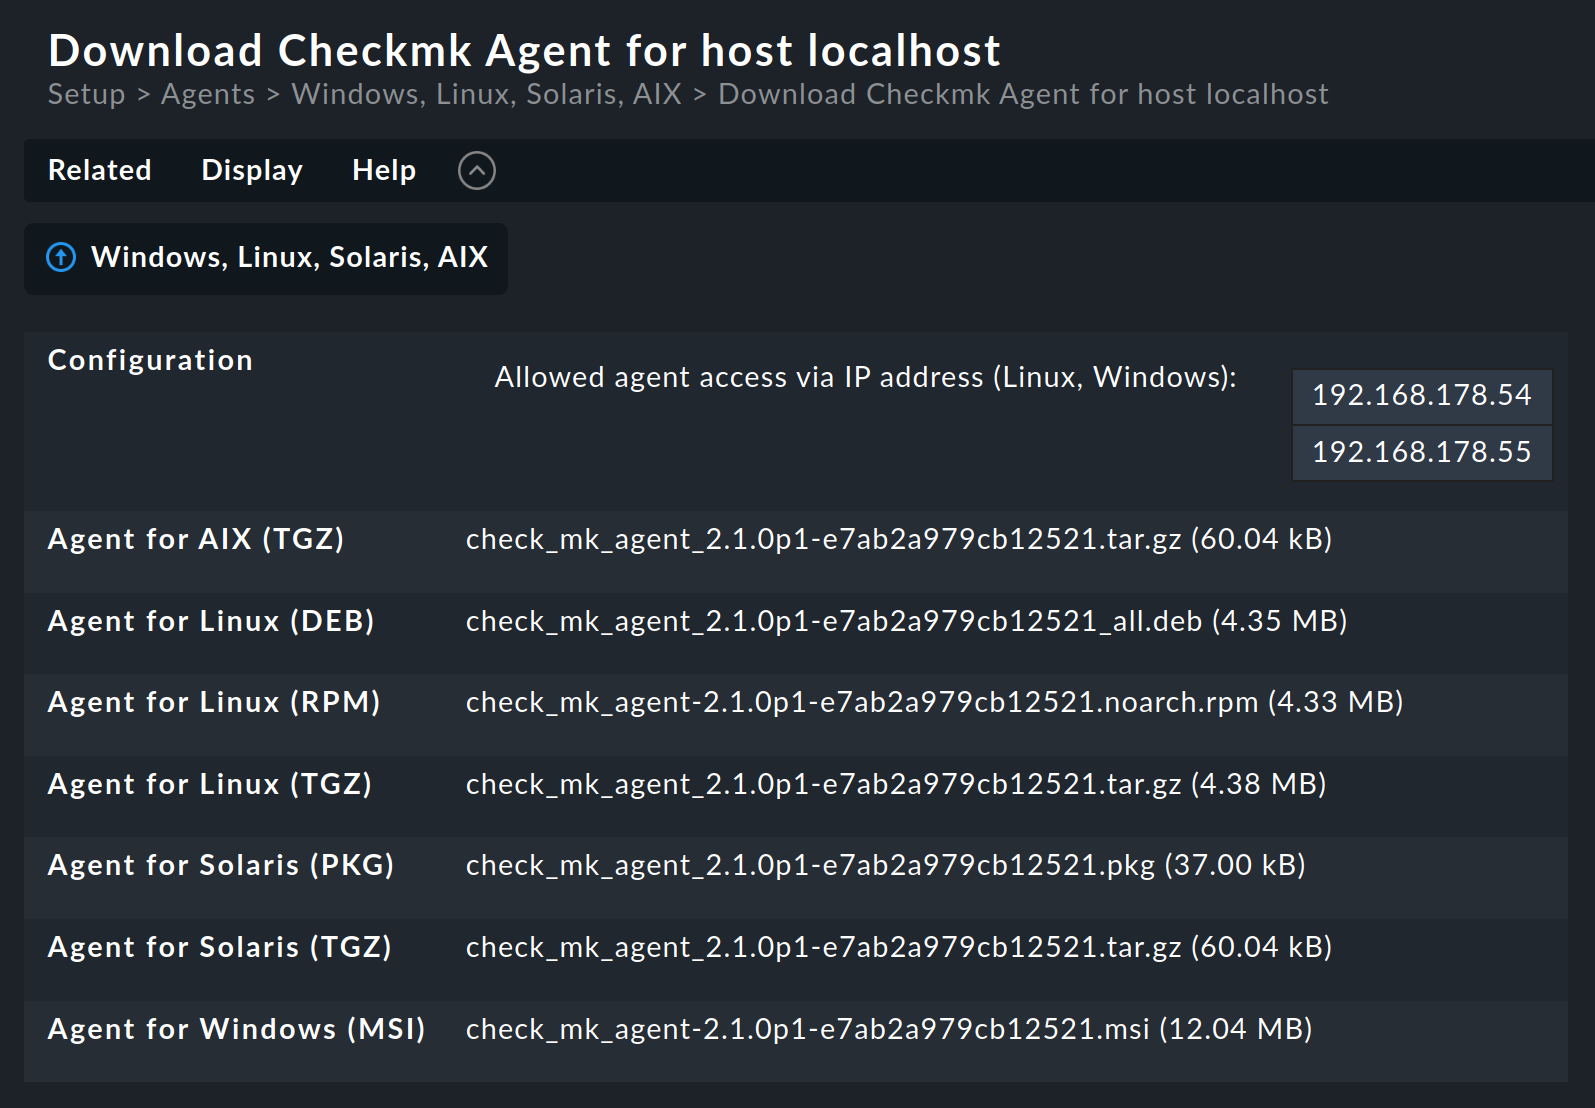
In the ![]() Checkmk Raw Edition, the menu items Linux, Windows and Other operating systems will take you directly to the download pages where you will find the pre-configured agents and agent plug-ins, in the following example to the download page for Linux, Solaris, AIX:
Checkmk Raw Edition, the menu items Linux, Windows and Other operating systems will take you directly to the download pages where you will find the pre-configured agents and agent plug-ins, in the following example to the download page for Linux, Solaris, AIX:
In the ![]() Checkmk Enterprise Editions, the menu item Windows, Linux, Solaris, AIX takes you to a page that also gives you access to the Agent Bakery.
From this page, the Related menu item will take you to the agent files pages as in the Raw Edition.
Checkmk Enterprise Editions, the menu item Windows, Linux, Solaris, AIX takes you to a page that also gives you access to the Agent Bakery.
From this page, the Related menu item will take you to the agent files pages as in the Raw Edition.
The packaged agents for Linux (in RPM and DEB file formats) and for Windows (in MSI file format) are found right in the first box of the corresponding download page. In these software packages you will find the new agent with Agent Controller since version 2.1.0. The installation and configuration is described in detail in the articles on Linux agents and Windows agents.
In the Agents box you can find the appropriate agent scripts for the various operating systems. For operating systems on which the agent must be set up in the legacy mode (i.e., without an Agent Controller), there are the articles on Monitoring Linux in legacy mode and Monitoring FreeBSD.
4. The Agent Bakery
4.1. Introduction
![]() If you use one of the
If you use one of the ![]() Checkmk Enterprise Editions you can package personalized agents with the Agent Bakery.
In this way, alongside the existing agents, you can also create (or ‘bake‘) agent packages that contain custom configurations and additional or optional plug-ins.
You can install these packages with a single command.
Such packages are ideal for automatic distribution and installation.
You can even create personalized agents for folders or specific groups of hosts.
This allows great flexibility through the use of the automatic agent updates.
Checkmk Enterprise Editions you can package personalized agents with the Agent Bakery.
In this way, alongside the existing agents, you can also create (or ‘bake‘) agent packages that contain custom configurations and additional or optional plug-ins.
You can install these packages with a single command.
Such packages are ideal for automatic distribution and installation.
You can even create personalized agents for folders or specific groups of hosts.
This allows great flexibility through the use of the automatic agent updates.
While it is true that the Checkmk agent can function ‘naked’ immediately — without needing configuration, and without plug-ins — nonetheless in some cases the agent does need to be set up. Some examples:
Restriction of access to specific IP addresses
Monitoring of Oracle databases (a plug-in and configuration are required)
Monitoring of text log files (a plug-in, data names and a text-patterns are required)
Utilization of the hardware/software inventory (a plug-in required)
4.2. Downloading the agent
You can access the Agent Bakery via Setup > Agents > Windows, Linux, Solaris, AIX:
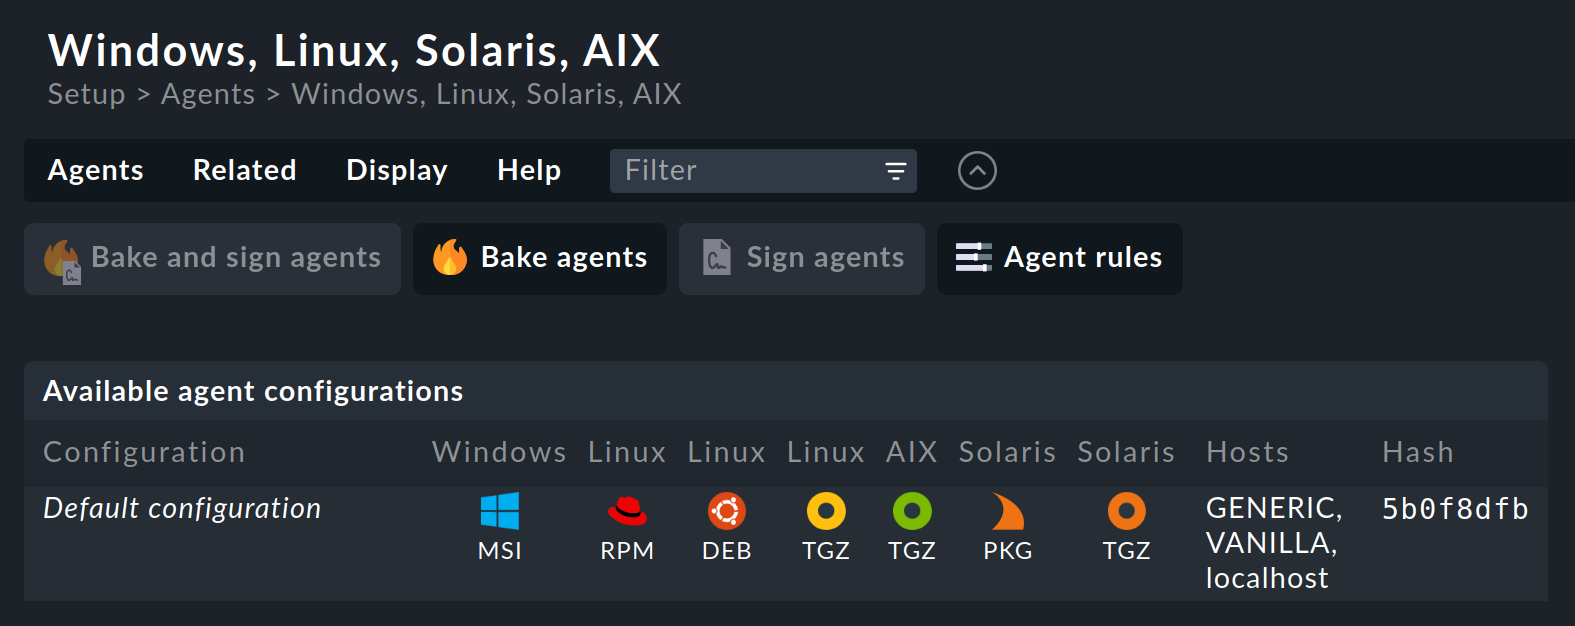
Checkmk supports Windows, Linux, Solaris and AIX operating systems with the Agent Bakery.
For Linux you have a choice between the package formats RPM (for Red Hat Enterprise Linux (RHEL) based systems, SLES) and DEB (for Debian, Ubuntu),
as well as a so-called 'tarball' in the TGZ file format that is simply unpacked as root under /.
Likewise, a tarball is available for AIX, however this does not include automatic integration into the inetd.
The integration must be performed manually as a one-off action.
For Solaris there is again the tarball and a PKG package.
If you have not yet made any settings for specific hosts, there is only one default agent configuration. An explanation of the various possible agent configurations will be provided in the next two sections.
Every agent configuration has an explicit ID: its hash. A hash’s first eight characters are displayed in the GUI. This hash will be a part of the package version and embedded in the package file name. Whenever you change something in a package’s configuration or update Checkmk, the package’s hash will also be changed. In this way the operating system’s package manager recognizes that it is a different package and perform an update. Checkmk’s version number would not suffice to distinguish here.
Baked packages for Linux and Windows are installed in the same way as the packages available on the Checkmk download page.
4.3. Configuration using rules
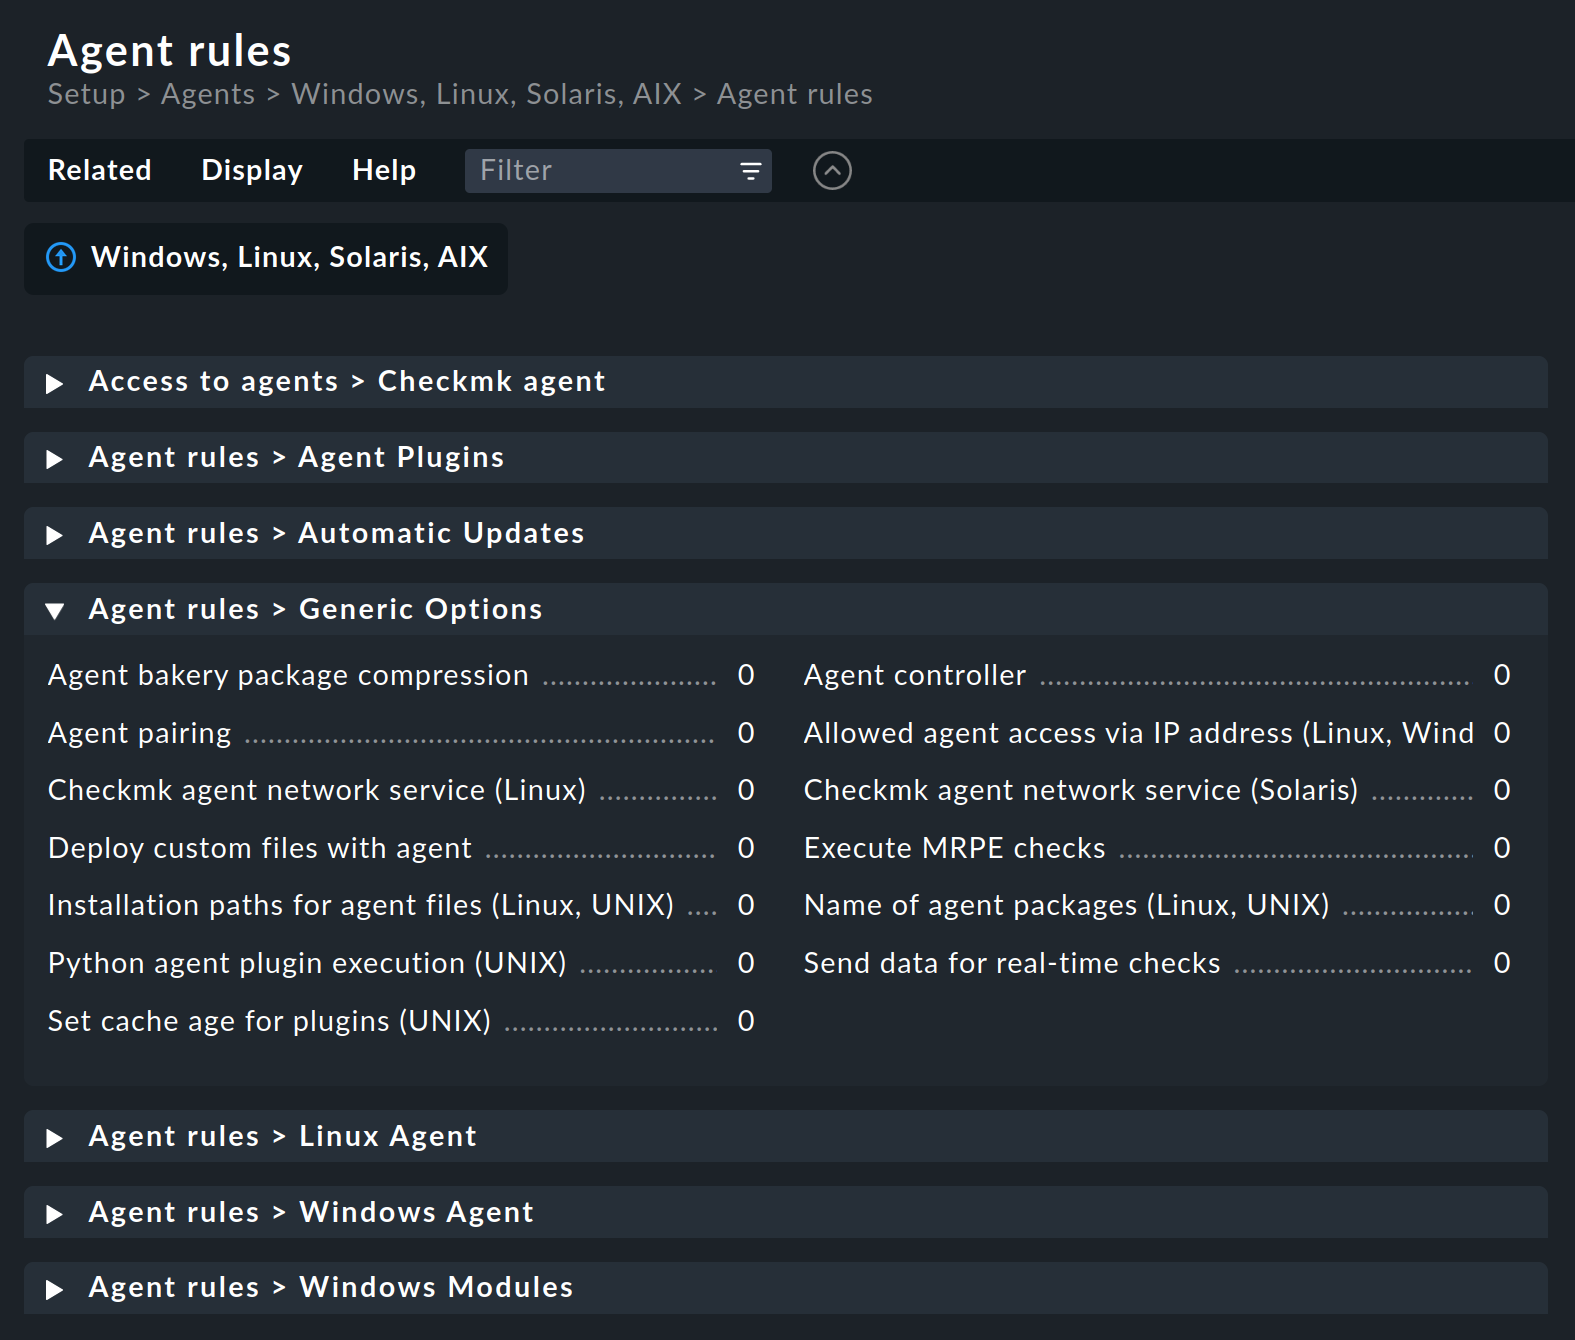
The agent’s configuration can be altered — as is so often the case in Checkmk — via rules. These offer you the possibility of equipping different hosts with differing settings or plug-ins. The Agent rules button takes you to a page which lists all of the rule sets that affect the agents:
Let’s take the following example: you wish to limit the list of IP addresses that are permitted to access the agent. For this you select the Generic Options > Allowed agent access via IP address (Linux, Windows) rule set. Enter one or more IP addresses as the rule’s value:

Leave the default values in the Conditions box unchanged so that this rule applies to all hosts. Save the new rule.
4.4. The agent configurations
After saving, go back to the Windows, Linux, Solaris, AIX page.
The ![]() button ensures that the agent will be freshly-baked.
The result — you now have two individual configurations:
button ensures that the agent will be freshly-baked.
The result — you now have two individual configurations:

In the Agent type column you can read which hosts the respective configuration is assigned to. For space reasons this list may not be complete.
Vanilla (factory settings) |
The agent packages contain only the default configuration and thus no single agent rule. |
Folders |
The agent packages contain all agent rules in which no conditions are defined for hosts and which apply to the listed folders. |
Hosts |
The agent packages contain all of the agent rules that apply to the hosts in the the list. |
For the example shown above, the Allowed agent access via IP address (Linux, Windows) rule was created without conditions for hosts.
The new agent configuration therefore applies to the Main folder and to localhost, currently the site’s only host.
The more host-specific rules you deploy, the more different variants of agents will be built. The Agent Bakery takes care to build only those configurations that are used by at least one of the existing folders or hosts.
By the way, you can also access a host’s agent packages conveniently via the host’s properties by clicking on the host in Setup > Hosts > Hosts and selecting Monitoring agent in the Hosts menu:
Why are packages for all operating systems provided for every host? The answer is very simple: if no agent is installed on a system Checkmk cannot of course recognize the operating system. In any case, once automatic agent updates are activated you don’t need to do anything more.
4.5. Extending via plug-ins
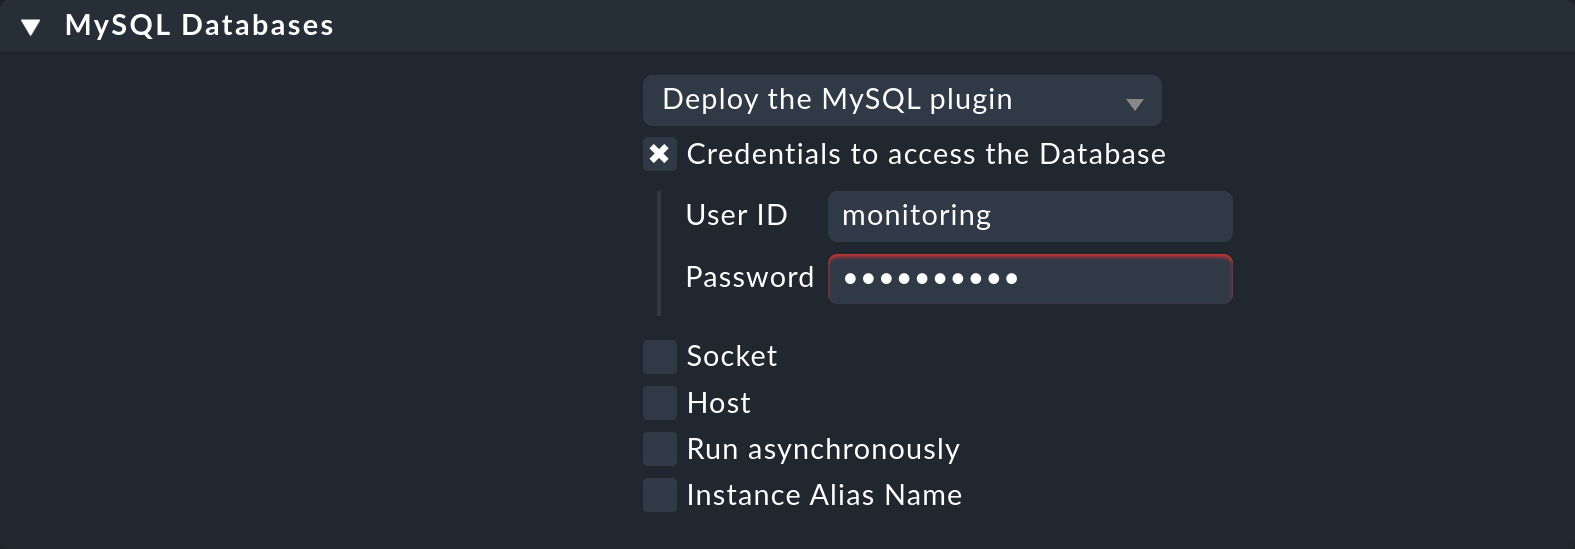
Many rules are concerned with the installation of various plug-ins. These extend the agent for the monitoring of quite specific components. Most of these are special applications such as databases, for example. Alongside the rule that activates a plug-in you will also find the settings for configuring the plug-in. Here, for example, is the rule for monitoring MySQL:
4.6. Configuration files
Be careful not to manually modify configuration files generated by the Agent Bakery on the target system. While manual changes will work for now, the next time you update the agent, the changes will be lost again. However it is possible to install additional plug-ins and configuration files without problems.
5. When should an agent be updated?
Regardless of whether you monitor only a handful — or even thousands of hosts — updating the Checkmk agent on all hosts is always a larger operation.
The automatic agent update in the ![]() Checkmk Enterprise Editions is however a big help.
Nonetheless, you should really only update the agent when:
Checkmk Enterprise Editions is however a big help.
Nonetheless, you should really only update the agent when:
the update solves a problem affecting you, or
the update includes required new functions.
In order for this to be possible a general rule applies in Checkmk: Newer versions of Checkmk can basically handle the output of older agents.
Important: the reverse is not necessarily true. If an agent’s Checkmk version is newer than that of the monitoring server it is possible that the check plug-ins there cannot interpret the agent’s output correctly. In such a case the affected services go into an UNKNOWN status:

Even if the output in the above image suggests otherwise, please do not send a crash report in such a case.
6. Error diagnosis
6.1. Testing the agent via the command line
A correctly-installed agent can be very easily queried from the command line.
The best way to do this is directly from the Checkmk site that is also actively monitoring the agent.
In this way you can be certain that the server’s IP address will be accepted by the agent.
Suitable commands are e.g. telnet and netcat (or nc).
OMD[mysite]:~$ echo | nc 10.1.1.2 6556
16
The 16 output indicates that the connection established via TCP port 6556 was successful and the TLS handshake can now take place.
The agent has been registered with the Checkmk site via the Agent Controller, so the communication is TLS encrypted and no agent output will be displayed.
For registration details, see the Linux agent and the Windows agent articles.
If the communication between agent and Checkmk server is still unencrypted (as in legacy pull mode) or is and remains unencrypted (as in legacy mode), this command will give you the complete unencrypted agent output instead of the 16 (of which only the first lines are shown below):
OMD[mysite]:~$ echo | nc 10.1.1.2 6556
<<<check_mk>>>
Version: 2.1.0p1
AgentOS: linux
Hostname: mycmkserver
AgentDirectory: /etc/check_mk
DataDirectory: /var/lib/check_mk_agent
SpoolDirectory: /var/lib/check_mk_agent/spool
PluginsDirectory: /usr/lib/check_mk_agent/plugins
The output always begins with the line <<<check_mk>>>.
Lines included in <<< and >>> are called section headers.
These divide the agent output into sections.
Each section contains related information and is usually simply the output from a diagnostic command.
The check_mk section plays a special role.
It contains general information about the agent such as e.g., its version number.
If the host is already being monitored you can also fetch the data with the cmk -d command.
This uses the IP address configured in the Setup, allows for a possibly reconfigured port number, and also for any special agent that may be present:
OMD[mysite]:~$ cmk -d mycmkserver
<<<check_mk>>>
Version: 2.1.0p1
If monitoring is already running regularly for the host in question a current copy of the output can always be found in the ~/tmp/check_mk/cache site directory:
OMD[mysite]:~$ cat tmp/check_mk/cache/mycmkserver
<<<check_mk>>>
Version: 2.1.0p1
Note: For information on more diagnostic commands that can be run on the agent host, see the Linux agent and Windows agent articles.
6.2. Testing the agent via the web interface
You can also conduct a diagnosis of the agent via the web interface. This takes all settings into consideration and also supports SNMP devices and those queried using special agents. In effect, Checkmk always attempts to query via TCP port 6556 and SNMP simultaneously.
You can access the connection test via the host properties: On the Properties of host page, select Host > Connection tests from the menu, and start the test by clicking Run tests:

You can try out quite a few of the settings (for example, the SNMP community) right away, and save them when successful.