1. OMD - The Open Monitoring Distribution
The Checkmk monitoring system uses the Open Monitoring Distribution (OMD). Founded by Mathias Kettner, OMD is an Open Source project which revolves around the user-friendly and flexible installation of a monitoring solution made up of various components. The abreviation OMD might already be familiar to you as part of the RPM/DEB-Package installation.
An OMD-based installation is distinguished by a number of characteristics:
The ability to run multiple monitoring sites in parallel
The ability to operate sites with differing versions of the monitoring software
An intelligent and convenient mechanism for updating the software
Uniform file paths — regardless of which Linux-platform is installed
A clear separation of data and software
A very simple installation — with no dependence on third-party software
A perfect preconfiguration of all components
OMD is managed on the command line, using the omd command — more precisely, a set of omd commands for the various actions used for the management of the monitoring sites, for example, omd create for creating a site.
The most important omd commands are presented in this article.
The first command is omd help, which displays an overview of the available omd commands.
You can get help for any of these commands by adding the --help option after the command, e.g. omd create --help.
The two dashes before help are important here, because without them omd create help would have already created your first site with the name help.
2. Creating sites
Perhaps the best thing about OMD is that it can manage any number of monitoring sites simultaneously on a single server. Each site is a self-contained monitoring system which runs independently of the others.
A site always has a distinctive name, specified at its creation. This name is the same as that of the Linux user which is created at the same time. The site’s name conforms to the same conventions as user names under Linux.
A creation is performed with the omd create command.
This must be executed as the root user:
root@linux# omd create mysite
Adding /opt/omd/sites/mysite/tmp to /etc/fstab.
Creating temporary filesystem /omd/sites/mysite/tmp...OK
Updating core configuration...
Generating configuration for core (type nagios)...
Precompiling host checks...OK
Executing post-create script "01_create-sample-config.py"...OK
Restarting Apache...OK
Created new site mysite with version 2.1.0p17.cre.

  The site can be started with omd start mysite.
  The default web UI is available at http://linux/mysite/

  The admin user for the web applications is cmkadmin with password: YzxfoFZh
  For command line administration of the site, log in with 'omd su mysite'.
  After logging in, you can change the password for cmkadmin with 'cmk-passwd cmkadmin'.
When creating the cmkadmin user a password will be randomly-generated and issued.
What takes place during the creation of a site named mysite?
An operating system user
mysite, and a groupmysitewill be created.A new home directory
/omd/sites/mysitewill be created and assigned. This directory is also referred to as the site directory.This home directory will be populated with configuration files and sub-directories.
A basic configuration will be created for the new site.
Note: It is not possible to create a new site with a name that is already assigned on the server as the name of a 'normal' user.
2.1. User and group IDs
In some cases it is also desirable to specify the user/group ID of the new user to be created.
This is performed with the -u and -g options, e.g.:
root@linux# omd create -u 6100 -g 180 mysiteAn overview of the further options can be shown with omd create --help.
The most important options are:
|
The new user will be created with the User-ID |
|
The new user’s group will be created with the Group-ID |
|
The new user is created with the password |
|
OMD assumes that the new user already exists, and does not create it. The home directory of this user must be located below |
|
The new site’s temporary file system will be created with the |
2.2. External site directory
By default, the home directory of a new site is created at /omd/sites/ and filled with default files.
However, you can also have an empty home directory created, for example to mount an external volume at this location.
This is done by the --no-init option:
root@linux# omd create --no-init mysiteThis option also omits integration with the system apache, leaving /omd/apache/mysite.conf empty.
You could then mount any directory or volume and continue the setup:
root@linux# omd init mysiteomd init then catches up with the two omitted steps, so it adds the default files and creates the Apache configuration.
3. Site user
You can execute the omd commands as root user or as site user.
Under root you have more possibilities.
For example, only root can create a site, which is logical, because of course first a site must be created before a user can be created for it.
Since you can execute a command on root that applies simultaneously to all existing sites, you must include the name of the particular site you are interested in with the omd command.
Once the new site has been created, you should run any other omd commands only as the site user.
As a site user you can execute all important operations affecting this site.
Switching users is done with su:
root@linux# su - mysiteNote that the minus sign following the su is essential.
It ensures that switching users processes all of the operations that take place during a normal login.
In particular, all environment variables will be correctly set, and your session will start as mysite in the /omd/sites/mysite site directory:
OMD[mysite]:~$Once you are logged in as a site user, you usually don’t need to include a site name with omd commands, since such a command is applied only to the site you are logged in to.
If you have multiple Checkmk versions installed on your Checkmk server, the corresponding OMD version is also installed with each of these versions.
This can result in a long list of software versions over time.
Since omd commands can also differ between versions, it is sometimes interesting to know which OMD version you are currently working with.
As a site user, you always use the
omdcommands for the Checkmk version currently installed on the site, which you can display withomd version.As a
rootuser, you execute the commands for the default version that is also used when creating a site — this is usually the latest version installed on the server. You can display the default version withomd versionand change it withomd setversion.
4. Starting and stopping sites
Your site is now ready to be started — which can be done as root with omd start mysite.
It is however, fundamentally better to work with the site as the site user:
OMD[mysite]:~$ omd start
Creating temporary filesystem /omd/sites/mysite/tmp...OK
Starting agent-receiver...OK
Starting mkeventd...OK
Starting rrdcached...OK
Starting npcd...OK
Starting nagios...OK
Starting apache...OK
Starting redis...OK
Initializing Crontab...OK
Unsurprisingly, stopping is done with omd stop:
OMD[mysite]:~$ omd stop
Removing Crontab...OK
Stopping redis...killing 484382...OK
Stopping apache...killing 484371...OK
Stopping nagios...OK
Stopping npcd...OK
Stopping rrdcached...waiting for termination...OK
Stopping mkeventd...killing 484279...OK
Stopping agent-receiver...killing 484267...OK
Stopping 1 remaining site processes...OK
Starting and stopping a site is nothing more than starting or stopping a collection of services. These can also be individually managed by specifying the name of the service, for example:
OMD[mysite]:~$ omd start apache
Temporary filesystem already mounted
Starting apache...OK
The names of the various services can be found in the ~/etc/init.d directory.
Note the tilde (~) prefixing the path name — this represents the home directory for the site user (the site directory).
~/etc/init.d and /etc/init.d are different directories.
Alongside start and stop, there are also the omd commands restart, reload and status.
Reloading Apache is, for example, always necessary following a manual change to the Apache configuration:
OMD[mysite]:~$ omd reload apache
Reloading apache
Note that this does not apply to the global Linux server’s Apache process, but rather the site’s own dedicated Apache process.
In order to be able to maintain an overview of the state of the site following all of the starts and stops, simply use omd status:
OMD[mysite]:~$ omd status
agent-receiver: stopped
mkeventd:       stopped
rrdcached:      stopped
npcd:           stopped
nagios:         stopped
apache:         running
redis:          stopped
crontab:        stopped
-----------------------
Overall state:  partially running
5. Configuring the components
As already mentioned, OMD integrates multiple software components into a monitoring system.
In so doing, some components are optional, and for some there are alternatives or different operational settings.
All of this can be conveniently configured with the omd config command.
There are also interactive and scripting modes.
5.1. Interactive configuration
As the site user you can simply call the interactive mode with:
OMD[mysite]:~$ omd config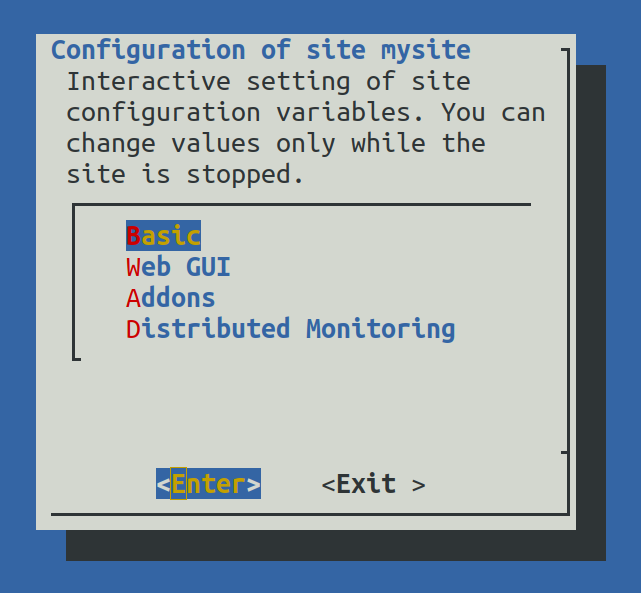
omd config menu you navigate with the cursor and enter keysAs soon as you change a setting while the site is running, OMD will inform you that your site must be stopped first and does this as needed:
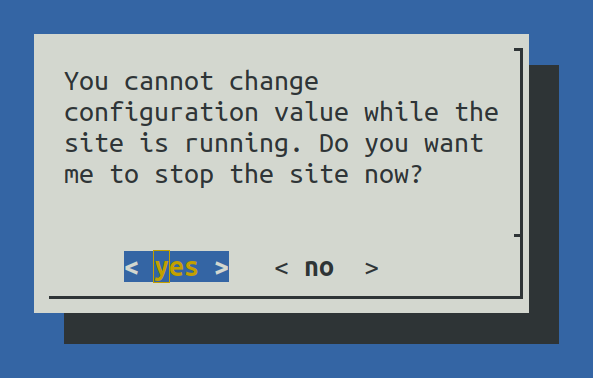
Don’t forget to restart the site following the completion of the work.
omd config will not do this for you automatically.
5.2. Configuration via script mode
Those who don’t like the interactive mode, or prefer to work with scripts, can set the individual settings as variables via the command line.
For this there is the omd config set command.
The following example sets the AUTOSTART variable to off:
OMD[mysite]:~$ omd config set AUTOSTART offThis can be also performed as root if the site’s name is added as an argument:
root@linux# omd config mysite set AUTOSTART offThe current assignment of all variables shows as root the command omd config mysite show and as site user omd config show:
OMD[mysite]:~$ omd config show
ADMIN_MAIL:
AGENT_RECEIVER: on
AGENT_RECEIVER_PORT: 8005
APACHE_MODE: own
APACHE_TCP_ADDR: 127.0.0.1
APACHE_TCP_PORT: 5008
AUTOSTART: off
[...]
The command output above is abreviated for clarity and shows only the first entries.
5.3. Commonly used settings
There are numerous settings in omd config.
The most important are:
| Variable | Default | Meaning |
|---|---|---|
|
|
Set this to |
|
|
Selection of the monitoring core. In the |
|
|
Activates the Event Console with which the syslog messages, SNMP traps and other events can be processed. |
|
|
Allows external access to the status data for this site. This can be used to set up a distributed monitoring. The status of this (remote) site can be incorporated into the central site. Enable this setting only in a secure network. |
Note: You can also see these variables under the same names in the interactive mode.
6. Copying and renaming sites
6.1. Copying sites
It is sometimes useful to create a copy of a site for testing purposes or when preparing for an update.
Of course one could simply copy the /omd/sites/mysite_old directory to /omd/sites/mysite_new.
That will however not work as desired, because:
many configuration files include the site’s name,
in several places absolute paths which start with
/omd/sites/mysite_oldalso appear,and not least, at the operating system level there must be a user, including its associated group that owns the site and by default has the same name as the site.
To simplify copying a site, there is instead the omd cp command, which takes all of this into account.
Run the command as root and simply enter the name of the existing site followed by the name of the new one.
For example:
root@linux# omd cp mysite_old mysite_newThe copy can only work if:
the site is stopped and
no processes are running that belong to the site user.
Both of these ensure that the site is in a consistent state at the time of copying and does not change during the operation.
6.2. Migrating the configuration
OMD could originally only handle the files that were actually created during the creation of the site with omd create, and which also contained the site’s ID ($OMD_SITE).
These files can be found in the site directory ~/etc with this command:
OMD[mysite]:~$ grep -r $OMD_SITE etcPreviously, OMD could not do anything with configuration files that were created later via work with the Checkmk site (the configurations of hosts that had been added at a later date, for example).
From a purely technical point of view, this behavior corresponds exactly to the scope of OMD.
However, the expectation of most users is that an omd cp creates a completely new site that can continue to be used productively — including its own monitoring configuration.
From Checkmk version 2.1.0 OMD can now also customize the most important elements of the Checkmk configuration. By the way, you don’t have to do anything, the whole migration described below takes place automatically.
A typical example:
In a host’s properties you can use the Monitored on site attribute to manually specify which site this host should be monitored on, for example mysite_old.
After an omd cp mysite_old mysite_new the value will change to mysite_new accordingly.
(Previously this procedure would have resulted in the entry Unknown site (mysite_old)).
The actual technical implementation of this migration is as follows:
OMD detects changes to the site ID and then executes the post-rename-site -v -o mysite_new command.
The individual migration steps are subsequently processed completely automatically via the so-called rename actions plugins, which you can find in the Git repository at cmk/post_rename_site/plugins/actions.
Migration also includes informing you about anything that cannot be migrated automatically.
Here’s a concrete example: you are using distributed monitoring and rename both the central site and a remote site.
Central site: The sites.py plug-in detects that this is a central site and updates, among other things, the URL prefix value, which can be found in the connection settings of the local site under Setup > General > Distributed Monitoring.
Remote site: The warn_remote_site.py plug-in recognizes that it is a remote site and accordingly indicates that the central site must be checked and manually customized if necessary.
This in turn means that in the distributed monitoring settings on the central site, the remote site’s new name must be entered in the connection settings to the renamed remote site — OMD of course cannot do this from a remote computer.
OMD itself informs you in detail about the whole procedure in the terminal.
Here you can see an example of the migration messages from the omd cp output when renaming a central site — separated into success and warning messages.
The processed rename action plugins are numbered individually.
First the output from the automatically performed migration tasks (shortened here):
...
Executing post-cp script "01_cmk-post-rename-site"...
-|  1/6 Distributed monitoring configuration...
-|  2/6 Hosts and folders...
-|  3/6 Update core config...
...
The second part of the output now contains tips regarding settings you may need to configure manually (here heavily abbreviated):
...
-|  4/6 Warn about renamed remote site...
-|  5/6 Warn about new network ports...
-|  6/6 Warn about configurations to review...
...
The Warn about configurations to review… item includes general notes on individual aspects that will generally need to be reviewed manually during a migration, such as hardcoded filters for views:
...
-| Parts of the site configuration cannot be migrated automatically. The following
-| parts of the configuration may have to be reviewed and adjusted manually:
-|
-| - Custom bookmarks (in users bookmark lists)
-| - Hard coded site filters in custom dashboards, views, reports
-| - Path in rrdcached journal files
-| - NagVis maps or custom NagVis backend settings
-| - Notification rule "site" conditions
-| - Event Console rule "site" conditions
-| - "site" field in "Agent updater (Linux, Windows, Solaris)" rules (CEE/CME only)
-| - Alert handler rule "site" conditions (CEE/CME only)
-|
-| Done
Here is an overview of the six currently active plug-ins — the order here corresponds to the numbering in the above output:
| Plug-in | Function |
|---|---|
|
Changes the site ID in various configuration files. |
|
Changes the site attribute of host and folder properties. |
|
Updates the core configuration ( |
|
Warns when renaming a remote site. |
|
Notices of problems with multiple ports. |
|
General tips for elements that should be checked manually. |
6.3. Limiting data volume
If you are monitoring a large number of hosts with the site, the volume of data to be copied can be quite substantial. Most of this is produced by the measured values stored in the Round Robin Databases (RRD). But the log files containing historic events can also produce larger data volumes.
If the history is not required (for example, because you just want to test something quickly), these can be omitted from the copy.
In such cases the following options can be added to omd cp:
|
Copies the site without the RRDs. |
|
Copies the site without log files and other historical data. |
|
Does both: |
The order of the option(s) is important:
root@linux# omd cp --no-rrds mysite_old mysite_new6.4. Renaming sites
Renaming a site is performed with the omd mv command.
This is done similarly to copying a site, has the same prerequisites and is also done including configuration migration.
The options to restrict the data volume are not available since the data is only being moved to another directory and is not being duplicated.
Example:
root@linux# omd mv mysite_old mysite_new6.5. Other options
As with creating a site, copying and renaming each creates a new Linux user.
Therefore omd cp and omd mv also have some of the same options as omd create, e.g. to specify user and group IDs.
For more detailed information, use the omd cp --help and omd mv --help commands.
7. Showing changes in configuration files
When creating a site, the omd create command fills the ~/etc directory with numerous predefined configuration files.
A number of directories will also be created under ~/var and ~/local.
Now it will probably be the case that over the course of time a number of the files will have been customized.
When after a time you wish to determine which files are no longer in the condition as originally supplied, the omd diff command can provide the answer.
Amongst other things, this is useful before an update of Checkmk, since your changes could conflict with changes in the default files.
When called without further arguments, all changed files below the current directory will be listed:
OMD[mysite]:~$ omd diff
 * Changed content var/check_mk/wato/auth/auth.php
 ! Changed permissions var/check_mk/wato/auth/auth.php
 * Changed content etc/htpasswd
 * Changed content etc/diskspace.conf
 ! Changed permissions etc/diskspace.conf
 * Changed content etc/auth.secret
 * Changed content etc/mk-livestatus/xinetd.conf
 * Changed content etc/omd/allocated_ports
 * Changed content etc/apache/apache.conf
 * Deleted etc/apache/apache-own.conf
You can also enter a query for a specific directory:
OMD[mysite]:~$ omd diff etc/apache
 * Changed content etc/apache/apache.conf
 * Deleted etc/apache/apache-own.conf
If you wish to see the changes in detail, simply enter the path to the file:
OMD[mysite]:~$ omd diff etc/apache/apache.conf
74,75c74,75
< ServerLimit 64
< MaxClients 64
---
> ServerLimit 128
> MaxClients 128
8. Updating sites
The omd update command is used to update the monitoring software installed on the site to a later version.
This is presented in detail in the Updating Checkmk article.
Other useful omd commands related to software updates are also shown there as examples:
omd versionsto list all installed software versions,omd sitesto list all existing sites with the versions installed on them,omd versionto display the default version used when creating a site,omd setversionto set a different default version.
By the way, omd update is also used to upgrade to another edition, e.g. from the Free Edition to the Standard Edition.
9. Backing up and restoring sites
9.1. Creating a backup
The site management in Checkmk has a built-in mechanism for backing up and restoring Checkmk sites.
The omd backup and omd restore commands are the basics for packing all of the site’s data into a tar archive, and respectively, extracting that data for a restore.
Note: Checkmk also offers the possibility of performing backups and restores without using the command line, via the GUI under Setup > Maintenance > Backups. There you can also create encrypted backups and scheduled backup jobs. See the Backups article to learn how to do this.
Backing up a site with omd backup does not require root permissions.
A site user can perform this.
Simply enter as an argument the name of the backup file to be created:
OMD[mysite]:~$ omd backup /tmp/mysite.tar.gzNote that:
The created file type is a gzip-compressed tar archive. Therefore use
.tar.gzor.tgzas the file extension.Do not store the backup in the site directory, since this will of course be completely backed up – thus every subsequent backup will contain a copy of all of its predecessors.
If you create the backup as a site user, only the site user and their group will get read and write access to the tar archive.
If the backup’s target directory is not writable for a site user, you can also do the backup as root.
In this case an additional argument is required, as always, specifying the site name to be backed up:
root@linux# omd backup mysite /var/backups/mysite.tar.gzThe backup contains all of the site’s data — except for the volatile data under ~/tmp/.
With the tar tzf command one can easily have a look at the file’s contents:
OMD[mysite]:~$ tar tvzf /tmp/mysite.tar.gz  | less
lrwxrwxrwx mysite/mysite     0 2022-07-25 11:59 mysite/version -> ../../versions/2.1.0p8.cre
drwxr-xr-x mysite/mysite     0 2022-07-25 17:25 mysite/
-rw------- mysite/mysite   370 2022-07-26 17:09 mysite/.bash_history
-rw-r--r-- mysite/mysite  1091 2022-07-25 11:59 mysite/.bashrc
-rw-r--r-- mysite/mysite    63 2022-07-25 11:59 mysite/.modulebuildrc
-rw-r--r-- mysite/mysite  2066 2022-07-25 11:59 mysite/.profile
drwxr-xr-x mysite/mysite     0 2022-07-25 11:59 mysite/.version_meta/
drwxr-xr-x mysite/mysite     0 2022-07-20 11:40 mysite/.version_meta/skel/
-rw-r--r-- mysite/mysite  1091 2022-06-26 02:03 mysite/.version_meta/skel/.bashrc
-rw-r--r-- mysite/mysite    52 2022-07-20 09:02 mysite/.version_meta/skel/.modulebuildrc
-rw-r--r-- mysite/mysite  2055 2022-06-26 02:03 mysite/.version_meta/skel/.profile
drwxr-xr-x mysite/mysite     0 2022-07-20 11:40 mysite/.version_meta/skel/etc/
drwxr-xr-x mysite/mysite     0 2022-07-20 11:40 mysite/.version_meta/skel/etc/apache/
-rw-r--r-- mysite/mysite  1524 2022-06-26 02:03 mysite/.version_meta/skel/etc/apache/apache-own.conf
9.2. Backup without history
The lion’s share of the data to be moved during a site backup are the measured values and the log files with historical events. This is just as true when backing up as when copying a site. If you do not absolutely need this data, you can omit it and thus make the backup much faster and the resulting output file much smaller.
omd backup provides the same options to omit this data as omd cp does when copying.
In the following example, the backup is created without measurement data and without the history stored in the log files:
OMD[mysite]:~$ omd backup -N /tmp/mysite.tar.gz9.3. Backing up a running site
A backup can also be created from a running site.
To ensure a consistent state of the Round Robin Databases (RRD) used for recording the measurement data, the omd backup command automatically alters the Round Robin cache to a mode with which the running updates are written only to the journal, and no longer to the RRDs.
The journal files are the last to be backed up — thus it can be achieved that as much as possible of the measurement data that has been generated during the backup is also included in the backup.
9.4. Restore
Restoring a backup is as simple as creating a backup.
The omd restore command restores a site from a backup — in the Checkmk version that was used to backup the site.
Therefore, for the restore to work, this same version must be installed on the server.
The site is completely emptied and refilled.
Before omd restore the site must be stopped and afterwards it must be restarted:
OMD[mysite]:~$ omd stop
OMD[mysite]:~$ omd restore /tmp/mysite.tar.gz
OMD[mysite]:~$ omd start
A restore can also be performed by a root user.
Unlike when called by the site user, the site will be recreated with the backup.
So if there is still a site with the same name, you will need to delete it before the restore.
This can be performed either with an omd rm, or by simply including the --reuse option with the omd restore.
A --kill additionally ensures that the already existing site is stopped before the restore proceeds.
You do not need to specify the site name in the command, because it is contained in the backup:
root@linux# omd restore --reuse --kill /var/backup/mysite.tar.gz
root@linux# omd start mysite
As root, you can also restore a site with a different name from that in the backup.
To do this, specify the desired name as an argument after the word restore:
root@linux# omd restore mysite2 /var/backup/mysite.tar.gz
Restoring site mysite2 from /tmp/mysite.tar.gz...
 * Converted ./.modulebuildrc
 * Converted ./.profile
 * Converted etc/xinetd.conf
 * Converted etc/logrotate.conf
The long list of conversions that happen here has the same function as for copying and renaming sites described earlier. The site name is included in numerous configuration files, and with this procedure any such occurrences will be replaced automatically by the new name.
9.5. Live backup & restore to another server
The omd backup and omd restore commands can — in good old Unix tradition — also work via standard input/output instead of files.
Instead of a path for the tar file, simply enter a hyphen (-).
In this way a pipe can be constructed and the data ‘streamed’ directly to another computer without requiring intermediate files. The larger the backup, the more advantageous this will be since no temporary space in the backed up server’s file system will be needed.
The following command backs up a site to another computer using SSH:
root@linux# omd backup mysite - | ssh user@otherserver "cat > /var/backup/mysite.tar.gz"If you want to reverse the SSH access, i.e. prefer to connect from the backup server to the Checkmk site, this is also possible, as the following example shows. For this, first an SSH login as a site user must be permitted.
root@otherserver# ssh mysite@checkmkserver "omd backup -" > /var/backup/mysite.tar.gzIf you are clever, and combine the above with an omd restore which reads the data from the standard input, you can copy a complete, running site from one server to another — and without needing any
additional space for a backup file:
root@otherserver# ssh mysite@checkmkserver "omd backup -" | omd restore -And now again the whole thing with reversed SSH access — this time again from the source system to the target system:
root@linux# omd backup mysite - | ssh user@otherserver "omd restore -"10. Disabling sites
OMD can disable sites.
With the command omd disable --kill mysite, executed as root, the following happens:
The site
mysiteis stopped.Processes accessing the
tmpfsare stopped.The
tmpfsis unmounted.The
/omd/apache/mysite.conffile is flushed.Apache is restarted.
In this state, the home directory of the site, here /omd/sites/mysite, is no longer referenced by any process.
This is especially practical in an cluster, since the home directory can now be moved to another node.
11. Deleting sites
Deleting a site is as easy as creating one — with the omd rm command as root.
The site will first be automatically stopped.
root@linux# omd rm mysite
PLEASE NOTE: This action removes all configuration files
             and variable data of the site.

In detail the following steps will be done:
- Stop all processes of the site
- Unmount tmpfs of the site
- Remove tmpfs of the site from fstab
- Remove the system user <SITENAME>
- Remove the system group <SITENAME>
- Remove the site home directory
- Restart the system wide apache daemon
 (yes/NO): yes
Attention: It goes without saying that this action also deletes all of the site’s data!
If you are no fan of confirmation prompts, or wish to perform the deletion as part of a script, the deletion can be forced with the -f option.
Attention: Here the -f must be placed before the rm:
root@linux# omd -f rm mysite12. Uninstall unused versions
Since Checkmk may be installed in several versions at the same time, it may happen that not all versions are actually in use by an instance.
OMD can uninstall unused versions with the command cleanup:
root@linux# omd cleanup
1.6.0p28.cee         In use (by mysite_old). Keeping this version.
2.1.0p15.cee         Uninstalling
2.1.0p15.cme         Uninstalling
2.1.0p15.cre         In use (by mysite_raw). Keeping this version.
2.1.0p19.cme         Keeping this version, since it is the default.
2022.12.14.cee       In use (by mysite). Keeping this version.
OMD keeps the default version in addition to the used versions; unless manually configured otherwise, the last installed version of Checkmk, here 2.1.0p19.cme.
13. Files and directories
| Path | Description |
|---|---|
|
Site directory for the site |
|
The site’s configuration files are stored in this directory. |