1. Users in Checkmk
Once you have your monitoring in a state where it is beginning to be useful to others, it is time to deal with the user administration function in Checkmk.
If you are only operating the system on your own, working as cmkadmin user is quite sufficient, and you can simply continue reading in the next chapter on notifications.
Assuming, then, that you have colleagues who are expected to work with Checkmk alongside you, why don’t you all simply work as cmkadmin users?
Well, this is theoretically possible, but it does create a number of difficulties.
If, however, you create one account per person, you will have several advantages:
Individual users can have individual permissions.
You can restrict the responsibility for a user to specific hosts and services, so that only these will be visible in their monitoring.
Users can create their own bookmarks, set up their sidebar individually and also customize other settings for themselves.
You can delete an account when an employee leaves the company without affecting the other accounts.
You can find all the details that go beyond the introduction in this Beginner’s guide in the article on user administration.
2. Roles for permissions
We would like to take a closer look at the two points on permissions and responsibilities. Let’s start with permissions — that is, with the question of who is allowed to do what. For this purpose, Checkmk uses the concept of roles. A role is nothing more than a collection of permissions. Each of the permissions allows a specific action. For example, there is a permission for changing the global settings.
Checkmk comes with three predefined roles that you assign to a new user:
| Role | Abbreviation | Description |
|---|---|---|
Administrator |
|
An administrator can perform all functions in Checkmk. Their main task is the general configuration of Checkmk, not the monitoring. This also includes creating users and customizing roles. |
Normal monitoring user |
|
This role is intended for the operator who carries out the actual monitoring. In principle, the operator should only see those hosts and services for which they are responsible. In addition, it is possible that you, as the administrator, give them the permissions for managing their own hosts. |
Guest user |
|
A guest user may see everything but not change anything. This role is useful, for example, if you want to hang a status monitor on the wall that always shows an overall view of the monitoring. Since a guest user cannot change anything, it is also possible for several colleagues to use an account with this role simultaneously. |
You can learn how to customize the predefined roles in the article on user administration.
3. Contact groups for areas of responsibility
The second important aspect of user administration is the definition of responsibilities.
Who is responsible for the host mysrv024, and who for the service Tablespace FOO on the host ora012?
Who should see the host and service in monitoring and possibly be notified if there is a problem?
Responsibilities in Checkmk are not defined via roles, but via contact groups. The word 'contact' is meant in the sense of notification: Who should the monitoring contact if there is a problem?
The basic principle is as follows:
Any user can be a member of any number of contact groups.
Each host and service is a member of at least one or more contact groups.
Here is an example of such an assignment:
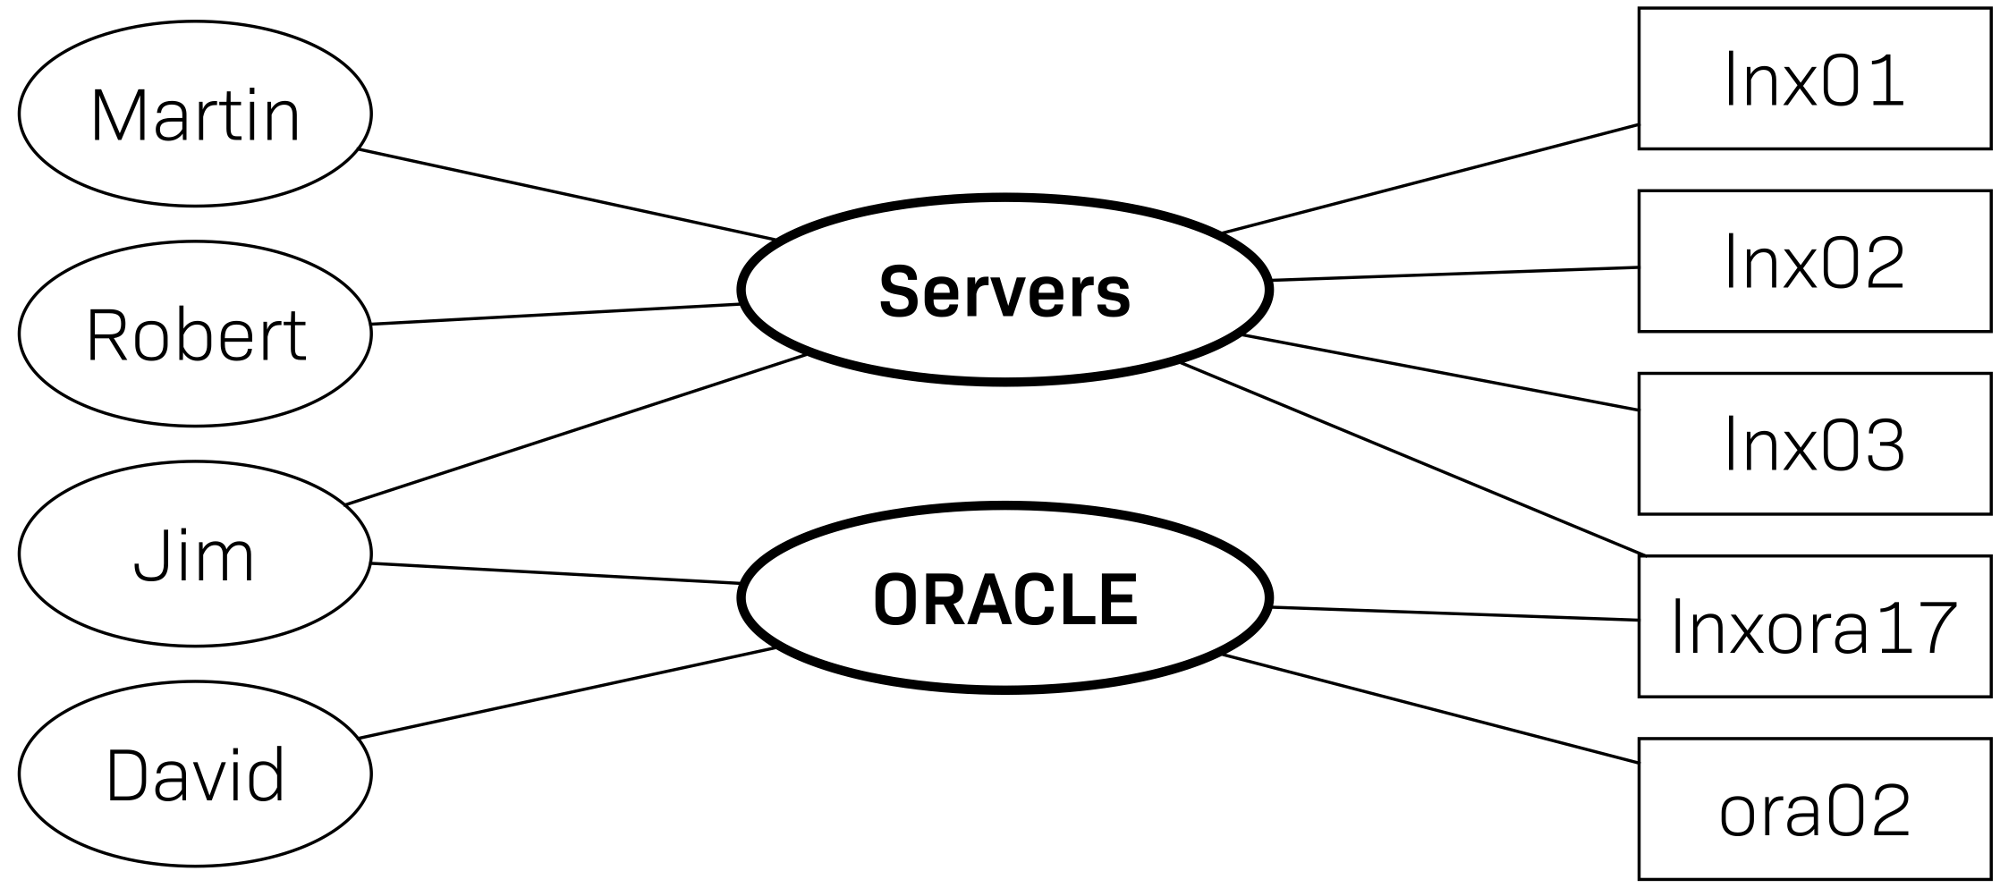
As you can see, both a user and a host or service can be a member of several contact groups. Membership of a group has the following effects:
A user with the role
usersees exactly those objects in the monitoring that are in their contact groups.If there is a problem with a host or service, all users who are in at least one of its contact groups are notified (by default).
Important: There is no possibility in Checkmk to assign a host or service directly to a user. This has been intentionally omitted, as such a direct assignment leads to problems in practice — e.g. when a colleague leaves your company.
4. Creating contact groups
To manage the contact groups, follow this way: Setup > Users > Contact groups. A contact group with the name all and the alias Everything is already predefined. All hosts and services will automatically be assigned to this group, which is intended for simple setups in which there is (so far) no division of tasks, and for which you will initially have the sole responsibility.
With Add group you create a new contact group. Here you need, as usual, the internal ID (Name) and the title (Alias), which it is possible to change later:

In the above example you can see a new contact group, which unsurprisingly should be responsible for the Windows and Linux servers.
5. Assigning hosts
Once you have created all of your contact groups, you will need to assign hosts and services on the one hand, and users on the other. You do the latter in the properties for the users themselves — we will come to this in a later chapter.
There are two ways of assigning hosts to contact groups, which you can also choose to use in parallel — via rules or via the properties of the hosts or their folders.
5.1. Assignments using rules
The required rule set is called Assignment of hosts to contact groups. You can find this, for example, on the Contact groups page you opened in the previous chapter, in the Contact groups > Rules menu.
Even with a fresh Checkmk installation, the rule set will not be empty, by the way. You will find a rule that assigns all hosts to the contact group Everything mentioned above.
So create your own new rules here, and based on the condition select the hosts that you want to assign to the respective contact group(s):

Important: If several rules apply to a host, all of them will be evaluated and the host will be assigned to several contact groups in this way.
5.2. Assignments using host properties
Open the properties of the host, e.g. via Setup > Hosts > Hosts. Click on the host to display the Properties of host page. In the Basic settings box, select the Permissions checkbox.
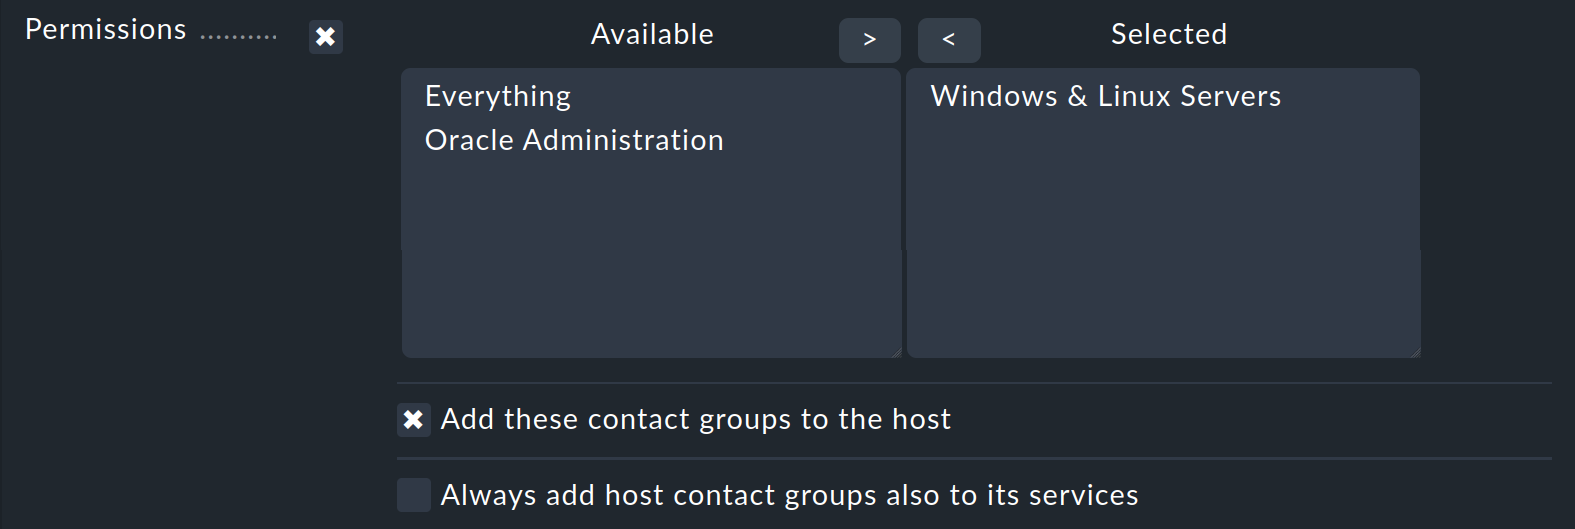
Select one or more contact groups from the Available list and move them to the Selected list using the right arrow. Activate the Add these contact groups to the host checkbox.
You do not usually need to select the Always add host contact groups also to its services checkbox, because services automatically inherit the contact groups from their hosts. You will learn more about this in the next chapter.
Note: You can set the Permissions attribute in the same way at the folder level instead of at the host level. For a folder, some additional options are available regarding whether the permissions should also apply to subfolders.
6. Assigning services
You only need to assign services to contact groups if these are to differ from those of their hosts. However, an important basic principle applies in this regard — once a service has been explicitly assigned to at least one contact group, it no longer inherits any contact groups from its host.
An assignment at the service level allows you to, for example, separate server and application operations.
For instance, put the host srvwin123 into the contact group Windows & Linux Servers, but put all of its services beginning with the prefix Oracle into the contact group Oracle Administration, which means that the Windows administrators will not see the Oracle services, and the Oracle administrators, conversely, will not get details of the operating system’s services — which is often a practical separation.
If you do not need this separation, simply limit yourself to the assignments for hosts — and you are done.
The Assignment of services to contact groups rule set is responsible for the assignment at service level. When creating the rule, proceed in the same way as described in the previous chapter for the host assignment. In addition, you specify conditions for the service names.
7. Creating users
Enter the user administration with Setup > Users > Users:
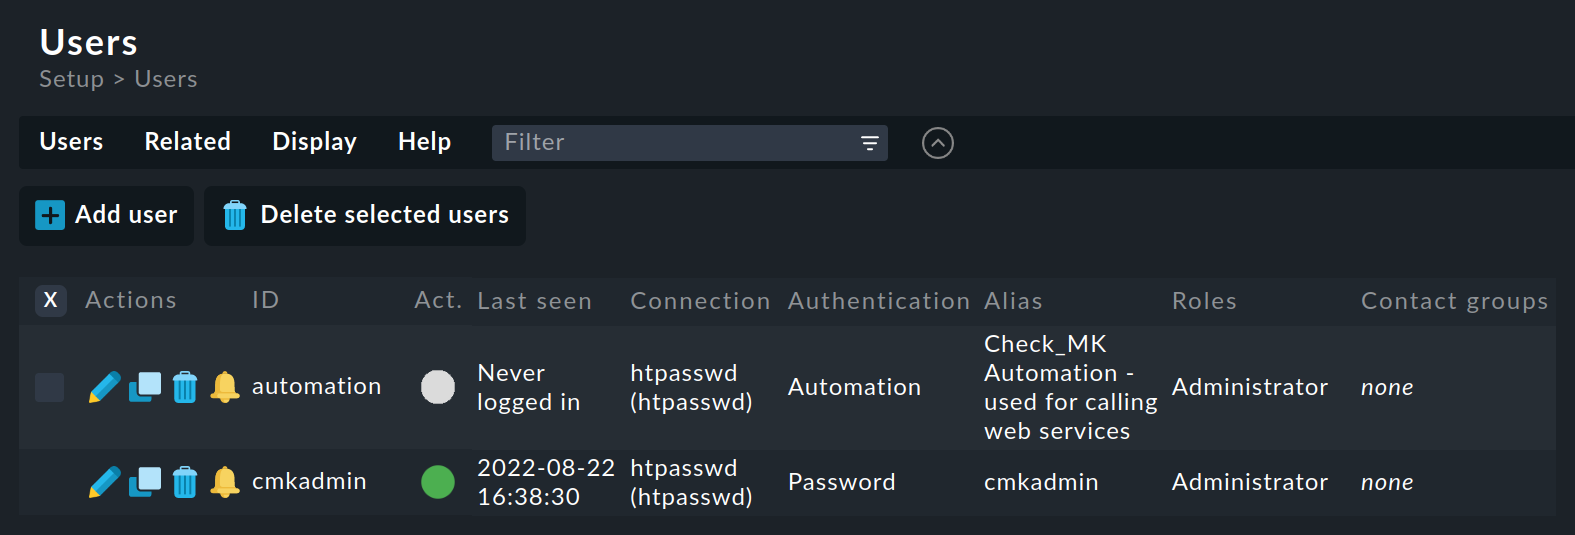
Don’t be surprised if, in addition to the cmkadmin entry, there is also an automation user there.
This automation user is intended for remote access, e.g. via script or REST API.
You create a new user with the Add user button on the page with this same title:
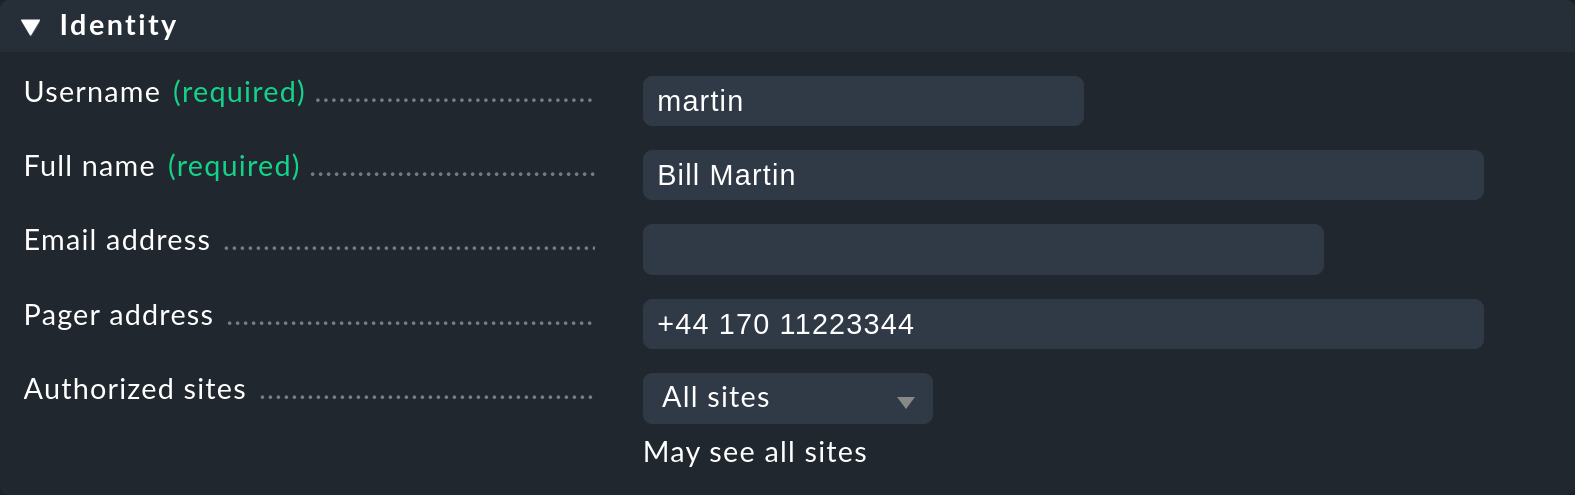
In the Identity box, enter the internal ID (Username) and a title — here the Full name of the user. The Email address and Pager address fields are optional and are used for notifications via email and SMS respectively.
Note: Do not enter an email address here for now. First read the notes in the chapter on notifications.
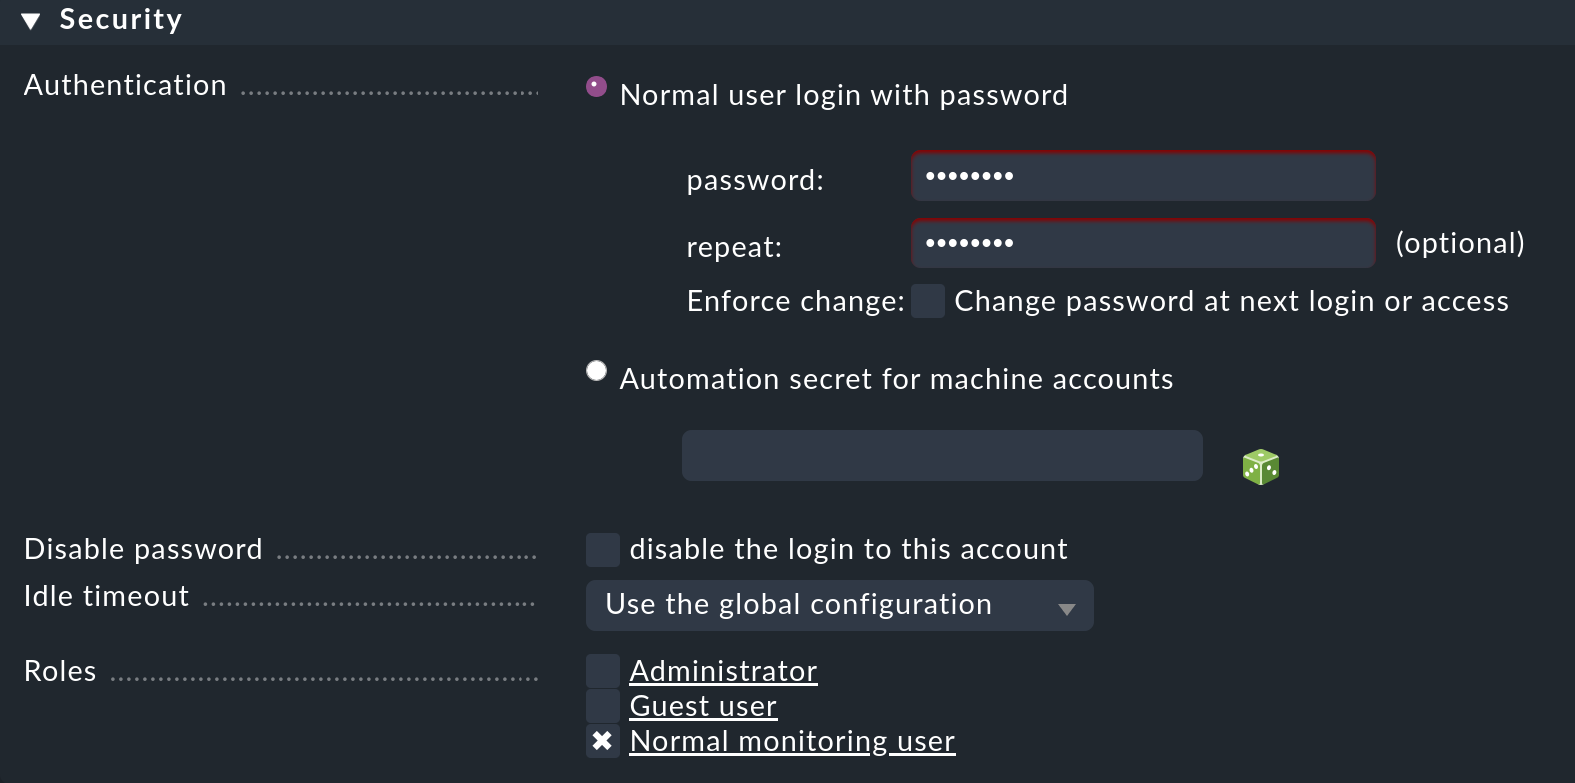
In the Security box, leave the default setting at Normal user login with password and only assign an initial password. At the bottom at Roles you can assign roles to the user. If you assign more than one role, the user simply receives the maximum permissions from these roles — although this would not make much sense for the three predefined roles.

Under Contact Groups you can now select from those previously-created contact groups. If you select the predefined group Everything, the user will be responsible for everything, as all hosts and services are included in this group.
By the way, the last two boxes on this page — Personal settings and Interface settings — contain exactly the same settings that a user can change in their profile via the User > Edit profile menu. Only guest users (with the Guest user role) cannot change these settings in their profiles.
Tip: On the overview page of the user administration Users you will find the LDAP & Active Directory entry in the Related menu. If you use Active Directory or another LDAP service in your organization, you will also have the option of including users and groups from these services. Details on this can be found in the article on the LDAP/Active Directory.