1. Introduction
According to a survey among our users, Amazon Web Services is currently the most important provider of cloud-based Services, so goes without saying that Checkmk must here provide excellent monitoring.
Checkmk contains a comprehensive monitoring for AWS which consists of a connector to AWS and an impressive collection of check plug-ins consisting of various metrics for the retrieval and evaluation of states. Because of the amount of check plug-ins only some of them, to show the AWS areas that Checkmk can currently monitor:
For a complete, up-to-date list of all available plug-ins, see the Catalog of Check plug-ins.
2. Concrete implementation of AWS monitoring
2.1. Hosts and services
In Checkmk all objects to be monitored are arranged in a hierarchical structure of hosts and services. The concept of hosts does not exist in cloud-based services. However to retain the simplicity and consistency of Checkmk, we still map AWS objects according to the host/service schema.
How that is achieved can best be illustrated by an example: In one region several EC2 instances have been configured. An EC2 is usually assigned to EBS. This constellation looks like this in Checkmk:
There is a host that matches the AWS account. This host gives an overview of all EC2 instances and their status as a service.
The EC2 instances themselves are their own hosts.
On these EC2 hosts you can find services with the actual metrics.
The EBS are interpreted as a type of hard disk, and accordingly provide metrics to I/O (e.g., the number of bytes read or written). For this purpose, in each EBS there are separate services in Checkmk with the name
AWS/EBS Disk IOwhich are assigned to the EC2 instance.
2.2. Access to AWS
An agent is actually not necessary for monitoring AWS services since AWS provides an HTTP-based API over which monitoring data is also available.
Checkmk accesses this API via the agent_aws ‘special agent’ — which replaces the Checkmk agent — but in contrast this agent runs locally on the
Checkmk server.
3. Preparing AWS
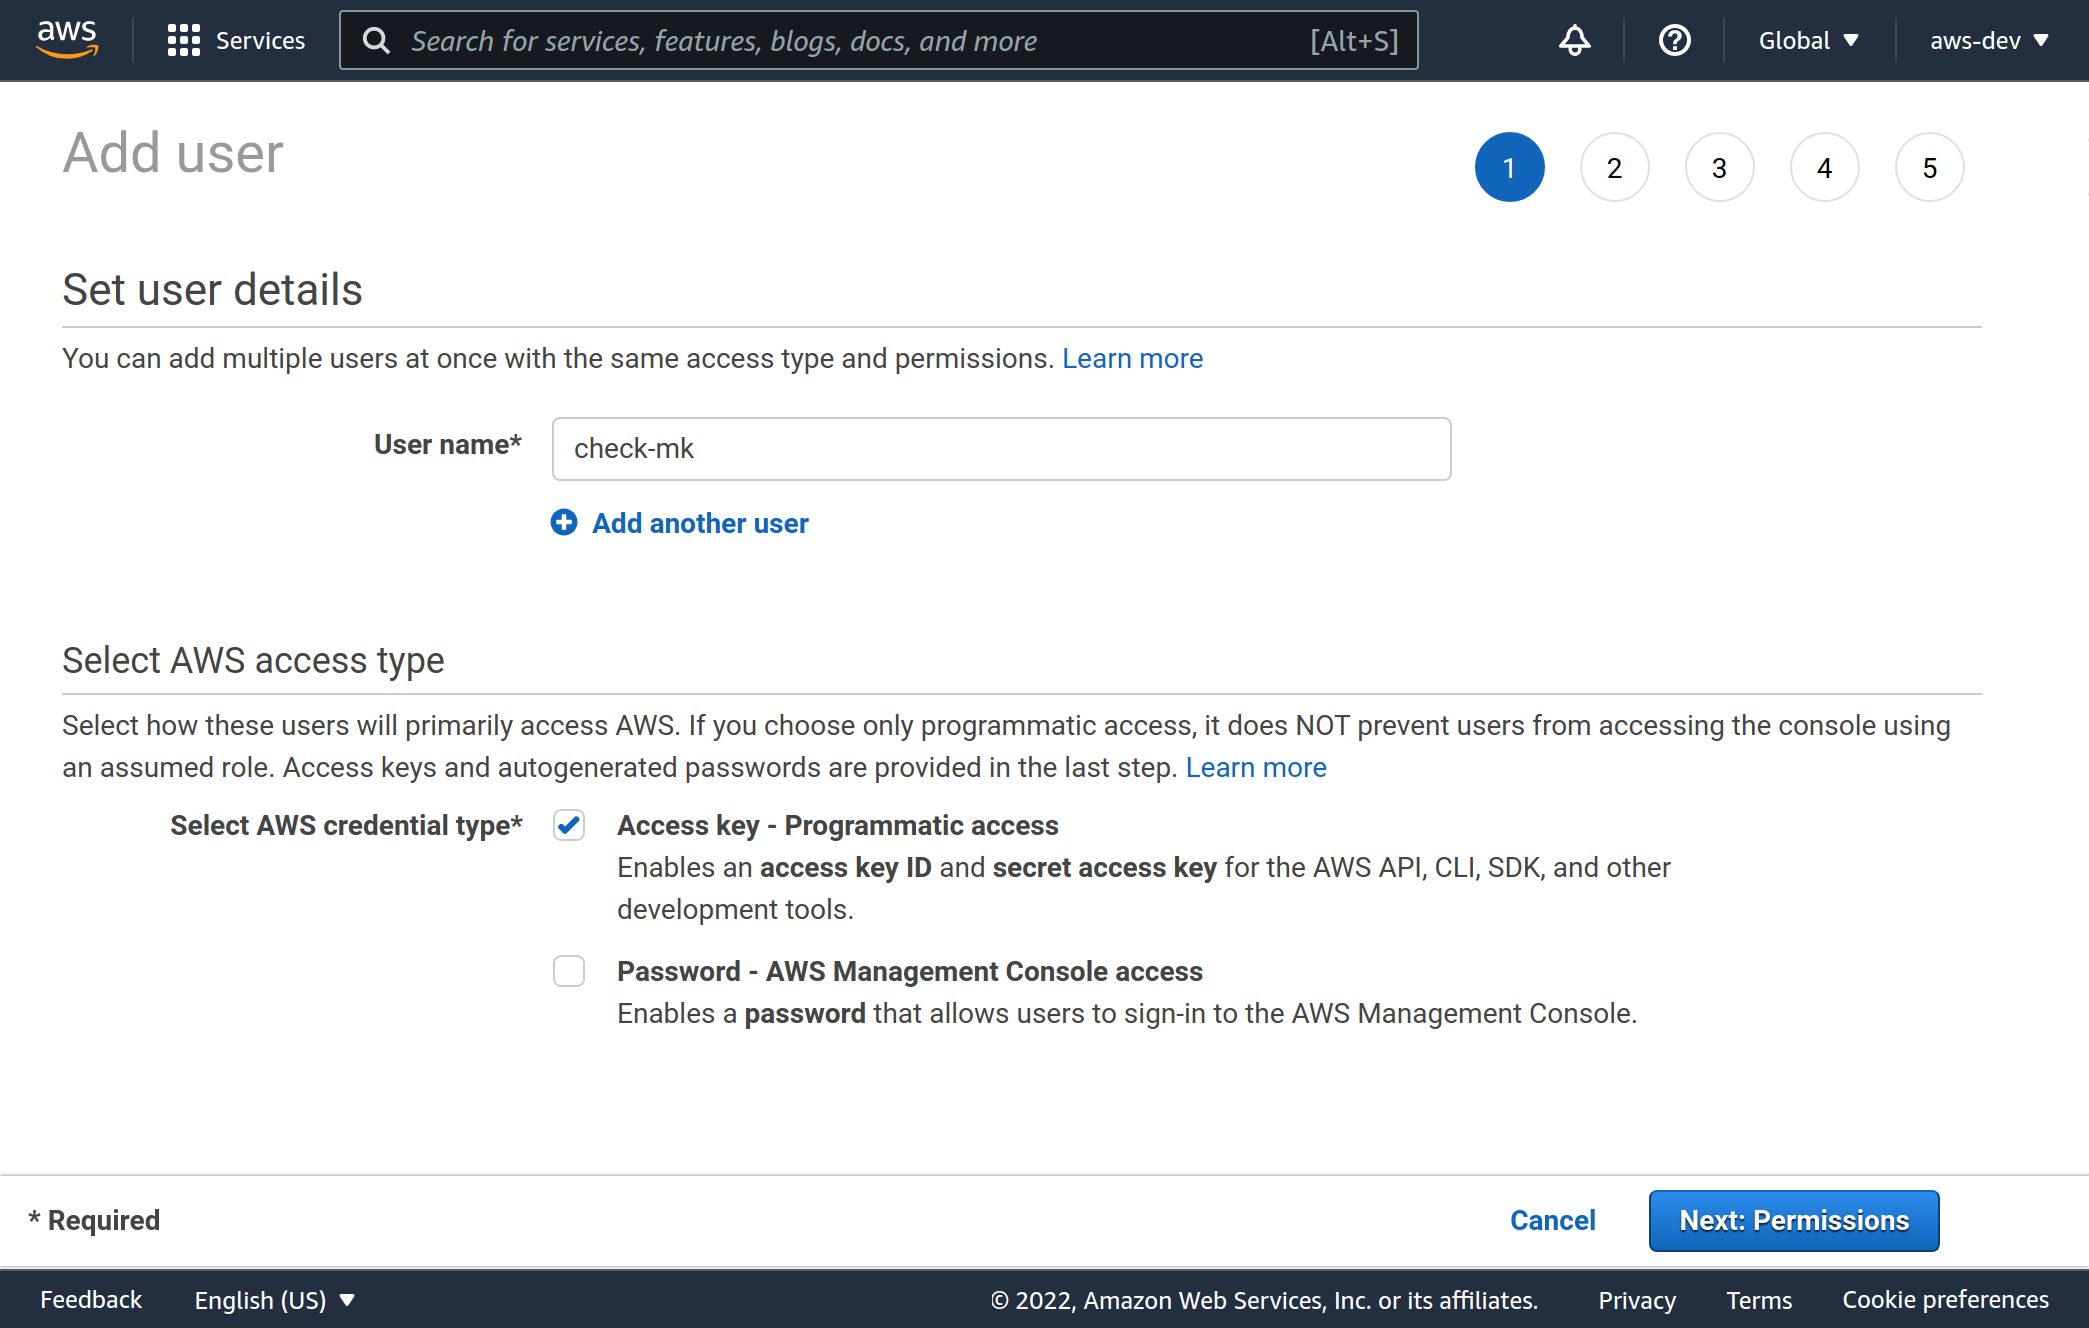
3.1. Creating the user
To enable monitoring via Checkmk, it is best to achieve it by creating a special AWS user under your root account.
Log in to AWS as the root user, and navigate in All services to Security, Identity, & Compliance > IAM (Identity and Access Management).
Go to Users and create a new user with Add user.
As a user name choose, for example, check-mk.
It is important that you select the Access key - Programmatic access for Select AWS credential type.
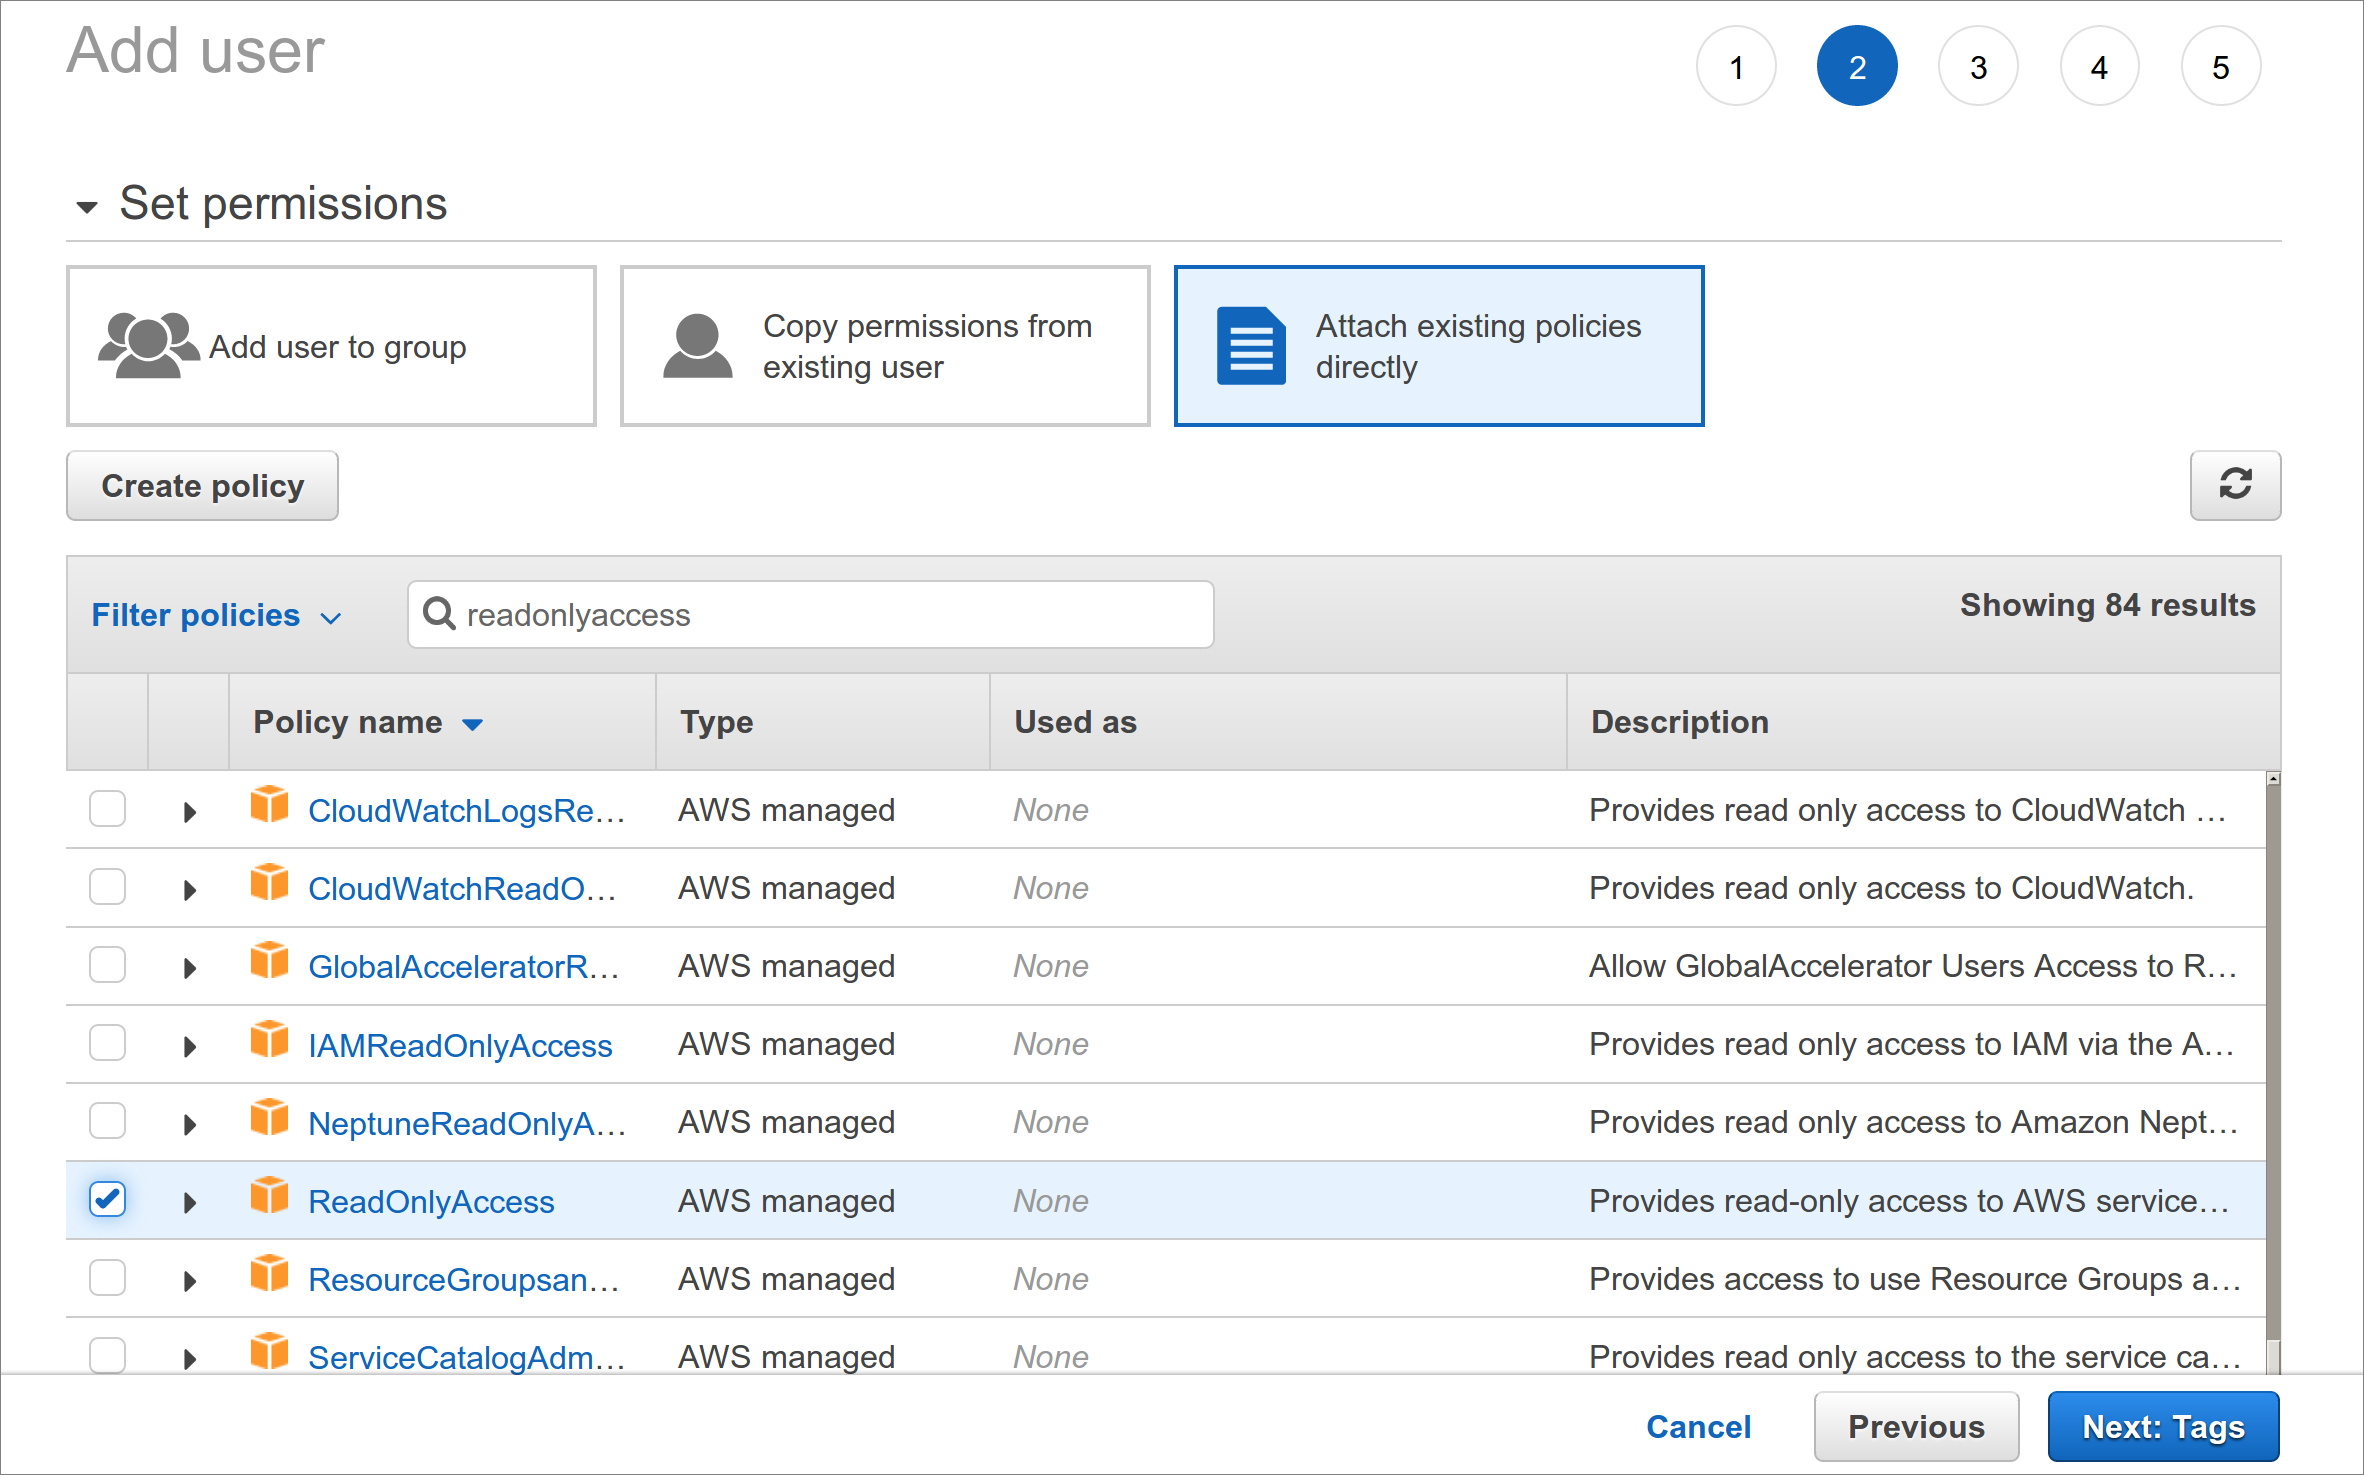
3.2. Permissions
The user you just created should only be used for monitoring by Checkmk and only needs read-only access to AWS.
We recommend simply assigning the policy ReadOnlyAccess to this user.
To find this policy, first click Attach existing policies directly and then type readonlyaccess in the search box.
In the list below the search field, you still have to scroll down quite far, because there are quite a few policies that contain this string.
3.3. Keys
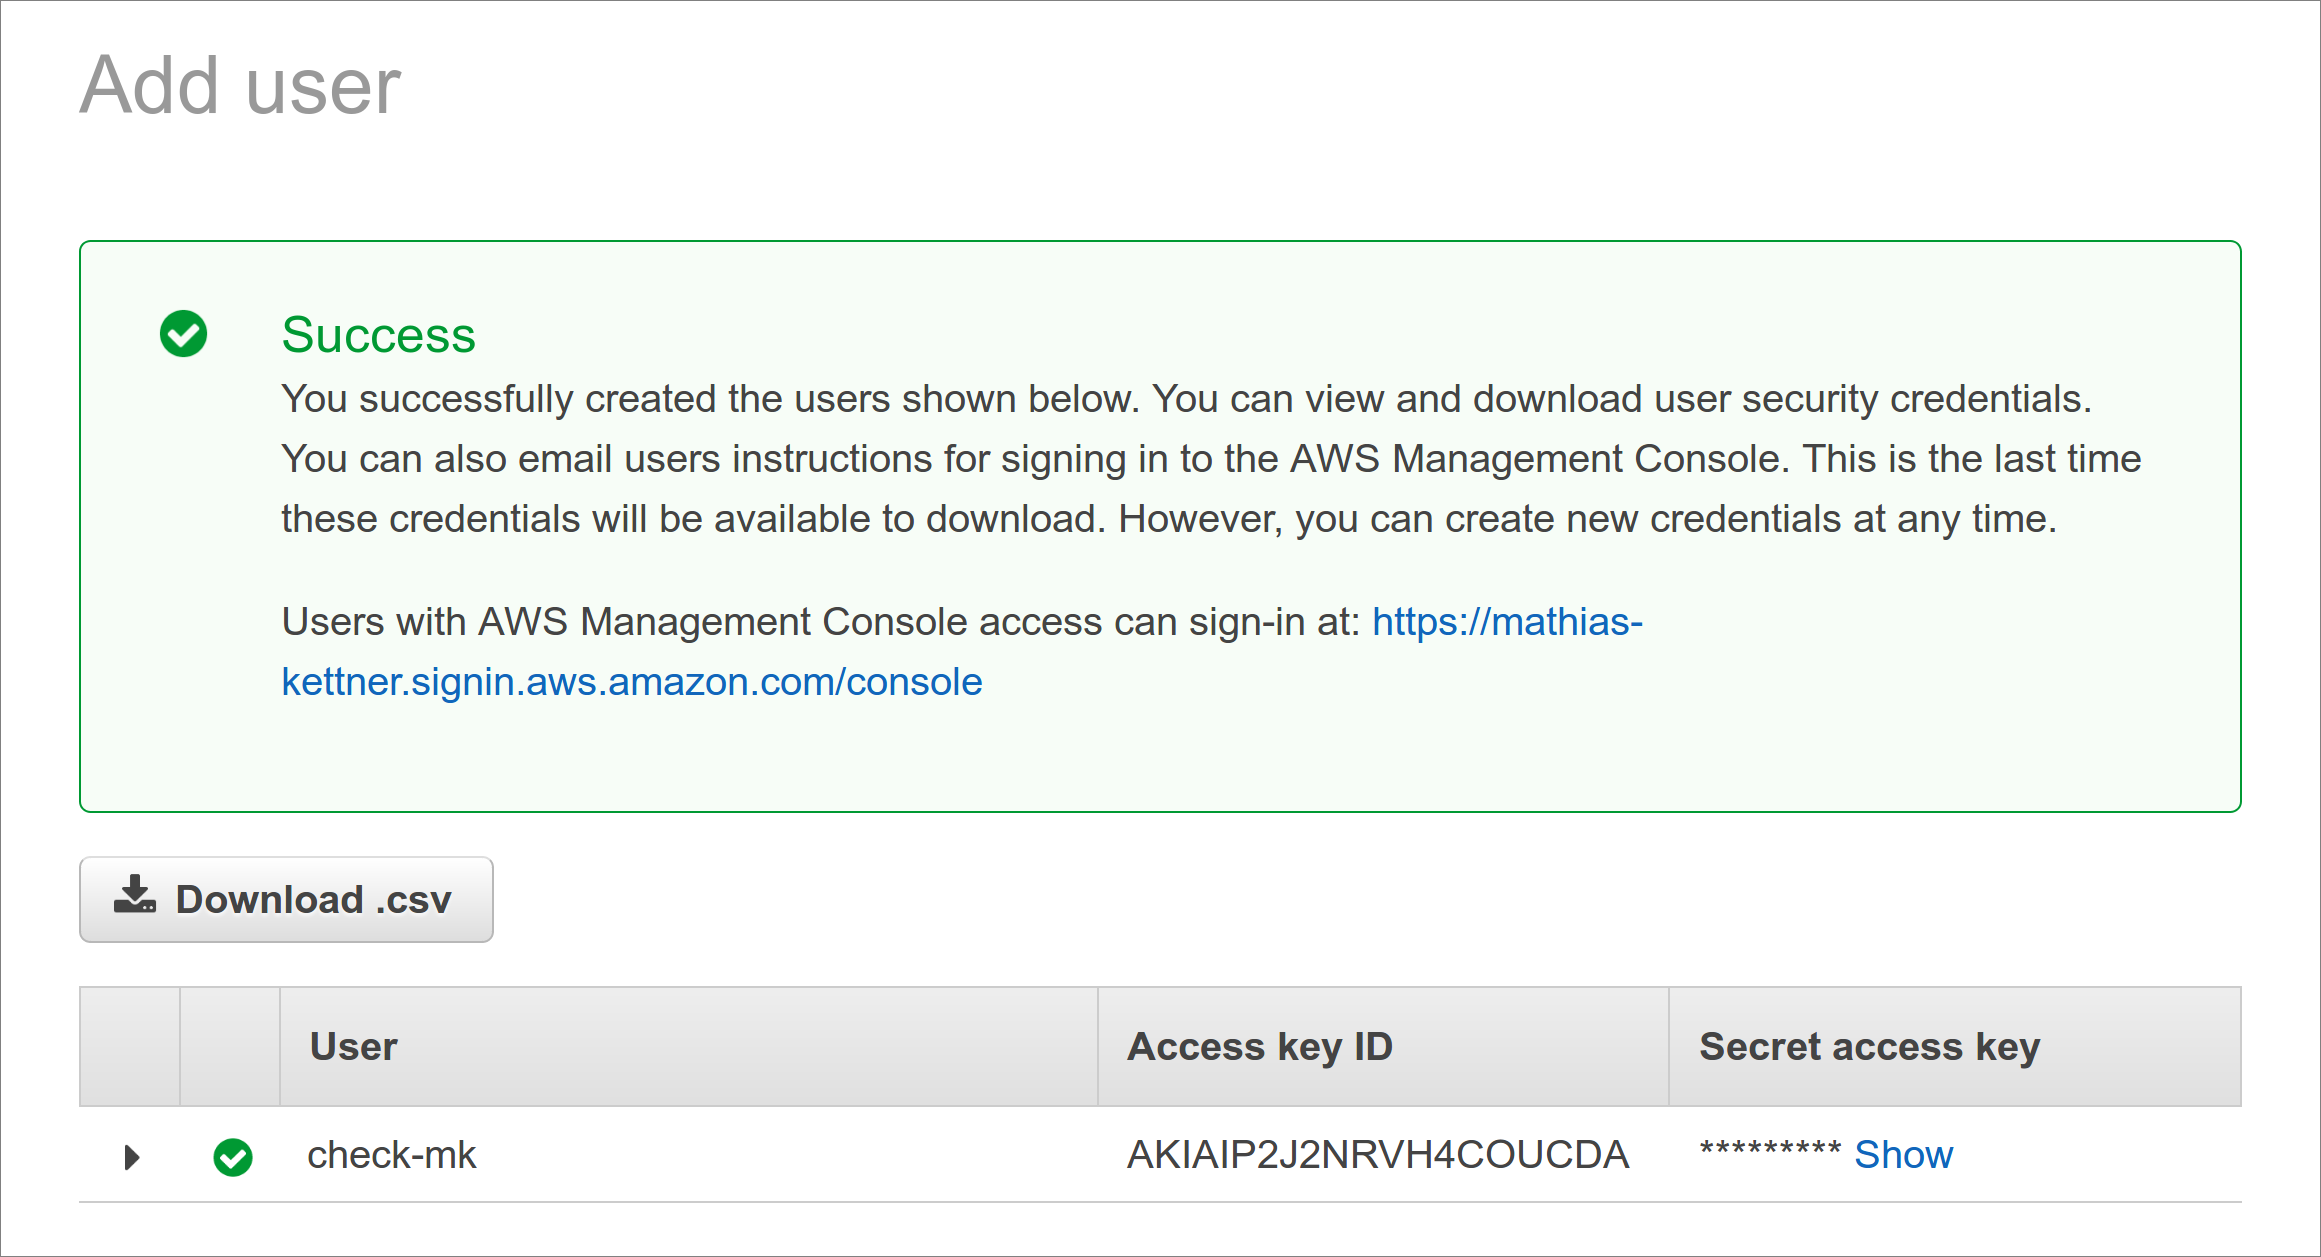
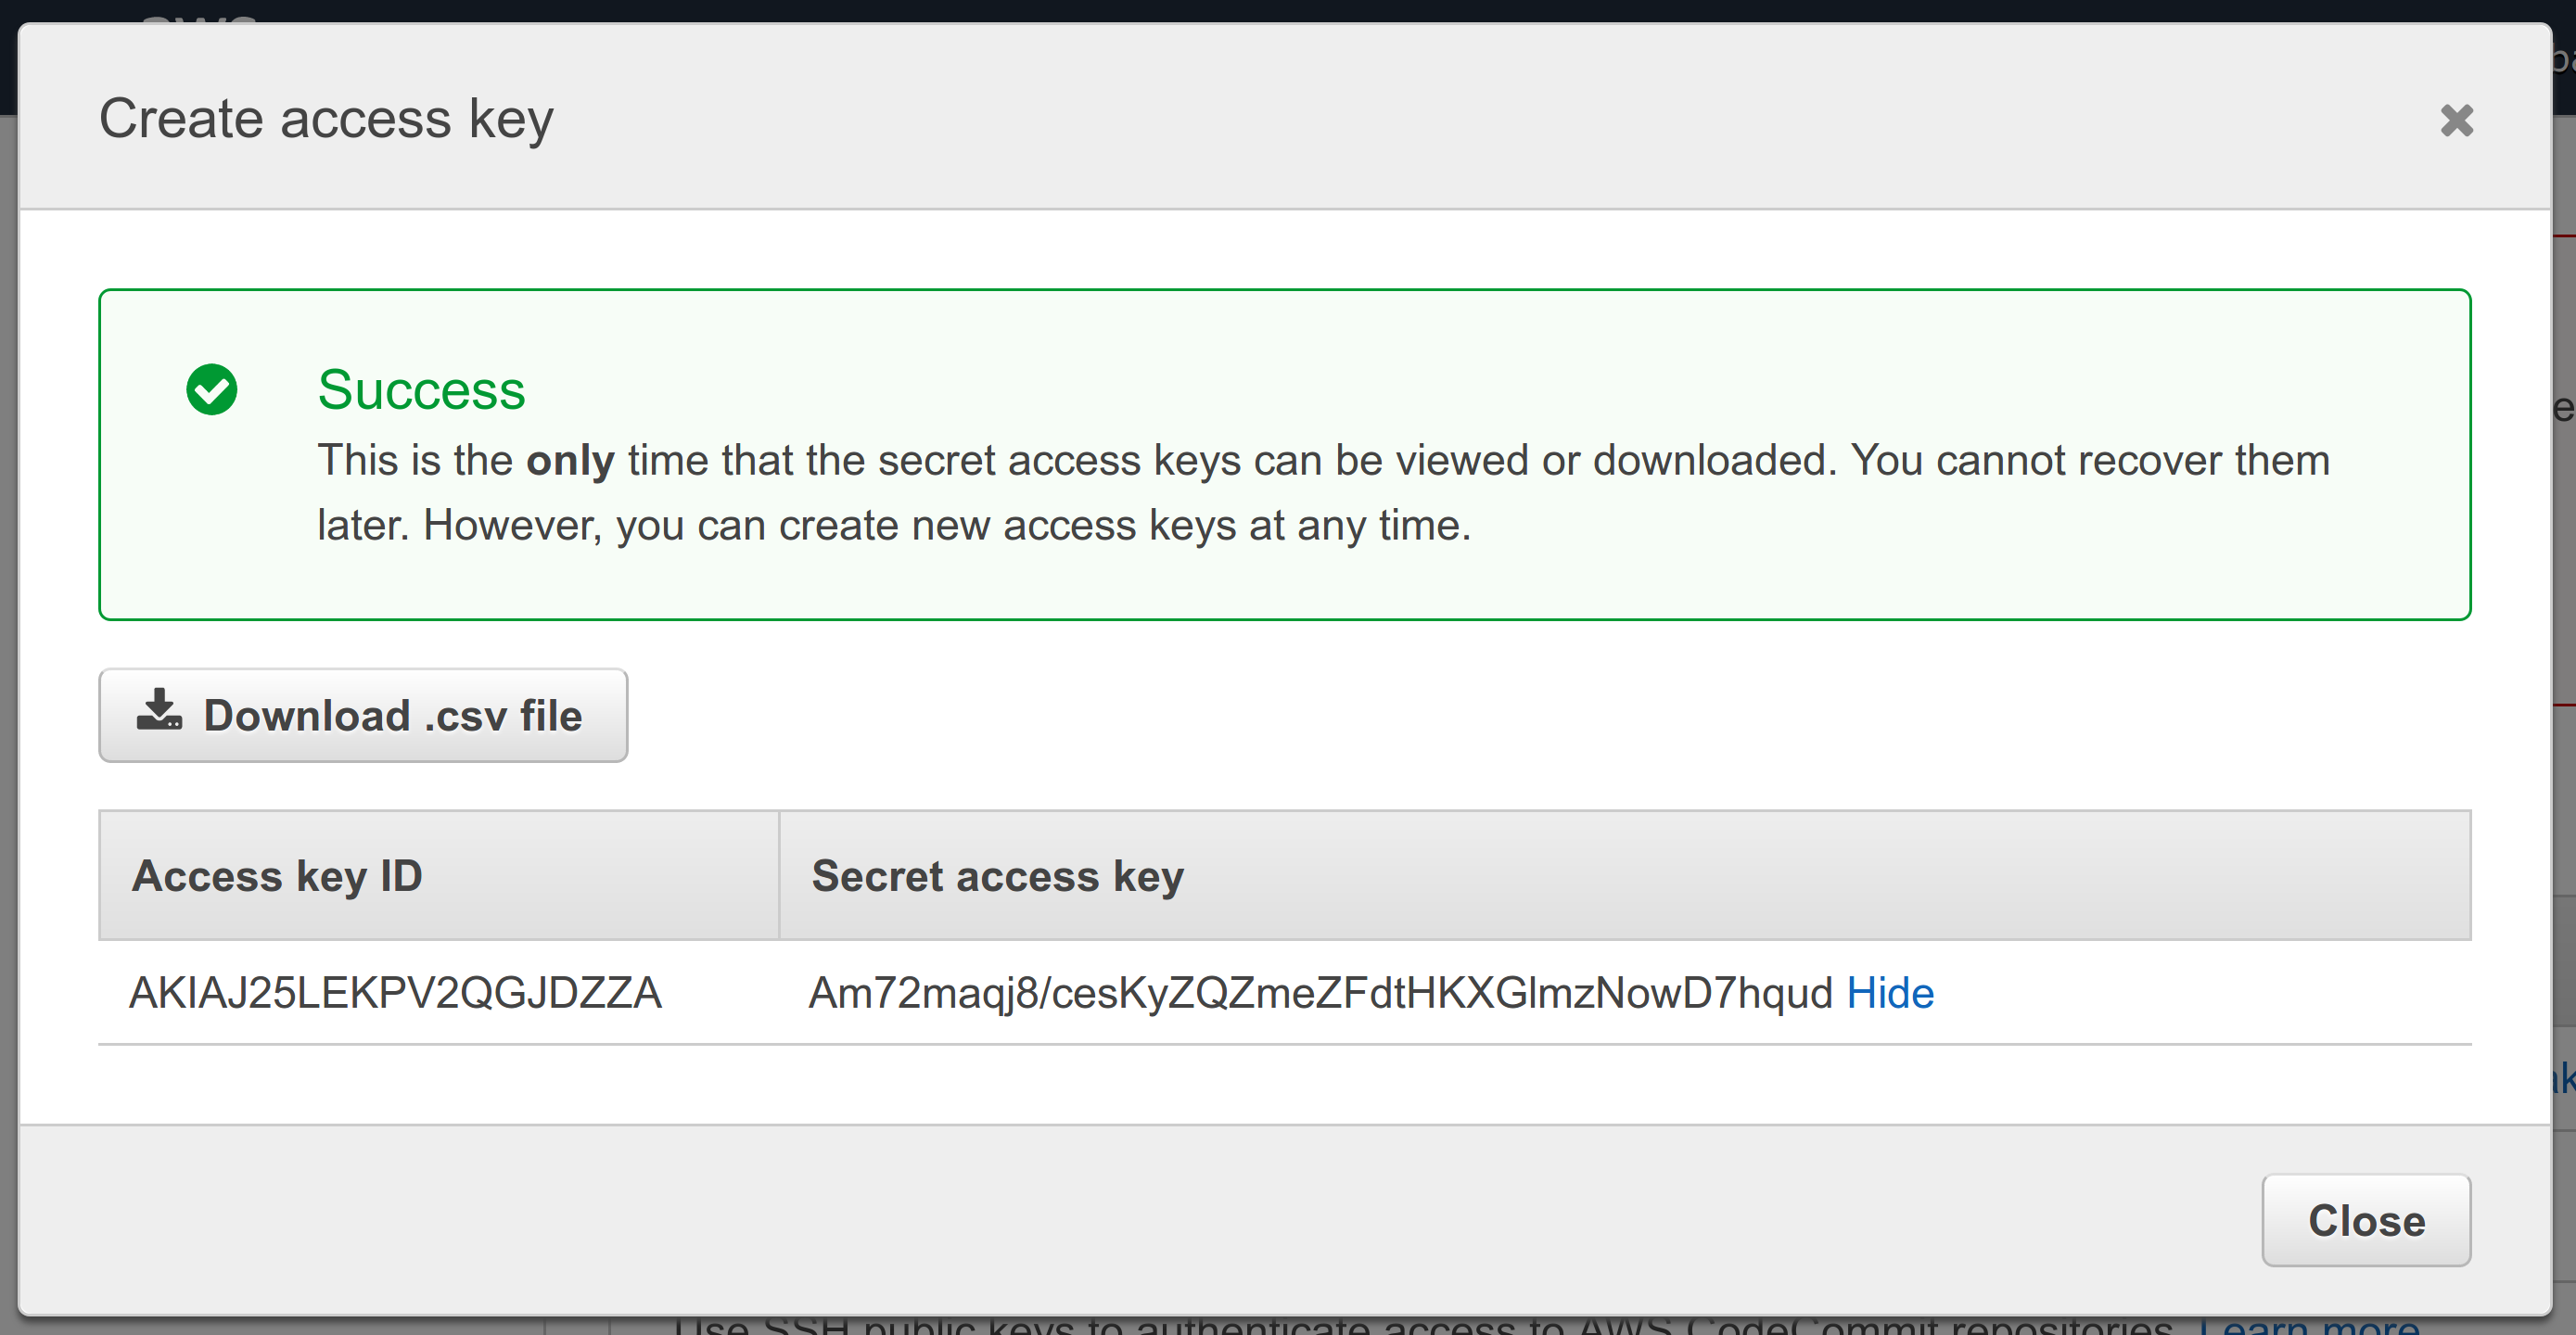
After completing the user creation an access key will be generated
automatically for you. Note: The key’s secret is displayed only
once — directly after its creation. Therefore without fail copy the key and
save it, for example, in the Checkmk password store. Alternatively specify
it in plain text as a rule (see below). For Checkmk you need the Access key ID
in addition to the secret. The name of the user (in our example
check-mk) does not matter here.
If for some reason you should lose the secret, you can create a new access key for the user and get a new secret:
3.4. Access to billing information
If you want Checkmk to have read access for the billing information (in order to perform the Costs and Usage global check), you need another policy for your AWS user — a policy you yourself must first define.
Under Security, Identity, & Compliance > IAM > Policies select the Create Policy button. Select from Select a Service > Service > Choose a Service the Billing service. Under Actions tick the Read checkbox. We have to set an additional permission. Add one via the Add additional permissions button. Select from Select a Service > Service > Choose a Service the Cost Explorer Service service. Under Actions again tick the Read checkbox.
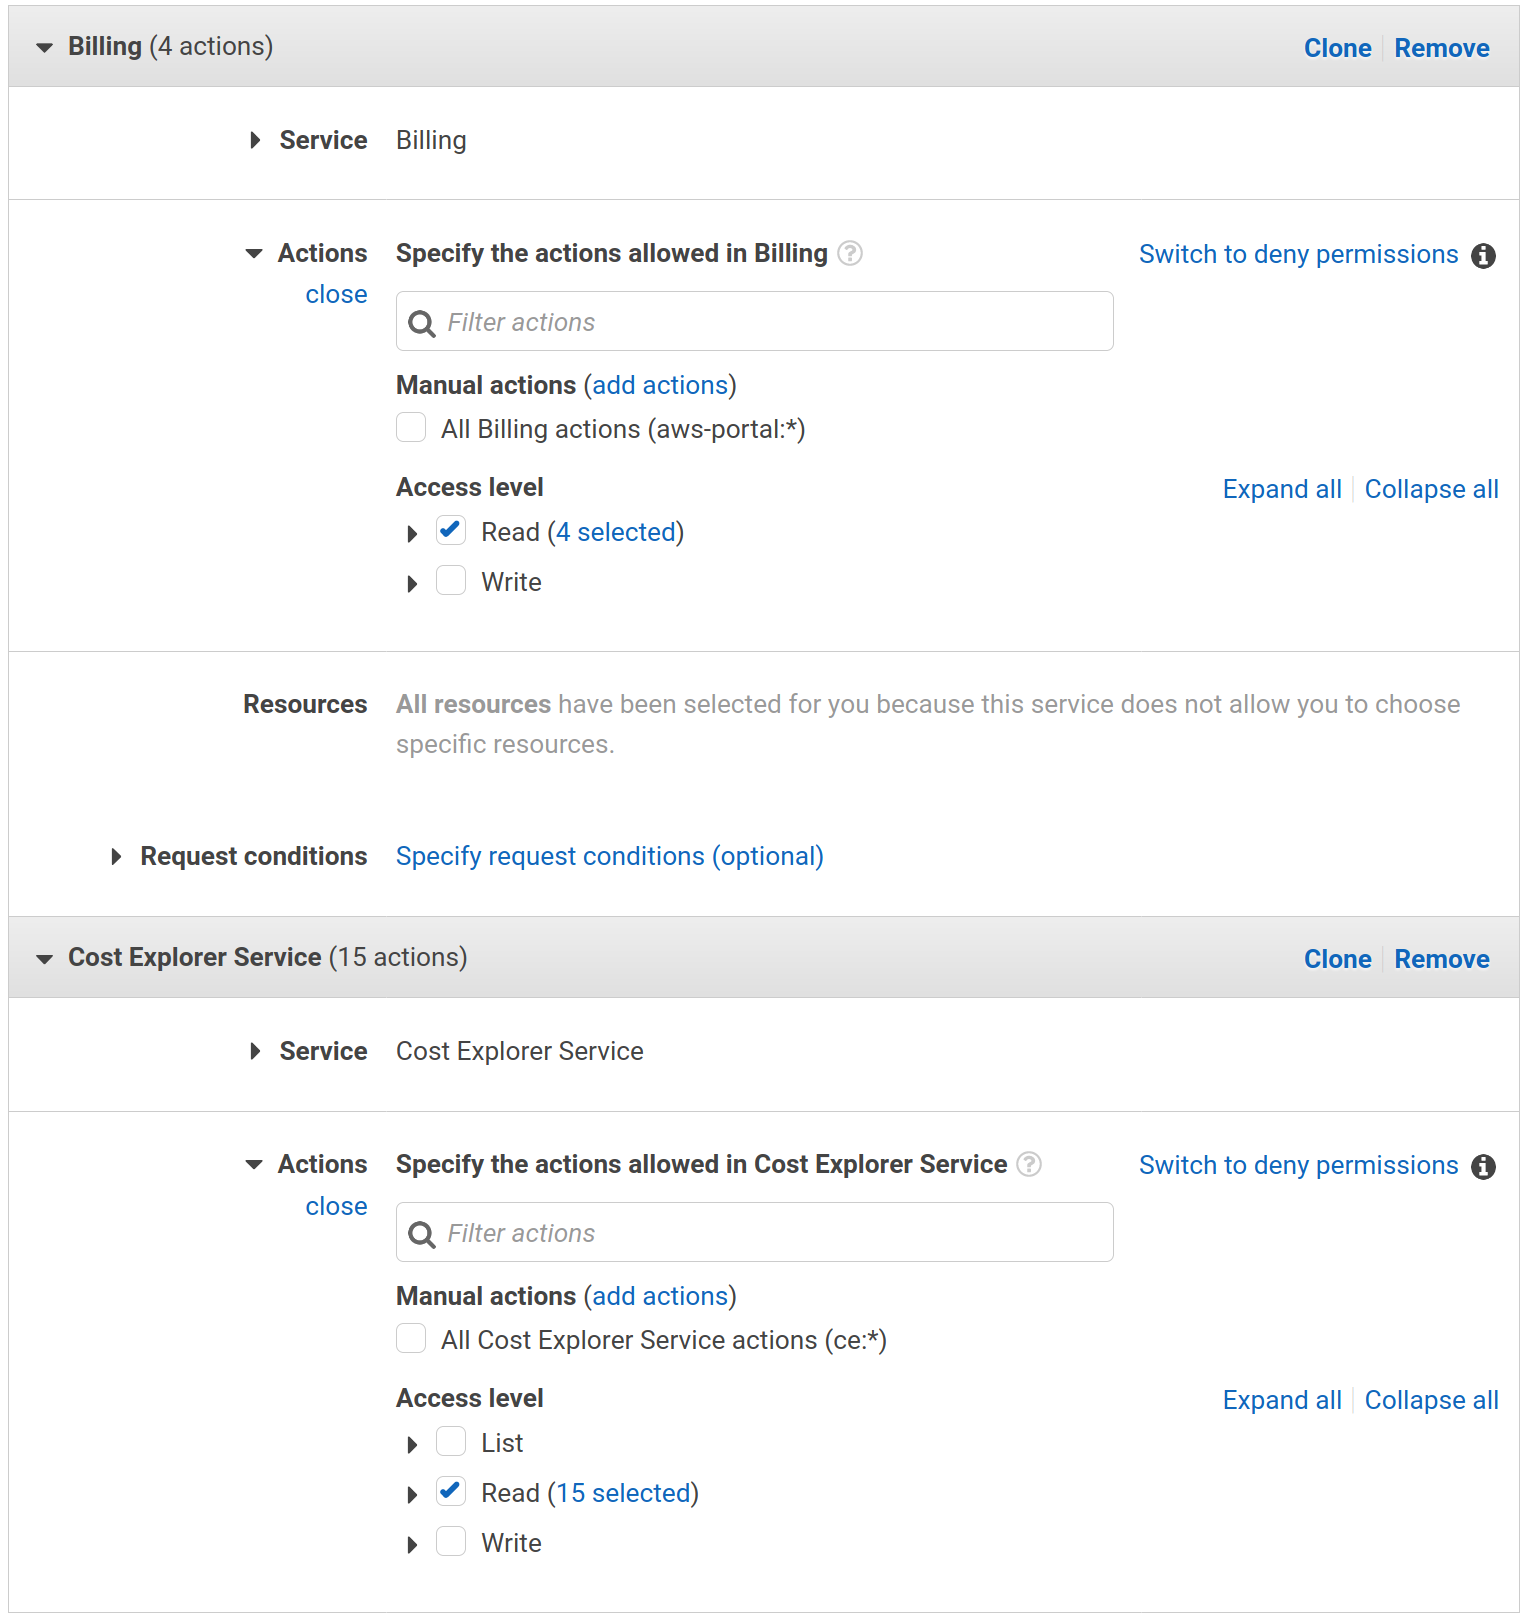
Click Review to go to step two. Set BillingViewAccess as the Name,
and save it with the Create policy button.
You must now add this new policy to the user.
Go again to Security, Identity, & Compliance > IAM > Policies — in the
Filter Policies search box look for BillingViewAccess, select this by clicking in the circle to the left, and then go to Policy actions > Attach.
Here you will find your check-mk user,
select this and confirm it with Attach policy.
4. Configuring the monitoring in Checkmk
4.1. Create a host for AWS in Checkmk
Now create a host to monitor AWS in Checkmk. You can assign the host name as you wish. Important: Because AWS is not a service it has no IP-address or DNS name (access is granted by the special agent itself), so you need to set the IP address family to No IP.

4.2. Create a rule for AWS agent
AWS cannot be queried through the regular Checkmk agent, so next set up the AWS special agent. To do so, under Setup > Agents > VM, Cloud, Container > Amazon Web Services (AWS) add a rule whose conditions apply only to the just-created AWS host.
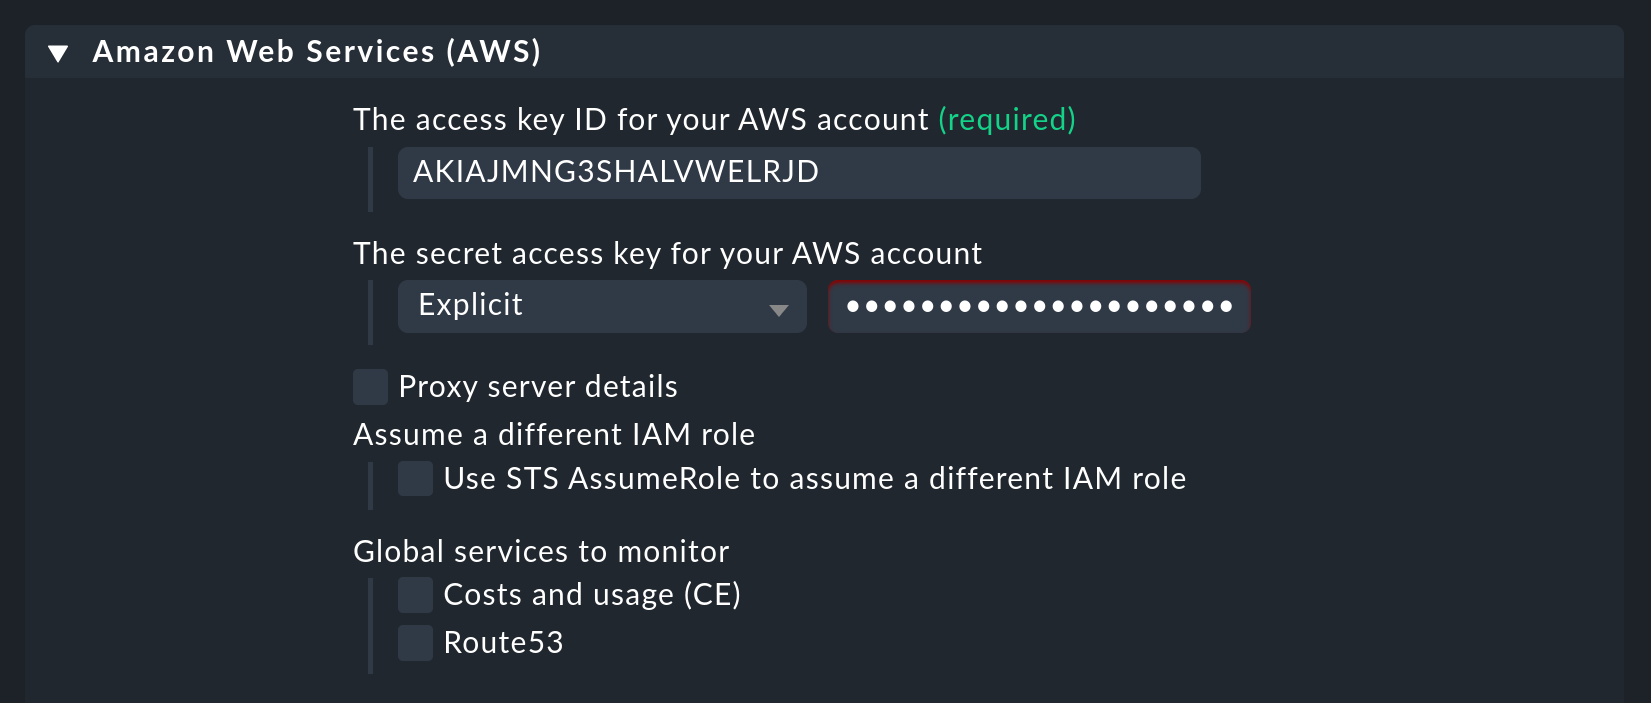
In the actual content of the rule, you will first find the information for the login.
Here enter the 'Access key ID' for the newly-created AWS user check-mk.
Also choose here if you need a proxy to fetch the data and which global data you want to monitor,
i.e., those that are independent of a region. That is currently
only the data relating to the costs:
In the image above you can also see the option Use STS AssumeRole to assume a different IAM role. If you do use different accounts at AWS, you may use a single monitoring user to monitor the other accounts, too.
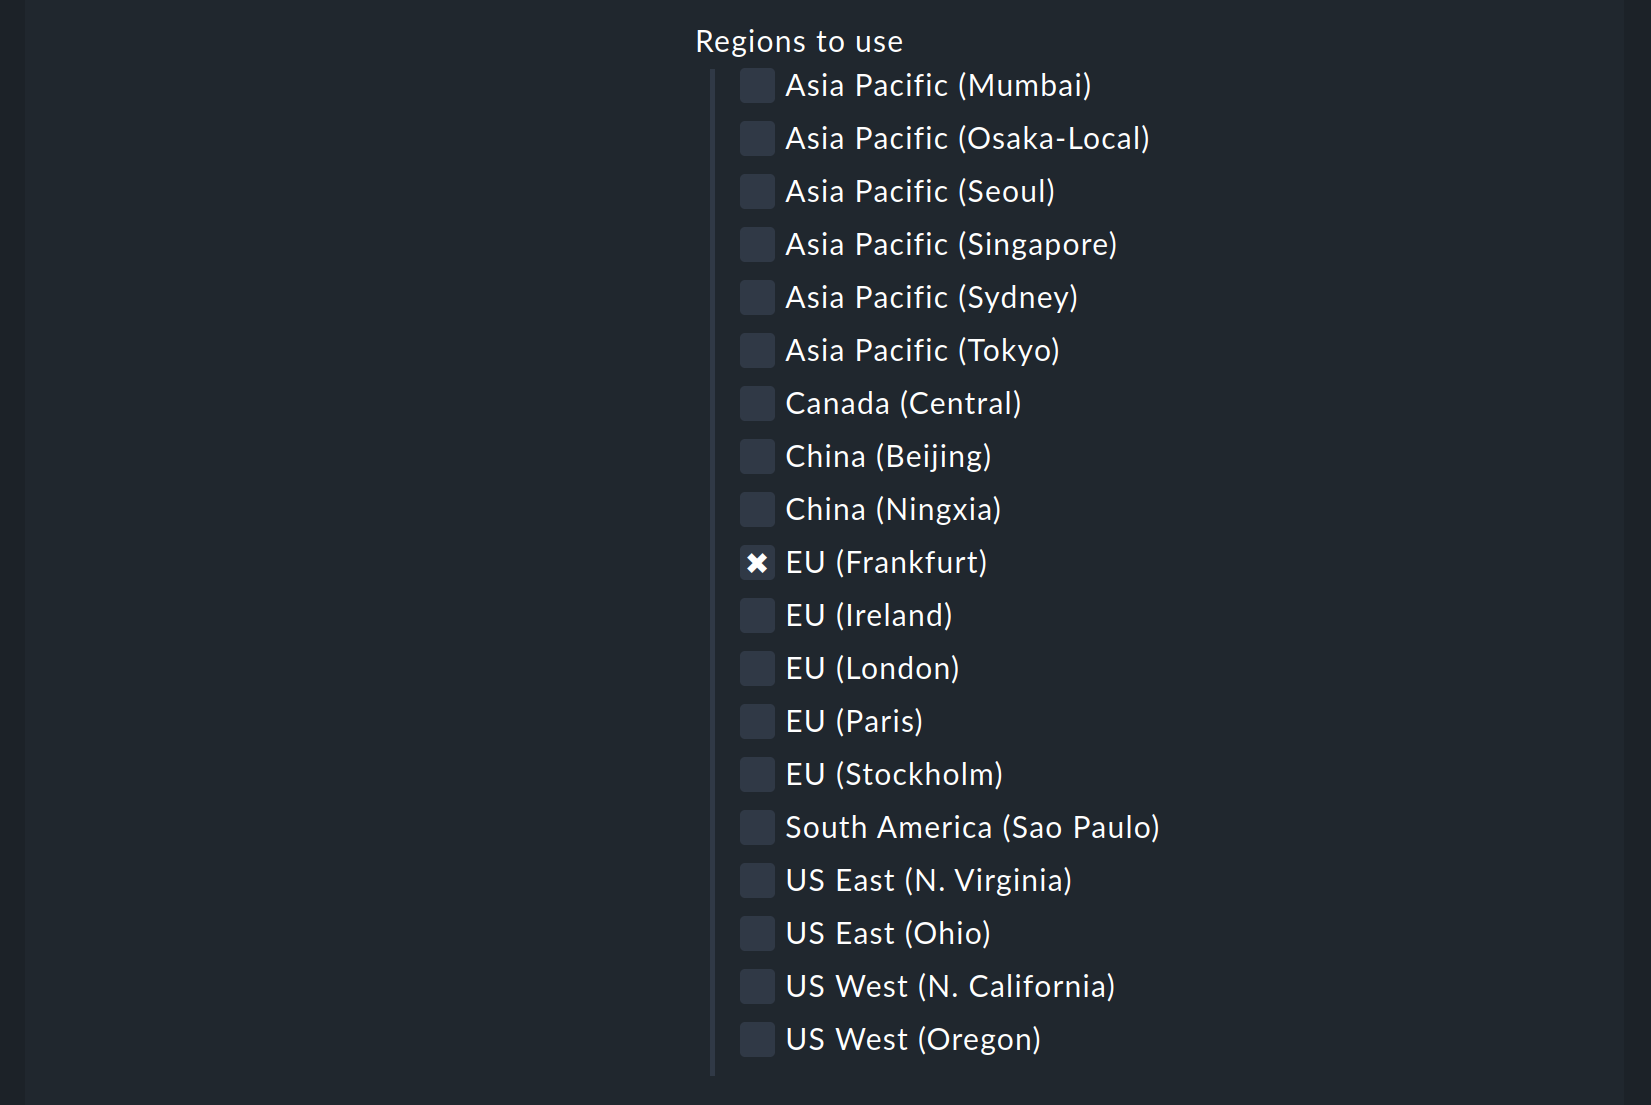
But the really interesting data is assigned to regions. Therefore here select your AWS region(s):
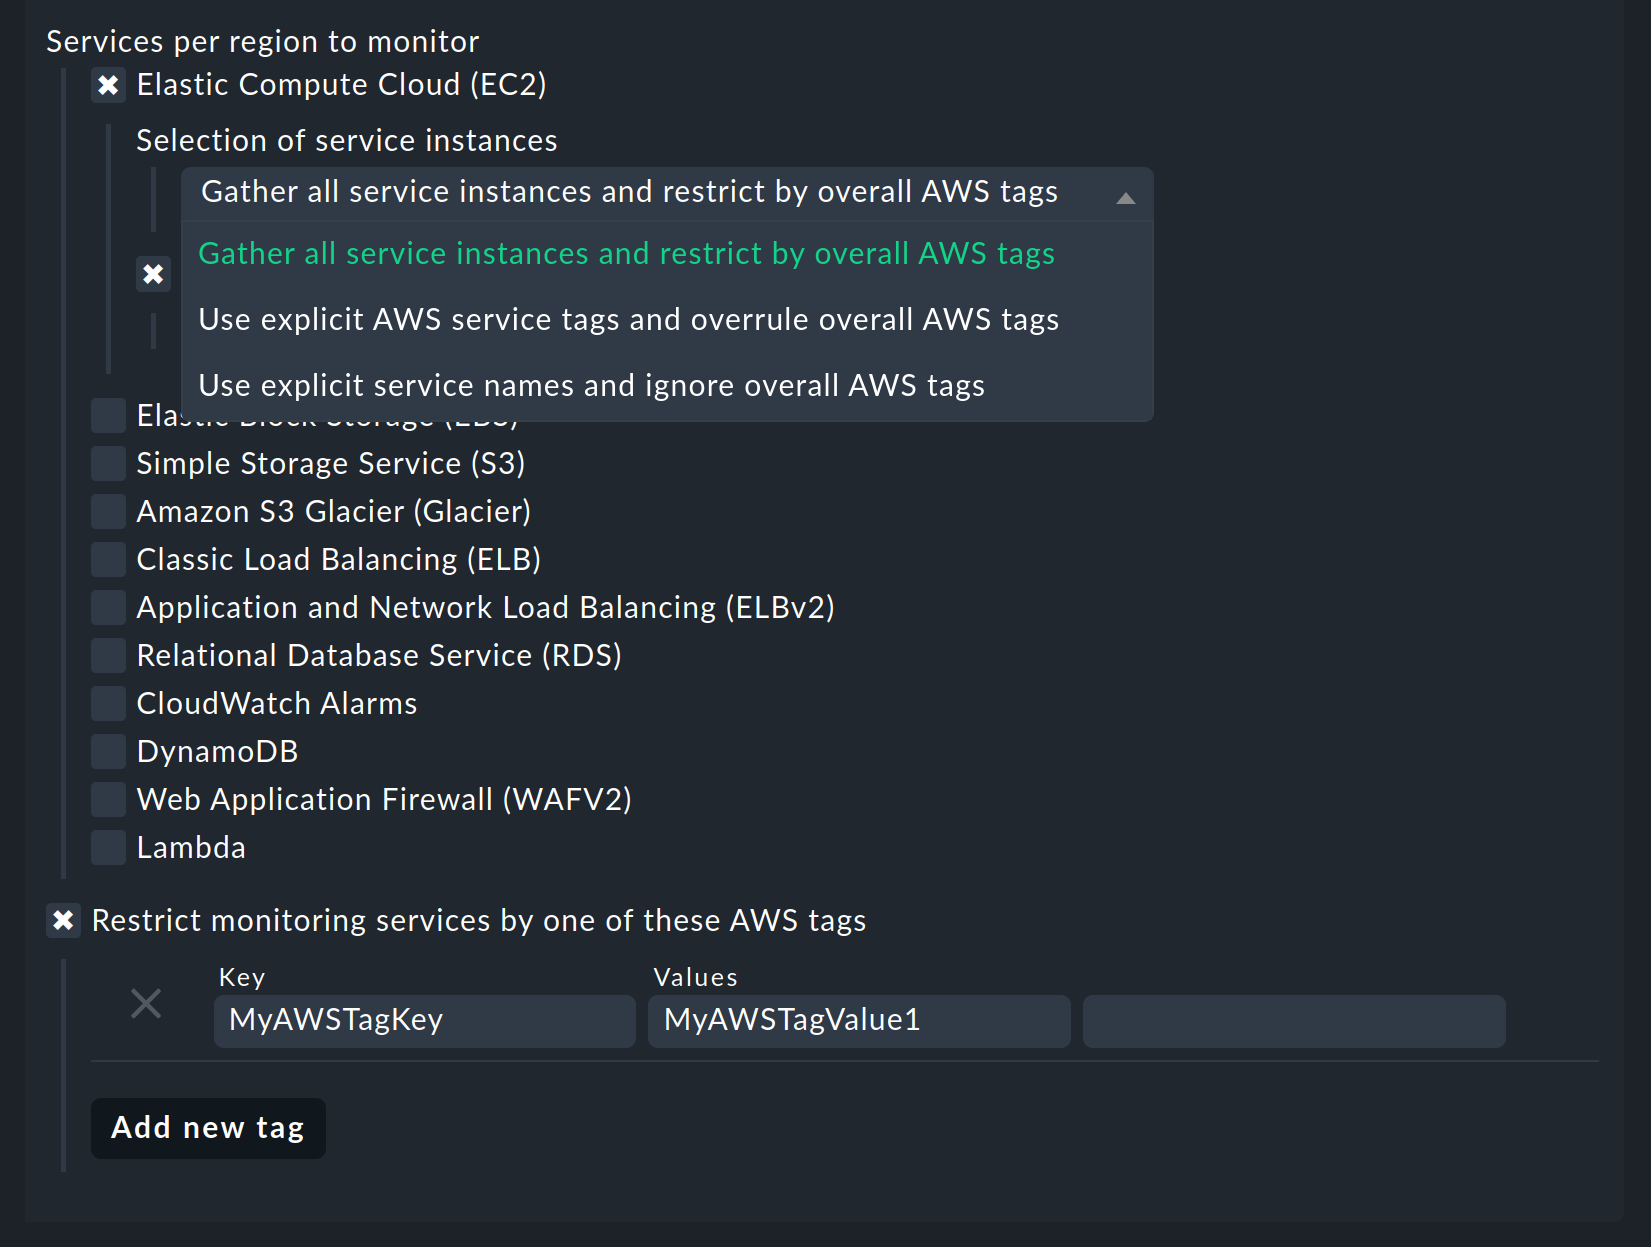
Under Services by region to monitor you specify which information you want to retrieve from these regions. At default all AWS services and the monitoring of their limits are activated. In the following image are all but one deactivated to get a better overview:
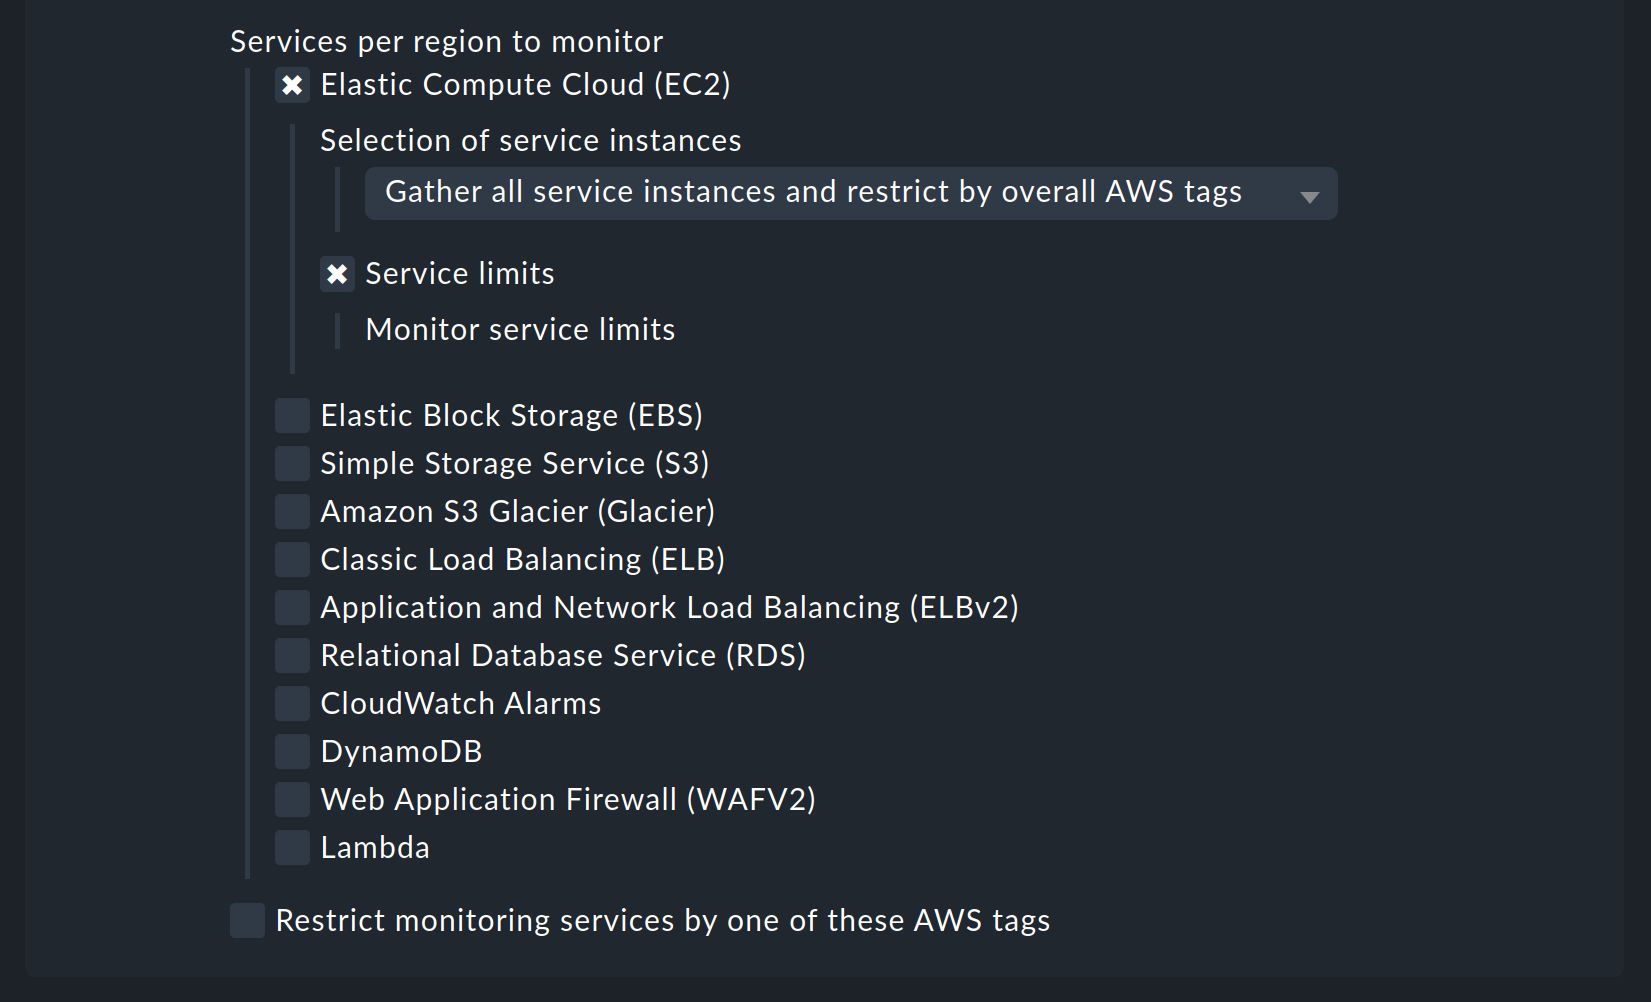
You now can restrict the fetched data per web service or globally with Restrict moinitoring services by one of these AWS tags. The global restriction will be overwritten, if you restrict by web service. Also you not only have the option to restrict by AWS tags but additionally to specify the explicit names:
Don’t forget to assign the special agent to the previously created host by entering that host name in Conditions > Explicit hosts.
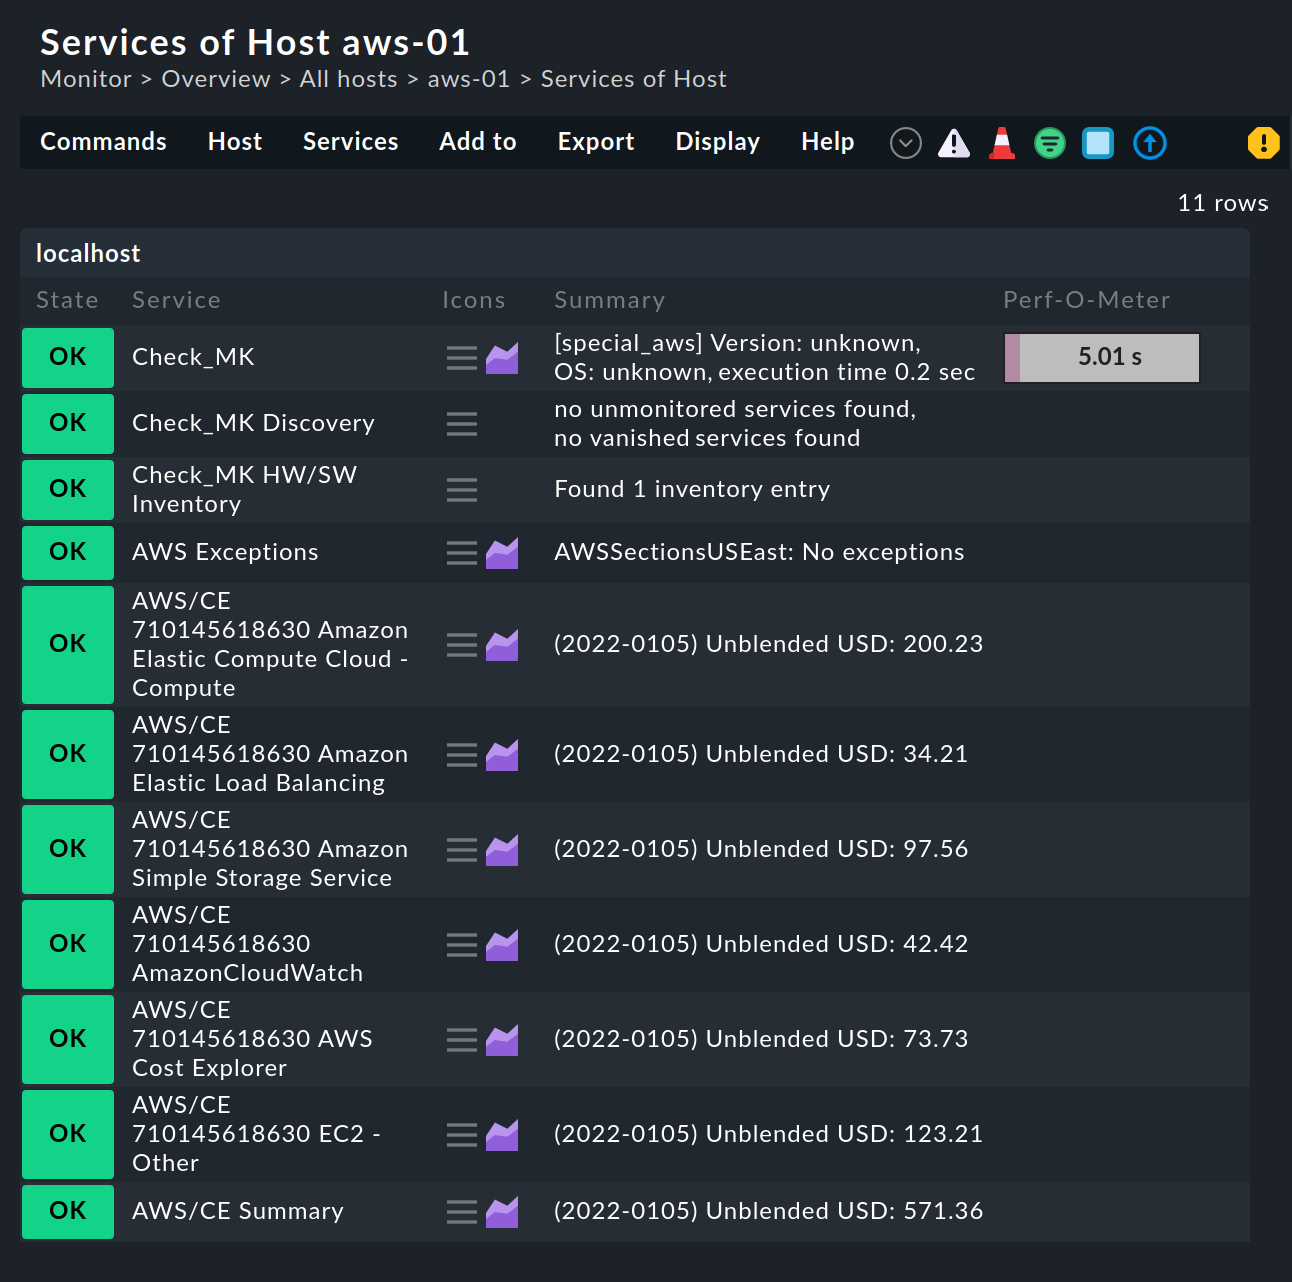
4.3. Services on the AWS host itself
Now switch to the service discovery of the newly created AWS host in Checkmk, where Checkmk should now find several services. After you add the services and after an activating changes it will look something like this in monitoring:
4.4. Create hosts for the EC2 instances
Services associated with EC2 instances are not associated with the AWS host, but to so-called piggyback hosts. This works in such a way that data retrieved from the AWS host is distributed to these piggyback hosts, which operate without their own monitoring agents. In this process, each EC2 instance is assigned a piggyback host named after the private DNS name of the EC2 instance.
The piggyback hosts are not automatically created by Checkmk. Create these hosts either manually or optionally with the Dynamic Configuration Daemon (DCD). It is important that the names of the hosts exactly match the private DNS names of the EC2 instance — they are also case-sensitive!
Tip: with the auxiliary script find_piggy_orphans from the
Treasures directory you can find all of the piggyback hosts for which there are data
but which are not yet created as hosts in Checkmk:
OMD[mysite]:~$ share/doc/check_mk/treasures/find_piggy_orphans
ip-172-31-44-50.eu-central-1.compute.internal
ip-172-31-44-51.eu-central-1.compute.internal
Configure the EC2 hosts without IP addresses (analogous to the AWS host), and select No API integrations, no Checkmk agent as agent.

4.5. Hosts for the ELB (Classic Load Balancer)
The services for the ELB are also assigned to piggyback hosts. The names correspond to their DNS names.
4.6. Monitoring limits
Some web services of AWS do have limits and Checkmk is able to monitor them. Here some examples:
As soon as such a check plug-in creates services and checks them later on, the special agent will always fetch all elements of the web service. Only in this way Checkmk is able to reasonably calculate the current workload at these limits and check the thresholds. That’s also the case even if you restrict the fetched data by some tags or names in the configuration.
The checking of the limits is activated by default for each monitored web service. If you want to restrict the fetched data in the special agent rule to limit the amount of transferred data, you need also to turn off the limits.
4.7. Further services
The other web services in AWS are assigned as follows:
| Service | Assignment | |
|---|---|---|
CE |
Costs & Usage |
At the AWS host |
EBS |
Block Storages |
Appended to the EC2 instance if it belongs to the instance, otherwise to the AWS host |
S3 |
Simple Storages |
At the AWS host |
RD |
Relational databases |
At the AWS host |