1. Introduction
Since the manual definition of users is scalable only up to a certain level, Checkmk provides a facility for using LDAP-based services for managing users, for automatically synchronizing users from the home directories, and likewise for assigning contact groups, roles and other attributes to these users in Checkmk automatically. Checkmk is not restricted to a single LDAP source, and it can also distribute the users to other connected sites if required.
2. Configuring an LDAP connection
2.1. Connecting to the Server
Creating a connection to an LDAP-compatible server requires a user with read permission for the server. As a minimum it must have read permission for the persons and groups that it is to synchronize. In the following example this user is called check_mk.
Under Setup > Users > LDAP connections > Add connection a new connection can be created. In the input mask, first enter any desired ID for the connection into the General Properties field. A simple meaningful title can be optionally entered in the Description field. As always the ID must be unique and an ID cannot be changed later.

Next, under LDAP Connection the LDAP server can be defined, as well as one or more Failover-Servers if they are available. Then only the Directory Type needs to be selected, and the user data for the read-access defined under Bind Credentials. Note that the user name with its full LDAP path must be entered. Upper and lower case must not does not need to be taken into account. The configuration should then look something like this:
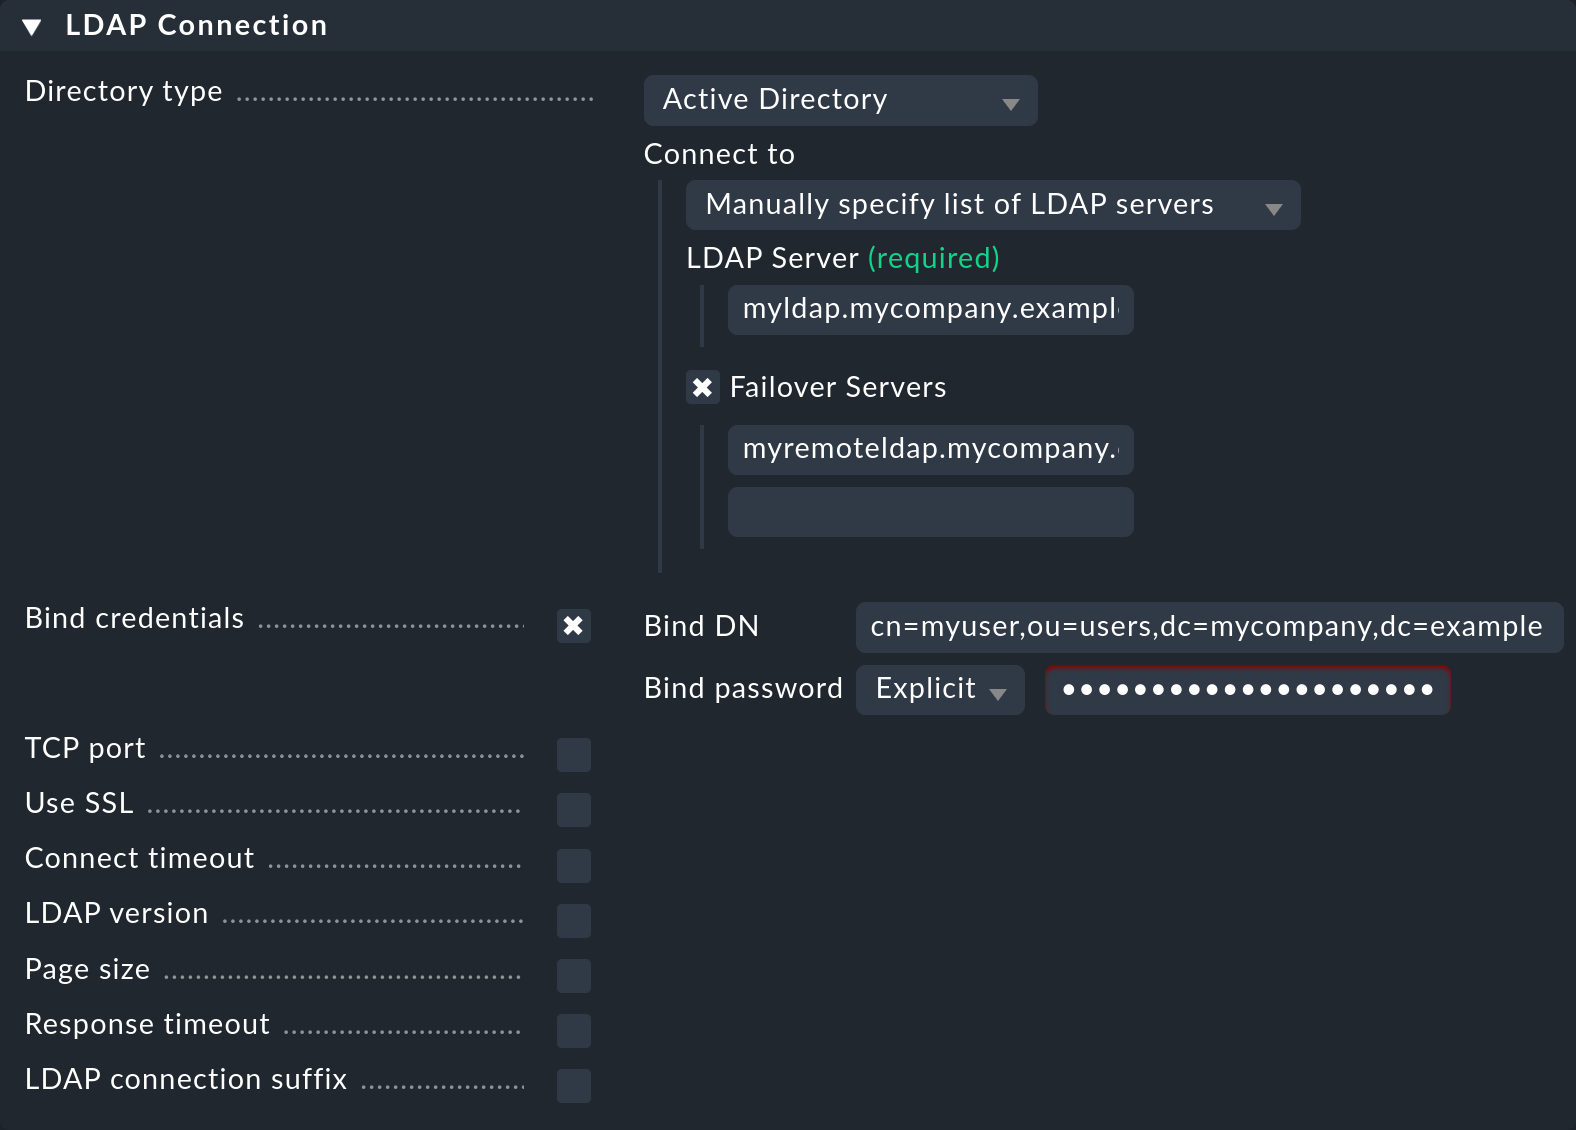
Checkmk supports more than just Active Directory. To alter the directory to, e.g., OpenLDAP, select it in the Directory Type field — further configuration alterations resulting from this action occur in only a few locations.
The Failover Servers are used when the actual server is not accessible, or when a time limit has been exceeded. This makes sense if there is no local own server in use, but it is desired to create a redundant connection.
Checkmk utilizes a persistent connection to the LDAP server. With this persistent connection Checkmk always uses the same server as long as it is available, and only switches if a timeout or other problem occurs. The same also applies after a switchover — the connection will only revert to the actually configured server if the failover server becomes unavailable.
2.2. Defining users
Next the paths to the users and groups will be defined, and the filters set. Then enter the path via which the users are to be found in User Base DN. Make sure here that the Operational Unit (OU) is set so that all desired users and as few others as possible are included. The more users that are queried, the slower the synchronization will be to process.
Next set the Search Scope option. Here you can recursively filter for all users located in the OU and in those units below it, or restrict the search to those located directly in this OU. If you have entered a user directly in the path, you should select Search only the entry at the base DN — only this user will then be included.
With the help of the option Search Filter you can narrow down the selection
of users to be imported even further. If for example you want to synchronize
only the users belonging to a specific group, set an LDAP query as shown in the
following screenshot. The prerequisite for this is that the users have the
memberof attribute. How to filter by group membership, without this
attribute, can be learned below:
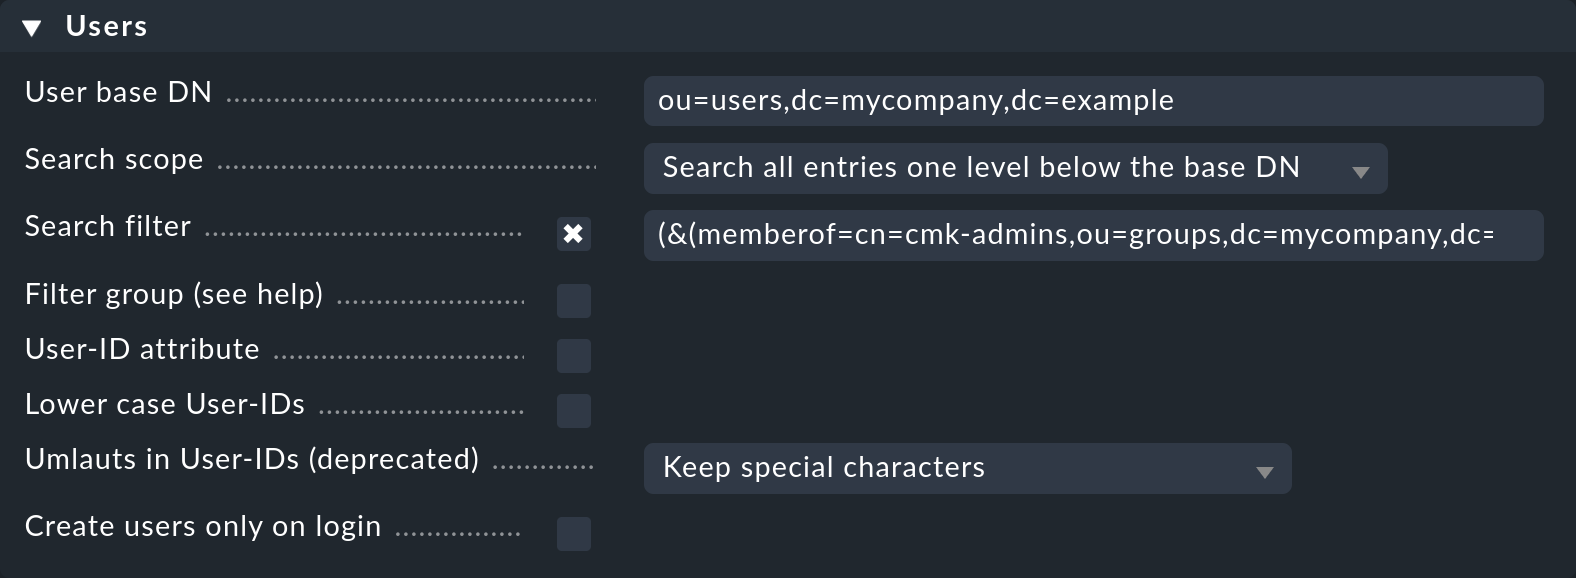
The standard filter can also be combined with the memberof,
or with other filters:
(&(objectclass=user)(objectcategory=person)(memberof=cn=cmk-admins,ou=groups,dc=mycompany,dc=org))
As can be seen under Users, there are further options for a user search. with the User-ID Attribute option it is possible to specify which attribute the user is to utilize as its login ID in Checkmk. The user will subsequently use this login when signing in. As a rule, in Active Directory it will be the sAMAccountName attribute, which is used as standard in Checkmk. Under OpenLDAP it is often the uid attribute.
With the Lower Case User-IDs options you can convert the synchronized IDs to lower-case letters. This is possibly sensible, since as already mentioned, Active Directory/LDAP does not differentiate between upper and lower case letters, but Checkmk does. That can lead to confusion which this option can solve.
The Translate Umlauts in User-Ids option was only provided for compatibility reasons and should no longer be used/altered.
Last but not least the option Create users only on login allows you to create new users only once they login to Checkmk instead of during the synchronization with LDAP.

The Filter Group option should only be used if the LDAP server is not an Active Directory, and the memberof Dynamic Attribute is not available in the user data. In such cases the user filtering takes place in Checkmk itself. In the process it is possible that many users will be queried which will later be discarded. Such a scenario can be largely stopped by the LDAP module in Checkmk.
Should you be dependent on this option however, the complete path for the group to be filtered must be entered here:

2.3. Defining groups
Should you wish to filter the users by group, define the path to the group so that a matching can be performed. This can be done in the same way as with the users — when a group is directly specified, under Search Scope the Search only the entry at the base DN option can be used — otherwise the search will be performed either directly in the OU or its subsidiary units will also be included.
Here as well, with the help of the Search Filter option it is possible to specify how the group’s name is to be defined in Checkmk. You can additionally specify the name of the attribute (Member Attribute) in which the group’s members are lodged. Checkmk uses member as standard. Under OpenLDAP this can also be uniqueMember. Alter the option as appropriate.

2.4. Testing the configuration
The first setup is now complete, and for diagnosis the configuration can now be saved and tested via the corresponding button at the bottom of the page.
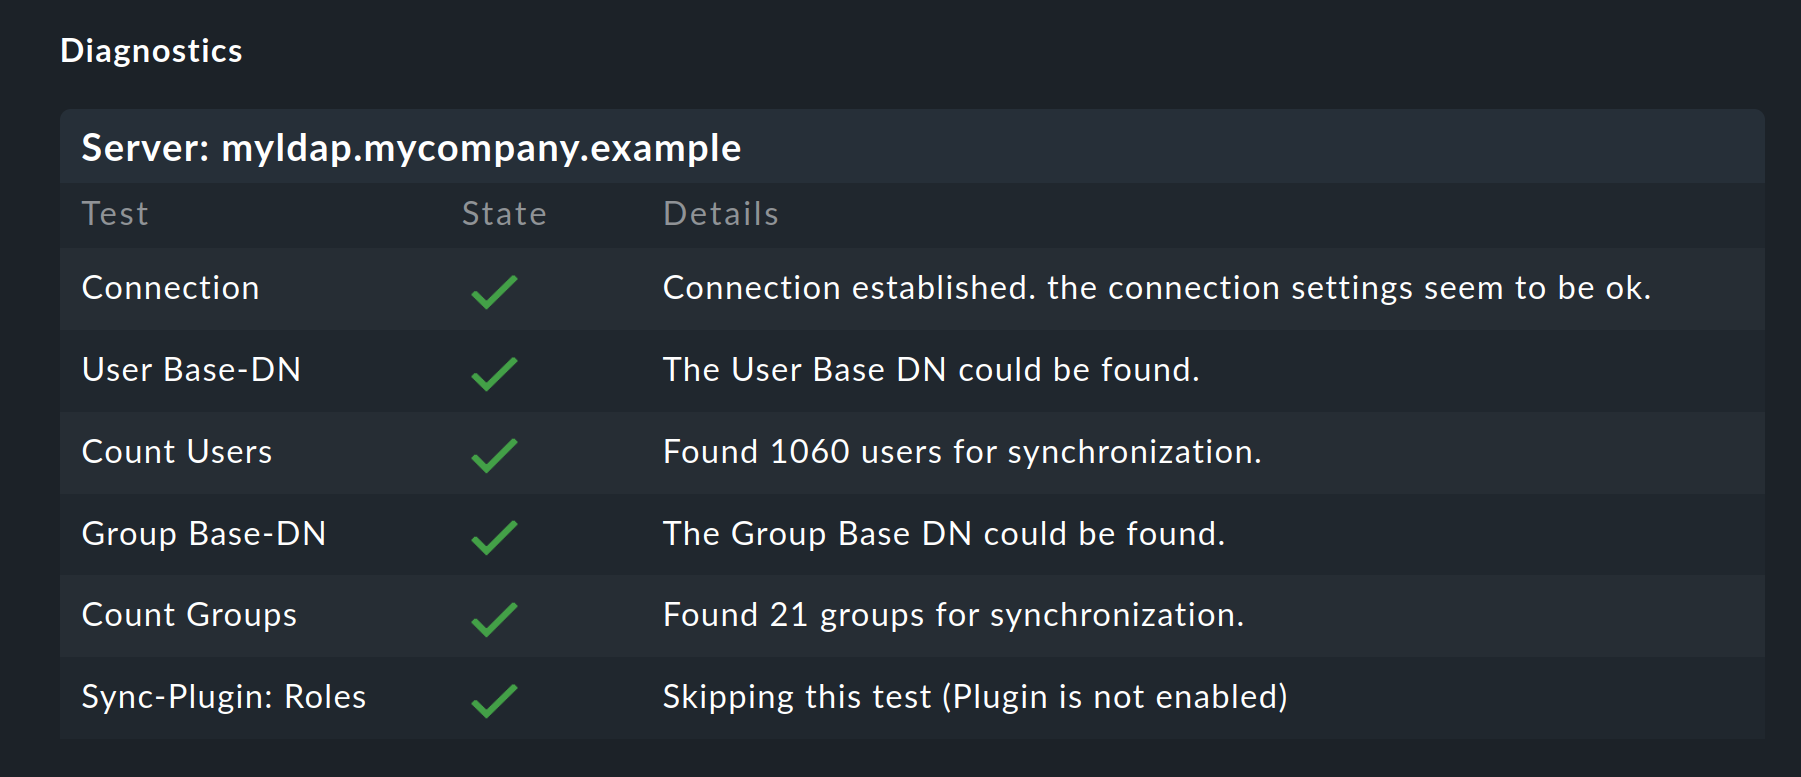
You don’t need to specify a group to produce a functioning configuration. As long as only users for Checkmk are present, it is sensible to limit the selection to one or more groups.
2.5. The synchronization interval
Finally, you can also define how often the users are to be automatically synchronized. In an environment in which changes seldom occur the standard is perhaps too tight. The time frame should not not be too long however, so that any changes can be reflected promptly in Checkmk.

A synchronization can be manually initiated at any time in Setup > Users. In addition, a user will be synchronized if required when they attempt to log in and have not yet been synchronized.
3. Automatic allocation of attributes
3.1. Contact groups
It is not much use being able to create all users automatically, if it is then necessary to allocate them to contact groups manually. Checkmk provides the function of using the LDAP server’s groups to enable allocation to contact groups. For this, activate the Attribute Sync Plugins > Contactgroup Membership option:

For an allocation to be successful, the group’s name (cn) on the LDAP server must be identical to that in Checkmk — i.e., the oracle_admins group will only be allocated to a user if it is also in the oracle_admins group in LDAP. If, instead of this, it is in the oracle-admins or the ORACLE_admins groups the allocation will not work. Therefore be careful to use the correct syntax and use of upper and lower case should problems arise in this situation.
Nested groups
Checkmk also offers — currently only for Active Directory — the possibility of using inherited groups. Activate this option if, for example, your user is in the oracle_admins group, and this group is in turn a member of cmk-user.
Groups from other connections
If multiple LDAP connections have been created in Checkmk, groups from other sources can also be utilized to enable an allocation. This can make sense if one general connection has been configured, and others are filtered only for particular groups.
3.2. Roles
Roles can also be automatically allocated in a similar way and the Nested Groups function likewise used here. One or more groups can be defined for each role. Select the role for which a connection is to be created and enter the full path to the group. As standard a search will be performed in groups found in group filter. Other connections can however be searched in order to use the groups found there. Select the connections to be searched from the list.
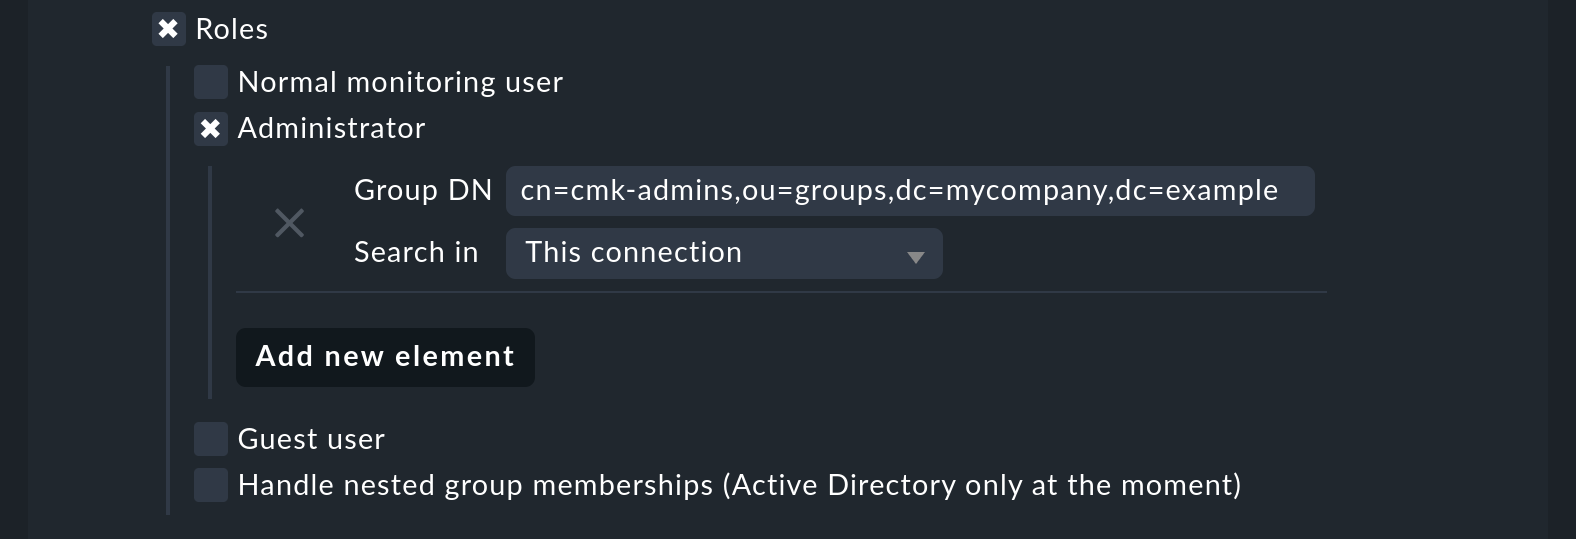
All users in the nominated group will now be allocated to the Administrator role, unless they will be synchronized through the user filter. As can be seen in the screenshot, your own configured roles can also be selected and connected with LDAP groups.
3.3. Other attributes
For the synchronization of other user information, as a rule only the activation of the relevant plug-in under Attribute Sync Plugins is required, and possibly also the entry of the attribute which provides the information. Below is a table of the plug-ins and the attribute used (if not manually set) and a short description:
| Plug-in | Attribute | Syntax | possible values | Description |
|---|---|---|---|---|
Alias |
cn |
String |
Normally the user’s first and last name |
|
Authentication Expiration |
pwdlastset |
Interval |
When a user will be logged out or locked out |
|
Disable Notifications |
disable_notifications |
Boolean |
|
Deactivates all notifications to the user |
Email address |
String |
The user’s email address |
||
Mega menu icons |
icons_per_item |
String |
|
Choose whether the you want to display one icon per topic ( |
Navigation bar icons |
nav_hide_icons_title |
String |
|
Choose whether the icons in the navigation menu shall be labeled ( |
Pager |
mobile |
String |
A nominated telephone/pager contact number |
|
Show more / Show less |
show_mode |
String |
|
Set default of "Show more / Show less" mode. With |
Sidebar position |
ui_sidebar_position |
String |
|
Choose on which side of the screen you want to see the sidebar ( |
Start-URL to display in main frame |
start_url |
String |
Example: |
The view to be displayed in the right frame |
User interface theme |
ui_theme |
String |
|
User interface theme |
Visibility of Hosts/Services |
force_authuser |
Boolean |
|
Only display hosts/services for which one is a contact |
4. LDAP in distributed environments
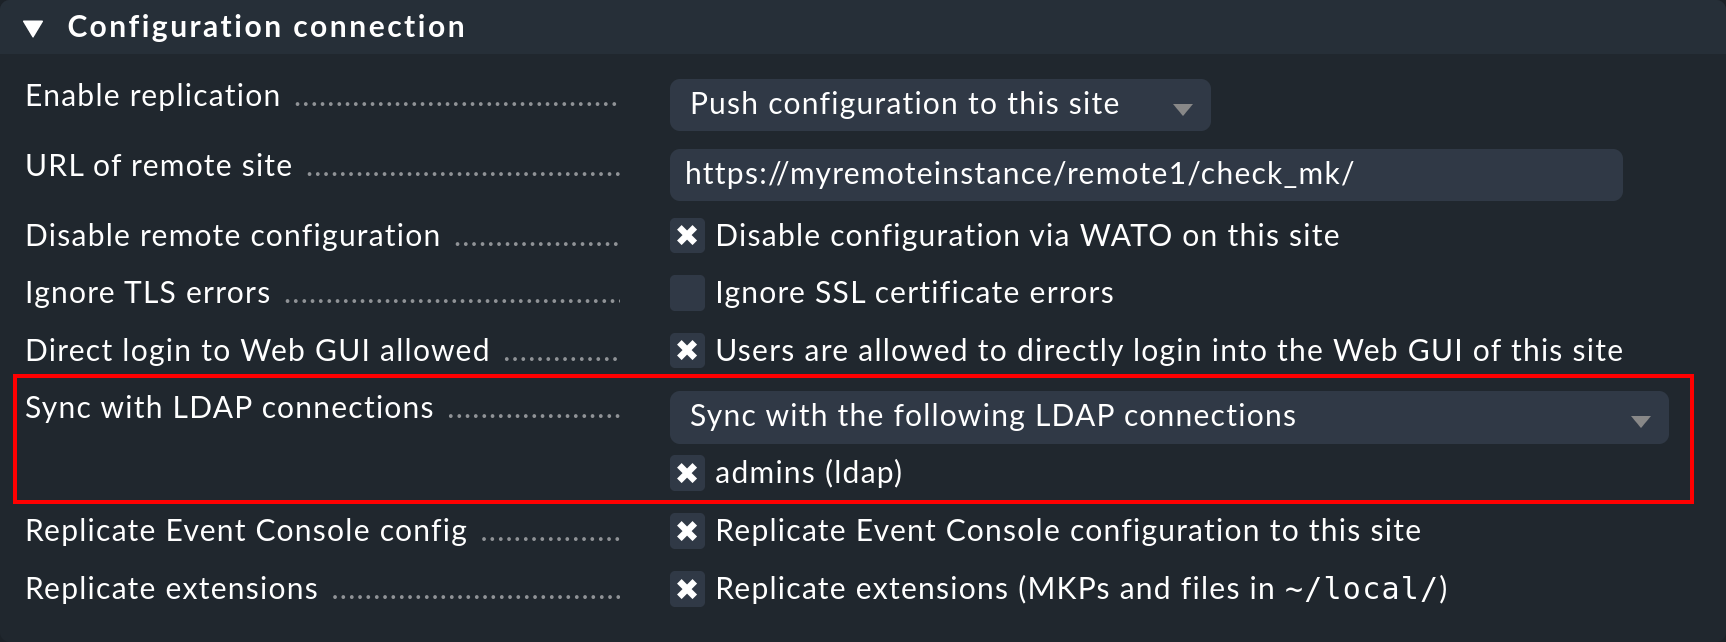
When configuring a distributed monitoring with a centralized configuration you can specify whether, and which LDAP connections should be synchronized from the remote site. If not otherwise specified, the remote site itself will synchronize all users of the configured connection. In this way changes will be automatically reflected on every site within the defined time frame and do not first need to be copied from the central to the remote site(s). The synchronization can also be restricted to specific connections or completely disabled. In the second case the users on the central site are retrieved from the LDAP connections and copied to the remote sites with an Activate Changes.
The setup can be configured in Setup > General > Distributed Monitoring > Connection Properties. Here is an example in which the option shown in the menu has been selected:
5. Securing LDAP with SSL
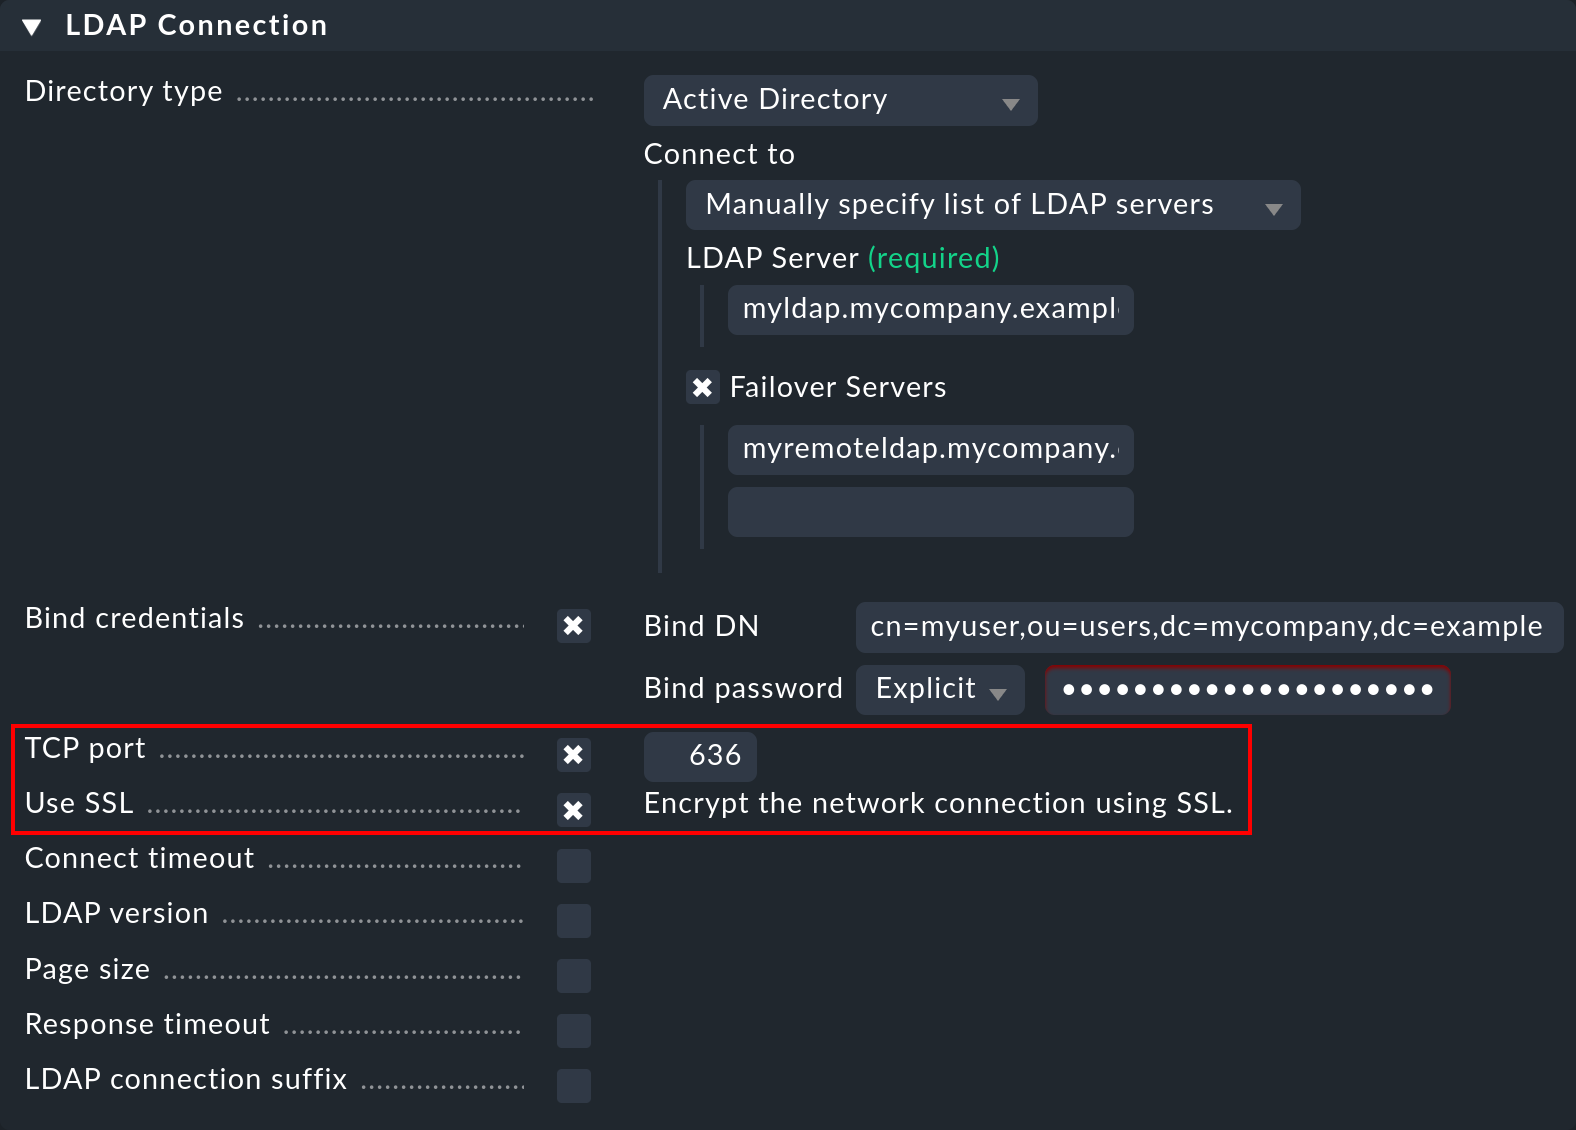
In order to secure the LDAP connection with SSL, simply activate the Use SSL
check box in the connection data and match the TCP Port
(usually 636 for SSL in LDAP). If the LDAP server or servers use
a certificate signed by a trusted certifier, once the above-described action
has been completed nothing more needs to be done to establish a secure connection.
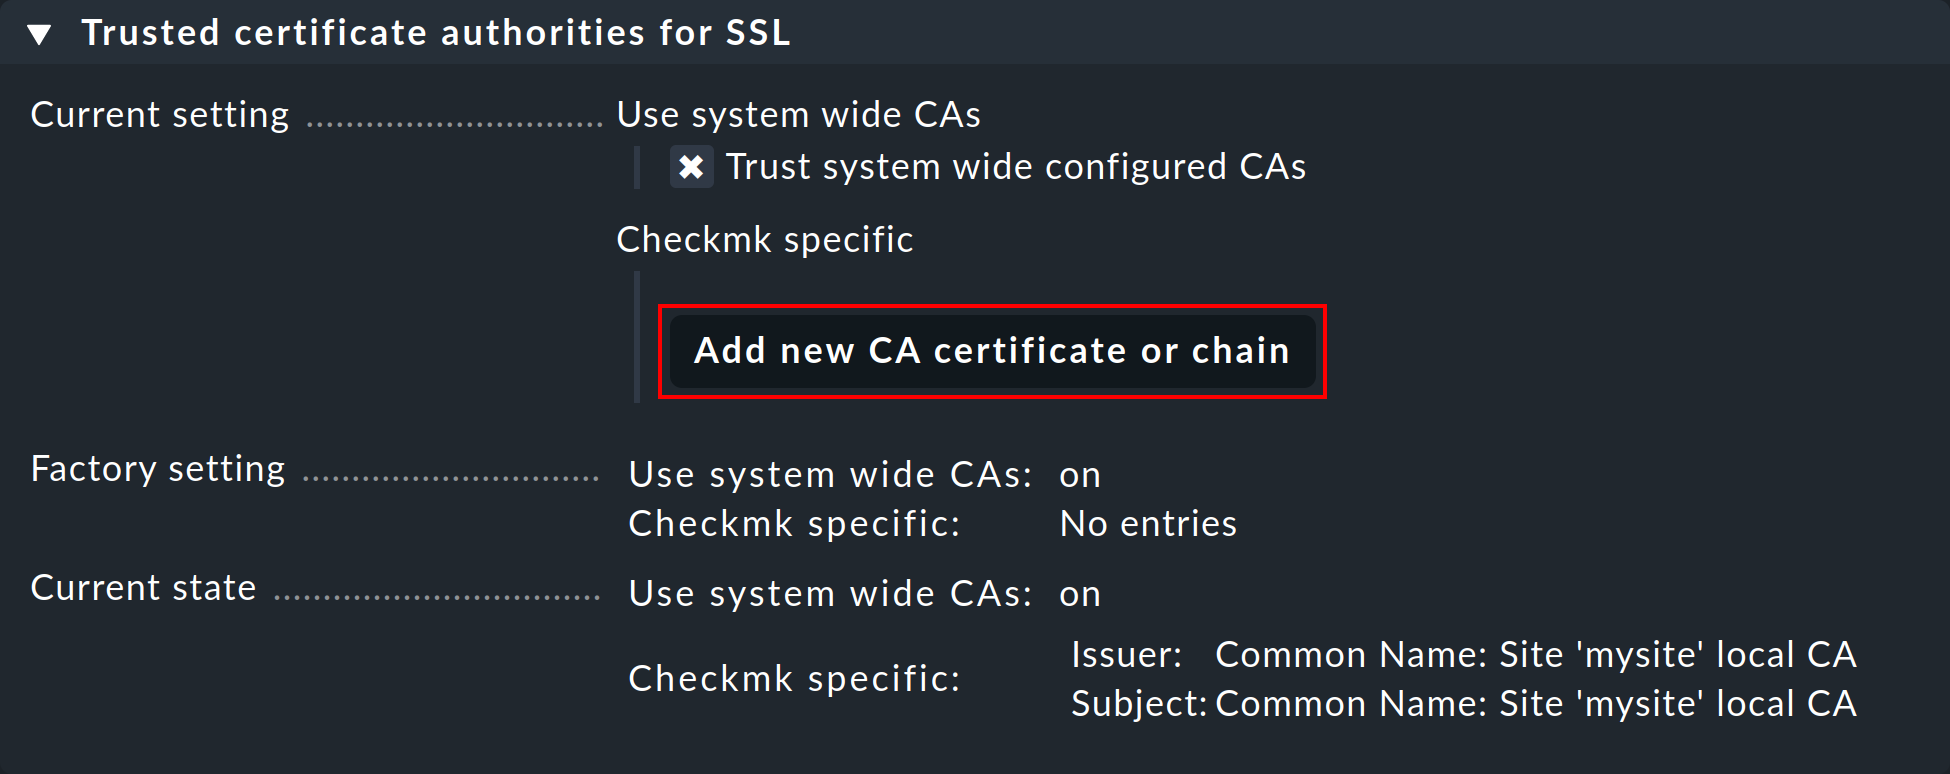
If a self-signed certificate is to be used, the connection can only be established after the certificate has been imported into the certificate store. Only then will it be classified as trustworthy and the connection established.
In order to do so, simply go to Setup > General > Global Settings > Site Management > Trusted certificate authorities for SSL. Click Add new CA certificate or chain and either paste in the content of your CRT or PEM file or choose Upload CRT/PEM File and do just that.
6. Error diagnosis
An error diagnosis is implemented directly in the Configuration settings.
After the setup it can also be checked for the possible source of an error.
Error messages will additionally be written to the web.log. These messages
can likewise point to the source of an error:
2020-09-19 16:03:17,155 [40] [cmk.web 31797] /ldaptest/check_mk/wato.py Internal error: Traceback (most recent call last):
  File "/omd/sites/ldaptest/share/check_mk/web/htdocs/wato.py", line 6563, in mode_edit_ldap_connection
    state, msg = test_func(connection, address)
  File "/omd/sites/ldaptest/share/check_mk/web/htdocs/wato.py", line 6506, in test_group_count
    connection.connect(enforce_new = True, enforce_server = address)
  File "/omd/sites/ldaptest/share/check_mk/web/plugins/userdb/ldap.py", line 274, in connect
    ('\n'.join(errors)))
MKLDAPException: LDAP connection failed:
ldap://myldap.mycompany.org: Can't contact LDAP server
7. Files and directories
| File path | Function |
|---|---|
|
All LDAP connections configured used by Setup will be retained in this file. |
|
All users will be defined here. |
|
The log file in which connection errors are be recorded — it is thus one of the first sources of information when problems occur. |
