1. The new Windows agent
From the very beginning, monitoring Windows servers has been one of the most important tasks performed by Checkmk. As for all other server operating systems, Checkmk therefore also delivers its own agent for Windows.
In the Checkmk version 2.1.0 there is now a new Windows Agent.
More precisely, a new component is added to the agent program check_mk_agent.exe: the Agent Controller.
The Agent Controller is upstream of the agent program, queries the agent program and communicates with the Checkmk server in its place.
To do this, it registers with the Agent Receiver, which is also a new process running on the Checkmk server.
So, on the one hand, the new Windows Agent is taking over functions from the agent program, and thus its advantages. On the other hand, it supplements the program in such a way that new functions can be added, such as TLS encryption of the communication, data compression — and also the reversal of the communication direction.
The registered, encrypted and compressed pull mode with the Agent Controller is available from version 2.1.0 for all Checkmk editions — as long as both the Checkmk server and the agent versions are 2.1.0 or higher.
The Agent Controller is only executable on certain (newer) Windows versions. You can see which versions are supported in the table below.
However, the agent also masters a so-called legacy mode to support older Windows versions. In this mode the new agent works like the old one, i.e. without Agent Controller and therefore without registration at the Checkmk server. For the legacy mode some special features have to be considered, which are summarized in the installation chapter.
For compatibility reasons, the agent supports only the current versions of the Microsoft Windows NT product line (edition).
The following table lists them explicitly.
In the Version column you will find the beginning of the version number, which can be displayed on the Windows system with the commands ver and systeminfo.
| Edition | Version | Agent Controller |
|---|---|---|
Windows Vista |
6.0 |
without |
Windows Server 2008 (R1) |
6.0 |
without |
Windows 7 |
6.1 |
with |
Windows Server 2008 R2 |
6.1 |
with |
Windows 8 |
6.2 |
with |
Windows Server 2012 (R1) |
6.2 |
with |
Windows 8.1 |
6.3 |
with |
Windows Server 2012 R2 |
6.3 |
with |
Windows 10 |
10.0 |
with |
Windows Server 2016 |
10.0 |
with |
Windows Server 2019 |
10.0 |
with |
Windows 11 |
10.0 |
with |
Windows Server 2022 |
10.0 |
with |
Important: Editions not listed in the table are not officially supported. This also includes Windows Embedded, for example.
The installation, registration, and setup of the agent can be accomplished in just a few steps, because the agent does not need any additional libraries for its function, for example. In addition, the agent is shipped with a basic configuration that is sufficient for most use cases.
2. Architecture of the agent
The Checkmk agent consists of the agent program and the Agent Controller, which communicates with the Agent Receiver on the Checkmk server. See the general article on monitoring agents for details on the common architecture of Linux agent and Windows agent. This chapter is about the Windows specific implementation.
The agent program check_mk_agent.exe is responsible for collecting the monitoring data.
The program is started as a Windows service under the local system account (Local System account).
It collects data about the local system when called and makes it available to the Agent Controller.
The agent program is minimalistic, secure, easily extensible and comprehensive, having access to important data that is not accessible via WMI or SNMP. In some cases, however, monitoring via SNMP in addition to the Checkmk agent can be useful. See the article on monitoring with SNMP for more on this topic. In addition, the agent program is as transparent as a file delivered as executable can be, because you have access to the source code at any time and thus insight into the functionality and can in principle also compile the agent yourself.
The Agent Controller cmk-agent-ctl.exe takes care of transporting the data collected by the agent program.
It runs as a background process under the local system account of Windows.
It listens on TCP port 6556 for incoming connections from the Checkmk site and queries the agent program over a TCP connection.
3. Installation
| Method | Description | CRE | CEE |
|---|---|---|---|
Supplied MSI package |
Simple installation of a standard agent with manual configuration via configuration files. |
X |
X |
MSI package from the Agent Bakery |
Configuration via GUI, individual configuration per host possible. |
X |
|
The package from the agent bakery is installed for the first time by hand or by script and automatically updated from then on. |
X |
Alternatively, you can also distribute the MSI package via other paths, such as the Microsoft Active Directory. The installation can be completely automated here using the MSI format.
3.1. Downloading an MSI package
You install the Windows agent by installing the MSI package.
Before installation, you need to get the package and bring it to the host (for example with scp or WinSCP) on which the agent will run.
Getting a package via the Checkmk GUI
In the ![]() Checkmk Raw Edition you can find the Windows package with the agent via Setup > Agents > Windows.
In the Enterprise Editions, you first get to the Agent Bakery via Agents > Windows, Linux, Solaris, AIX in the Setup menu, where you find the baked packages.
From there, the Related > Windows files menu item takes you to the list of agent files:
Checkmk Raw Edition you can find the Windows package with the agent via Setup > Agents > Windows.
In the Enterprise Editions, you first get to the Agent Bakery via Agents > Windows, Linux, Solaris, AIX in the Setup menu, where you find the baked packages.
From there, the Related > Windows files menu item takes you to the list of agent files:
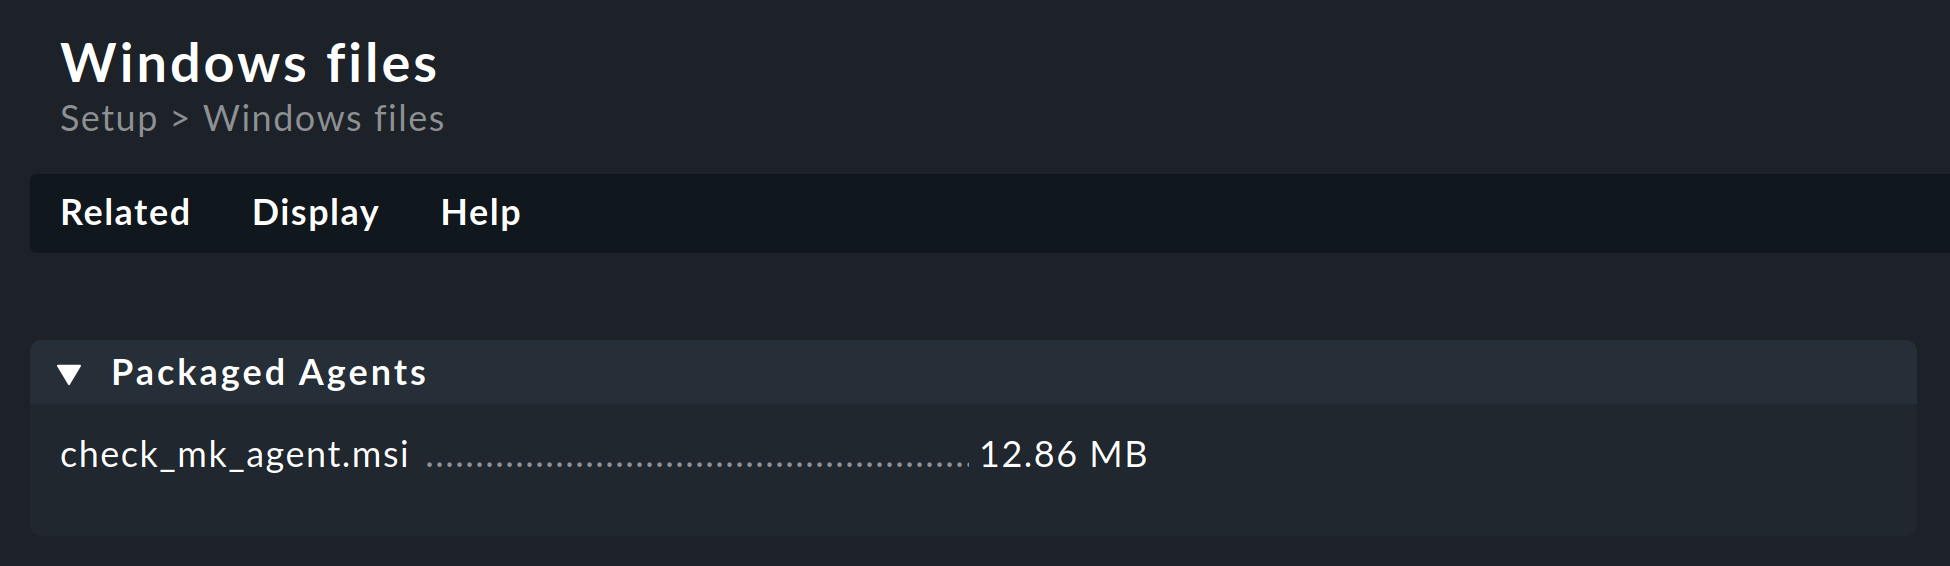
Everything you need can be found right in the first box named Packaged Agents:
the prepared MSI package file check_mk_agent.msi.
Getting a package via the REST API
The Checkmk REST API provides the following ways to download agent packages from the Checkmk server:
Downloading the provided agent.
Downloading a baked agent by host name and operating system.
Downloading a baked agent by hash of the agent and operating system.
Per REST API, you have the option to fetch the package from the Checkmk server directly to the target machine.
For example, the supplied MSI package for the Windows agent can be fetched using the following curl command.
In newer Windows versions curl is already included, in older versions you will first have to install the curl command environment separately via curl for Windows.
C:\Users\hhirsch\Downloads\> curl -OJG "http://mycmkserver/mysite/check_mk/api/1.0/domain-types/agent/actions/download/invoke" ^
--header "Accept: application/octet-stream" ^
--header "Authorization: Bearer automation myautomationsecret" ^
--data-urlencode "os_type=windows_msi"
Note: The above command has been split into four lines for readability.
This is just a simple example to demonstrate how this one REST API endpoint works to download the agent. Details on this and other REST API endpoints can be found in the API documentation, which can be accessed in Checkmk via Help > Developer resources > REST API documentation.
3.2. Package installation
Manual installation
After fetching the MSI package and — if necessary — copying it to the host to be monitored using scp, WinSCP or other means, start the installation either by double-clicking the MSI file or from the command line as follows:
C:\Users\hhirsch\Downloads\> check_mk_agent.msiYou will see the start page for the Setup wizard:
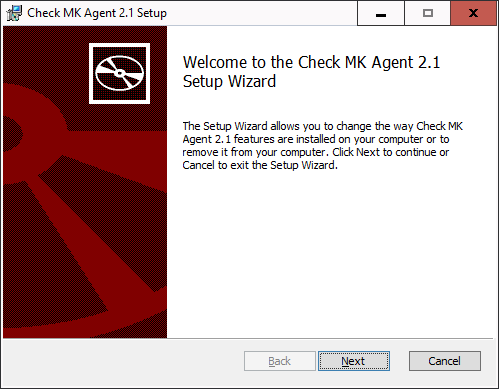
Use the Next buttons to scroll through the pages of the wizard. Accept the license terms of the GNU GENERAL PUBLIC LICENSE to continue. Then the Setup wizard presents you with the following page:
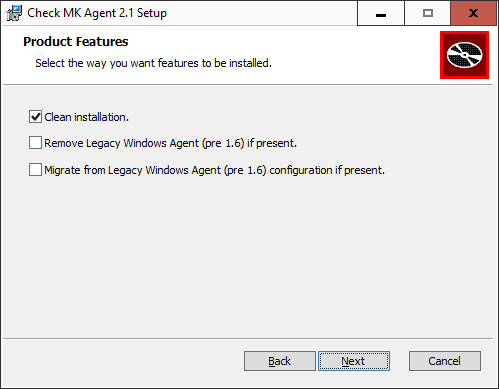
The choices on this page are relevant to you only if a Windows agent is already installed on the host and it is older than version 1.6.0. In version 1.6.0 the architecture of the Windows agent had changed fundamentally. If you are updating (or migrating) from a Windows agent before version 1.6.0 to the current agent, then first read the chapter on the old agent in the Checkmk User guide for version 2.0.0. There you will learn which of the provided options you should select in this particular update case.
In all other cases, we recommend selecting the Clean installation. option.
Confirm the start of the installation and then allow the installation program to make changes in the (User Account Control dialog. When finished, you can exit the Setup wizard.
After the installation, the agent will immediately start as a Windows service and be ready to monitor the system.
Unattended installation
Via the command line, Windows provides administrators with msiexec the possibility to install MSI packages automatically without user interaction.
An automated installation can then look like this, for example:
C:\Users\hhirsch\Downloads\> msiexec /i check_mk_agent.msi /qnIn this case, the agent is installed (/i) without user interaction or the user interface (/qn) and is also started immediately as a Windows service.
So this method is great for automatically rolling out the agent to many hosts.
You can also use this method to select the three options that were offered to you during the manual installation in the Setup wizard. For each option, there is an identifier that you can use for the installation command:
| Option in the Setup wizard | Identifier |
|---|---|
Clean installation. |
|
Remove Legacy Windows Agent (pre 1.6) if present. |
|
Migrate from Legacy Windows Agent (pre 1.6) configuration if present. |
|
To enable an option, append its identifier followed by an equal sign:
C:\Users\hhirsch\Downloads\> msiexec /i check_mk_agent.msi /qn WIXUI_CLEANINSTALL=To explicitly disable an option, you must add two more quotation marks following the equal sign:
C:\Users\hhirsch\Downloads\> msiexec /i check_mk_agent.msi /qn WIXUI_MIGRATELEGACY=""3.3. Installation using the Agent Bakery
![]() The
The ![]() Checkmk Enterprise Editions have the Agent Bakery, a software module for automatically packaging customized agents — including Windows agents.
For a detailed description of this, see the general article on agents.
The installation of the baked MSI package is then done again exactly as described above.
Checkmk Enterprise Editions have the Agent Bakery, a software module for automatically packaging customized agents — including Windows agents.
For a detailed description of this, see the general article on agents.
The installation of the baked MSI package is then done again exactly as described above.
3.4. Automatic updates
![]() If you use the Agent Bakery, you can set up automatic updates of the agent.
These are described in their own article.
If you use the Agent Bakery, you can set up automatic updates of the agent.
These are described in their own article.
3.5. Agent configuration files
During an installation the MSI package stores the program-specific files in C:\Program Files (x86)\checkmk\service\ and the host-specific files in C:\ProgramData\checkmk\agent\.
You do not need to customize the program-specific files.
The host-specific files are used to store plug-ins, log and configuration files and to configure the behavior of the agent.
Note: By default, the entire C:\ProgramData directory is hidden in Windows.
The agent reads three configuration files in succession:
C:\Program Files (x86)\checkmk\service\check_mk.yml
is the default configuration file, which you should not change.C:\ProgramData\checkmk\agent\bakery\check_mk.bakery.yml
is created by the agent bakery and should not be changed manually.C:\ProgramData\checkmk\agent\check_mk.user.yml
is your configuration file where you can manually make custom adjustments to test a setting or extension on a host.
If an option has been set in multiple files, then the last file read in determines the content of this option.
For manual work with the agent, therefore, only the last configuration file check_mk.user.yaml is relevant, because it is read in last and thus has the last word.
If the agent bakery is not used, this is in fact the only file in which customizations to the agent’s configuration may be made.
As you may have already recognized from the file extension of the configuration files, YAML is used as the file format.
3.6. What happens when the installation is complete?
After installing the agent including the Agent Controller, the next step is the registration, which sets up TLS encryption so that the encrypted agent output can be decrypted by the Checkmk server and displayed in monitoring.
There is a special feature when the agent was installed with the Agent Controller for the first time. Then the agent switches to the unencrypted legacy pull mode so that the Checkmk server is not cut off from the monitoring data and can continue to display it. This applies to a new installation as well as to an update of an agent of version 2.0.0 and older.
It will look like this in the monitoring:

The Checkmk site recognizes from the agent output that the Agent Controller is present and thus TLS encryption is possible — but not yet enabled. The Check_MK Agent service changes to the WARN state and remains so until you register it. After registration, only encrypted pull mode is used for communication. The legacy pull mode is switched off and will remain so. However, it can be switched on again by command if necessary.
The case is different if the agent is installed on very old Windows systems. The installation of the agent may be successful. However, if the Agent Controller cannot be started due to API incompatibilities, the unencrypted transfer is resorted to. Without Agent Controller, registration is not possible and the only communication path remains the legacy mode. In legacy mode, only the sections in the Registration chapter are relevant for adding the host to the Setup and then to the monitoring. In the chapter Testing and troubleshooting you must omit the test for calling the Agent Controller, because it is not available in legacy mode. Since there is also no TLS encryption without Agent Controller, you have to use other methods of encryption if required. We recommend using the built-in (symmetric) encryption in this case with the Encryption (Linux, Windows) rule and/or setting up an SSH tunnel.
Note: In the Checkmk Agent installation auditing rule set you will find various settings to check the state of the agent and make it visible in monitoring. Among other things, you can specify here which state the Check_MK Agent service should have if TLS configuration has not yet been performed.
4. Registration
4.1. Overview and prerequisites
Immediately after the installation of the new agent (also as an update of an agent of version 2.0.0 and older) only unencrypted communication in legacy pull mode is possible. An exclusively encrypted data transmission is only active after a trust relationship has been established.
Therefore, perform the registration promptly after installation/update. This chapter shows how to do this.
Registration, and thus the establishment of the mutual trust relationship, is done from a Checkmk user with access to the REST API. For this purpose, a good choice is the automation user, which is automatically created with every Checkmk installation and whose password you can randomly generate.
Note: Since there is no Agent Controller, and thus no registry and TLS encryption, on very old Windows systems, you have to use other methods of encryption if required. In this case we recommend using the built-in (symmetric) encryption with the rule Encryption (Linux, Windows) or to set up an SSH tunnel.
4.2. Adding a host to the Setup
First create the new host via Setup > Hosts > Add host. A host must exist in the configuration environment before it can be registered.
4.3. Registering a host with the server
The registration is done using the Agent Controller cmk-agent-ctl, which provides a command interface for configuring the connections.
You can use the cmk-agent-ctl help command to display help on the options.
Now go to the host that is to be registered. Here you have to make a request to the Checkmk site with administrator rights:
C:\Windows\system32> "C:\Program Files (x86)\checkmk\service\cmk-agent-ctl.exe" ^
    register ^
    --hostname mynewhost ^
    --server cmkserver --site mysite ^
    --user automation --password test23
The host name following the --hostname option must be exactly the same as it was when it was created in the Setup.
The --server and --site options specify the name of the Checkmk server and the site.
The server name may also be the IP address, the site name (here mysite) corresponds to the one you see in the URL path of the web interface.
The options are completed by the name and password for the automation user.
If you omit the --password option, the password will be requested interactively.
If the specified values were correct, you will be asked to confirm the identity of the Checkmk site to which you want to connect. We have shortened the server certificate to be confirmed for clarity:
Attempting to register at cmkserver:8000/mysite. Server certificate details:

PEM-encoded certificate:
---BEGIN CERTIFICATE---
MIIC6zCCAdOgAwIBAgIUXbSE8FXQfmFqoRNhG9NpHhlRJ40wDQYJKoZIhvcNAQEL
[...]
nS+9hN5ILfRI+wkdrQLC0vkHVYY8hGIEq+xTpG/Pxw==
---END CERTIFICATE---

Issued by:
	Site 'mysite' local CA
Issued to:
	localhost
Validity:
	From Thu, 10 Feb 2022 15:13:22 +0000
	To   Tue, 13 Jun 3020 15:13:22 +0000

Do you want to establish this connection? [Y/n]
> Y
Confirm with Y to complete the process.
If no error message is displayed, the encrypted connection has been established. All data will be transmitted in compressed form via this connection.
4.4. Verifying the trust relationship
The cmk-agent-ctl status command now shows exactly one trust relationship with the Checkmk server:
C:\Windows\system32> "C:\Program Files (x86)\checkmk\service\cmk-agent-ctl.exe" status
Connection: 12.34.56.78:8000/mysite
	UUID: d38e7e53-9f0b-4f11-bbcf-d196deadbeef
	Local:
		Connection type: pull-agent
		Certificate issuer: Site 'mysite' local CA
		Certificate validity: Mon, 21 Feb 2022 11:23:57 +0000 - Sat, 24 Jun 3020 11:23:57 +0000
	Remote:
		Connection type: pull-agent
		Registration state: operational
		Host name: mynewhost
Note: There can only ever be one trust relationship between host and site.
For example, if you register an already registered host mynewhost under a different name (mynewhost2) but with the same IP address, then the new connection will replace the existing one.
The connection from mynewhost to the site will be disconnected and no more agent data will be supplied to the host for monitoring.
4.5. Registration by proxy
For easier registration of multiple hosts, any host on which the agent is installed can perform registration on behalf of others. This exports a JSON file, which can then be transferred to the target host and imported there. Again, as before, the host being registered in the job must already be set up on the site
First, the registration is performed on any host in the Setup by proxy.
Here, of course, the Checkmk server comes in handy, as it is usually the first host to be set up.
As with the example above, you can provide the password by job option or be asked for it interactively if you omit the --password option.
We redirect the JSON output to a file in the example:
root@linux# cmk-agent-ctl proxy-register \
    --hostname mynewhost3 \
    --server cmkserver --site mysite \
    --user automation > /tmp/mynewhost3.json
Now we transfer the file /tmp/mynewhost3.json to the host we registered for and import the file:
C:\Windows\system32> "C:\Program Files (x86)\checkmk\service\cmk-agent-ctl.exe" ^
    import /tmp/mynewhost3.json
4.6. Adding the host to the monitoring
Once the registration is complete, perform a connection test and a service discovery in the Checkmk server Setup. Then, as the last step include the discovered services in the monitoring by activating the changes.
If the connection test fails, refer to the following chapter for testing and troubleshooting information.
4.7. Deregistering a host
You can also deregister a host.
On a host connected to the Checkmk server, you can revoke the trust.
Here, in the following command, the Universally Unique Identifier (UUID) to specify is the one output by the cmk-agent-ctl status command:
C:\Windows\system32> "C:\Program Files (x86)\checkmk\service\cmk-agent-ctl.exe" ^
    delete d38e7e53-9f0b-4f11-bbcf-d196deadbeef
To delete all connections from the host and additionally restore legacy pull mode, enter the following command:
C:\Windows\system32> "C:\Program Files (x86)\checkmk\service\cmk-agent-ctl.exe" ^
    delete-all --enable-insecure-connections
After that, the agent behaves as it did after the initial installation and before the first registration and sends its data unencrypted.
Complete the deregistration on the Checkmk server: In the Setup, on the Properties of host page, select the Host > Remove TLS registration menu item and confirm the prompt.
In case you prefer the command line: On the Checkmk server, for each connection of a host that is in monitoring, there is a soft link with the UUID that points to the folder with the agent output:
OMD[mysite]:~$ cd ~/var/agent-receiver/received-outputs
OMD[mysite]:~$ ls -l d38e7e53-9f0b-4f11-bbcf-d19617971595
lrwxrwxrwx 1 mysite mysite 67 Feb 23 07:18 d38e7e53-9f0b-4f11-bbcf-d19617971595 -> /omd/sites/mysite/tmp/check_mk/data_source_cache/push-agent/mynewhost
If you delete this soft link, you will need to re-register the host.
5. Testing and troubleshooting
A modular system may not work as intended in many situations. Since the introduction with 2.1.0 of the two new agent components, the Agent Controller on the host and the Agent Receiver on the Checkmk server, the number of points where something can go wrong has increased.
When troubleshooting, a structured approach is thus recommended. You can of course also use the step-by-step analysis described here to get to know the data collection and communication provided by Checkmk in more detail.
All of the diagnostic options that are available from the Checkmk server side are described in the general article on monitoring agents. But, of course, there are other diagnostics available when logged in directly to the monitored host itself.
We’ll work our way from the agent program, through the Agent Controller and TCP port 6556, to the Checkmk site in the following sections. In most cases, after correcting an error, you can restart the service discovery and complete the inclusion in monitoring.
5.1. Checking the configuration
To check that the configuration has been read in as expected, call the agent program with the showconfig option.
With this option you will not only get the configuration as it is currently used by the agent, but additionally, the environment variables as well as the configuration files in use will always be displayed.
If only a certain part of the configuration is of interest, you can limit the output to that specific part.
Here, for example, it is checked whether the options in the ps section have been set correctly:
C:\Windows\system32> "C:/Program Files (x86)/checkmk/service/check_mk_agent.exe" showconfig ps
# Environment Variables:
# MK_LOCALDIR="C:\ProgramData\checkmk\agent\local"
# MK_STATEDIR="C:\ProgramData\checkmk\agent\state"
# MK_PLUGINSDIR="C:\ProgramData\checkmk\agent\plugins"
# MK_TEMPDIR="C:\ProgramData\checkmk\agent\tmp"
# MK_LOGDIR="C:\ProgramData\checkmk\agent\log"
# MK_CONFDIR="C:\ProgramData\checkmk\agent\config"
# MK_SPOOLDIR="C:\ProgramData\checkmk\agent\spool"
# MK_INSTALLDIR="C:\ProgramData\checkmk\agent\install"
# MK_MSI_PATH="C:\ProgramData\checkmk\agent\update"
# Loaded Config Files:
# system: 'C:\Program Files (x86)\checkmk\service\check_mk.yml'
# bakery: 'C:\ProgramData\checkmk\agent\bakery'
# user : 'C:\ProgramData\checkmk\agent\check_mk.user.yml'

# ps
enabled: yes
use_wmi: yes
full_path: no
In this way you get a quick overview of how the three different configuration files have been merged and used by the agent program. Errors will be immediately visible.
5.2. Output of the agent program
The agent program is a simple Windows executable that obtains data from your system and outputs it as loosely-formatted text.
You can call this program directly from the command line.
With the test parameter it prints everything to standard output.
With the help option you get, among other things, a detailed and complete list of options available to you beyond those described here.
Since the output can be a bit long, the more pager, with which you can exit from the output with the Q key, is very handy here:
C:\Windows\system32> "C:/Program Files (x86)/checkmk/service/check_mk_agent.exe" test | more
<<<check_mk>>>
Version: 2.1.0b1
AgentOS: windows
Hostname: DESKTOP-XYZA123
AgentController: cmk-agent-ctl 0.1.0
This allows you to test whether the output contains all the desired data — for example, whether all the installed plug-ins provide data.
Since the agent program listens on the local loopback interface (127.0.0.1) on port 50001, you can also test the connection to this using Telnet or Putty.
5.3. Network environment for registration
If registering a host fails even before a certificate is presented, knowledge about the ways of communication can help identifying the problem — and of course solving it.
After entering the cmk-agent-ctl register command, the Agent Controller first asks the Checkmk server for the Agent Receiver port using the REST API.
As second step a connection to the Agent Receiver is established to request the certificate.
You can simulate the first request on the host with a program like curl:
C:\Windows\system32> curl.exe -v --insecure https://mycmkserver/mysite/check_mk/api/1.0/domain-types/internal/actions/discover-receiver/invokeThe parameter --insecure instructs curl to skip the certificate check.
This behavior reflects the behavior of the Agent Controller in this step.
The response is only a few bytes, containing the port number of the Agent Receiver.
For the first site this is usually just 8000, for the second 8001 and so on.
Common problems regarding this request are:
The Checkmk server is unreachable from the host
The port used by the REST API differs from the default ports 443 (https) or 80 (http)
When the curl command fails you might change routing or firewall settings to enable access, respectively add the internal CA to the trust chain of the host.
In case the host you are trying to register uses an HTTP proxy, curl will use it, but cmk-agent-ctl won’t do so with default settings.
Use the additional Flag --detect-proxy to instruct cmk-agent-ctl to use a proxy configured via system settings.
However often it may be easier to find out the port of the Agent Receiver and note it down. To do so, on the Checkmk server run, logged in as site user:
OMD[mysite]:~$ omd config show | grep AGENT_RECEIVER
AGENT_RECEIVER: on
AGENT_RECEIVER_PORT: 8000
Now you can specify the port when entering the command for registration. This skips the first request to the REST API. Communication then takes place directly with the Agent Receiver without any detours:
C:\Windows\system32> "C:\Program Files (x86)\checkmk\service\cmk-agent-ctl.exe" ^
    register ^
    --hostname mynewhost ^
    --server cmkserver:8000 --site mysite ^
    --user automation --password test23
Port 8000 also must be reachable from the host. In case it is not, you will get this error message:
ERROR [cmk_agent_ctl] Connection refused (os error 111)Equivalent to port 443 (respectively 80) mentioned above, you can now adjust routing or firewall settings so that the host to be registered can reach the Checkmk server on the Agent Receiver’s port (8000 or 8001…)
Should security policies prohibit access to the Agent Receiver, there is still the possibility to use registration by proxy on the Checkmk server.
5.4. The Agent Controller in dump mode
The Agent Controller provides its own subcommand, dump, which displays the full agent output as it arrives in the monitoring:
C:\Windows\system32> "C:/Program Files (x86)/checkmk/service/cmk-agent-ctl.exe" dump | more
<<<check_mk>>>
Version: 2.1.0b1
BuildDate: Mar 14 2022
AgentOS: windows
Hostname: DESKTOP-QVPV284
Architecture: 64bit
WorkingDirectory: C:\Windows\system32
ConfigFile: C:\Program Files (x86)\checkmk\service\check_mk.yml
LocalConfigFile: C:\ProgramData\checkmk\agent\check_mk.user.yml
AgentDirectory: C:\Program Files (x86)\checkmk\service
PluginsDirectory: C:\ProgramData\checkmk\agent\plugins
StateDirectory: C:\ProgramData\checkmk\agent\state
ConfigDirectory: C:\ProgramData\checkmk\agent\config
TempDirectory: C:\ProgramData\checkmk\agent\tmp
LogDirectory: C:\ProgramData\checkmk\agent\log
SpoolDirectory: C:\ProgramData\checkmk\agent\spool
LocalDirectory: C:\ProgramData\checkmk\agent\local
OnlyFrom:
<<<cmk_agent_ctl_status:sep(0)>>>
This allows you to verify that the data from the agent program has arrived at the Agent Controller. This output does not yet prove that the agent is also accessible over the network.
5.5. External connection test
If you are sure that locally the agent program and the installed plug-ins are executing correctly, you can next check from the Checkmk server via netcat (or nc) whether port 6556 is accessible via the external IP address of the host:
OMD[mysite]:~$ echo | nc 10.76.23.189 6556
16
The output 16 indicates whether the connection was successfully established and that the TLS handshake can now take place.
Since everything else here is TLS encrypted, no more detailed check is possible.
If the communication between agent and Checkmk server is still unencrypted (as in legacy pull mode), you will get the complete unencrypted agent output with this command instead of the 16.
For more diagnostics to run on the Checkmk server, see the general article on the monitoring agents. In particular, you can also perform a connection test using the Checkmk interface. You will get the result in the Agent: box.

If you get no information or only a timeout error message during the connection test, as in the example above, you should check the Inbound Rules of the Windows firewall on the host.
5.6. Windows Firewall
The agent already creates a rule in the Windows Firewall during its installation, so that the Agent Controller can be reached from the outside via port 6556.
In current versions of Windows you can find the Windows Defender Firewall with Advanced Security via Windows Settings (Settings > Windows Security) or start it by calling wf.msc from the command line:
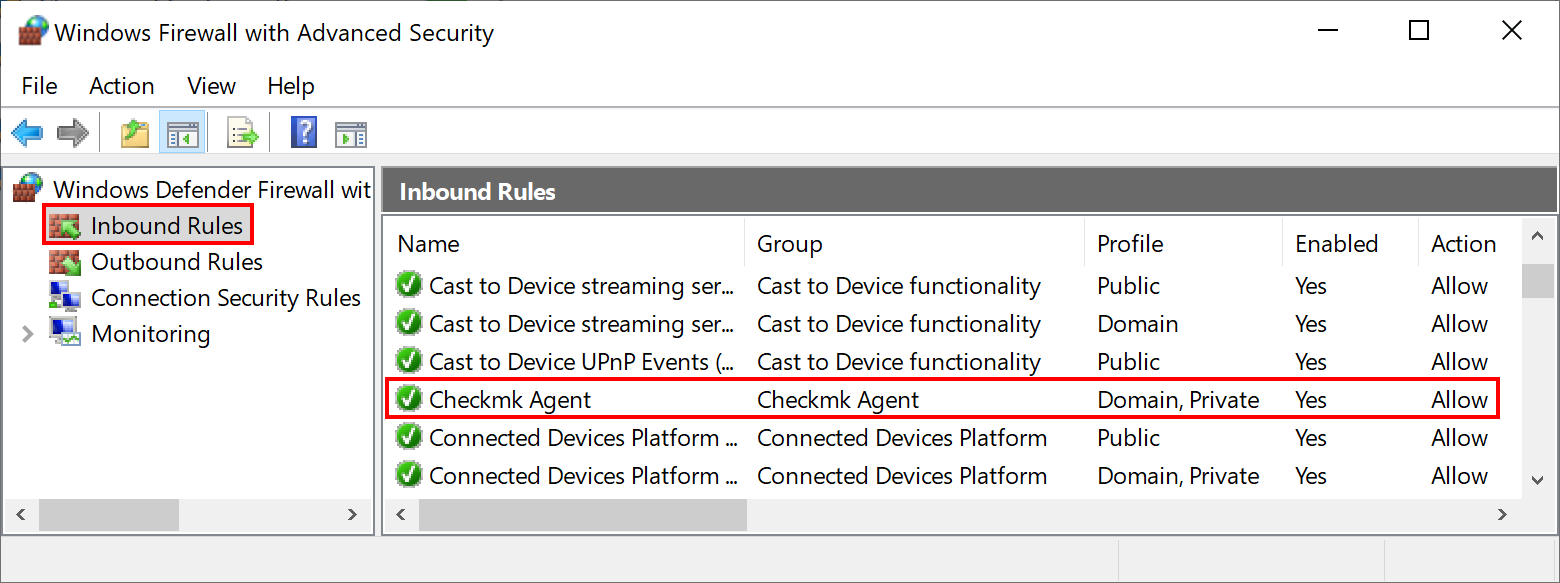
If you do not find such an entry in the Windows Firewall settings, you can add it at this exact location. To do this, click on New Rule in the Action menu.
This opens a wizard for creating a new firewall rule. Set the five choices as follows:
Rule Type |
Leave the selection here at Program. |
Program |
Enter This program path |
Action |
Allow the connection. |
Profile |
This point strongly depends on the configuration of your network. However, in most cases it is recommended to enable only Domain and Private here. |
Name |
Give the rule a concise and short name. |
Alternatively, you can automate this step and set the rule directly on the command line. Modify the following command to your customized installation path if necessary:
C:\Windows\System32> netsh advfirewall firewall add rule name="Checkmk Agent" ^
description="Allow inbound network traffic to the Checkmk Agent" dir=in localport=6556 protocol=tcp action=allow ^
program="%ALLUSERSPROFILE%\checkmk\agent\bin\cmk-agent-ctl.exe" ^
profile=private,domain enable=yes
OK.
Note: The command has been split into four lines for readability.
6. Security
6.1. Preliminary considerations
Security is an important criterion for any software, and of course monitoring is no exception. Since the monitoring agent is installed on every monitored server, a security problem here could have particularly serious consequences.
This is why security was emphasized in the design of Checkmk and has been an absolute principle since the earliest days of Checkmk: The agent does not read data from the network. Period. This means that it is impossible for an attacker to inject any commands or script components via the monitoring port 6556.
6.2. Transport Layer Security (TLS)
For an attacker, however, even a process list can be a first approach to draw conclusions about worthwhile targets. Therefore, transport encryption between agent and Checkmk server with Transport Layer Security (TLS) is mandatory starting with Checkmk version 2.1.0. Here, the Checkmk server "pings" the monitored host, which then establishes the TLS connection to the Checkmk server and transmits the agent output over it. Since only Checkmk servers with which a trust relationship exists can initiate this data transfer, there is no risk of data falling into the wrong hands.
Note: Since there is no Agent Controller, and thus no registry and TLS encryption, on very old Windows systems, you will have to choose other ways of encryption if needed. In this case, we recommend using the built-in (symmetric) encryption with the Encryption (Linux, Windows) rule and/or setting up an SSH tunnel.
6.3. Restricting access via IP addresses
Restricting access to specific IP addresses can also be configured via the firewall. However, the agent itself also offers the possibility to simply ignore requests from foreign IP addresses. Just add the following restriction to the configuration file in the global options. Note that there may be other parameters set in the configuration file before or after this and this is just a snippet:
global:
  only_from: 127.0.0.1/32 192.168.42.0/24
As you can see in the example, you can allow any number of subnets.
For example, with /32 you specify a subnet of size 1, so that only this one address is allowed, while with 192.168.42.0/24 you allow all addresses between 192.168.42.0 and 192.168.42.255.
![]() In Agent Bakery, you can configure the allowed IP addresses using the following ruleset:
Setup > Agents > Windows, Linux, Solaris, AIX > Agent rules > Allowed agent access via IP address (Linux, Windows).
In Agent Bakery, you can configure the allowed IP addresses using the following ruleset:
Setup > Agents > Windows, Linux, Solaris, AIX > Agent rules > Allowed agent access via IP address (Linux, Windows).
6.4. Calling via SSH
Newer versions of Windows (Windows 10 from version 1809 and Windows Server from 2019) have native support for SSH.
OpenSSH can be installed here via Apps > Apps & Features > Optional Features.
But even with older versions, you can retrofit an SSH server via Cygwin and thus recreate an identical configuration as is possible under Linux.
Please note the current help from Cygwin or Microsoft for the setup.
Once an SSH server is started and accessible, further setup is identical to that under Linux:
You set up authorized_keys on the monitored host and restrict access to running the agent.
However, the entry in the authorized_keys file is a bit bumpy on Windows hosts, as many characters have to be masked here.
Use the following (shortened) example for orientation.
The forward slashes as path separators are in both examples a permissible and preferred (saves escaping) exception to the otherwise common backslashes:
command="\"C:/Program Files (x86)/checkmk/service/check_mk_agent.exe\" test" ssh-rsa AAAA...pb48 mysite@mycmkserverIf the call is to be made under a user with administrator rights, the following two lines in the global configuration file sshd_config must be commented out with hash marks (#) on the Microsoft OpenSSH server:
Match Group administrators
    AuthorizedKeysFile __PROGRAMDATA__/ssh/administrators_authorized_keys
Note that you can stop the Windows service after this, and as a result any firewall rules that may have been set up will also become obsolete.
6.5. Disabling built-in encryption
When updating the agent, it may happen that the built-in (symmetric) encryption performed by the agent program itself remains active. If TLS encryption and built-in encryption are active at the same time, then the entropy of the transmitted data is so high that compression, which is active from version 2.1.0 onwards, will not save any transmitted data — and will burden the CPUs of both the host and the Checkmk server with additional further encryption and decryption steps.
For this reason, you should disable the built-in encryption promptly after switching to TLS.
In the ![]() Checkmk Raw Edition you can achieve this by setting the value of the
Checkmk Raw Edition you can achieve this by setting the value of the encrypted parameter to no in the configuration file C:\ProgramData\checkmk\agent\check_mk.user.yml.
global:
  encrypted: no
passphrase: D0e5NotMat7erAnym0r3![]() In the
In the ![]() Checkmk Enterprise Editions, you can change existing rules to Use TLS encryption in Setup > Agents > Access to agents > Encryption (Linux, Windows) in the Encryption (Linux, Windows) section and then rebake the agent packages.
After the next automatic agent update, the agent program encryption is disabled but guaranteed by the Agent Controller.
Note that after the automatic agent update, only registered hosts can provide monitoring data.
Checkmk Enterprise Editions, you can change existing rules to Use TLS encryption in Setup > Agents > Access to agents > Encryption (Linux, Windows) in the Encryption (Linux, Windows) section and then rebake the agent packages.
After the next automatic agent update, the agent program encryption is disabled but guaranteed by the Agent Controller.
Note that after the automatic agent update, only registered hosts can provide monitoring data.
7. Disabling sections
The output from the Checkmk agent is divided into sections.
Each of these sections contains related information.
Sections always start with a section header.
This is a line enclosed in <<< and >>>.
Except for Checkmk’s own sections, you can individually disable any of the 30+ sections that the agent generates by default. Specifically, this means that the corresponding commands will not be executed by the agent at all, possibly saving computation time. Other reasons for disabling could be that you are simply not interested in certain information from a certain group of hosts, or that a particular host is providing erroneous values and you want to suspend retrieval of that data for a short time.
As a user of one of the ![]() Checkmk Enterprise Editions, you can simply create a rule via Setup > Agents > Windows, Linux, Solaris, AIX > Agent rules > Disabled sections (Windows agent) which will then be taken into account by the Agent Bakery.
Checkmk Enterprise Editions, you can simply create a rule via Setup > Agents > Windows, Linux, Solaris, AIX > Agent rules > Disabled sections (Windows agent) which will then be taken into account by the Agent Bakery.
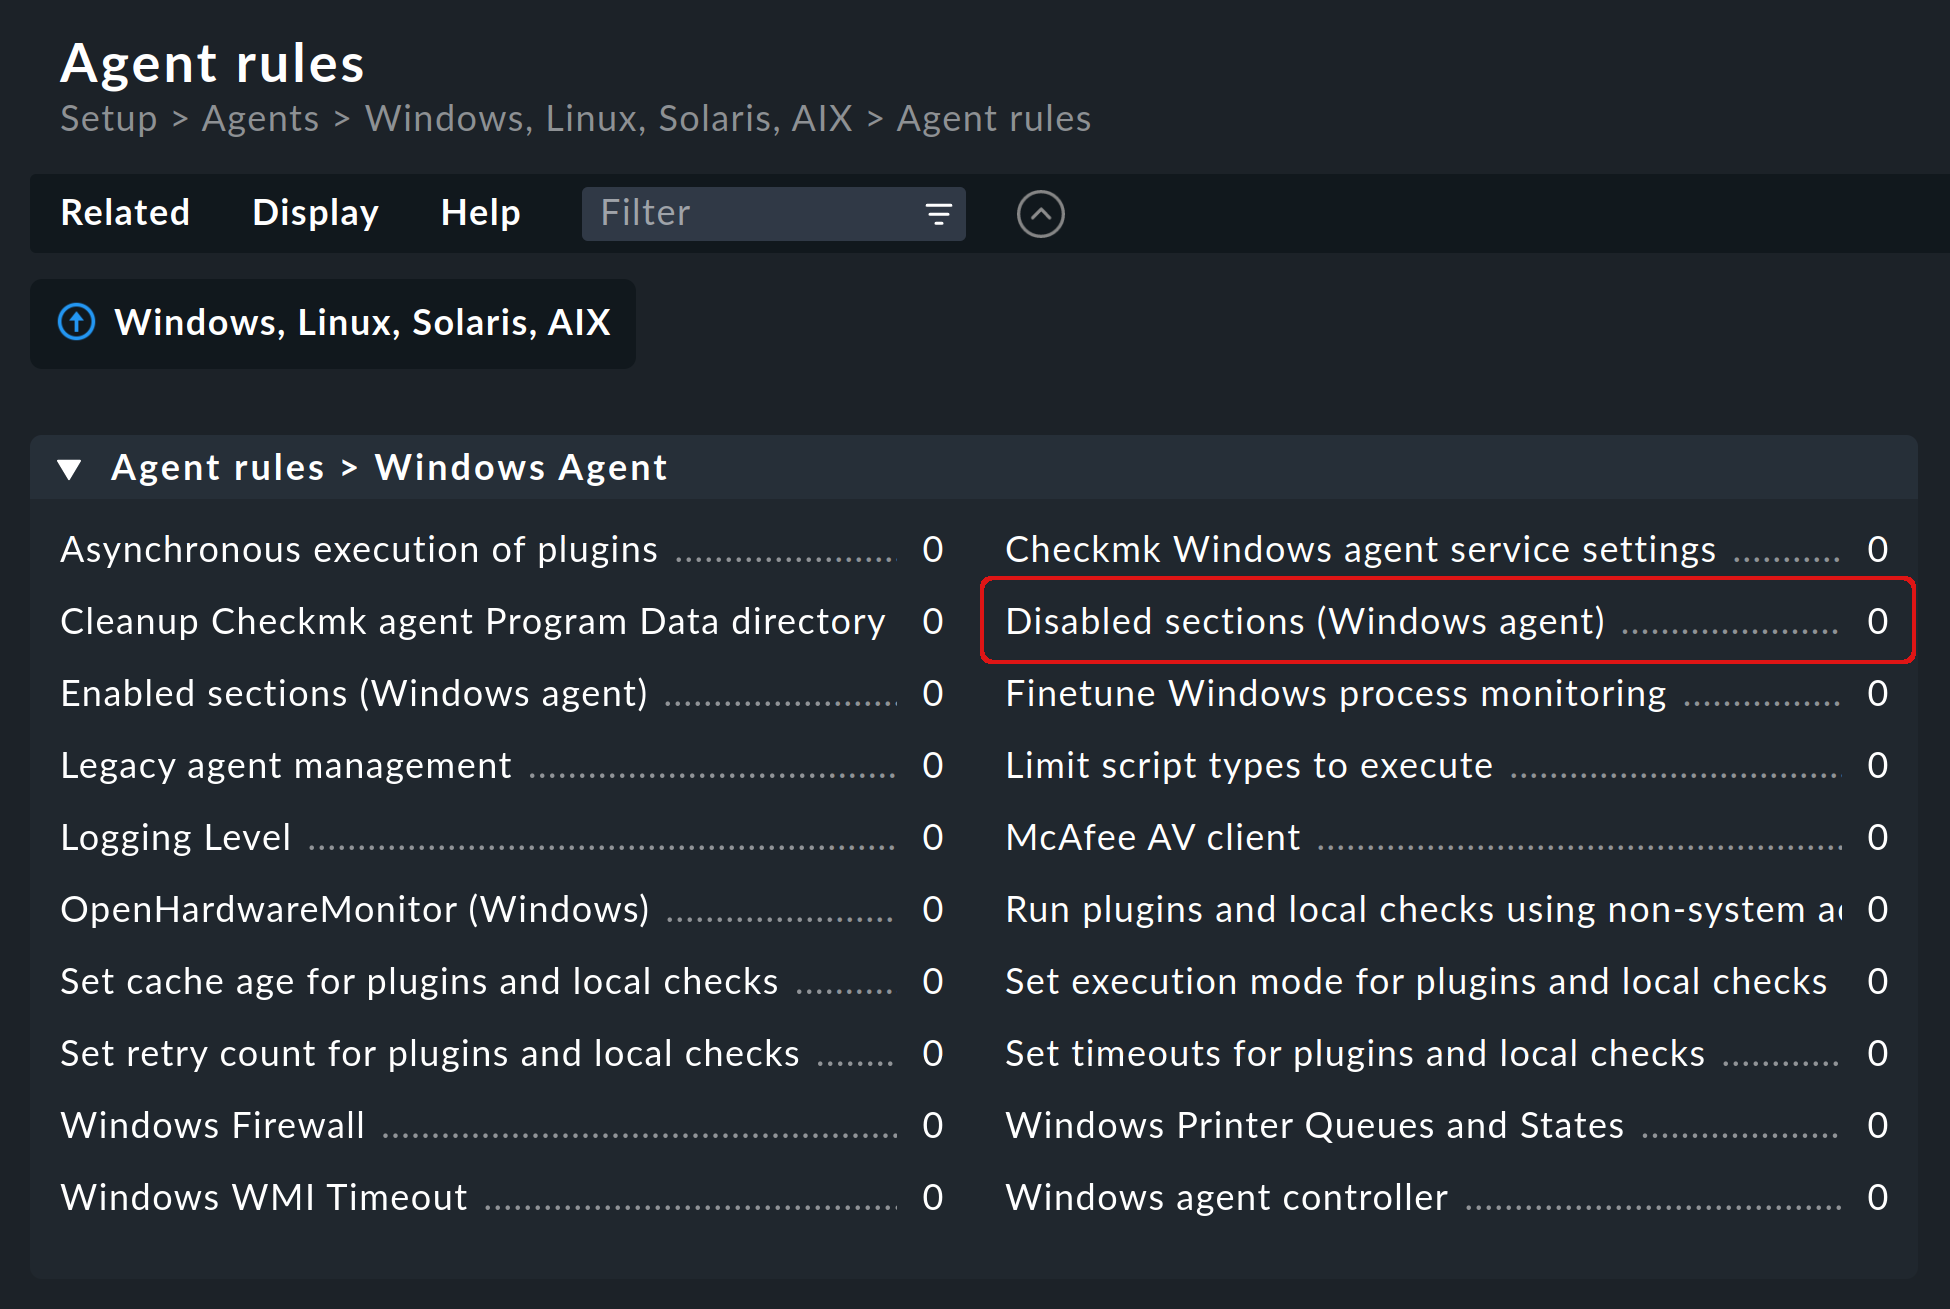
Note: The above image shows that there is also an opposite rule Enabled sections (Windows agent) to Disabled sections (Windows agent). So you can work with the positive list instead of the negative one. However, to keep the overview, we recommend to use only one of the two rules.
In the rule Disabled sections (Windows agent) you will find a separate checkbox for each section that can be disabled.
For the selected checkboxes you will then find — after the newly baked agent has been installed on the selected hosts — in the Agent Bakery configuration file C:\ProgramData\checkmk\agent\bakery\check_mk.bakery.yml below global: a line disabled_sections: listing the selected sections.
Users of ![]() Checkmk Raw Edition can manually create an entry in the
Checkmk Raw Edition can manually create an entry in the C:\ProgramData\checkmk\agent\check_mk.user.yml configuration file and enter there the sections which should be disabled.
All sections that can be disabled are listed in this file below global: in the _sections: section.
For example, to disable the two sections uptime (for "System uptime") and wmi_webservices (for "Web Services"), the appropriate section of the configuration file would look like this:
global:
    disabled_sections: [uptime, wmi_webservices]
8. Extending the agent by plug-ins
8.1. What are agent plug-ins?
The agent program check_mk_agent.exe contains a whole set of sections which provide monitoring data for various check plug-ins which are then automatically found by the service discovery.
This includes all important monitoring of the operating system.
In addition, there is the possibility to extend the agent with agent plug-ins. These are small scripts or programs that are called by the agent and extend it with additional sections with additional monitoring data. The Checkmk project provides a number of such plug-ins, which — if installed and configured correctly — automatically provide new services in the service discovery.
Why aren’t these plug-ins simply hard-coded into the agent? For each of the plug-ins there is one of the following reasons:
The plug-in can only fetch its data through internal interfaces that the agent does not provide (example: PowerShell).
The plug-in needs a configuration anyway, without which it would not work (example:
mk_oracle.ps1).The plug-in is so special that it is not needed by most users (example:
citrix_licenses.vbs).
8.2. Manual installation
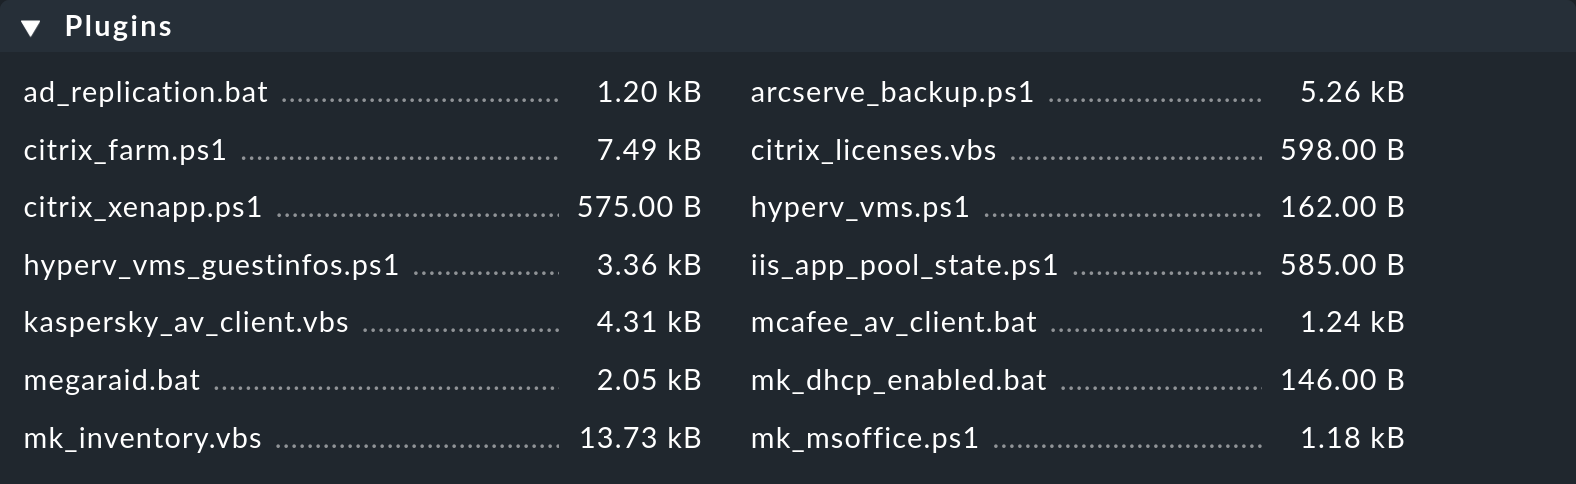
The included plug-ins for Windows can all be found on the monitored host in the agent installation directory under C:\Program Files (x86)\checkmk\service\plugins.
They are stored there so that they are directly available.
Alternatively, the plug-ins for Windows are also located on the Checkmk server under share/check_mk/agents/windows/plugins.
They are also available from the agent download page in the Setup menu (as described in the Installation chapter) in the Plugins box:
For all agent plug-ins we provide, there are matching check plug-ins that can evaluate their data and generate services. These are already installed, so that newly found services are immediately recognized and can be configured.
Note: Before you install a plug-in on the host, take a look at the corresponding file. Often you will find important information there about the correct use of the plug-in.
The actual installation is then simple:
Copy the file to C:\ProgramData\checkmk\agent\plugins.
Once the plug-in is in the correct directory, it will be called automatically by the agent and a new section will be created in the agent output.
This usually has the same name as the plug-in.
Complex plug-ins (e.g. mk_oracle.ps1) even create a whole set of new sections.
8.3. Configuration
Some plug-ins need a configuration file in C:\ProgramData\checkmk\agent\config to work.
For others, a configuration is optional (e.g. mssql.vbs) and allows special features or customizations.
Still others just work that way.
You have several sources to get information:
The documentation of the associated check plug-ins in your Checkmk site, which you can access via Setup > Services > Catalog of check plugins.
Comments in the plug-in file (often very helpful!)
A suitable article in this User guide (e.g. about monitoring Oracle)
For special (scripting) languages, it may be necessary to enable them first in the agent configuration.
For example, Python scripts will not be executed unless they are explicitly enabled.
You can do this by extending the file extensions in the check_mk.user.yml configuration file in the global section, as shown in the following excerpt:
global:
execute: [exe, bat, vbs, cmd, ps1, py]Important: The use of such plug-ins requires that the files can also be called in a regular command line without special paths. In the case of Python, it must be installed correctly and the path to the interpreter must be present in the environment variables. Instructions on how to set up Python correctly can be found directly on the pages of the Python Software Foundation.
8.4. Customizing execution of a specific plug-in
Each plug-in can be executed in different modes. The following options are available for entry in the configuration file. The value in bold is the default value:
| Option | Value | Description |
|---|---|---|
|
|
Sets the range of the following options. Wildcards can also be used here. Then the following options refer to all plug-ins to which the expression applies. Leading determines whether the plug-in should be executed directly from the installation directory under |
|
|
Determines whether the execution of a plug-in should be suppressed. |
|
|
Executes a plug-in asynchronously and stores the data in a file. If executed synchronously, the output is passed directly to the agent. |
|
|
Sets the maximum execution time. After that the plug-in will be terminated even if no output has come. The default value is based on the default for the query interval of the agent. |
|
|
Sets in seconds how long an output is valid. |
|
|
The number of times a plug-in may fail before discarding output from the cache. |
|
|
Here you can enter a free text to be appended to the logs. |
A configuration for the Veeam plug-in looks then for example like this (the excerpt is shortened and contains only the relevant part for the example):
plugins:
    enabled: yes
    execution:
        - pattern: $CUSTOM_PLUGINS_PATH$\veeam_backup_status.ps1
          async: yes
          timeout: 120
          cache_age: 300
          retry_count: 2
According to the above exemplary configuration the plug-in in the data directory C:\ProgramData\checkmk\agent\plugins is executed asynchronously every five minutes (300 seconds) and may run for a maximum of two minutes (120 seconds).
If the plug-in runs into this timeout, it will try a second time to get a result.
8.5. Installation via the Agent Bakery
![]() In the
In the ![]() Checkmk Enterprise Editions, the included plug-ins can be configured via the Agent Bakery.
This takes care of both the installation of the plug-in itself and the correct creation of the configuration file, should one be needed.
Checkmk Enterprise Editions, the included plug-ins can be configured via the Agent Bakery.
This takes care of both the installation of the plug-in itself and the correct creation of the configuration file, should one be needed.
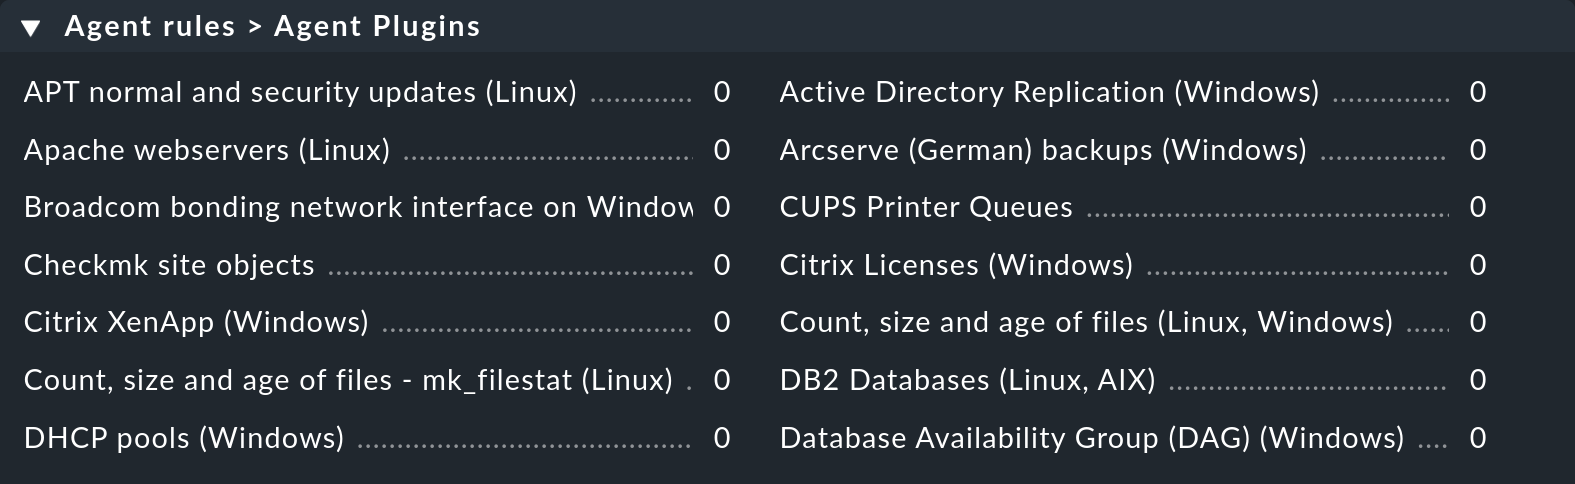
Each plug-in is configured via an agent rule. You can find the appropriate rule sets in Setup > Agents > Windows, Linux, Solaris, AIX > Agent rules > Agent Plugins:
8.6. Manual execution
Since agent plug-ins are executable programs, you can run them manually for testing and diagnostic purposes. However, there are plug-ins that need certain environment variables set by the agent to find their configuration file, for example. If necessary, set them manually if they are needed in the script or program.
9. Including classic (Nagios) check plug-ins
9.1. Running plug-ins via MRPE
There are two good reasons to use Nagios plug-ins also under Checkmk. If you migrated your monitoring from a Nagios based solution to Checkmk, you can continue to use older check plug-ins for which there is no Checkmk counterpart yet. In many cases these are self-written plug-ins in Perl or Shell.
The second reason for using Nagios plug-ins is true end-to-end monitoring. Let’s assume you have your Checkmk server, a web server and a database server distributed over a large data center. In such a case, the response times of the database server measured from the Checkmk server are not very meaningful. It is far more important to know these values for the connection between the web server and the database server.
The Checkmk agent provides a simple mechanism to meet both of these requirements: MK’s Remote Plugin Executor or MRPE for short. The name is deliberately an analogy to Nagios' NRPE, which performs the same task there.
The MRPE is built into the agent and is controlled by various configuration files.
Enabling and disabling MPRE
By default the consideration of MRPE plug-ins is enabled. If you do not want to use this feature, you can disable it in the configuration file by adding the following definition:
mrpe:
  enabled: no
Limiting the execution time
Sometimes the runtime of a script or Nagios plug-in is unpredictable and in the worst case a plug-in never finishes. To keep control here, you can limit the maximum runtime of the MRPE plug-ins. The value shown here is also the default value in seconds. So adjustments are only necessary if you want to set a shorter or longer interval:
mrpe:
  # enabled: yes
  timeout: 60
Adding MRPE plug-ins
To tell the agent where the file to run is located and how to call it, add an entry in the MRPE configuration:
MRPE:
  config:
    - check = MyServiceName 'C:\ProgramData\checkmk\agent\mrpe\my_check_plugin.bat' -w 10 -c 20 MyParameter
It is not necessary to put the file in the agent’s directory as well, although it is convenient to collect them all in a common place. In this example configuration, you can now see the following elements of the relevant line:
| Element | Description |
|---|---|
|
The service name as it should be displayed in Checkmk. |
|
Program to run; quotes for any spaces. |
|
Passed options: A threshold of 10 for WARN and 20 for CRIT. |
|
Example passing of other parameters. |
After you set up the MRPE plug-in, it will be active directly without restarting the agent and will be added to the output. In the service discovery you will now find your new service automatically:

9.2. MRPE with the Agent Bakery
![]() As an alternative to configuring directly on a host in the user-specific configuration file, you can also define your MRPE plug-ins directly in the Setup menu.
To do this, use the Setup > Agents > Windows, Linux, Solaris, AIX > Agent > Agent rules > Execute MRPE checks rule set.
The necessary entry is then automatically created in the Agent Bakery configuration file.
As an alternative to configuring directly on a host in the user-specific configuration file, you can also define your MRPE plug-ins directly in the Setup menu.
To do this, use the Setup > Agents > Windows, Linux, Solaris, AIX > Agent > Agent rules > Execute MRPE checks rule set.
The necessary entry is then automatically created in the Agent Bakery configuration file.
10. Monitoring hardware
Hardware monitoring of Windows hosts is well covered by the Checkmk agent, provided plug-ins and extensions available in the Checkmk Exchange well covered. However, there are situations where neither ready-made plug-ins nor programming interfaces for creating your own plug-ins are available, but either application software or a hardware monitoring tool from a hardware manufacturer can provide monitoring data via SNMP.
In such a case, set SNMP to the appropriate connection type (SNMP v2 or v3 or SNMP v1) in the Monitoring agents box in the host’s properties in Setup. Services that are available via both SNMP and Checkmk agent (e.g. CPU usage, file systems, network cards) are then automatically fetched by the Checkmk agent and not via SNMP. This automatically avoids duplicate transmissions.
For more information, see the Monitoring with SNMP article.
11. Uninstallation
You have several options for uninstalling the agent in Windows. In all versions of Windows you will find an entry in the Control Panel under Control Panel > Programs and Features > Uninstall a program. In newer versions you can also find the entry for the Checkmk agent in the settings under Settings > Apps > Apps & features.
From the command line for administrators, you have several options to remove the agent. If you still have the last installed MSI package, you can use it for uninstallation as follows:
C:\Users\downloads\> msiexec /x check_mk_agent.msi /qnAlternatively, you can use the Windows Management Instrumentation Command (WMIC) to uninstall:
C:\> wmic product where name="Check MK Agent 2.1" call uninstall /nointeractiveIf the uninstallation was successful, you will receive the message Method execution successful. as confirmation.
Note: The string after name= must be exactly correct.
If you want to uninstall another version of the agent here, you will find a list of all installed products with the following call:
C:\> wmic product get nameThe process can sometimes take quite a long time and will not give any status messages, but will give very long lists. For filtering you can extend the command to a pipe:
C:\> wmic product get name | findstr Check
Check MK Agent 2.1
Since the various routines of Windows only remove files that also got there through the installation process, it is perfectly normal that files remain in the directories of the agent. These can be deleted manually.
12. Files and directories
12.1. Paths on the monitored Windows host
| Path | Meaning |
|---|---|
|
Installation directory for the program specific files including the agent program |
|
The default configuration file of the agent. Do not modify this file. |
|
Installation directory for the host-specific files. This is where extensions, log, and configuration files specific to this host are located. |
|
This configuration file is created by the Agent Bakery and overwrites values from the default configuration file if necessary. |
|
Configuration file for your individual customizations. This file is read in last and overwrites values from the other configuration files if necessary. |
|
Directory for plug-ins which should be executed automatically by the agent and extend its output with additional monitoring data. |
|
Storage of configuration files for the agent. |
|
Directory for custom local checks. |
|
MRPE extensions can be stored here. |
|
After each change of the Checkmk agent service a backup is created from the user configuration here. |
12.2. Paths on the Checkmk server
| Path | Meaning |
|---|---|
|
Base directory for custom files to be delivered with a baked agent. |
|
Directory containing the agent’s MSI package. This directory also contains configuration examples and all agent plug-ins. |