1. Introduction
As of Version 2.0.0, there is a new application programming interface in Checkmk: the Checkmk REST API. This API enables you to perform tasks — that you would otherwise perform in Checkmk in its GUI — to be transmitted to and executed with HTTP requests on the Checkmk server using commands or scripts.
Using an API via HTTP? This may sound familiar to you, of course, since Checkmk has been providing an API for a long time — the so-called Web API — with which you can perform many administration tasks. So why is there now a new API? Unlike to what the name REST API might suggest, the new API is not intended to provide the Rest of the functions missing in the Web API. On the contrary, the REST API is intended to cover the complete functionality that Checkmk up until now has provided via the GUI and via the command interface, thus completely replacing the Web API.
REST stands for REpresentational State Transfer, and it describes an architecture for the exchange of data on distributed systems — especially for web services. An API implemented according to the REST architecture follows certain principles, e.g. the client-server model, stateless communication and a uniform interface. In practice the implementation is preferably carried out via the HTTP protocol, whereby the resources are addressed via the Uniform Resource Identifier (URI) and accessed using HTTP methods (GET, POST, PUT, DELETE).
So much for the principles of the REST. The advantages of these principles can be demonstrated by the concrete features provided by the Checkmk REST API:
| Protocol | The Hypertext Transfer Protocol (HTTP/1.1) is used as the transport system for communication. |
| Coding | The JavaScript Object Notation (JSON) is used as the data format. The payload of the answers is serialised with JSON and encoded in UTF-8. Date and time information is encoded in the ISO-8601 format with valid time zone information. |
| Language | English is the language for labels, identifiers and API documentation. |
| Authentication | Access to the API is only granted to a client if it has proven its authorization by means of HTTP authentication — 'Basic' or 'Bearer' for example. |
| Versioning | The API is versioned and uses a three-level numbering scheme according to the Semantic Versioning 2.x standard. For details, refer to the Chapter on Versioning below. |
| Documentation | The API is documented in a machine-readable structure, and in a human-readable, English format, and includes all resources, their input and output parameters and their associated value ranges. The API is created with the OpenAPI Specification (OAS) 3.x, an API description format intended especially for REST APIs. The API document created with this specification is displayed to the user with ReDoc, a responsive web tool for OpenAPI documents. |
| Code example | To demonstrate its use, sample code for various applications is provided for each request. |
| Error display | In the event of an error, the API sends numeric HTTP status codes and a diagnostic message for the problem, which helps to identify possible causes of incorrect requests. |
| REST API classification | The API fulfils all four levels (0 to 3) of the Richardson Maturity Model (RMM), which can be used to assess how much REST an API contains. Level 1 requires the introduction of resources to enable communication via the API to individual endpoints rather than to a global one. Level 2 is met if HTTP methods are used for the requests. At the (highest) level 3, the API is effectively self-documenting, in that the server, when responding to a request, communicates any possible next actions and the resources to be addressed, thus enabling the client to discover the available functionality for themselves. This provision of additional information is also known as 'Hypermedia as the Engine of Application State' (HATEOAS). |
In addition to these general comfort functions, the Checkmk REST API already provides access to more areas in Checkmk than the Web API, for instance host status, service status, downtimes, time periods, acknowledgement of problems and Business Intelligence (BI). For many areas that support both the Web and REST APIs, REST API also gives you more, and more specific functionality.
However, there are a few features in the Web API that the REST API currently lacks. Since this is the present situation, you will find a comparison of the functionalities of the REST API and Web API in the last chapter of this article. The last missing functionality in the REST API for accessing sites in distributed monitoring and metrics and graphs will be delivered in Checkmk 2.1.0 patch versions.
2. The API documentation
2.1. Versioning
One of the advantages of the REST API is that both the software and its documentation come from the same source — the OpenAPI document. Thus the API documentation always matches the software and describes exactly what the API can do. Therefore it is not necessary to describe the reference part of the available resources, methods, parameters etc. in the Checkmk User guide — instead you will find the API documentation separately from this manual, directly in your Checkmk site.
The API with its documentation is versioned and uses a three-level numbering scheme in X.Y.Z format, where X stands for a main release, Y for a minor release and Z for a patch. A new minor release contains new, backward-compatible functions. A new main release may contain changes that make the API incompatible with the previous main release (so-called breaking changes). The version numbers of the main and minor releases are part of the URL used to send a request to the server.
Important: Note that the REST API follows a different versioning scheme than that for the Checkmk software. Since a new main release of the API is necessary if there are incompatible API changes, this usually does not match the release cycle of the Checkmk software.
Nevertheless, the correlation between the versions of API documentation and Checkmk software is very straightforward, as you will learn in the next chapter.
2.2. Access
The REST API documentation is available in HTML format for viewing in a Web browser.
In the Checkmk GUI, open the API documentation from the navigation bar via Help > Developer resources APIs > REST API documentation. The API documentation is displayed in a new browser window (or browser tab). We will discuss this in more detail in the next chapter.
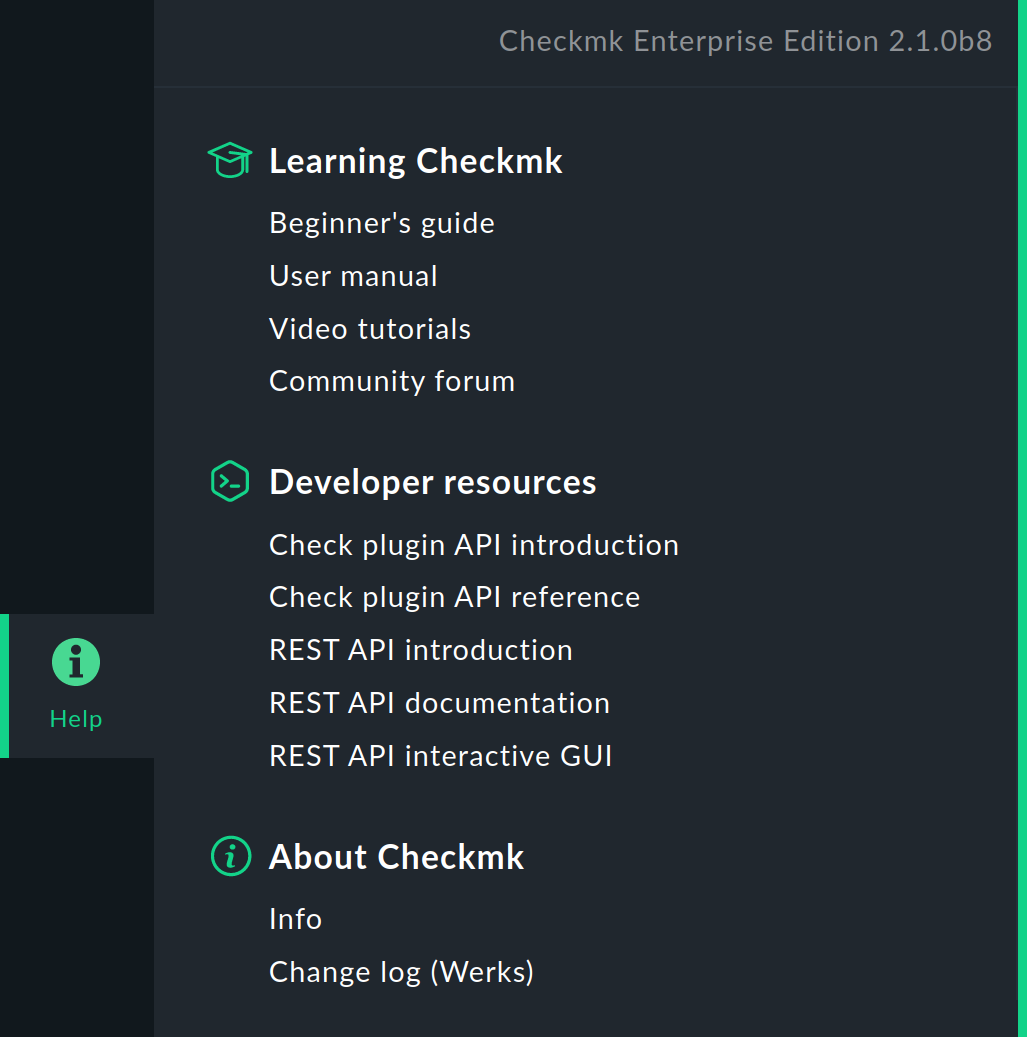
Note: You will surely have noticed that there are more entries covering the REST API in the Help menu. With REST API introduction you can open this article. With REST API interactive GUI you can open another view of the REST API. The entry is called GUI since not only are you shown the REST API functions, but because you can also interact with the API directly from the browser — by sending requests to the server for example. We will introduce the REST API GUI as an alternative to execution by script later in the chapter on the REST API GUI.
2.3. Structure and content
The API documentation uses a responsive web design consisting of three sections:
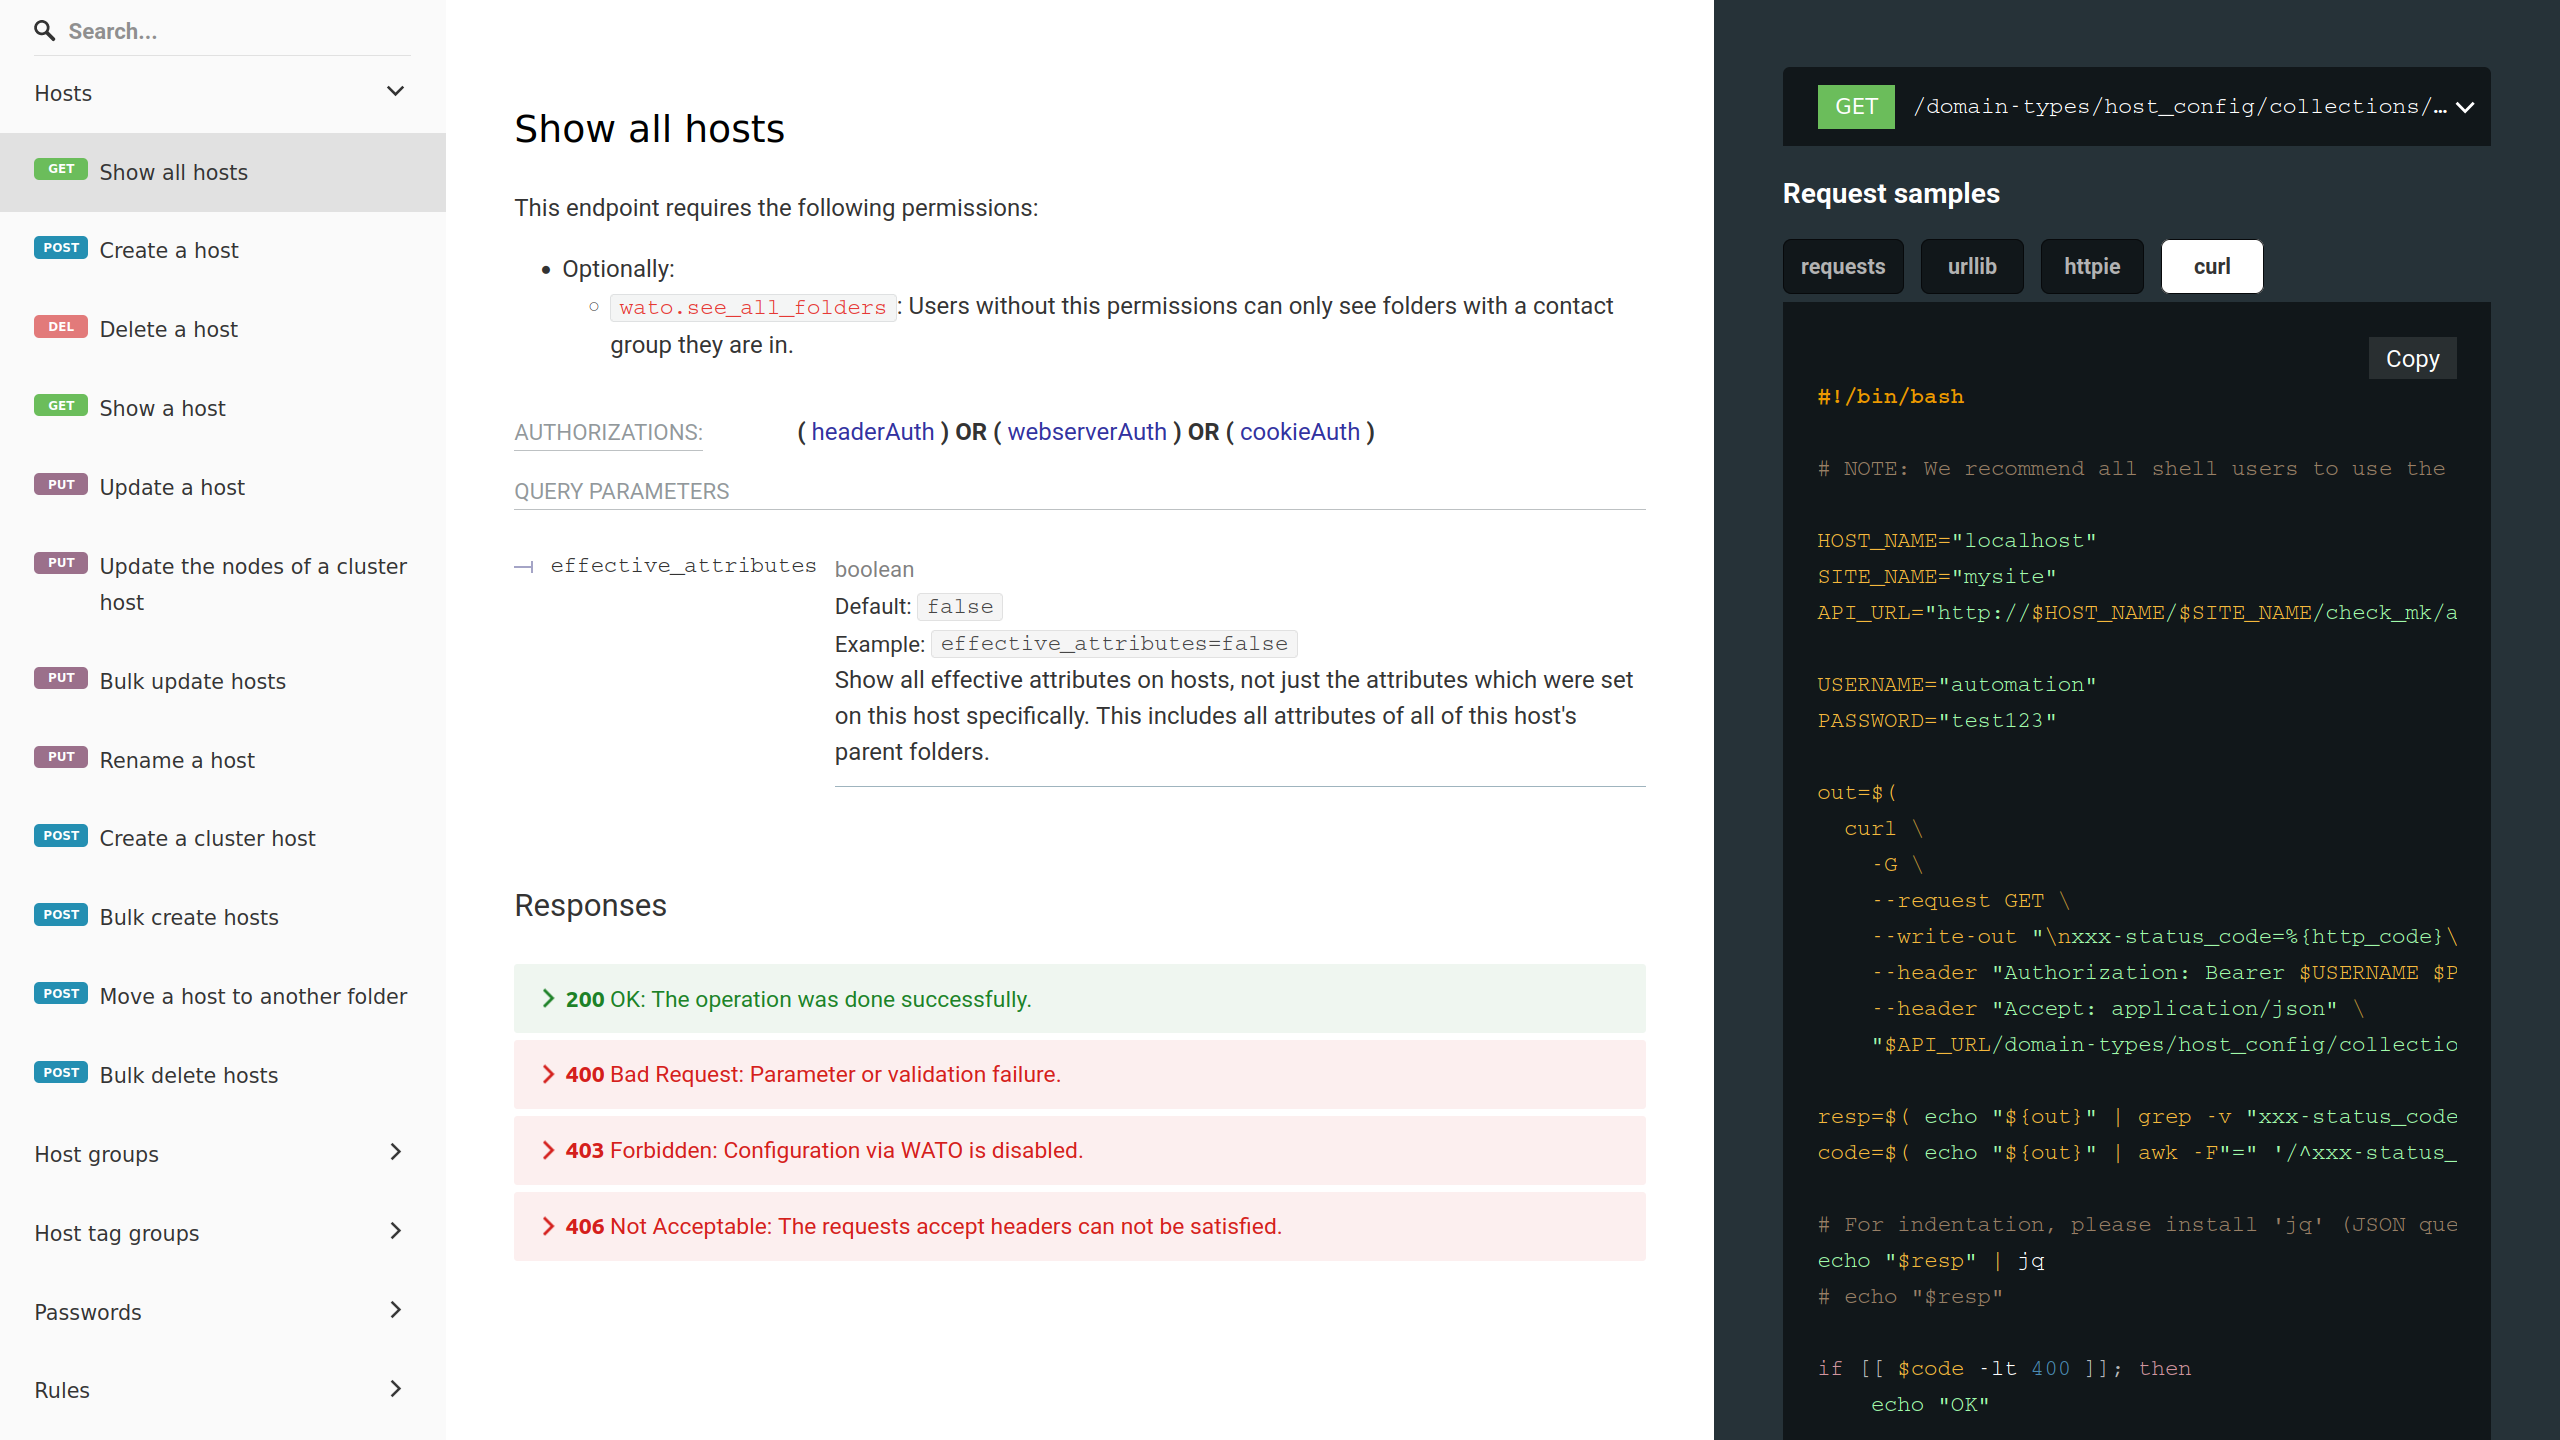
The left-hand section, Navigation, is used for orientation, searching and a quick jump to the exact description of the entries in the central section. The table of contents contains one entry for each API endpoint. An endpoint uses a URL to refer to the resource that the API provides (e.g. hosts), together with the method used to access the resource (e.g. GET to display a host). The endpoints are organised into several folders.
The central section, Content, contains the hard facts on the documentation: all information for defining a request (with parameters, value ranges, default values and descriptions) and the corresponding answers (also with all details). The possible answers are displayed in different colours, depending on whether the returned HTTP status code signals success or an error.
The right-hand section, Request samples, shows the method and URL for the endpoint selected in the content section, followed by several examples of requests: the payload in JSON format (if relevant for the endpoint) and code examples, e.g. for cURL, HTTPie, Python Requests and Python Urllib. Then follow the responses according to the HTTP status. All code examples can be copied to the clipboard with the Copy button.
The navigation section is scroll-synchronised with the other two sections, which means that if you scroll up or down in the content section, the navigation section automatically scrolls to the appropriate entry in the table of contents.
The responsive web design ensures that the example section does not appear in a very narrow browser window (the examples are then displayed below the corresponding method), and the navigation section is converted into a menu.
In all sections you will find content that you can show and hide, for example, the entries for the endpoints in the navigation section, and nested parameters in the content section. By clicking on > or Expand all you can show the hidden contents, and with ∨ or Collapse all you can hide them again.
In the next chapter you will learn how you can use the API documentation to create concrete requests from the information, send these requests to the Checkmk server, have them executed and monitor that execution and results.
3. Using the API
3.1. Authentification
In order to use the REST API in the Checkmk server from a client, the client must prove its identity. The REST API supports the following methods for authentication: Bearer, Web server and Cookie — in this order of precedence. This means, for example, that if authentication with Bearer is successful, none of the other methods will be checked.
Bearer or Header authentication
'Bearer' means the holder of an identity. The client authenticates itself with the credentials of a user set up on the Checkmk server. Ideally, this is the so-called automation user, which is provided in Checkmk for the execution of actions via an API. Bearer authentication is recommended for use in scripts.
For authentication, you need the user name and the corresponding so-called automation secret for machine accounts, i.e. the password for the automation user.
Both items of information must be transmitted to the Checkmk server in the header of each request.
In a newly-created site, the automation user will have already been created.
You can find it, like other users, under Setup > Users > Users.
Make sure that the roles and associated permissions for the automation user are set to allow you to execute your requests.
For the scripts presented in this article, the automation user is always used as the default example.
Web server authentication
For web server authentication, the REST API uses the HTTP authentication configured for the web server ('Basic' or 'Digest').
This authentication method is intended for large Checkmk installations with special requirements that are realised by using and configuring software modules for authentication of the Apache web server. If you want to use the web server authentication, you need to reconfigure the Apache web server of the Checkmk site itself.
Cookie authentication
Cookie authentication is a special case of authentication by API key. Every Checkmk user who is logged into Checkmk and has been assigned an HTTP cookie can use the REST API. Cookie authentication is used for trying out and testing with the REST API GUI. Whether requests can be executed depends on whether your Checkmk user account has the appropriate permissions.
3.2. Testing the API locally
To test the REST API, it is advisable to make the requests directly from the Checkmk server, i.e. in this example client and server are on the same computer.
If you are working as a site user, you can also use local variables such as $OMD_SITE, which refers to the name of the site.
In the following examples, we use the sample code contained in the API documentation for the command line program cURL, which enables data to be transferred to or from a server without user interaction, for example via HTTP.
The curl command is executed within a bash script.
For the preparation, create a script file to which the sample code is later copied:
OMD[mysite]:~$ touch rest-api_test.sh
OMD[mysite]:~$ chmod +x rest-api_test.sh
The REST API outputs all responses in a single-line JSON format.
Since formatted output is much easier to read, for formatted output the cURL sample code uses the command line JSON processor jq.
You can use the following command to check whether jq is installed:
OMD[mysite]:~$ jq --version
jq-1.6
and — if not — install the software from stedolan.github.io/jq/download/.
If you do not want to use jq, you will have to cope with the unformatted output.
Before starting, gather some basic information specific to your Checkmk configuration:
| Variable | Beispielwert | Bedeutung |
|---|---|---|
|
|
The Checkmk server’s hostname |
|
|
The Checkmk site name |
|
|
The automation user’s name |
|
|
The automation user’s password |
These variables are used in the sample code and must be edited by you before sending a request. In the table above you will also find the sample values used in the following.
3.3. Making requests using scripts
With a straightforward example we will now demonstrate how to use the REST API. Create a host with its services using a total of three requests. In principle, you proceed in the same way as you would with the Checkmk GUI:
Create a host
Perform a service discovery on the host
Activate the changes
Creating a host
Open the API documentation and select the entry for creating a host (Create a host) in the left navigation area:
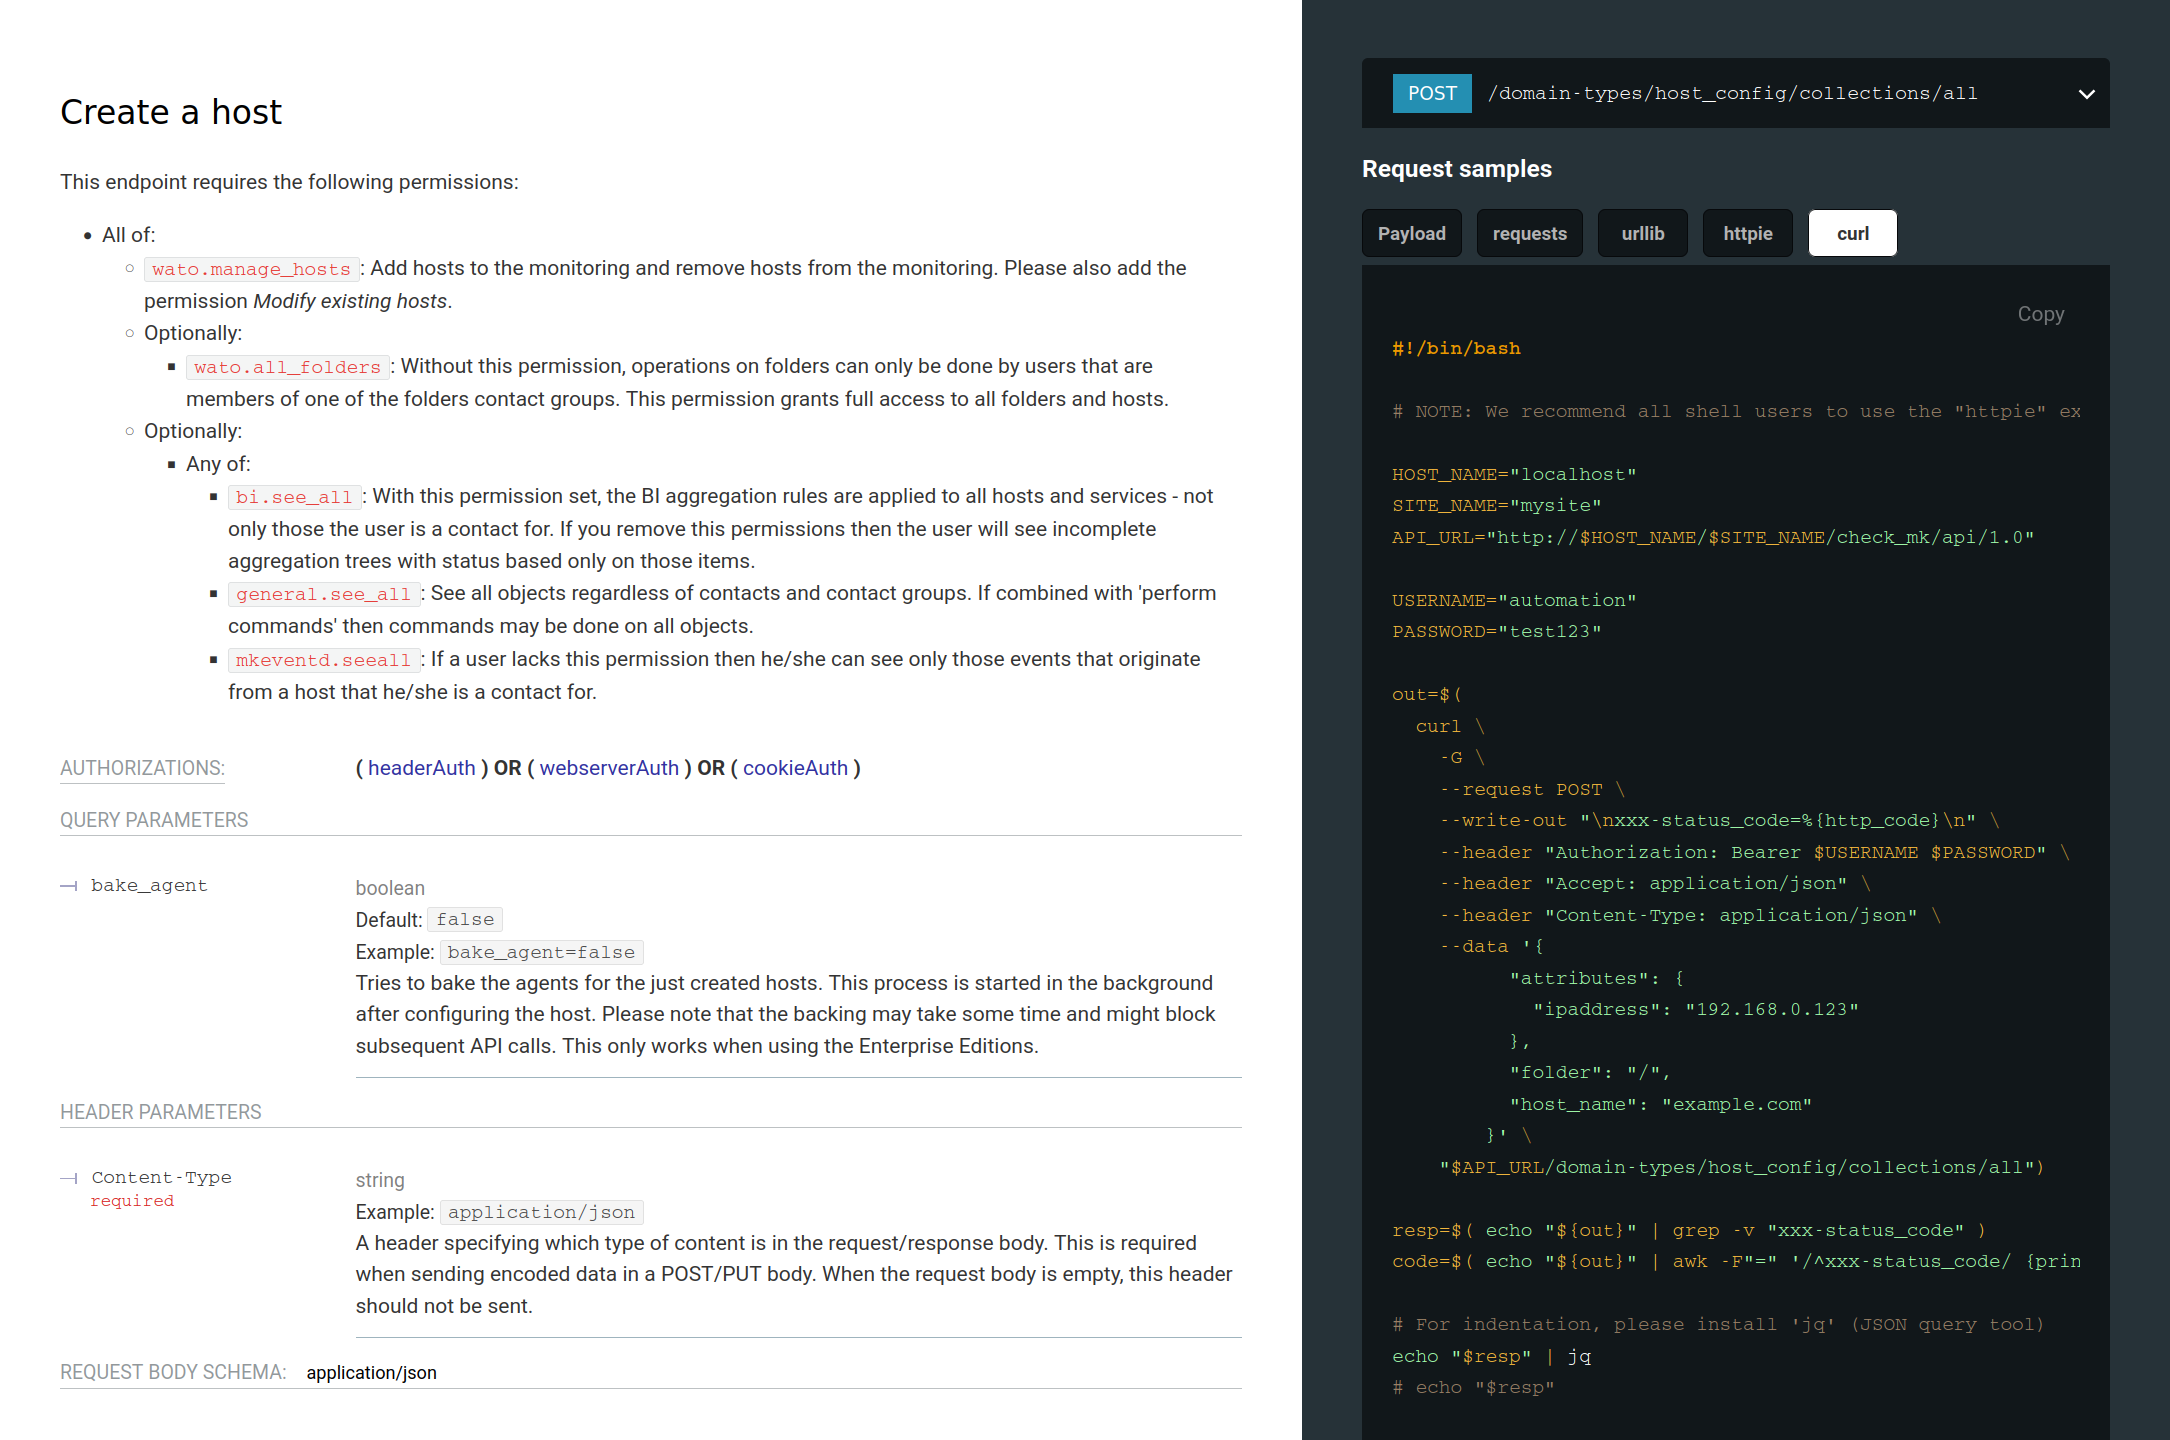
In the central part of the panel you can see the details for the selected request, which HTTP authentication is required (this is identical for all requests via the REST API), and the required and optional parameters. The name of the host and the folder in which it should be created is required. By default, the host is created in the Main directory. If you want to create the host in another folder, you may first need to make another API request (Show all folders) to view the existing folders to determine the ID of the one you want to use.
In our example, we want to create the host myhost123 with the IP address 192.168.0.42 in the Main folder.
In the API documentation, click the curl button in the right-hand example area and then click Copy to copy the cURL sample code to the clipboard.
Open the prepared script rest-api_test.sh and paste the clipboard’s contents into it:
#!/bin/bash

HOST_NAME="localhost"
SITE_NAME="mysite"
API_URL="http://$HOST_NAME/$SITE_NAME/check_mk/api/1.0"

USERNAME="automation"
PASSWORD="test123"

out=$(
  curl \
    --request POST \
    --write-out "\nxxx-status_code=%{http_code}\n" \
    --header "Authorization: Bearer $USERNAME $PASSWORD" \
    --header "Accept: application/json" \
    --header "Content-Type: application/json" \
    --data '{
          "attributes": {
            "ipaddress": "192.168.0.123"
          },
          "folder": "/",
          "host_name": "example.com"
        }' \
    "$API_URL/domain-types/host_config/collections/all")

resp=$( echo "${out}" | grep -v "xxx-status_code" )
code=$( echo "${out}" | awk -F"=" '/^xxx-status_code/ {print $2}')

# For indentation, please install 'jq' (JSON query tool)
echo "$resp" | jq
# echo "$resp"

if [[ $code -lt 400 ]]; then
    echo "OK"
    exit 0
else
    echo "Request error"
    exit 1
fi
In the first part of the sample code you will find the environment variables, then comes the curl command with the POST method on the resource whose URL is in the last line.
With the POST method, following the header lines (one of which defines the HTTP authentication), you will find the data section where the parameters for the new host are specified.
The remaining lines are used to prepare the output.
Note that the cURL sample code may contain more parameters than you might need for a specific situation.
For our example this is not the case and you only need to change the two existing parameters, host_name and ipaddress.
Now edit the sample code so that the result looks something like this:
#!/bin/bash

HOST_NAME="myserver"
SITE_NAME="mysite"
API_URL="http://$HOST_NAME/$SITE_NAME/check_mk/api/1.0"

USERNAME="automation"
PASSWORD="theautomationsecret"

out=$(
  curl \
    --request POST \
    --write-out "\nxxx-status_code=%{http_code}\n" \
    --header "Authorization: Bearer $USERNAME $PASSWORD" \
    --header "Accept: application/json" \
    --header "Content-Type: application/json" \
    --data '{
          "attributes": {
            "ipaddress": "192.168.0.42"
          },
          "folder": "/",
          "host_name": "myhost123"
        }' \
    "$API_URL/domain-types/host_config/collections/all")

resp=$( echo "${out}" | grep -v "xxx-status_code" )
code=$( echo "${out}" | awk -F"=" '/^xxx-status_code/ {print $2}')

# For indentation, please install 'jq' (JSON query tool)
echo "$resp" | jq
# echo "$resp"

if [[ $code -lt 400 ]]; then
    echo "OK"
    exit 0
else
    echo "Request error"
    exit 1
fi
If the jq command line JSON processor is not installed, you must comment out the line with jq in the above sample code and comment in the line following it. The result then looks like this:
# echo "$resp" | jq
echo "$resp"
OMD[mysite]:~$ ./rest-api_test.sh
% Total % Received % Xferd Average Speed Time Time Time Current
Dload Upload Total Spent Left Speed
100 3471 100 3319 100 152 14430 660 --:--:-- --:--:-- --:--:-- 15091
{
"links": [
{
"domainType": "link",
"rel": "self",
"href": "http://myserver/mysite/check_mk/api/1.0/objects/host_config/myhost123",
"method": "GET",
"type": "application/json"
},
{
"domainType": "link",
"rel": "urn:org.restfulobjects:rels/update",
"href": "http://myserver/mysite/check_mk/api/1.0/objects/host_config/myhost123",
"method": "PUT",
"type": "application/json"
},
[...]
{
"domainType": "link",
"rel": "urn:com.checkmk:rels/download",
"href": "http://myserver/mysite/check_mk/api/1.0/domain-types/agent/actions/download/invoke?os_type=windows_msi&host_name=myhost123",
"method": "GET",
"type": "application/json",
"title": "Download the windows_msi agent of the host."
}
],
"domainType": "host_config",
"id": "myhost123",
"title": "myhost123",
"members": {},
"extensions": {
"folder": "/",
"attributes": {
"ipaddress": "192.168.0.42",
"meta_data": {
"created_at": "2022-07-20T15:06:01.316714+00:00",
"updated_at": "2022-07-20T15:06:01.406772+00:00",
"created_by": "automation"
}
},
"effective_attributes": null,
"is_cluster": false,
"is_offline": false,
"cluster_nodes": null
}
}
OKIn the response, the first 3 lines contain information on the data transmission.
Then, under links, the API returns a selection of requests (heavily truncated in the above example) which can be applied to the host just created — as befits a REST API.
Finally, the API returns the ID and name (title) of the created host, the folder (/ for the main folder), and under attributes the attributes assigned to the host including its IP address.
Perform a service discovery on the host
Once the host myhost123 has been created, its services can be discovered.
To do this, select the entry for executing a service discovery (Execute a service discovery on a host) in the API documentation, copy the sample code into the script and customise it to match your configuration.
You can copy the first part with the environment variables 1:1 from the previous example.
In the curl command, change the name of the host to myhost123 and, if necessary, use the mode parameter to change the type of service discovery.
#!/bin/bash

HOST_NAME="myserver"
SITE_NAME="mysite"
API_URL="http://$HOST_NAME/$SITE_NAME/check_mk/api/1.0"

USERNAME="automation"
PASSWORD="theautomationsecret"

out=$(
  curl \
    --request POST \
    --write-out "\nxxx-status_code=%{http_code}\n" \
    --header "Authorization: Bearer $USERNAME $PASSWORD" \
    --header "Accept: application/json" \
    --header "Content-Type: application/json" \
    --data '{
          "host_name": "myhost123",
          "mode": "refresh"
        }' \
    "$API_URL/domain-types/service_discovery_run/actions/start/invoke")

resp=$( echo "${out}" | grep -v "xxx-status_code" )
code=$( echo "${out}" | awk -F"=" '/^xxx-status_code/ {print $2}')

# For indentation, please install 'jq' (JSON query tool)
echo "$resp" | jq
# echo "$resp"

if [[ $code -lt 400 ]]; then
    echo "OK"
    exit 0
else
    echo "Request error"
    exit 1
fi
Execute this script:
OMD[mysite]:~$ ./rest-api_test.sh
  % Total    % Received % Xferd  Average Speed   Time    Time     Time  Current
                                 Dload  Upload   Total   Spent    Left  Speed
100    75    0     0  100    75      0    937 --:--:-- --:--:-- --:--:--   937
OK
Success is reported succinctly at the end of the output with OK.
Activate the changes
Finally, the changes must be activated. The appropriate request is called Activate pending changes.
As before, take the first part with the environment variables from the previous examples.
In the data part of the curl command change the parameter sites and set it to the name of the site on which the changes should be activated:
#!/bin/bash

HOST_NAME="myserver"
SITE_NAME="mysite"
API_URL="http://$HOST_NAME/$SITE_NAME/check_mk/api/1.0"

USERNAME="automation"
PASSWORD="theautomationsecret"

out=$(
  curl \
    --request POST \
    --write-out "\nxxx-status_code=%{http_code}\n" \
    --header "Authorization: Bearer $USERNAME $PASSWORD" \
    --header "Accept: application/json" \
    --header "Content-Type: application/json" \
    --data '{
          "force_foreign_changes": false,
          "redirect": false,
          "sites": [
            "mysite"
          ]
        }' \
    "$API_URL/domain-types/activation_run/actions/activate-changes/invoke")

resp=$( echo "${out}" | grep -v "xxx-status_code" )
code=$( echo "${out}" | awk -F"=" '/^xxx-status_code/ {print $2}')

# For indentation, please install 'jq' (JSON query tool)
echo "$resp" | jq
# echo "$resp"

if [[ $code -lt 400 ]]; then
    echo "OK"
    exit 0
else
    echo "Request error"
    exit 1
fi
Execute this script:
OMD[mysite]:~$ ./rest-api_test.sh
  % Total    % Received % Xferd  Average Speed   Time    Time     Time  Current
                                 Dload  Upload   Total   Spent    Left  Speed
100   796  100   660  100   136   2784    573 --:--:-- --:--:-- --:--:--  3358
{
  "links": [
    {
      "domainType": "link",
      "rel": "self",
      "href": "http://myserver/mysite/check_mk/api/1.0/objects/activation_run/919c5dd4-727d-4c08-84d5-25f70ec233ac",
      "method": "GET",
      "type": "application/json"
    },
    {
      "domainType": "link",
      "rel": "urn:com.checkmk:rels/wait-for-completion",
      "href": "http://myserver/mysite/check_mk/api/1.0/objects/activation_run/919c5dd4-727d-4c08-84d5-25f70ec233ac/actions/wait-for-completion/invoke",
      "method": "GET",
      "type": "application/json"
    }
  ],
  "domainType": "activation_run",
  "id": "919c5dd4-727d-4c08-84d5-25f70ec233ac",
  "title": "Activation 919c5dd4-727d-4c08-84d5-25f70ec233ac was started.",
  "members": {},
  "extensions": {}
}
OK
The title text indicates that the activation has been started.
Again, the REST API suggests two useful follow-up requests under links:
to query the status of this activation, and to wait for its completion.
3.4. Making requests via the REST API GUI
With the REST API GUI you get a new perspective on the API. With this GUI you can interact directly with the API from the browser by sending requests to the server via cURL commands, and immediately see the responses. To do this, you have to do without the code examples of the REST API documentation in the API GUI — both views are optimised for their respective functions.
The REST API GUI is generated from the same source as the REST API documentation — the OpenAPI document — and therefore always provides functions that match the API.
You open the API GUI in the Checkmk GUI from the navigation bar, menu Help > Developer resources > REST API interactive GUI. The API GUI is displayed in a new browser window (or browser tab):

In the following we outline how you can exec ute the first request from the above example (create a host) with the REST API GUI instead of using a script:
Authenticate: The REST API GUI offers a dialog box for entering authentication information after clicking the Authorize button (on the right side above the entry for the first endpoint folder). However, you do not need to make any entries there, because as a logged-in Checkmk user you are already authorised to use the REST API via cookie authentication.
Select the endpoint: In the Hosts folder, select the endpoint Create a host and click Try it out.
Enter parameter values: In Request body overwrite the example values for
host_nameandipaddress.Send a request: Click Execute.
Check the response: Under Responses you will first see the sent cURL command and the URL of the endpoint. Then under Server response the response is displayed with HTTP status code and in Responses with the (multi-line formatted) REST API response.
The REST API GUI therefore offers you the opportunity to try out the functions of the API quickly and easily, and to familiarise yourself with the functions of the input values as well as with concrete responses.
3.5. Error correction
In contrast to the output from successful commands via script shown so far, the REST API shows you errors in the following way:
{
  "title": "The operation has failed.",
  "status": 401,
  "detail": "There are changes from other users and foreign changes are not allowed in this API call."
}
Request error
Depending on the error, the parameters displayed in the output may vary.
However, in status the HTTP status code, and in title they always receive a brief description of the cause of the error.
In most cases, detail will show you detailed information, as the name suggests.
In the above example, you can see that there are pending changes in Checkmk, but these were initiated by another user.
By default, only changes that have also been made via the API can be activated via the API.
In the next example, the helpful messages are also in the detailed information:
{
  "title": "Bad Request",
  "status": 400,
  "detail": "400 Bad Request: Failed to decode JSON object: Invalid \\escape: line 6 column 31 (char 136)"
}
Request error
The problem in the above example is that a parameter value does not adhere to the valid value range because the host name contains a slash.
The number of possible errors is of course much greater than the two we have presented here. However, you can see from the examples shown that in its output the REST API usually provides sufficient information on the cause and thus gives you clues for starting the analysis and troubleshooting.
4. Securing the API
Since sensitive data can be transferred during access via the REST API and — depending on the authorization of the automation user — considerable alterations could potentially be made to Checkmk, you should secure such access accordingly. Here you will find some of the available options:
Checkmk over HTTPS: Use the API exclusively over Hypertext Transfer Protocol Secure (HTTPS), otherwise user names, passwords, and also configuration data will be transmitted in clear text on the network.
Give the automation user a password of sufficient length. Since the password is usually only stored in a script, you can easily assign a very long one.
Be sure to pay careful attention to the authorization concept for the scripts you use to make requests to the API. The scripts may contain sensitive data such as configuration data, passwords, etc. Therefore make sure that only authorized users and groups can read these scripts.
5. Examples with REST API requests
In this chapter you will find examples that show how to perform commonly needed actions using the REST API.
The examples are again based on the sample code for the cURL command line program.
In contrast to the procedure in the chapter Using the API, however, here the requests are made as curl commands on the command line rather than by script.
This allows you to try out our examples right away — after you have customized them to suit your own environment.
In order to present the commands clearly here, we have only shown the lines from the sample code that are absolutely necessary for the command execution.
The REST API’s responses are by default unformatted, and you can format them by redirecting the output back to the command line JSON processor jq by appending a | jq to the end of a curl command.
More info on jq is provided earlier in this article in the chapter Testing the API locally.
As with the sample code in the API documentation, the examples in this chapter contain variables for assembling the base URL for the REST API on your Checkmk server and for setting the credentials for the automation user for the Bearer authentication used:
| Variable | Example value | Description |
|---|---|---|
|
|
Name of the Checkmk server |
|
|
Name of the Checkmk site |
|
|
Base URL of the REST API |
|
|
Name of the automation user |
|
|
Password of the automation user |
Before issuing the curl commands, you can tailor the variables to suit your environment using the following shell commands:
user@host:~$ HOST_NAME="myserver"; SITE_NAME="mysite"; API_URL="http://$HOST_NAME/$SITE_NAME/check_mk/api/1.0"; \
USERNAME="automation"; PASSWORD="theautomationsecret";
5.1. Hosts and folders
The requests described in this chapter can be found in the API documentation in the Hosts and Folders subfolders. The titles of the respective endpoints contained in the API documentation are the following headings.
Show all folders
Here all folders in the Setup are displayed — recursively starting from the Main folder — without listing the hosts they contain:
user@host:~$ curl -G \
--request GET \
--header "Authorization: Bearer $USERNAME $PASSWORD" \
--header "Accept: application/json" \
--data-urlencode 'parent=~' \
--data-urlencode 'recursive=true' \
--data-urlencode 'show_hosts=false' \
"$API_URL/domain-types/folder_config/collections/all"
Show all hosts in a folder
Here the hosts in the Main > Linux subfolder are requested:
user@host:~$ curl \
--request GET \
--header "Authorization: Bearer $USERNAME $PASSWORD" \
--header "Accept: application/json" \
"$API_URL/objects/folder_config/~linux/collections/hosts"
Create a folder
Here a subfolder Production Hosts is created in Main > Linux — in the file system as the directory production_hosts.
The new folder is thereby assigned the Productive system host tag from the predefined host tag group Criticality:
user@host:~$ curl \
--request POST \
--header "Authorization: Bearer $USERNAME $PASSWORD" \
--header "Accept: application/json"     \
--header "Content-Type: application/json" \
--data '{
    "attributes": {
        "tag_criticality": "prod"
    },
    "name": "production_hosts",
    "parent": "~linux",
    "title": "Production Hosts"
    }' \
"$API_URL/domain-types/folder_config/collections/all"
Create a host
Here, in the Main > Linux > Production Hosts folder, the host mylinuxserver is created with the IP address 192.168.0.123 and the Use piggyback data from other hosts if present host tag:
user@host:~$ curl \
--request POST \
--header "Authorization: Bearer $USERNAME $PASSWORD" \
--header "Accept: application/json" \
--header "Content-Type: application/json" \
--data '{
    "attributes": {
        "ipaddress": "192.168.0.123",
        "tag_piggyback": "auto-piggyback"
    },
    "folder": "~linux~production_hosts",
    "host_name": "mylinuxserver"
    }' \
"$API_URL/domain-types/host_config/collections/all"
Show a host
By displaying a host you receive a list of the attributes assigned to it. This additionally provides the HTTP ETag (entity tag) that you need to be able to modify a host. Modifying an object via REST API is not done using the object’s ID or title. Instead, the generated ETag is used, which is intended to prevent multiple competing requests from overwriting each other’s values for the same object.
The ETag is returned in the response header.
To display this header, call curl with the -v option (for verbose).
Here the host mylinuxserver is queried — and from the response only the line containing the ETag is shown:
user@host:~$ curl -vG \
--request GET \
--header "Authorization: Bearer $USERNAME $PASSWORD" \
--header "Accept: application/json" \
"$API_URL/objects/host_config/mylinuxserver"
...
< ETag: "57db3792f23bd81ca7447ba4885fa2865d0c78aed4753229b29e179e539da48b"
...
Update a host
Before making the change, get that host’s ETag as described in the preceeding section Show a host.
You then enter the ETag in the request header under If-Match.
Here, the host tag from the Piggyback group that was specified when the host was created is deleted, and the predefined tag API integrations if configured, else Checkmk agent is specified to replace it:
user@host:~$ curl \
--request PUT \
--header "Authorization: Bearer $USERNAME $PASSWORD" \
--header "Accept: application/json" \
--header "If-Match: "57db3792f23bd81ca7447ba4885fa2865d0c78aed4753229b29e179e539da48b"" \
--header "Content-Type: application/json" \
--data '{
    "remove_attributes": [
        "tag_piggyback"
    ],
    "update_attributes": {
        "tag_agent": "cmk-agent"
    }
    }' \
"$API_URL/objects/host_config/mylinuxserver"
Execute a service discovery on a host
To ensure that a service discovery actually delivers the expected services, on Linux and Windows hosts you must first install and register their respective monitoring agents.
Here, a service discovery is performed on the host mylinuxserver with the refresh option, which corresponds to the Full service scan button in the Checkmk GUI:
user@host:~$ curl \
--request POST \
--header "Authorization: Bearer $USERNAME $PASSWORD" \
--header "Accept: application/json" \
--header "Content-Type: application/json" \
--data '{
    "host_name": "mylinuxserver",
    "mode": "refresh"
    }' \
"$API_URL/domain-types/service_discovery_run/actions/start/invoke"
Bulk create hosts
Here, two hosts are created in the Main > Linux > Production Hosts folder: the first host with only an IP address, and the second host with a parent host and two labels in addition to its IP address:
user@host:~$ curl \
--request POST \
--header "Authorization: Bearer $USERNAME $PASSWORD" \
--header "Accept: application/json" \
--header "Content-Type: application/json" \
--data '{
	"entries": [
	{
	"attributes": {
	    "ipaddress": "192.168.0.130"
	},
	"folder": "~linux~production_hosts",
	"host_name": "mylinuxserver02"
	},
	{
	"attributes": {
	    "ipaddress": "192.168.0.131",
	    "parents": [ "router01" ],
	    "labels": {
	    	"color": "blue-metallic",
	    	"admin": "Fozzie Bear"
	    }
	},
	"folder": "~linux~production_hosts",
	"host_name": "mylinuxserver03"
	}
	]
	}' \
"$API_URL/domain-types/host_config/actions/bulk-create/invoke"
Activate pending changes
Before the complex action of renaming a host can be tackled, it is necessary to activate all changes that have accumulated in its configuration environment.
Here the changes for the site mysite are all activated in a single action:
user@host:~$ curl \
--request POST \
--header "Authorization: Bearer $USERNAME $PASSWORD" \
--header "Accept: application/json" \
--header "Content-Type: application/json" \
--data '{
    "force_foreign_changes": false,
    "redirect": false,
    "sites": [
        "mysite"
     ]
     }' \
"$API_URL/domain-types/activation_run/actions/activate-changes/invoke"
Rename a host
A new name is also going to change the host.
Therefore, first get the host’s current ETag, e.g. from mylinuxserver, as described in the Show a host section, and enter this into the request header under If-Match.
Here the host is being renamed as mylinuxserver01:
user@host:~$ curl \
--request PUT \
--header "Authorization: Bearer $USERNAME $PASSWORD" \
--header "Accept: application/json" \
--header "If-Match: "a200832df1b3c5ebe8f30809177630abbdcf8f7cbd9d0f69bd9f229b359f4d00"" \
--header "Content-Type: application/json" \
--data '{
	"new_name": "mylinuxserver01"
	}' \
"$API_URL/objects/host_config/mylinuxserver/actions/rename/invoke"
6. Comparison of the REST API and the Web API
This chapter gives you an overview of the functions available to you via the REST API and via the Web API. The following table is structured according to the endpoints that you will find in the left navigation area of the REST API documentation. In the table, the column for the REST API contains the HTTP methods (supplemented with context information in case of ambiguity) and the column for the Web API contains its commands.
| Function | Action | REST API | Web API |
|---|---|---|---|
Acknowledge problems |
Acknowledge for hosts |
POST host |
- |
Acknowledge for services |
POST service |
- |
|
Downtime |
Show |
GET |
- |
Show all |
GET all |
- |
|
Create a host |
POST host |
- |
|
Create a service |
POST service |
- |
|
Delete |
POST delete |
- |
|
Host status |
Show hosts with specific states |
GET |
- |
Service status |
Show service of a host |
GET show_service |
- |
Show services of a host |
GET services |
- |
|
Show all services |
GET all |
- |
|
Miscellaneous |
Show version information |
GET version |
- |
Agent |
Show all agents |
GET all |
- |
Show the status of automatic deployment |
GET automatic-deployment |
- |
|
Show the baking status |
GET baking_status |
- |
|
Show agent configuration |
GET agent_hash |
- |
|
Download agent by host name and operating system |
GET download_by_host |
- |
|
Download agent by hash and operating system |
GET download_by_hash |
- |
|
Sign all agents |
POST sign |
- |
|
Bake all agents |
POST bake |
bake_agents |
|
Bake and sign all agents |
POST bake_and_sign |
- |
|
Download agents shipped with Checkmk |
GET download |
- |
|
Activate changes |
Wait for activation completion |
GET wait-for-completion |
- |
Show the activation status |
GET activation_run |
- |
|
Show all currently running activations |
GET collections running |
- |
|
Activate pending changes |
POST |
activate_changes |
|
Business Intelligence (BI) |
Delete BI rule |
DEL bi_rule |
- |
Show BI rule |
GET bi_rule |
- |
|
Create BI rule |
POST bi_rule |
- |
|
Update BI rule |
PUT bi_rule |
- |
|
Delete BI aggregation |
DEL bi_aggregation |
- |
|
Show BI aggregation |
GET bi_aggregation |
- |
|
Create BI aggregation |
POST bi_aggregation |
- |
|
Update BI aggregation |
PUT bi_aggregation |
- |
|
Show all BI packs |
GET all bi_pack |
- |
|
Delete BI pack |
DEL bi_pack |
- |
|
Show BI pack |
GET bi_pack |
- |
|
Create BI pack |
POST bi_pack |
- |
|
Update BI pack |
PUT bi_pack |
- |
|
Show status of BI aggregations |
GET aggregation_state |
- |
|
Contact group |
Show all |
GET all |
get_all_contactgroups |
Create |
POST |
add_contactgroup |
|
Delete |
DEL |
delete_contactgroup |
|
Show |
GET |
- |
|
Update |
PUT |
edit_contactgroup |
|
Bulk update |
PUT bulk-update |
- |
|
Bulk create |
POST bulk-create |
- |
|
Bulk delete |
POST bulk-delete |
- |
|
Folder |
Show all hosts of a folder |
GET collections hosts |
- |
Show all |
GET all |
get_all_folder |
|
Create |
POST |
add_folder |
|
Delete |
DEL |
delete_folder |
|
Show |
GET |
get_folder |
|
Update |
PUT |
edit_folder |
|
Bulk update |
PUT bulk-update |
- |
|
Move |
POST move |
- |
|
Host |
Show all |
GET all |
get_all_hosts |
Create |
POST |
add_host |
|
Delete |
DEL |
delete_host |
|
Show |
GET |
get_host |
|
Update |
PUT |
edit_host |
|
Update cluster node |
PUT nodes |
- |
|
Bulk update |
PUT bulk-update |
- |
|
Rename |
PUT rename |
- |
|
Create cluster host |
POST clusters |
- |
|
Bulk create |
POST bulk-create |
- |
|
Move |
POST move |
- |
|
Bulk delete |
DEL bulk-delete |
delete_hosts |
|
Host group |
Show all |
GET all |
get_all_hostgroups |
Create |
POST |
add_hostgroup |
|
Delete |
DEL |
delete_hostgroup |
|
Show |
GET |
- |
|
Update |
PUT |
edit_hostgroup |
|
Bulk update |
PUT bulk-update |
- |
|
Bulk create |
POST bulk-create |
- |
|
Bulk delete |
POST bulk-delete |
delete_hosts |
|
Host tag group |
Delete |
DEL |
- |
Show |
GET |
- |
|
Update |
PUT |
set_hosttags |
|
Show all |
GET all |
get_hosttags |
|
Create |
POST |
- |
|
Password (in password store) |
Delete |
DEL |
- |
Show |
GET |
- |
|
Update |
PUT |
- |
|
Show all |
GET all |
- |
|
Create |
POST |
- |
|
Rule |
Show all |
GET all |
- |
Create |
POST |
set_ruleset |
|
Delete |
DEL |
- |
|
Show |
GET |
- |
|
Move |
POST move |
- |
|
Rule set |
Search |
GET all |
get_ruleset_info |
Show |
GET |
get_ruleset |
|
Service discovery |
Show the current service discovery result |
GET service_discovery |
- |
Show services of a service discovery status |
GET collections[1] |
- |
|
Show last service discovery background job |
GET service_discovery_run |
- |
|
Show status of a bulk service discovery job |
GET discovery-run |
- |
|
Update service discovery status of a service |
PUT |
- |
|
Run service discovery on a host |
POST service_discovery_run |
discover_services |
|
Run service discovery on a host |
POST discover_services[1] |
discover_services |
|
Run bulk service discovery |
POST bulk-discovery-start |
- |
|
Service group |
Show all |
GET all |
get_all_servicegroups |
Create |
POST |
add_servicegroup |
|
Delete |
DEL |
delete_servicegroup |
|
Show |
GET |
- |
|
Update |
PUT |
edit_servicegroup |
|
Bulk update |
PUT bulk-update |
- |
|
Bulk create |
POST bulk-create |
- |
|
Bulk delete |
POST bulk-delete |
- |
|
Time period |
Delete |
DEL |
- |
Show |
GET |
- |
|
Update |
PUT |
- |
|
Show all |
GET all |
- |
|
Create |
POST |
- |
|
User |
Delete |
DEL |
delete_users |
Show |
GET |
- |
|
Update |
PUT |
edit_users |
|
Show all |
GET all |
get_all_users |
|
Create |
POST |
add_users |
|
Graph |
Get |
- |
get_graph |
Site |
Show |
- |
get_site |
Update |
- |
set_site |
|
Delete |
- |
delete_site |
|
Login |
- |
login_site |
|
Logout |
- |
logout_site |