1. Basics
To ensure that your monitoring data is backed up in the event of a hardware malfunction or other destruction, via the web interface you can configure backups of your appliance data.
To actually back up the data, it must be stored on another device, a file server for example. To do this, first configure the network share to be used for the backup via the file system management. You then set this up as a backup target in the backup configuration. As soon as you have done this, you can create a backup job which then stores a backup of your appliance data to the network share at the specified intervals.
The full data backup includes all configurations you have made on the unit, installed files and your monitoring sites.
The backup is performed (online) during normal operations.
2. Automated backup
To set up an automatic backup, configure one or more backup jobs. One backup per backup job is stored on the backup target. When the subsequent backup is completed, the previous backup will be deleted. This means that you must consider that you will temporarily need twice as much memory on the target system.
A backup job itself does not manage multiple backup generations. Therefore, if you want to keep multiple copies of a particular backup over a longer period of time, you must create these yourself.
3. Configuring backups
First configure your network shares with the help of the file system management.
Here in the example, a network share is configured under the file path /mnt/auto/backup.
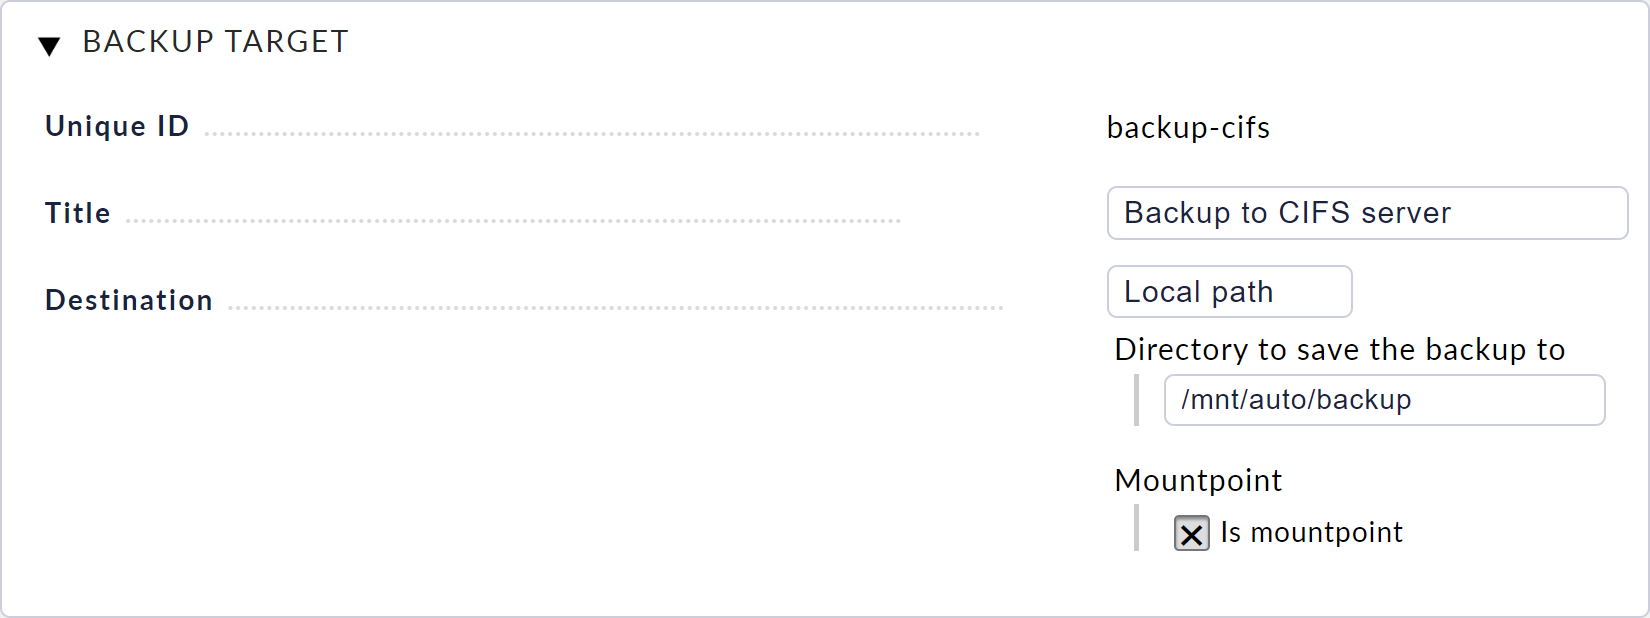
Now select Device backup from the main menu of the web interface and open the backup targets from there via Backup targets.
Create a new target via New backup target.
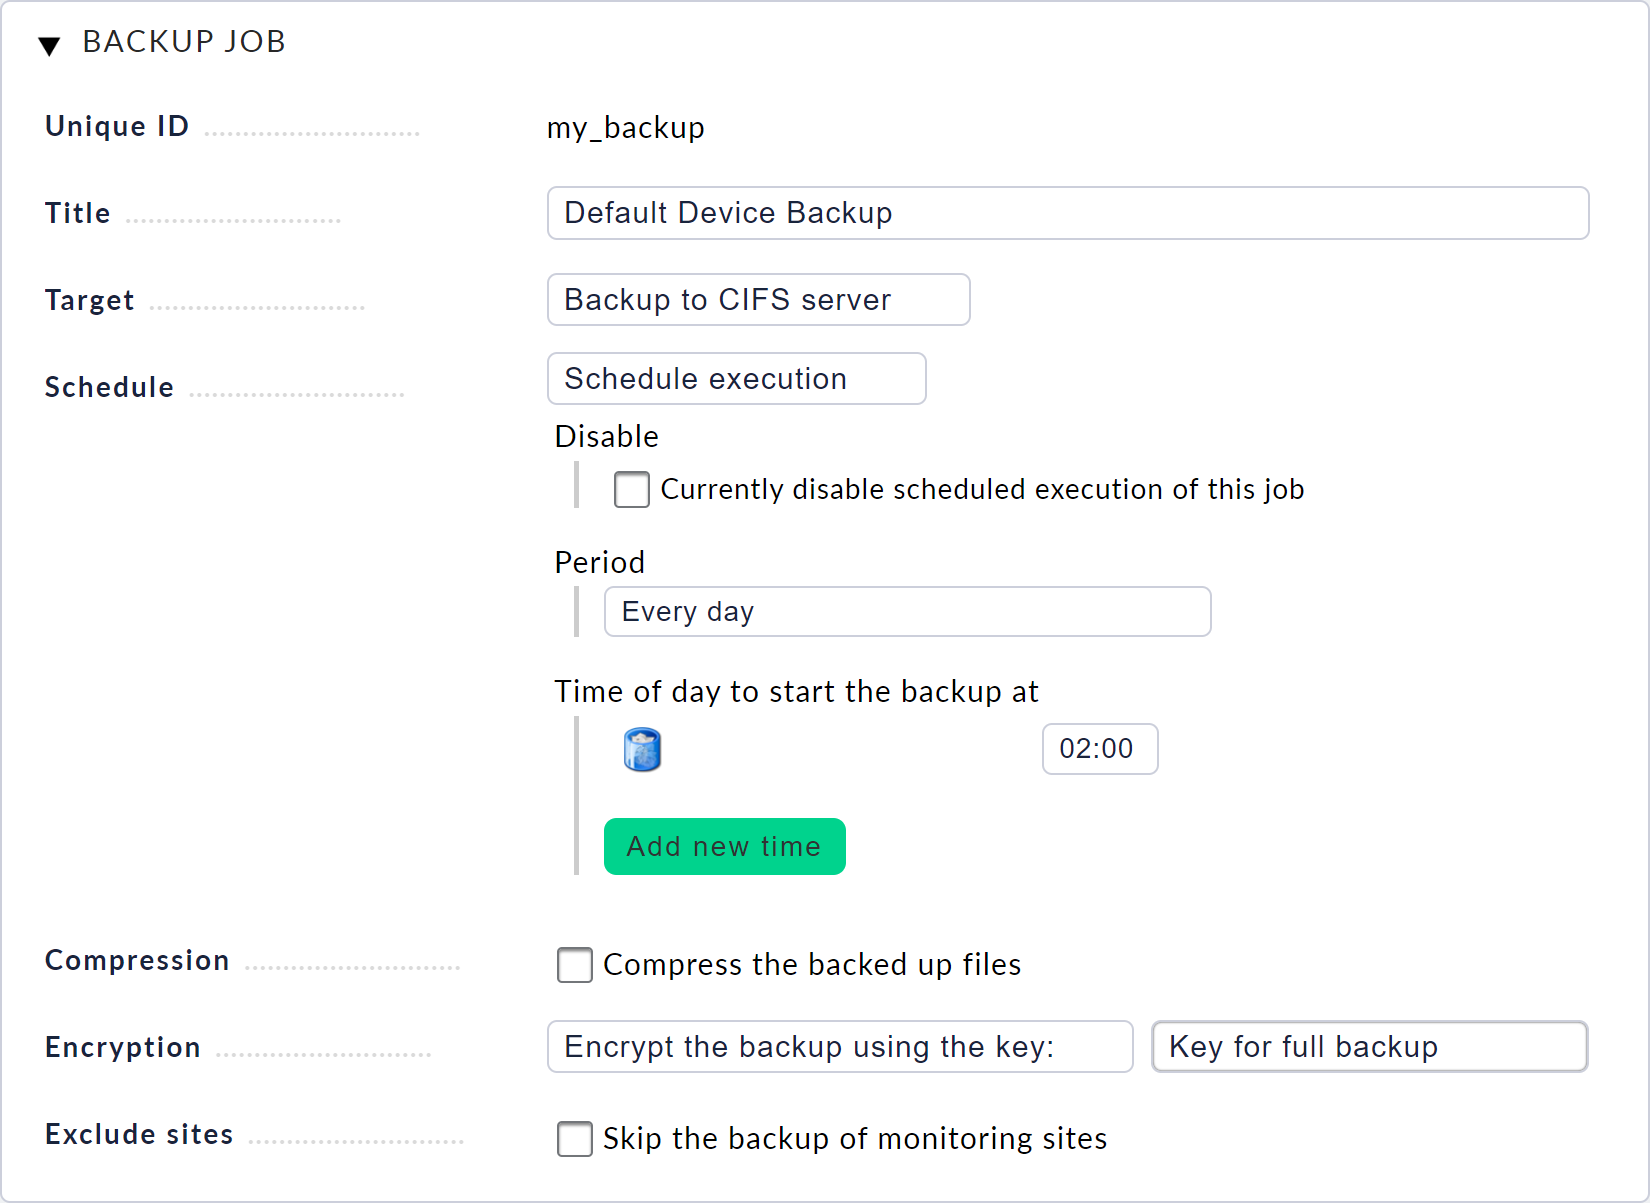
You can freely choose the ID and the title.
Under Directory to save the backup to configure the file path for the mounted network share, here /mnt/auto/backup.
The option Is mountpoint should be active when you back up to a network share.
This allows the backup to check whether the network share is actually mounted before saving.
Once you have created the backup target, return to the Device backup page and select New job. Here you can again enter an ID and a title. Then select the backup target you have just created and specify the desired execution interval.
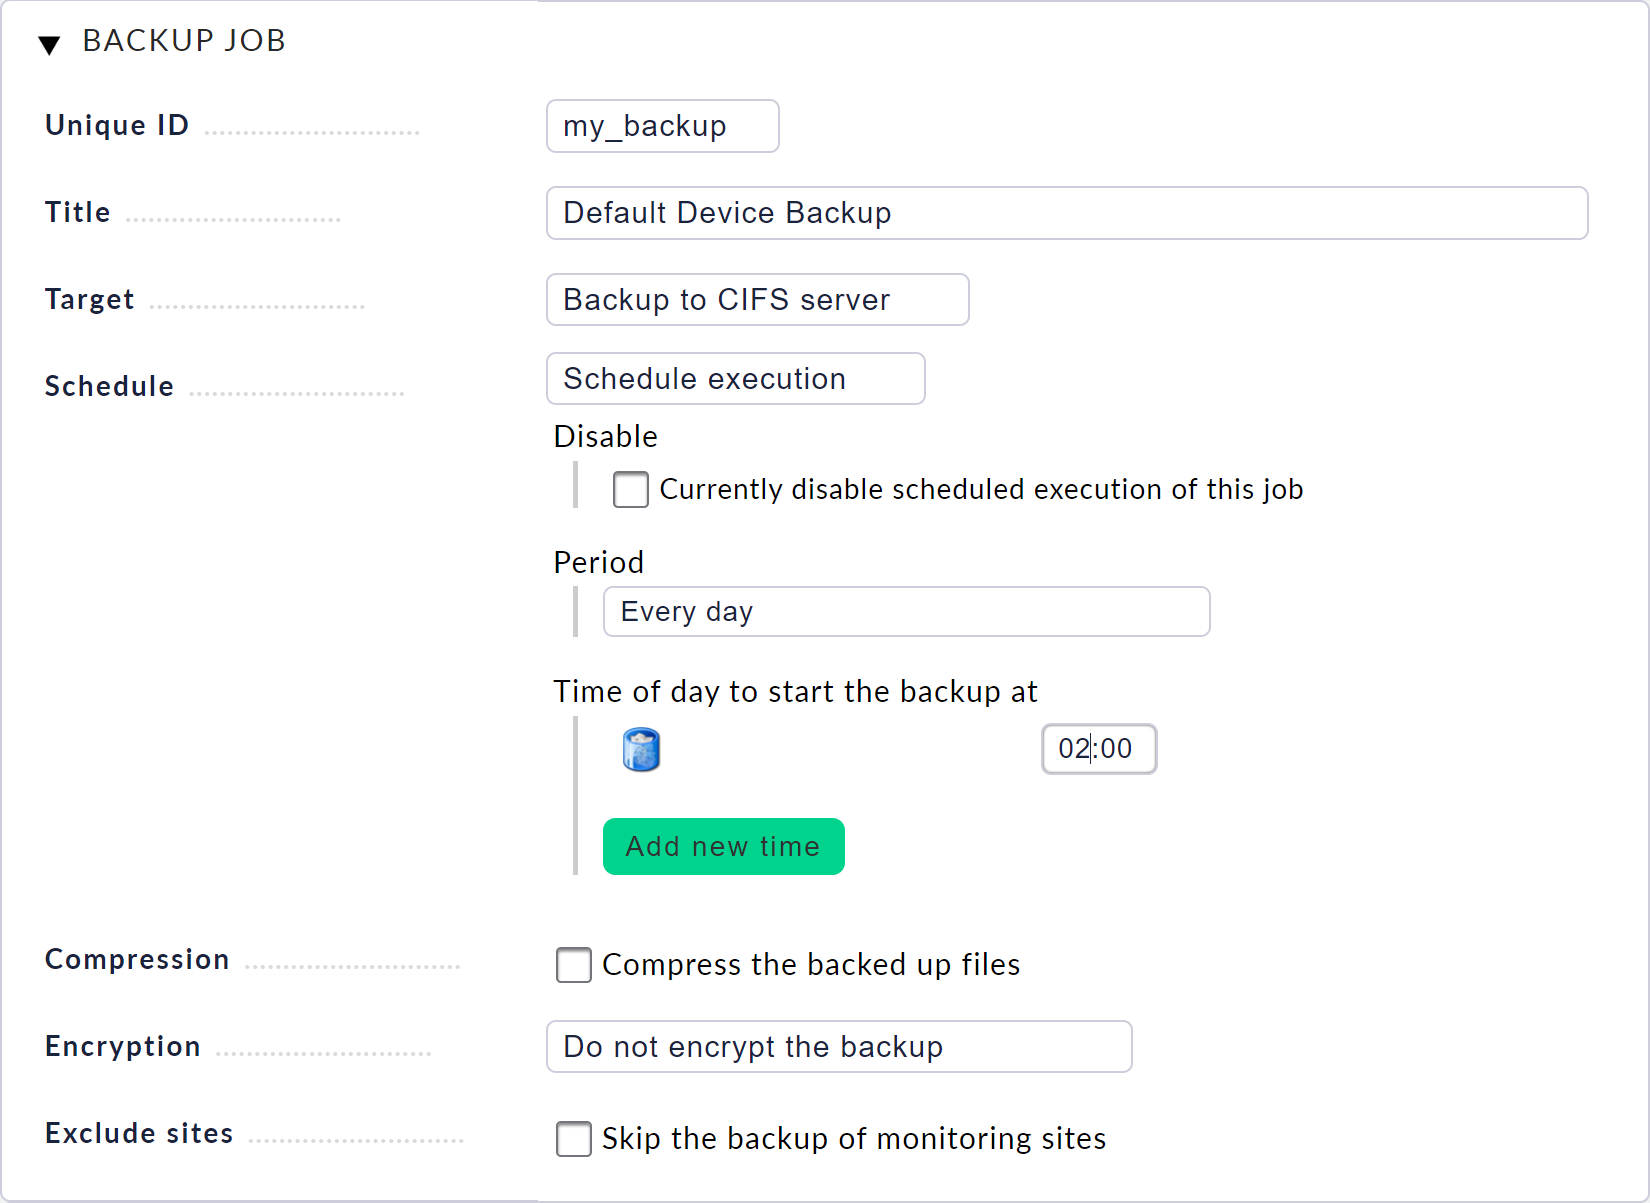
After saving, you will see an entry for your new backup job on the Device backup page. The time of the job’s next execution is shown at the end of the line. When the job is running or has been completed, its status will be displayed in this view. Here you can also start a job manually or cancel running backups.

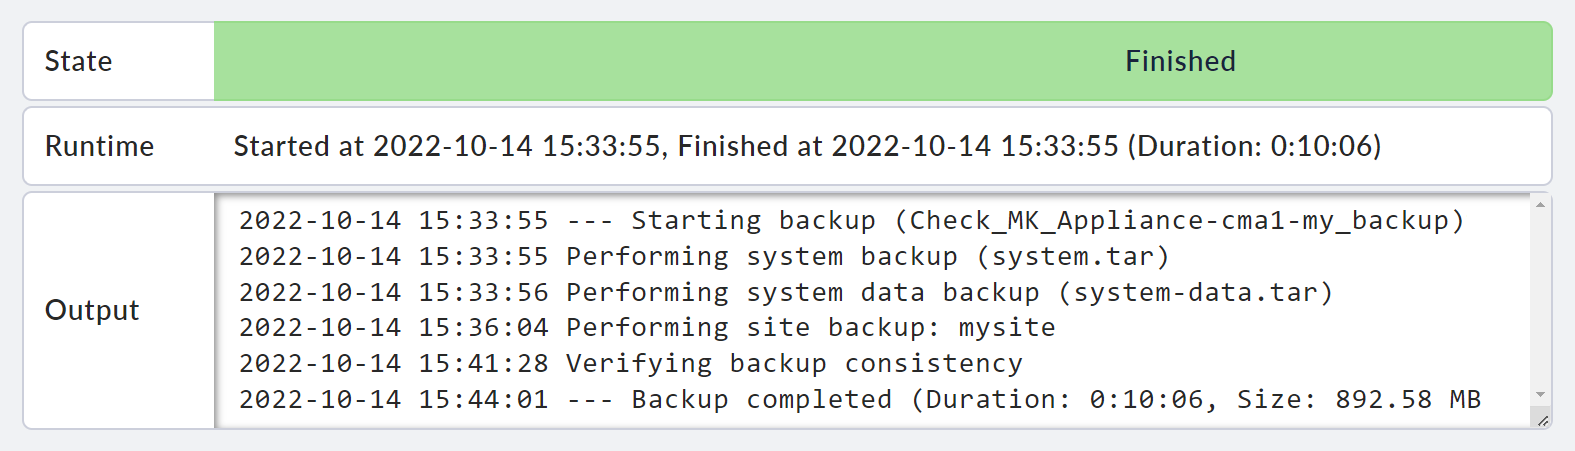
Start the job you have just set up by clicking on the play icon. You will now see in the table that the job is currently being executed. Click on the log icon to display the progress of the job in the form of log output.
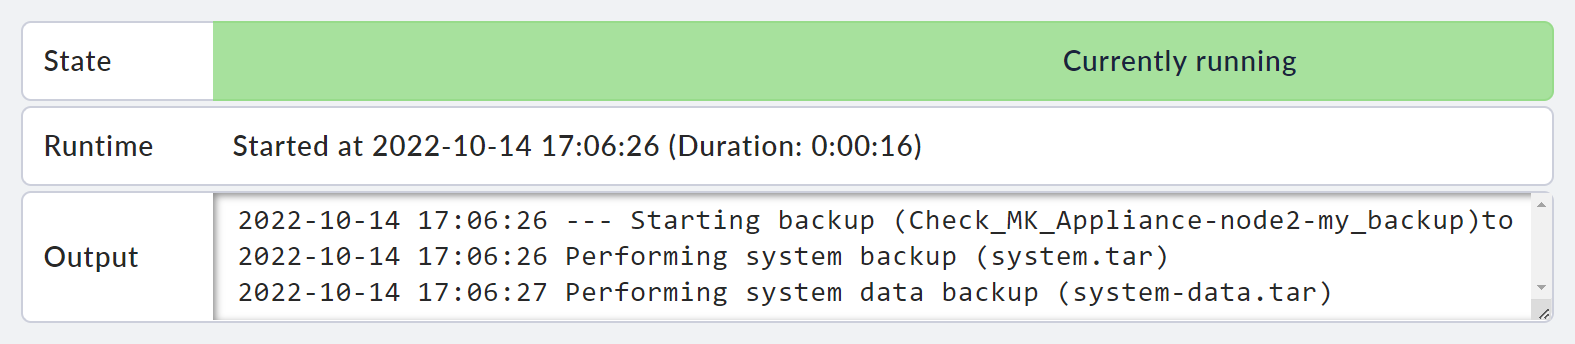
Once the backup has been completed, this will also be displayed in the table.
4. Backup formats
Each backup job creates a directory on the backup target. This directory is named in accordance with the following scheme:
Checkmk_Appliance-[HOSTNAME]-[LOCAL_JOB_ID]-[STATE]
During the backup, a directory with the suffix -incomplete will be stored.
When the backup has been completed, this directory is renamed and the suffix is changed to -complete.
In the directory there is a file mkbackup.info which contains meta information on the backup.
In addition to this file, several archives are stored in the directory.
The archive with the name system contains the appliance configuration, and system-data contains the data from the data file system — excluding the monitoring sites.
The monitoring sites are stored in separate archives using the site-[SITENAME] naming scheme.
Depending on the mode of a backup, these files are stored with the file extensions .tar for uncompressed and unencrypted, .tar.gz for compressed but unencrypted and .tar.gz.enc for compressed and encrypted archives.
5. Encryption
If you want to encrypt the backup of your data, you can configure this directly from the web interface. Your backed up files are completely encrypted before they are transferred to the backup target. The encryption is done using a previously-created backup key. This key is protected by a password, which you must specify when creating the key and keep in a safe place together with the key, as this is the only way to restore an encrypted backup.
To do this, open the Device backup page and select the Backup keys option. From here, create a new backup key. When specifying the password, make sure it is sufficiently complex.

Once you have created the key, download it and keep it in a safe place.
An encrypted backup can only be restored with the backup key and the corresponding password.
From the Device backup page, edit the backup job that is to create encrypted backups, activate the Encryption item there and select the backup key you have just created.
After you have confirmed the dialog, the next backup will automatically be encrypted.
6. Compression
It is possible to compress the backed up data during the copying process. This can be useful if you need to save bandwidth or have limited space on the target system.
However, please note that such compression requires significantly more CPU time and therefore prolongs the backup process. As a rule, it is recommended to not activate compression.
7. Restoring a backup
Using the mechanisms built into the web interface, you can only restore a backup in its entirety. Restoring individual files via the web interface is not available. This is however possible through the command line by manually unpacking from the backup.
If you want to restore a complete backup to a running device, select Restore on the Device backup page. On the following page, select the backup target from which you want to restore the backup.

Select the backup directory, you will see a list of all of the backups available there.
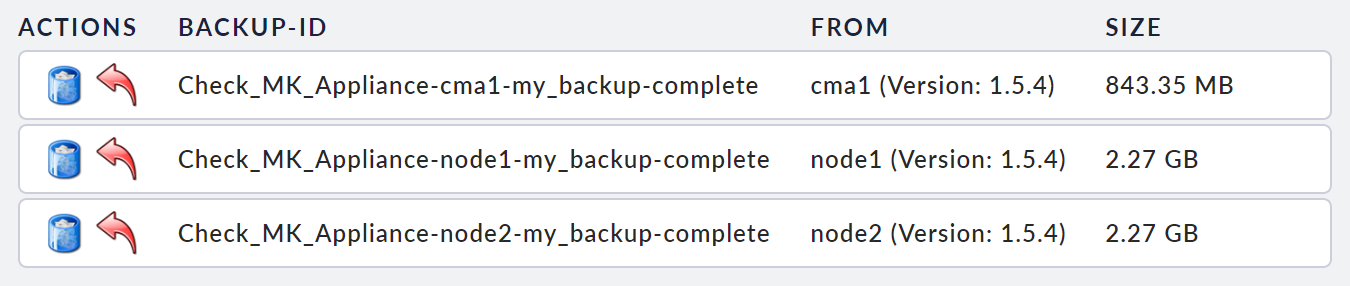
To start a restore, click on the arrow icon next to the backup you want to retrieve. After a confirmation prompt, the restore will start and you will be returned to the Restore starting page. You can check the current status of the restore by refreshing this page.
When the restore has completed, your device will be restarted automatically, and following the device restart, the restore will be complete.
7.1. Disaster Recovery
If you need to perform a complete restore of an appliance, the disaster recovery procedure is as follows:
Start with an appliance in the factory state (a new, identical appliance or an existing appliance reset to its factory state)
Make sure that the firmware version matches the version of the backup
Configure at least the following settings on the console:
Network settings
Access to the web interface
In the web interface, proceed as follows:
Select the backup target from which you want to restore.
Upload the backup key for the backup to be restored, if necessary.
Finally, start the restore as described in the previous chapter.
8. Monitoring
For each configured backup job, Checkmk’s Service Discovery automatically finds a new Backup [JOB-ID] service on the device.
This service informs you of any problems with the backup and records helpful statistics such as the size and time that it took to complete the backup.
9. Special points that apply for clusters
The entire configuration of the backup, including backup keys, is synchronized between the cluster nodes. The cluster nodes carry out their backups separately from each other, i.e. they also create separate directories for their backups in the backup target.
The active cluster node backs up the complete device including the data from the file system and the monitoring sites. The inactive cluster node only backs up its local device configuration and accordingly only requires a few megabytes of storage space.
Accordingly, you can restore the monitoring sites only with the backup of the active cluster node.