1. Introduction
Checkmk supports the concept of labels, of which you can assign any number to a host. Labels and host tags behave quite similarly:
Labels are ‘attached’ to hosts in the same way as tags.
Labels can be used as conditions for rules in the same way as tags.
Labels are constructed similarly to tags on the
key:valueprinciple.
So why is there a new concept here? Well, the IT world is changing and becoming much more dynamic. Cloud and container systems such as Amazon Web Services (AWS), Microsoft Azure and Kubernetes autonomously create and delete objects – which correspond to hosts in Checkmk. In these technologies labels and tags play a big role because they make the connections between the monitored objects and their functions. The host names, on the other hand, are increasingly random and meaningless.
Checkmk can create such dynamic hosts automatically with the dynamic host configuration, and can also receive information on any labels/tags that are already present. These labels/tags can then be used for rule conditions, searches, evaluations, dashboards, and other tasks.
Of course the question arises — why we do not simply map such dynamic labels to the existing concept of host tags. In fact that is also a very obvious conclusion at first look. However host tags have a very important property which would make that very difficult and complicated: Checkmk rigidly defines which tags and tag groups are present. Everything is well-defined. Every host has exactly one tag from every group. Everyone can rely on it. Typing errors in the spelling of tags cannot occur — not even with hosts which do not stick to the scheme — because its compliance is strictly controlled by Checkmk. This is very important and useful in very heterogeneous environments with many thousands of manually-managed hosts.
By contrast, dynamic labels from Kubernetes and Co are effectively ‘freeform’, and even if they do follow a scheme, this is unknown to Checkmk. In addition you might be monitoring several different platforms, which in turn use labels in very different ways.
That is why a Checkmk labels concept has been introduced which suits this growing dynamic. Of course you can also use the labels even if you don’t use connections to Cloud environments.
To answer the question "When to use labels and when to use host tags?" the following consideration may help: Labels may be present, host tags are always present. Host tags are therefore suitable for properties that are always present (or at least should be) and are usually specified by the Checkmk administrator for the entire system to be monitored and for all Checkmk users. Individual Checkmk users can implement the specific requirements in their area of responsibility by using labels. For a manageable local structure, labels can fill in the gaps left vacant by the global administration, showing their advantages: They can be quickly and easily created — and likewise also deleted.
Here are the features of labels:
Labels do not have to be predefined anywhere. There is no fixed scheme for labels. Everything is free form. Everything is allowed.
Each host can have as many labels as you like. These can be maintained manually, defined via rules, or created automatically.
Labels are structured according to the
key:valueprinciple. Each host may only have one value per key. So a host that has the labelfoo:barcannot at the same time havefoo:bar2.Unlike the host tags, both the key and the value — except for the colon (:) — may contain any characters.
There is no distinction between ID and title (or displayed name): the key of the label is both at the same time.
Labels have the following tasks:
They form a basis for conditions in configuration rules, for example: 'All hosts with the label
os:windowsshould be monitored in the same way.'It is very easy to store additional information or comments about a host (for example,
location:RZ 74/123/xyz) and to display this in views for example.
2. Creating labels
2.1. Explicit labels
Labels can be assigned to a host in a number of ways.
The first of these is simple: On the host properties page, which is displayed when you create or edit a host in the Setup, you can give it as many labels as you like:

Activate Labels with the checkbox, then click in the Add some label field,
enter the label definition in the form key:value and finish with Enter.
You can edit an existing label by clicking it in its text, or delete it with the little cross.
Note: Both the key and the value of a label may include any character — except the colon (:)! However you should think carefully about the use of characters and upper/lower case, since if you later define conditions via labels, then the spelling of both the key and the value must be strictly observed.
Of course labels can also be inherited from a folder.
Like other attributes, labels can be in subfolders or at the host, then as needed be overwritten again — individually in fact.
If for example, the label location:munich is set in the folder, this will be inherited by all hosts in this folder
which do not themselves already have the label location defined.
Other labels a host may have will remain unaffected.
Explicitly-defined labels for hosts or folders appear violet in the list of hosts:

2.2. Creating labels using rules
As usual in Checkmk, attributes can also be assigned to hosts and services by rules. This will make you independent of the folder structure, and it also applies to the labels. There is a Host labels rule set for this function, which you can quickly find via a search in the Setup menu.
The following rule adds the hw:real label to all hosts in the Bavaria folder which have the Real Hardware host tag:
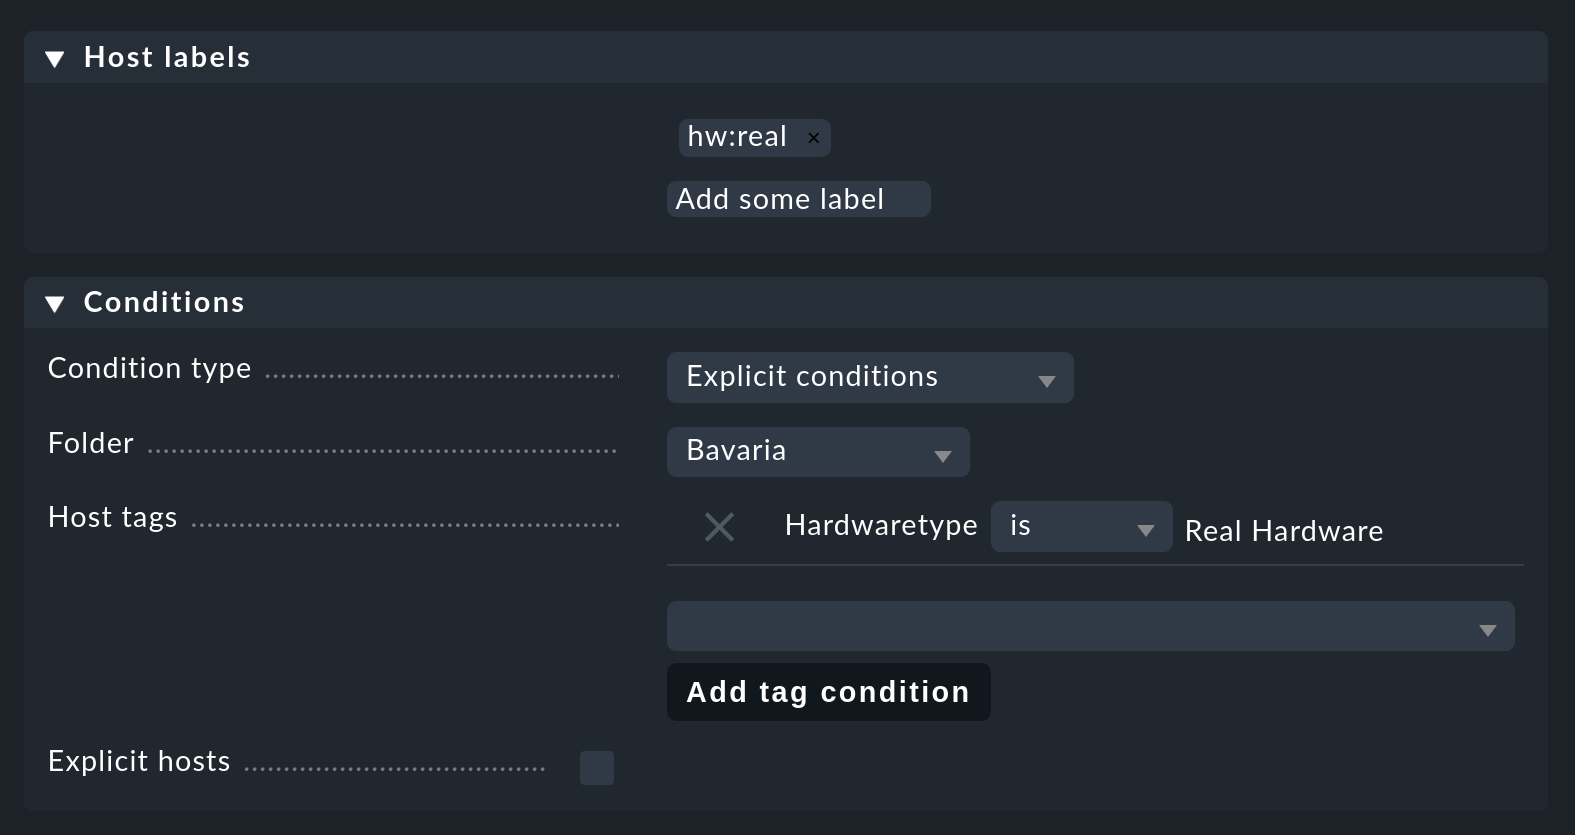
You may have noticed that labels cannot be used in the conditions for this rule. This is not a mistake, but intentional, and it avoids recursive dependencies and other anomalies.
Labels added via rules appear red at the host shown, but do not appear in the host list in the Setup, instead they only appear with the status view of the host.
2.3. Automatically generated labels
The third way labels can be created is fully automatically. Various data sources such as the special agents for monitoring cloud and container systems, as well as the agent plug-in of the hardware/software inventory automatically generate labels.
The nice thing is that you do not have to configure anything at all. As soon as these data sources are active, the corresponding labels will be generated.
In the Automatically generated host labels section you will find an overview of the labels that Checkmk generates automatically.
2.4. Specifying labels via an agent plug-in
A simple way to manipulate labels directly is to add an agent plug-in,
which, analogous to local checks, creates a section called labels.
In this way you can assign labels in more detail than by evaluating the HW/SW inventory alone — for example, according to nuances of the installed hardware (such as CPU features) or actually running processes (instead of just installed software).
The label output is to be formatted as a Python dictionary, as in the following example:
<<<labels:sep(0)>>>
{"cpu/vendor": "zilog"}
Avoid conflicts with the labels automatically assigned by Checkmk itself and other plug-ins, as no particular order of evaluation can be guaranteed.
2.5. Including labels found in the Discovery Check
If you have enabled the discovery check — which is the default for new installations — it will warn you when new host labels are found that have not yet been added to the host properties in the Setup. This will look like this, for example:

You have two options for responding to this warning. The first is to add the new labels by calling the service configuration for the host in the Setup and updating the configuration of the labels with the Hosts > Update host labels menu item. The discovery check will then be OK again the next time it runs (up to a two-hour delay), even if you have not yet activated the changes. If you don’t want to wait that long, you can also manually update the service immediately by selecting Reschedule check in the action menu of the service.
If this affects many hosts at once, you will certainly not want to visit the service configuration for each host. The best thing to do here is to run the bulk action for Discover services and select Only discover new host labels as the mode — or alternatively Add unmonitored services and new host labels if you also want to take the opportunity to add new services.
The second way to turn the discovery check green is to reconfigure it so that it no longer warns you about new labels. To do this, go to the Periodic service discovery rule set, and edit the existing rule — there you will find the Severity of new host labels option:
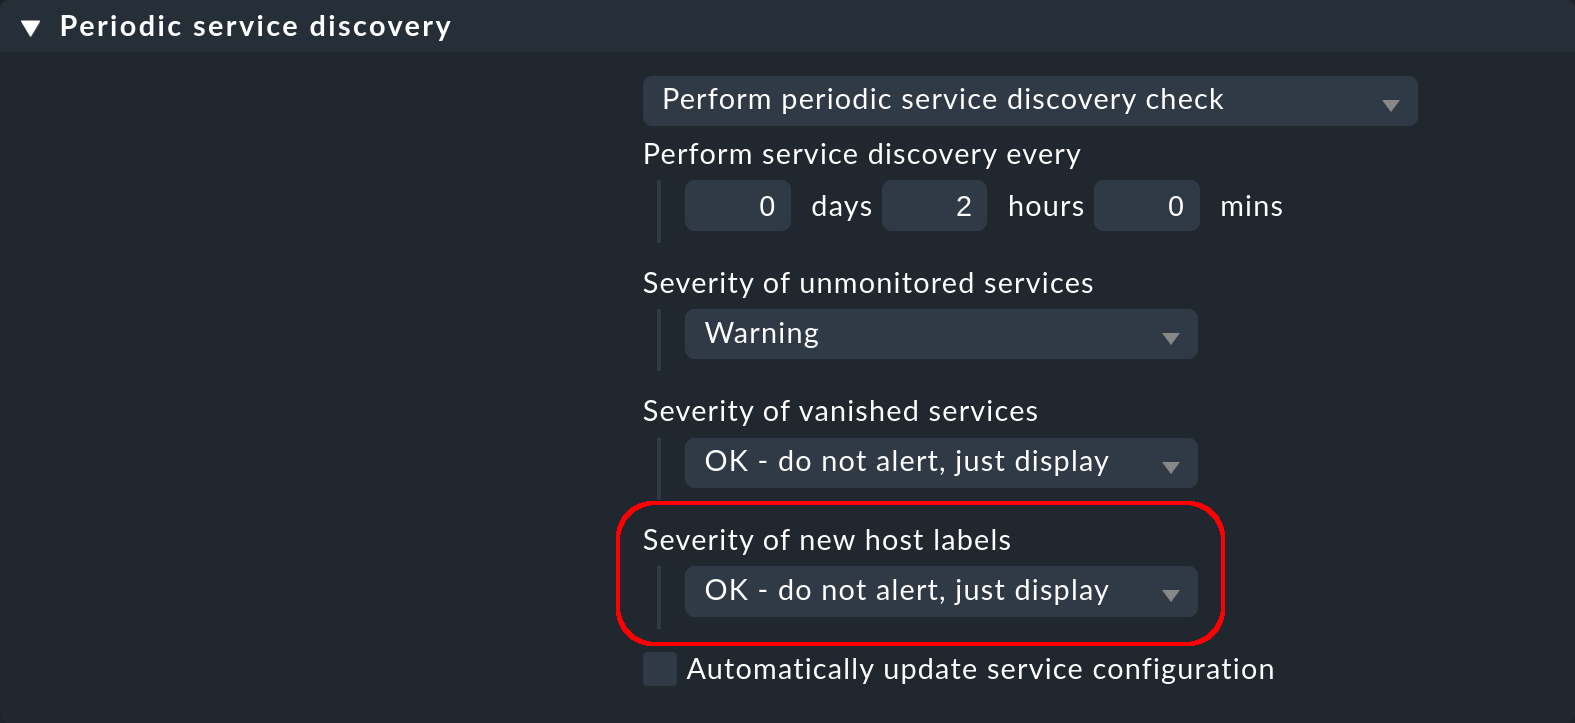
This is set to Warning by default. Choose OK - do not alert, just display and the check will go silent.
Labels found via discovery check are displayed in orange.
2.6. Sequence of label assignment priorities
Theoretically, the same label may be defined with different values in multiple sources simultaneously. That’s why there is the following order of priority:
First of all, explicit labels, i.e., those that you define for the host or folder directly in the Setup.
In the second place are labels that are created by rules.
In the last place are automatically-generated labels.
These precedence rules give you the ultimate control over the labels.
3. Labels as conditions in rules
3.1. Conditions in rules
An important function of labels is the same as with tags, namely their ‘Use’ condition in rules. This is especially true for automatically-generated labels, because they perform their monitoring fully-automatically according to information from AWS, Azure, Kubernetes, etc.
The following example shows a rule condition that only applies
when the host has the label state:bavaria, but not the label environment:test:
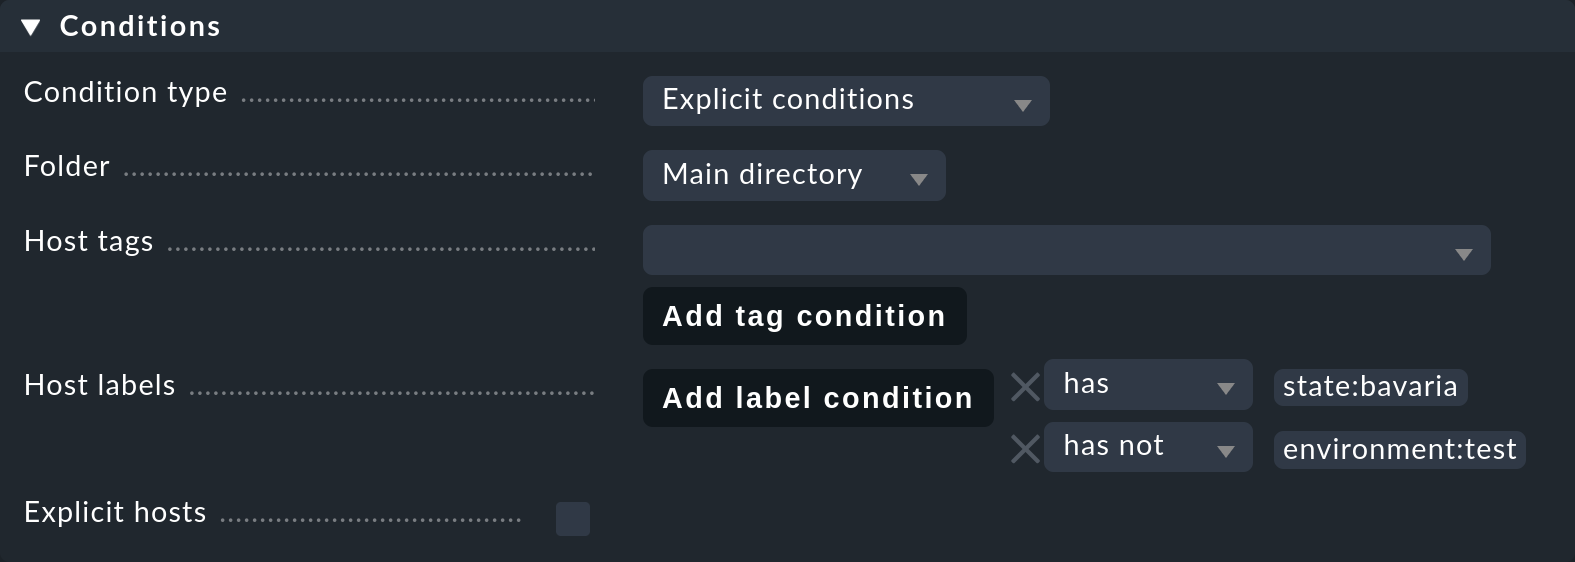
You can use both labels and host tags in a rule. These will be automatically AND-linked. The rule only applies if both conditions are met simultaneously.
Note that the exact spelling of the labels is important. Since labels can be defined without any defaults, Checkmk cannot recognize typos. Nevertheless: When typing a label, Checkmk suggests already existing labels if they match your previous input. The suggestions do not distinguish between host and service labels, so all matching labels are offered.
Tip: If this causes isolated problems it may be more effective if you work with host tags, since these work with defined values instead of free text input.
3.2. Conditions in notification rules
You can use labels as conditions in notification rules, too. The usage is the same as in other conditions, so you don’t need re-educate yourself to use them. Select Match host labels and simply enter which labels a host or service must have, thus triggering a notification through this rule. Again, multiple labels are connected by the AND operation.
4. Labels in views
So far we have only talked about the labels in the Setup (or the configuration environment). The labels are also visible in the monitoring environment — in the status view of a host, for instance:
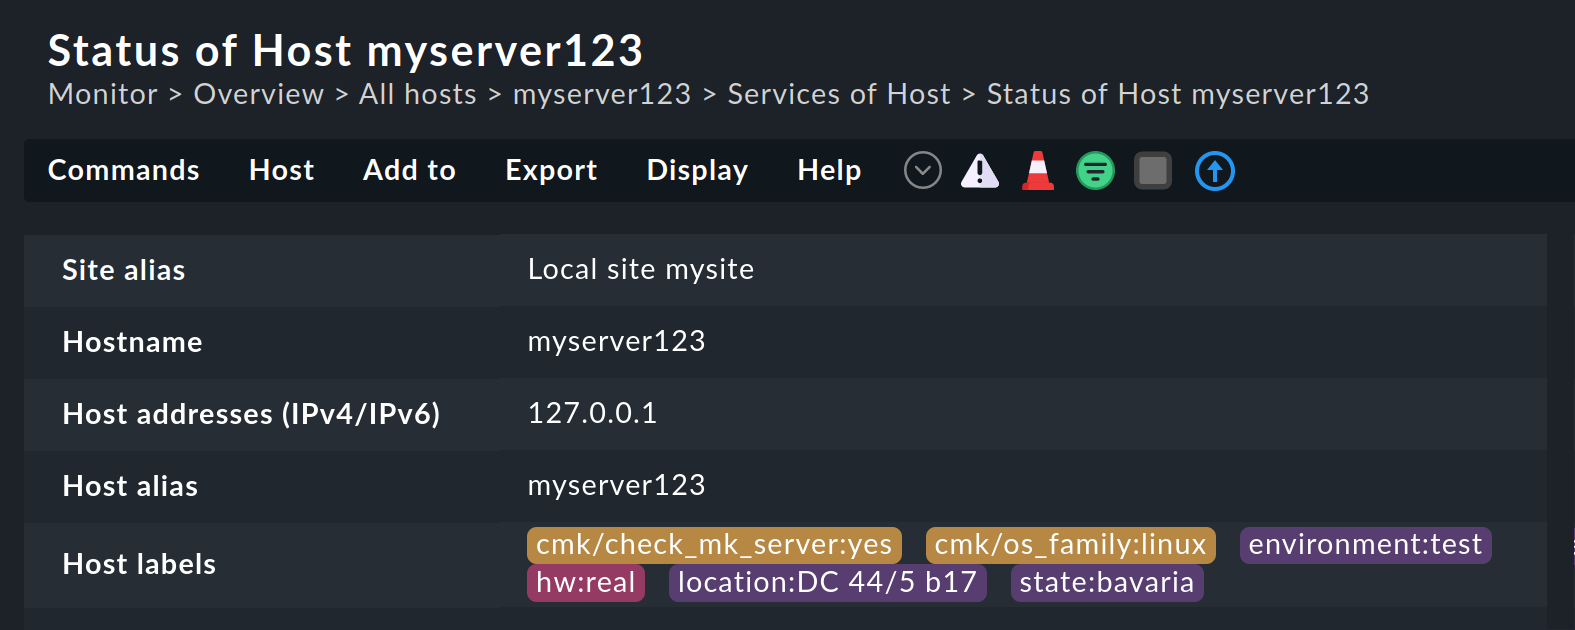
Here you can see the labels in different colors depending on how they were created: Explicit labels in violet, labels created by rules in red and labels created by a discovery check in yellow-ocher.
The colored highlighting of the labels not only stands out visually in the view, they are also practical because they can be clicked on, which leads you to a search for all hosts with this label:
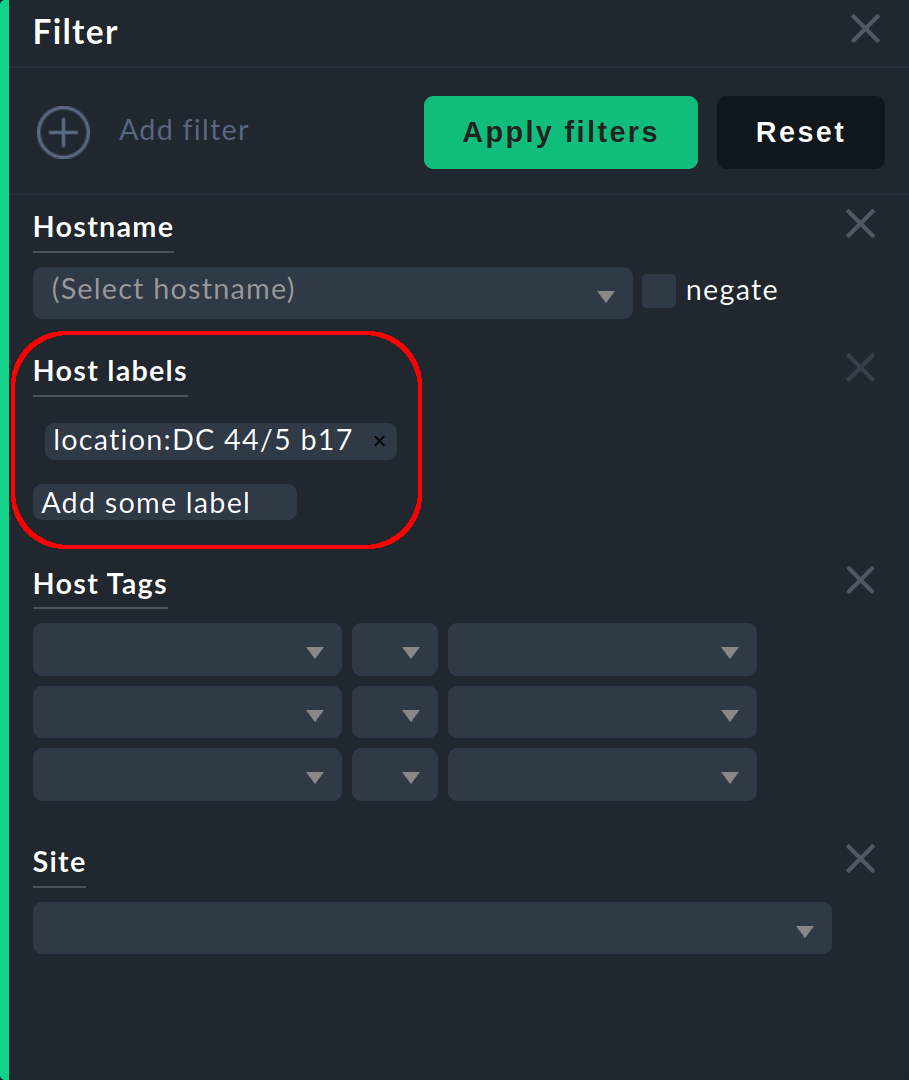
You can refine the search by adding more labels (which are then ANDed again) and of course combine the search for labels with the other available search parameters.
5. Service labels
Services can also have labels. These are similar to the host labels, however with a few small differences:
You cannot define service labels explicitly. These can only be created by rules (Service labels), or automatically.
You can also formulate conditions with service labels. In a rule set, the service labels are only offered for input if the rule can match a service.
6. Further information
6.1. Automatically generated host labels
| Key | Values |
|---|---|
|
|
|
SNMP transmitted device name, e.g. |
|
Docker image, e.g. |
|
Name of the Docker image, e.g. |
|
Version of the Docker image, e.g. |
|
|
|
These labels are output for any Kubernetes label that is a valid Kubernetes annotation (configurable via the Kubernetes rule). |
|
|
|
Kubernetes cluster name |
|
Name of the DaemonSet |
|
Name of the deployment |
|
Name of the associated Kubernetes namespace |
|
Name of the associated Kubernetes node. Checkmk hosts of type Pod or Node get this label. |
|
Kubernetes object type, e.g. |
|
Name of the StatefulSet |
|
Operating system, reported by the agent as |
|
|
6.2. Check plug-ins in which labels are registered
You can alternatively populate the Kubernetes-related cmk/kubernetes and cmk/kubernetes/object keys using the following plug-ins when using the Checkmk special agent for Prometheus to fetch the so-called 'kube-state-metrics':
k8s_daemon_podsk8s_ingress_infosk8s_job_infok8s_nodesk8s_pod_containerk8s_replicask8s_service_portk8s_stateful_set_replicas
