1. Introduction

Since Checkmk version 2.1.0 the new Linux agent with the Agent Controller masters the registered, TLS-encrypted and compressed pull mode.
For this, however, the Agent Controller must be started as a background process (daemon) by the init system on the host on which it is to be installed.
Currently, only systemd on the x86_64 platform is supported in this regard, and package management for deb or rpm packages is required for setup.
If all of the following requirements have been met…
Your Linux uses
systemdfrom version 219 or later as its init systemThe processor architecture is x86_64
Packages are managed as
deborrpm
…you can learn how to install, configure and extend the agent with the Agent Controller in the Monitoring Linux article.
While most Linux servers and desktops meet these requirements, years of version upgraded systems, older virtual machines with i686 instances, distroless containers or embedded Linux systems are merely not fringe elements, but normal components of many system landscapes for which there is a need for monitoring. Thanks to the modular structure of Checkmk, you can still include such Linux hosts in monitoring.
Since using encrypted transport of the agent data via Agent Controller is out of the question here, we explain in this article how to do either the unencrypted transport via an internet super server or the configuration of SSH as an encrypted tunnel.
The issues for which the agent mode does not matter can be found in the article on Linux agent with Agent Controller:
2. Installation
Depending on the package management, there are three installation options to choose from: Either DEB or RPM packages for Debian, Ubuntu, RHEL, SLES (and their derivatives), a TGZ archive for all other distributions (![]() Checkmk Enterprise Editions) or likewise a shell script (
Checkmk Enterprise Editions) or likewise a shell script (![]() Checkmk Raw Edition) for any other distributions.
Checkmk Raw Edition) for any other distributions.
2.1. Installation from packages
There is a comprehensive description of the installation from deb or rpm packages in the Monitoring Linux article, so we will only explain the procedure in a brief review here.
In the ![]() Checkmk Raw Edition, you can find the agent’s Linux packages via Setup > Agents > Linux.
In the
Checkmk Raw Edition, you can find the agent’s Linux packages via Setup > Agents > Linux.
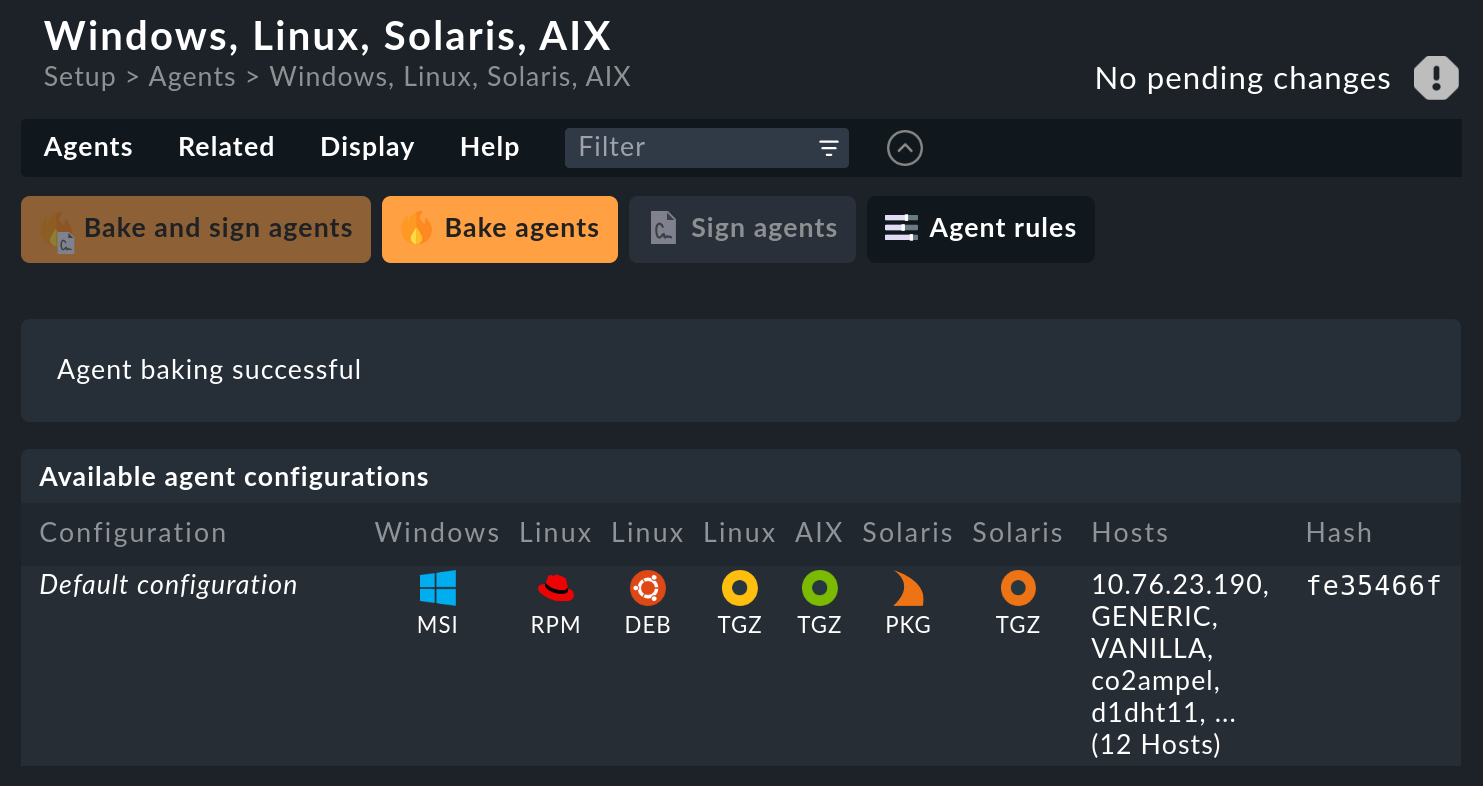
In the ![]() Checkmk Enterprise Editions, you first get to the Agent Bakery in the Setup menu via Agents > Windows, Linux, Solaris, AIX, where you will find the baked packages.
From there, the Related > Linux, Solaris, AIX files menu item will take you to the list of agent files.
Checkmk Enterprise Editions, you first get to the Agent Bakery in the Setup menu via Agents > Windows, Linux, Solaris, AIX, where you will find the baked packages.
From there, the Related > Linux, Solaris, AIX files menu item will take you to the list of agent files.
You can download these files via the browser or use wget or curl to download them directly into the host in the monitoring:
root@linux# wget http://mycmkserver/mysite/check_mk/agents/check-mk-agent-2.1.0b1-1.noarch.rpmOn RHEL, SLES and related distributions, the RPM package is installed as root with the command rpm -U:
root@linux# rpm -U check-mk-agent-2.1.0b1-1.noarch.rpmBy the way, the -U option stands for 'update' but it can also perform an initial installation correctly.
The installation of the DEB package on Debian, Ubuntu or related distributions is done as root with the command dpkg -i:
root@linux# dpkg -i check-mk-agent_2.1.0b1-1_all.deb
(Reading database ... 739920 files and directories currently installed.)
Preparing to unpack .../check-mk-agent_2.1.0b5-1_all.deb ...
Unpacking check-mk-agent (2.1.0b5-1) ...
Setting up check-mk-agent (2.1.0b5-1) ...
2.2. Installation from the TGZ archive
![]() For a convenient distribution-independent installation you will need the Linux agent in the TGZ archive format ('Tarball'), which you can download from the Enterprise Editions in the Setup menu via Agents > Windows, Linux, Solaris, AIX.
The TGZ archive contains the complete directory structure of the Linux agent for unpacking in the monitored host’s root directory.
For a convenient distribution-independent installation you will need the Linux agent in the TGZ archive format ('Tarball'), which you can download from the Enterprise Editions in the Setup menu via Agents > Windows, Linux, Solaris, AIX.
The TGZ archive contains the complete directory structure of the Linux agent for unpacking in the monitored host’s root directory.
The -C ('change directory') parameter is essential when unpacking to ensure that all of the file paths are correct.
We also use --no-overwrite-dir so that permissions for already existing directories are not changed:
root@linux# tar -C / --no-overwrite-dir -xvf /tmp/check-mk-agent_2.1.0b6.tar.gzIf you have done everything correctly, the agent script should now simply be executable as a command and produce its typical output.
The | head truncates everything following the 11th line of output:
root@linux# check_mk_agent | head
<<<check_mk>>>
Version: 2.1.0b6
AgentOS: linux
Hostname: mycmkserver
AgentDirectory: /etc/check_mk
DataDirectory: /var/lib/check_mk_agent
SpoolDirectory: /var/lib/check_mk_agent/spool
PluginsDirectory: /usr/lib/check_mk_agent/plugins
LocalDirectory: /usr/lib/check_mk_agent/local
<<<df>>>
If a version number lower than 2.1.0 is printed here, you probably still have an older version of the agent script installed as /usr/local/bin/check_mk_agent.
Move this old script, or rename it, for example by appending .bak to the filename.
2.3. Manual installation of the agent script
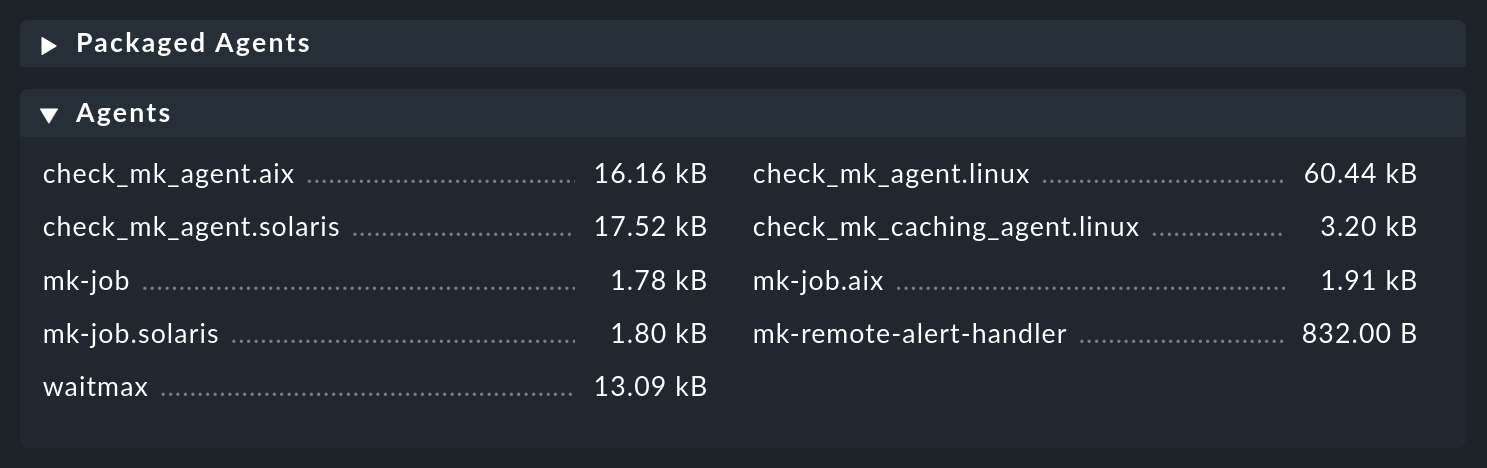
A manual installation of the agent script is rarely necessary, but it is not very difficult either. In this type of installation, at first only the agent script is installed, but no configuration of the access is performed yet. For this purpose you require the Agents box from the agent files page. There you will find the file check_mk_agent.linux:
Load this file onto the target system and copy it into a directory that is executable for root.
/usr/local/bin/ is a good choice, since it is in the search path and is intended for custom extensions.
Alternatively, you can use /usr/bin or a subdirectory of /opt.
We use /usr/bin so that all tests correspond to the other installation methods.
You can also perform the installation directly with wget if available:
root@linux# cd /usr/bin
root@linux# wget http://mycmkserver/mysite/check_mk/agents/check_mk_agent.linux
root@linux# mv check_mk_agent.linux check_mk_agent
root@linux# chmod 755 check_mk_agent
Do not forget the last two commands — these will remove the .linux extension and make the file executable.
Now the agent should be executable as a command and produce its typical output.
The | head truncates everything following the 10th line of output:
root@linux# check_mk_agent | head
<<<check_mk>>>
Version: 2.1.0b6
AgentOS: linux
Hostname: mycmkserver
AgentDirectory: /etc/check_mk
DataDirectory: /var/lib/check_mk_agent
SpoolDirectory: /var/lib/check_mk_agent/spool
PluginsDirectory: /usr/lib/check_mk_agent/plugins
LocalDirectory: /usr/lib/check_mk_agent/local
<<<df>>>
If you want to configure or extend the agent, you will need to create the necessary directories yourself.
The location for the three mandatory directories is hard-coded in the agent in variables that start with MK_ and are also provided to the plug-ins via the system environment:
root@linux# grep 'export MK_' check_mk_agent
export MK_LIBDIR="/usr/lib/check_mk_agent"
export MK_CONFDIR="/etc/check_mk"
export MK_VARDIR="/var/lib/check_mk_agent"
You should create these three directories (with the default permissions of 755 and root as owner):
root@linux# mkdir /usr/lib/check_mk_agent /etc/check_mk /var/lib/check_mk_agentIf you want to use different paths, simply edit /usr/bin/check_mk_agent.
3. Checking the state after installation
After installation, check if a service is already set up to listen on TCP port 6556.
In particular, when installing via package manager, an existing xinetd or systemd (in Superserver mode) is used to provide unencrypted agent output on TCP port 6556.
We use the ss command.
If this command is not available (on older distributions), one of the programs netstat, sockstat or lsof is available as an alternative.
root@linux# ss -tulpn | grep 6556
tcp	LISTEN 0	64	*:6556	*:*	users:(("xinetd",pid=1573,fd=5))
If there is no output, port 6556 is not yet open. If a line has been printed, then port 6556 is open.
In this case we are interested in the program name within the parentheses, here xinetd.
Remember this program name, because you will need it in the subsequent process — regardless of the selected access method.
If after installation from a DEB or RPM package the program name cmk-agent-ctl is printed here, you can be pleased:
Your Linux (especially the systemd version used) is in fact up-to-date enough to use the Agent Controller, as described in the article Monitoring Linux, and you can proceed to register the agent.
4. Selecting the access method
At this point you are faced with a decision:
Do you want to allow an easy-to-set-up, unencrypted connection?
Or is the higher security with encryption worth a certain additional effort to you?
The relevant aspects for this are what information a potential attacker has access to and how great their effort would need to be. For example, the process table that is always transmitted can already provide valuable clues, and a list of software updates that have not yet been carried out makes targeted attacks possible.
As a rule, we therefore recommend encrypted data transfer via an SSH tunnel.
5. Unencrypted: Setting up (x)inetd
If you decide that using an unencrypted data transfer is an acceptable risk, the next step is to set up an Internet Superserver.
If the test with ss showed that xinetd, inetd or systemd is already listening on TCP port 6556, jump to connection test.
If this is not the case, use the ps command to check whether an inetd is already active:
root@linux# ps ax | grep inetd
 1913 ?        Ss     0:00 /usr/sbin/xinetd -pidfile /run/xinetd.pid -stayalive -inetd_compat -inetd_ipv6
You can identify from the running process whether it is the more modern xinetd or one of the other Internet Superservers (GNU-Inetutils, OpenBSD-Inetd, Busybox-Inetd).
If no process is active, install an xinetd via your distribution’s package management.
If a 'classic' inetd is active, it usually makes sense to set up and use this instead of switching to xinetd.
5.1. Configuring xinetd
![]() For configuring an existing
For configuring an existing xinetd that uses the /etc/xinetd.d/ directory for configuration, both the TGZ archive and the DEB and RPM packages come with a script that automates the two necessary steps: first it installs the configuration and then it makes xinetd re-read the altered settings.
You have to call the script with the full file paths:
root@linux# /var/lib/cmk-agent/scripts/super-server/1_xinetd/setup deploy
root@linux# /var/lib/cmk-agent/scripts/super-server/1_xinetd/setup trigger
If you install the agent script manually, create the configuration file /etc/xinetd.d/check-mk-agent with the editor.
The content is sufficient:
service check_mk
{
        type           = UNLISTED
        port           = 6556
        socket_type    = stream
        protocol       = tcp
        wait           = no
        user           = root
        server         = /usr/local/bin/check_mk_agent
        # only_from    = 10.118.14.5 10.118.14.37
        disable        = no
}
Here we have added a (commented out) line restricting access to two Checkmk servers.
Further configuration options can be seen by looking at the ~/share/check_mk/agents/scripts/super-server/1_xinetd/check-mk-agent file on your Checkmk server.
If your xinetd uses the old configuration scheme with only one large /etc/xinetd.conf, transfer the sample configuration from /etc/check_mk/xinetd-service-template.cfg to /etc/xinetd.conf.
When the configuration of xinetd is complete, restart it:
root@linux# service xinetd restartYou are now ready for the connection test.
5.2. Setting up another inetd
First, check if your /etc/services already contains an entry for port 6556:
root@linux# grep 6556/ /etc/servicesIf this is not the case, Checkmk must be registered as a service. To do this, add the following line. The notation here is exactly the same as that stored in the IANA table with a single hyphen:
checkmk-agent 6556/tcp #Checkmk monitoring agentThe format of the /etc/inetd.conf configuration file differs between the individual variants.
Refer to the comments in the configuration file and the manual page (man 5 inetd.conf) for the format that matches your inetd.
This is followed by the configuration matching openbsd-inetd with two lines for IPv4 and IPv6 support.
Again, it is important to note the correct notation:
checkmk-agent stream tcp  nowait root /usr/bin/check_mk_agent
checkmk-agent stream tcp6 nowait root /usr/bin/check_mk_agent
After editing the configuration file, restart inetd, e.g. with:
root@linux# /etc/init.d/inetd restartDepending on the init system used and the Superserver installed, this command may differ.
5.3. Connection test
First check whether the xinetd or inetd could be (re)started:
root@linux# ss -tulpn | grep 6556
tcp	LISTEN 0	64	*:6556	*:*	users:(("xinetd",pid=1573,fd=5))
Now you can connect with telnet or nc (netcat) on TCP port 6556 — first from the host itself, later from the Checkmk server:
OMD[mysite]:~$ nc 12.34.56.78 6556
<<<check_mk>>>
Version: 2.1.0b6
AgentOS: linux
Hostname: myhost123
AgentDirectory: /etc/check_mk
DataDirectory: /var/lib/check_mk_agent
SpoolDirectory: /var/lib/check_mk_agent/spool
PluginsDirectory: /usr/lib/check_mk_agent/plugins
LocalDirectory: /usr/lib/check_mk_agent/local
If you receive a connection denied notification even though (x)inetd is active, check your firewall settings.
6. Encrypted: Use of an SSH tunnel
The SSH tunnel setup is performed with the following steps:
Create an SSH key pair specifically for this purpose.
On the target systems, allow access to the agent using this key.
Configure the Checkmk server to use SSH instead of the TCP connection on port 6556.
If available: Disable access via
(x)inetd.
And now the whole procedure, step by step with all necessary details:
6.1. Create an SSH key pair
SSH works with 'public key authentication'.
To do this, you first generate a pair of matched keys, where one is public and one is private.
When selecting the algorithm you can choose between rsa, ecdsa or ed25519.
In the example below, you use the ssh-keygen -t ed25519 command as the site user:
OMD[mysite]:~$ ssh-keygen -t ed25519
Generating public/private ed25519 key pair.
Enter file in which to save the key (/omd/sites/mysite/.ssh/id_ed25519):
Enter passphrase (empty for no passphrase):
Enter same passphrase again:
Your identification has been saved in /omd/sites/mysite/.ssh/id_ed25519.
Your public key has been saved in /omd/sites/mysite/.ssh/id_ed25519.pub.
The key fingerprint is:
cc:87:34:d2:ed:87:ed:f7:1b:ec:58:1f:7c:23:00:e2 mysite@mycmkserver
The key's randomart image is:
+--[ED25519  256--+
|                 |
|       . .       |
|      ..+..      |
|      .=.+.o     |
|       ES +.o    |
|         . o. o  |
|            ...B.|
|             .=.*|
|             . o+|
+-----------------+
Leave the filename empty to use the suggested filename. Of course you can specify a different path, for example if you want to work with separate keys for individual hosts.
Important: Do not specify a passphrase! Encrypting the file with the secret key would be of no use, after all, you certainly don’t want to have to enter the passphrase every time you start the Checkmk server…
The result is two files in the .ssh directory:
OMD[mysite]:~$ ll .ssh
total 8
-rw------- 1 mysite mysite 1679 Feb 20 14:18 id_ed25519
-rw-r--r-- 1 mysite mysite  398 Feb 20 14:18 id_ed25519.pub
The private key is called id_ed25519 and is readable only by the site user (-rw-------) — and that’s a good thing!
The public key id_ed25519.pub looks something like this:
OMD[mysite]:~$ cat .ssh/id_ed25519.pub
ssh-ed25519 AAAAC3NzaC1lZDI1NTE5AAAAIGb6AaqRPlbEmDnBkeIW3Q6Emb5lr2QEbWEQLmA5pb48 mysite@mycmkserver
6.2. Allow access via SSH
The next step must now take place on (each of) the Linux host(s) monitored via SSH.
Log in there as root and create the subdirectory .ssh in its home directory (/root), if it does not already exist.
With the following command the access privileges will be set correctly to 700 right away:
root@linux# mkdir -m 700 /root/.sshNow open the authorized_keys file with a (console-based) text editor of your choice.
If this file does not already exist, the editor will create it automatically:
root@linux# vim /root/.ssh/authorized_keysCopy the content of the public keys into this file. This can be done e.g. with the mouse and copy & paste. Be precise! Every space counts. Also make sure that there are never two spaces in a line. And: The whole thing is a single line!. If the file already exists, simply append a new line below.
6.3. Restrict access to the agent execution
What comes now is very important!
The SSH key should be used exclusively for executing the agent.
SSH offers something like this under the name command restriction.
To do this, put the text command="/usr/bin/check_mk_agent" at the beginning of the line you just created — separated from the rest by a single space.
It will look something like this:
command="/usr/bin/check_mk_agent" ssh-ed25519 AAAAC3NzaC1lZDI1NTE5AAAAIGb6AaqRPlbEmDnBkeIW3Q6Emb5lr2QEbWEQLmA5pb48 mysite@mycmkserverSave the file and check the permissions. Only the owner may have write permissions on this file.
root@linux# chmod 600 /root/.ssh/authorized_keys
root@linux# ll /root/.ssh/authorized_keys
-rw------- 1 root root 1304 Feb 20 14:36 authorized_keys
Next, test the access to the agent with the ssh command:
OMD[mysite]:~$ ssh root@myhost23
The authenticity of host 'myhost23 (10.11.12.13)' can't be established.
ECDSA key fingerprint is SHA256:lWgVK+LtsMgjHUbdsA1FK12PdmVQGqaEY4TE8TEps3w.
Are you sure you want to continue connecting (yes/no/[fingerprint])? yes
<<<check_mk>>>
Version: 2.1.0b6
AgentOS: linux
Hostname: myhost123
AgentDirectory: /etc/check_mk
DataDirectory: /var/lib/check_mk_agent
SpoolDirectory: /var/lib/check_mk_agent/spool
PluginsDirectory: /usr/lib/check_mk_agent/plugins
LocalDirectory: /usr/lib/check_mk_agent/local
<<<df>>>
The first time you will need to confirm the key’s fingerprint by entering yes.
All further accesses can then be made without user interaction, including the automatic polling of the agent script by the Checkmk server every minute.
If it does not work, please check:
Is the SSH server even installed on the target system?
Do the specified files and directories have the correct permissions?
Have you typed the syntax of
authorized_keyscorrectly?Did you enter the correct public key there?
Did you log in as the correct user (
root@…)?Did you remember the
command="…"?
With very old target systems, it is also possible that keys with the elliptic curves (ed25519 and ecdsa) are unknown.
In this case, generate an additional RSA key and enter this in the authorized_keys as well.
SSH will then automatically use the strongest known key for the connection.
6.4. Change the access from Checkmk to SSH
The target system has now been prepared.
Now only the configuration of Checkmk itself is missing.
This is done via the Setup > Agents > Other integrations> Custom integrations > Individual program call instead of agent access rule set.
Create a rule here for the affected hosts and enter ssh -T root@$HOSTNAME$ or ssh -C -T root@$HOSTNAME$ (for additional compression of the agent data) as command:

You can run the connection test in the GUI under Setup > Hosts > Properties of host > Test connection to host with the Run tests button.
If the test fails with timeout or access denied, check whether you used the host name in the same spelling as when testing on the command line — OpenSSH differentiates between short host name, FQDN and IP address.
Alternatively you can access the host using it’s IP address.
In this case you have to use the macro $HOSTADDRESS$ that is replaced by the cached (by Checkmk) IP address of the host.
After saving and executing Activate changes the host is added to the monitoring.
In the monitoring the service Check-MK Agent is now displayed with the note 'Transport via SSH'.
For further diagnostics the commands cmk -D and cmk -d can be used, which are explained in the article on the command line.
6.5. Multiple SSH keys
You can also work with more than one SSH key.
Place the keys in any directory.
In the Individual program call instead of agent access rule you must then specify the path to the respective private key with the -i option.
It is best to use $OMD_ROOT here as a replacement for the path to the site directory (/omd/sites/mysite).
The full command could then be ssh -i $OMD_ROOT/.ssh/my_key -T root@$HOSTADDRESS$, and thus the configuration would also be executable in a site with a different name:

This allows you to use different SSH keys for different groups of hosts by using multiple different rules.
6.6. Disabling access to port 6556
To avoid providing potential attackers with plain text data despite SSH tunnels, you must disable any access to port 6556 that may still be available in monitoring on the host.
If the command ss -tulpn | grep 6556 above did not find any process listening on TCP port 6556, you are done with setting up the SSH tunnel.
If a line is output, the process that has been found must be permanently disabled.
xinetd
To close the port provided by xinetd, disable Checkmk’s xinetd service by setting the value of disabled to yes.
Do not delete the whole configuration file — this would otherwise reappear in some constellations during agent updates!
Disabling is done in the /etc/xinetd.d/check-mk-agent file (on systems with older agent installations, the file may be called /etc/xinetd.d/check_mk):
service check_mk
{
        type           = UNLISTED
        port           = 6556
        socket_type    = stream
        protocol       = tcp
        wait           = no
        user           = root
        server         = /usr/bin/check_mk_agent
        disable        = yes
}
Then restart xinetd:
root@linux# /etc/init.d/xinetd restartor
root@linux# service xinetd restartNow verify that access via port 6556 is no longer possible.
inetd
If it is inetd that controls access to port 6556, modify the /etc/inetd.conf configuration file.
Look for the relevant line there:
root@linux# grep -n check.*mk /etc/inetd.confComment this line out with a hash # and then restart the process.
root@linux# /etc/init.d/inetd restartThen, using telnet or nc verify whether access is still possible.
systemd
If the search showed that systemd has TCP port 6556 open, you now need to determine the exact name of the configuration providing the socket:
root@linux# systemctl list-units | grep 'check.*mk.*socket'
  check-mk-agent.socket		loaded active listening CheckMK Agent Socket
Now you can first stop the service and then disable it:
root@linux# systemctl stop check-mk-agent.socket
root@linux# systemctl disable check-mk-agent.socket
Removed /etc/systemd/system/sockets.target.wants/check-mk-agent.socket.
Now access to port 6556 should not be possible.
Verification of success
In any case, do not forget to make a final test. It should now no longer be possible to connect to port 6556:
OMD[mysite]:~$ telnet myhost123 6556
Trying 10.118.15.23...
telnet: Unable to connect to remote host: Connection refused
7. Further security options
We have described the security options outlined here primarily for the sake of compatibility with existing installations. In many cases, the transmission of agent output via SSH will satisfy the requirements for access restriction and eavesdropping security. Nevertheless, in individual cases it may make sense to additionally use the protection mechanisms presented below or to use these when no SSH tunnel is possible.
7.1. Built-in (symmetric) encryption
The Checkmk agent script can encrypt its own data without using any additional tools. This is not a substitute for access control. However, since an attacker cannot send commands and cannot do anything with encrypted output data, the goal of security against eavesdropping is usually sufficiently fulfilled.
Of course, such encryption needs a suitable configuration on the agent as well as on the server. This can either be created manually (Raw Edition) or with the Agent Bakery (Enterprise Editions).
Note: Since symmetric encryption uses the same key for encryption and decryption, an attacker who intercepts an update packet created by the Agent Bakery which contains the key can decrypt the contents of agent output.
Setting up without the Agent Bakery
Again, without the Agent Bakery, the first step is to go to the Setup menu and create a rule in the Setup > Agents > Access to agents > Checkmk agent > Encryption (Linux, Windows) rule set. This rule should apply to all hosts for which you want to use encryption. SNMP hosts ignore this setting, so you do not need to explicitly exclude them.
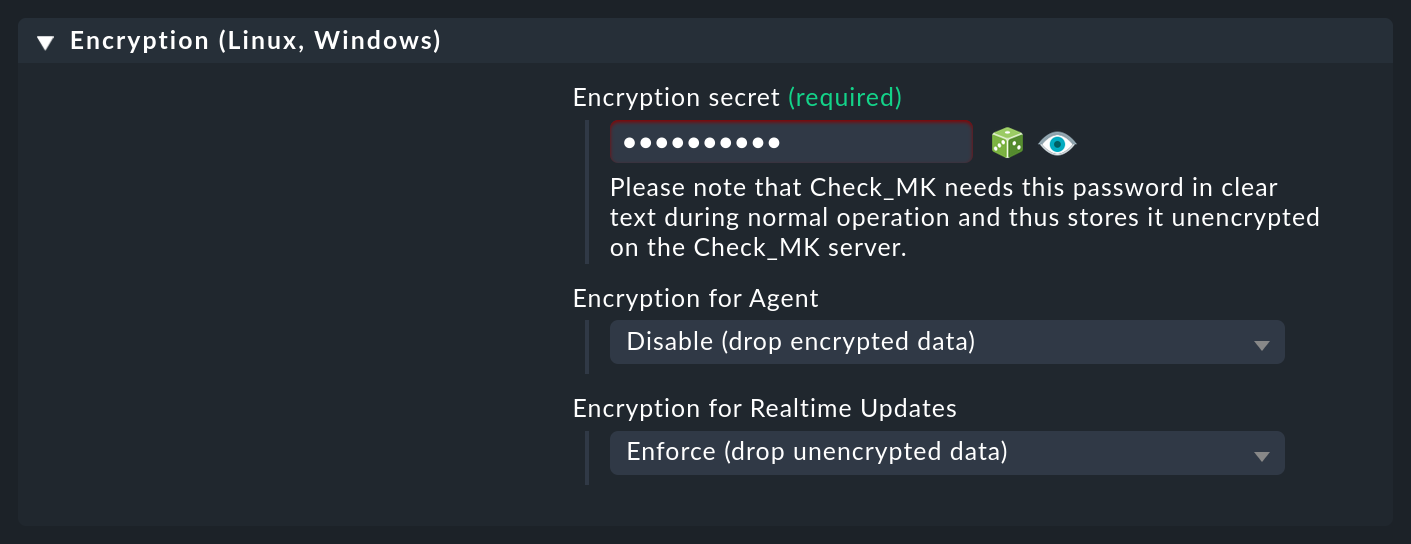
The setting for Encryption for Agent is important. As long as you leave the rule on the default of Disable, everything remains the same, of course. So you have the choice between:
Enable: Encryption is enabled, but data from agents without encryption will still be accepted.
Enforce: Encryption is enabled, only encrypted data will be accepted.
It makes sense to start with Enable. Once you think all agents have been switched to encryption, set to Enforce to thereby find hosts that are still sending data in plain text.
Encryption works with a shared password, which you specify here and which must be stored in plain text on both the Checkmk server and the agent (shared secret). Choose a random password and have it ready for the second step: configuring the agent.
There you create the file /etc/check_mk/encryption.cfg with the following content:
ENCRYPTED=yes
PASSPHRASE='MyPassword'
Of course, you set your own password here at PASSPHRASE.
And you should definitely protect the file from read access by other users:
root@linux# chmod 600 /etc/check_mk/encryption.cfgNow you can perform the following tests (see also the article on Checkmk’s command line):
The call to
check_mk_agenton the target system must output a jumbled string of characters.Access via
telnet myhost123 6556from the Checkmk server must output the same jumbled character string.The command
cmk -d myhost123on the Checkmk server must display the clean plain text data.
Setting up with the Agent Bakery
![]() Setting up encryption with the Agent Bakery is very simple.
By creating the rule just described, you are basically done.
All you need to do is bake new agents and deploy them.
The
Setting up encryption with the Agent Bakery is very simple.
By creating the rule just described, you are basically done.
All you need to do is bake new agents and deploy them.
The /etc/check_mk/encryption.cfg file is automatically created for you and will be included in the agent packages.
7.2. xinetd: IP restrictions
Even if an attacker cannot execute any commands, the agent’s monitoring data could still be useful to them, because it contains, among other things, a list of all of the processes running on the system. It is therefore best if the data cannot be easily accessed by anyone.
If you share the Checkmk Agent via xinetd, it is very easy and effective to restrict access to specific IP addresses — and those of the monitoring server, of course.
This can be quickly achieved via the only_from directive in your xinetd configuration file.
Enter IP addresses or address ranges (in the form 12.34.56.78/29 or 1234::/46) separated by spaces.
Host names are also allowed.
In this case, the system checks whether the host name determined by reverse resolution of the IP address for the requesting host matches the one entered:
service check_mk
{
        type           = UNLISTED
        port           = 6556
        socket_type    = stream
        protocol       = tcp
        wait           = no
        user           = root
        server         = /usr/bin/check_mk_agent
        only_from      = 10.118.14.5 10.118.14.37
        disable        = no
}![]() In the Enterprise Editions, Agent Bakery users can configure the permitted IP addresses via the Allowed agent access via IP address (Linux, Windows) rule set.
This rule set can be found via Setup > Agents > Windows, Linux, Solaris, AIX > Agent rules > Generic Options.
In the Enterprise Editions, Agent Bakery users can configure the permitted IP addresses via the Allowed agent access via IP address (Linux, Windows) rule set.
This rule set can be found via Setup > Agents > Windows, Linux, Solaris, AIX > Agent rules > Generic Options.
Of course, an attacker can very easily fake their IP address and thus connect to the agent. But then it is very likely that they will not receive the response — because the response will go to the legitimate monitoring server. Or the attacker actually does get a response, but the Checkmk server doesn’t receive any data and will quickly report an error.
8. Common error messages when using SSH
If you want to retrieve the Checkmk agent via SSH, it may happen that this retrieval fails and the Check_MK service on your host changes to the CRIT state.
These error messages often begin with Agent exited with code 255.
Information on how to fix such errors can be found in the Checkmk Knowledge Base.