1. Introduction
The piggyback mechanism has been in place since the early days of Checkmk — as a part of the monitoring of VMware. Here is a situation in which data needs to be queried from a particular host because the data is located only on that host (for example, from an ESX host system or the vCenter), but in the monitoring the data relates to a completely different host (a virtual machine for example).
This cannot be realized with the normal mechanism in Checkmk because this automatically assigns data and services that it fetches from a host. It would also be very impractical for a monitoring if all information for all VMs always appeared directly at the ESX host or even the vCenter.
The term ‘piggyback’ describes the process by which monitoring data for host B is piggybacked (so to speak) with the data queried from host A.
These days piggyback is used in many other monitoring plug-ins, e.g. when monitoring
Proxmox VE
In addition to virtualization environments, the piggyback mechanism can also be used for the monitoring of mobile devices or climate monitoring in the data center (MQTT). Since the query interfaces are very simple, it is very easy to use the piggyback mechanism yourself. You can use it, for example, when implementing your own check plug-ins to map data from one source to any other host.
2. The piggyback principle
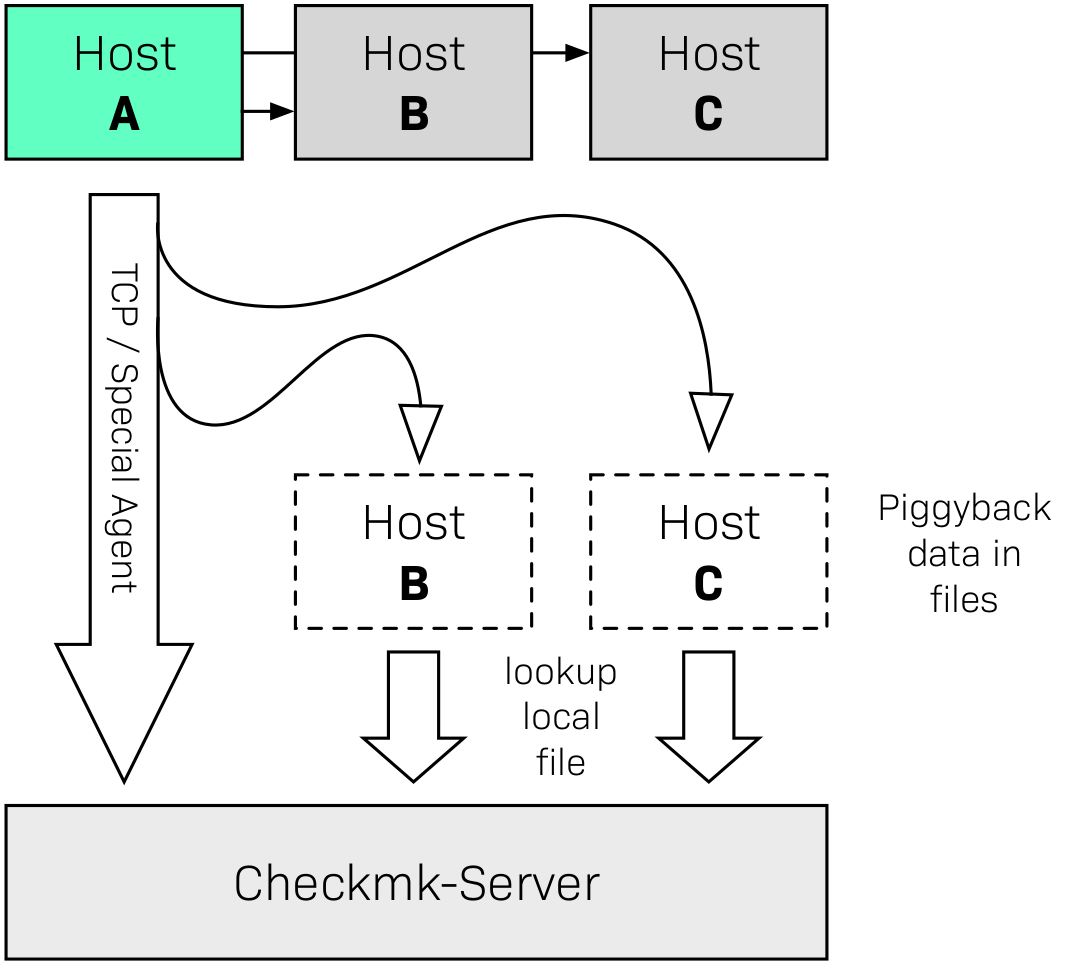
The basic principle of piggyback works as shown in the following diagram. Host A not only has its own monitoring data, but also that from other hosts — or more generally from other objects. For example, an ESX host records the state and many current metrics for each of its VMs. This host A is sometimes referred to as the source host in this context.
If Checkmk now retrieves the monitoring data from A in its regular one-minute intervals — be it from the normal Checkmk agent or from a special agent via a manufacturer’s API — in the response it also receives specially-marked reporting data from the other hosts/objects B, C, and so on. This piggyback data is then placed in files on the Checkmk server for later processing. The hosts B, C, and so on are referred to as piggybacked hosts.
If Checkmk later requires the monitoring data from B or C, they are already in the local files and can be processed directly without having to query an agent:
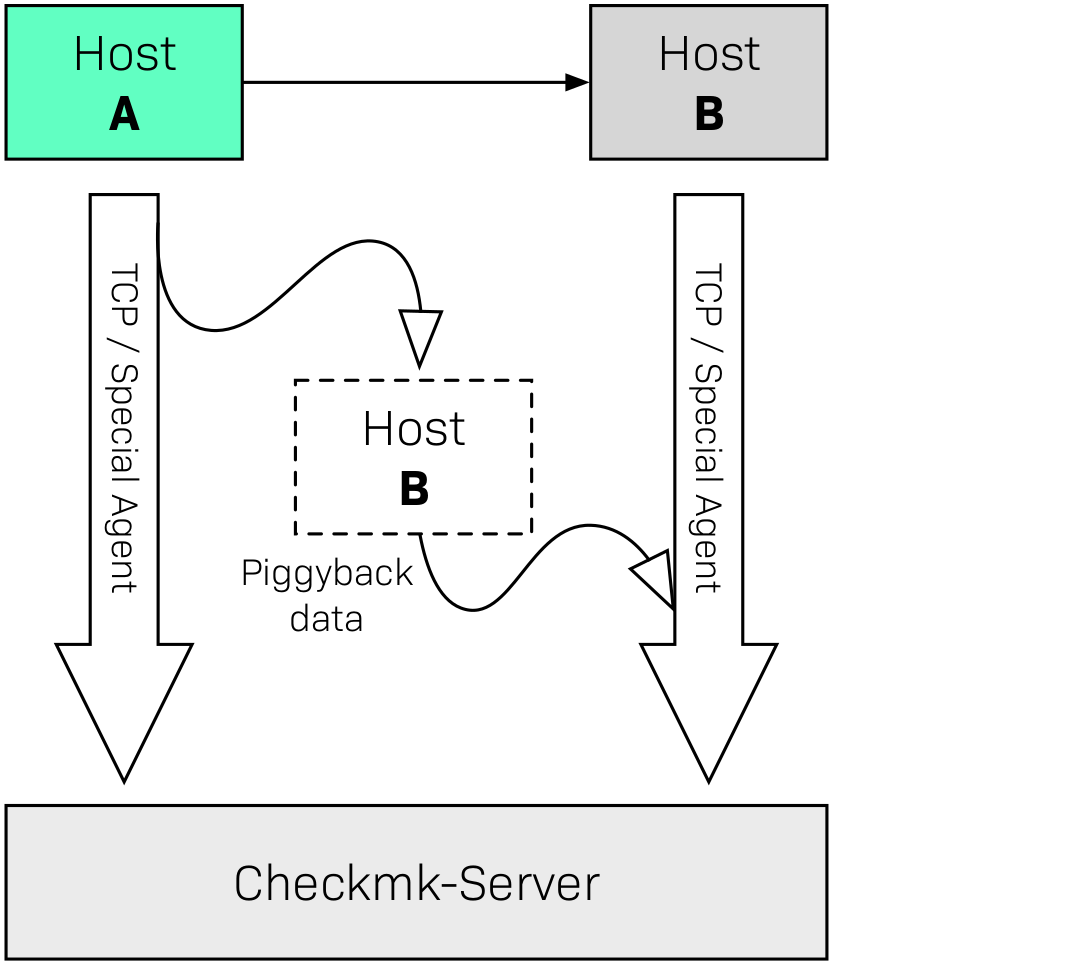
It is also possible and useful to combine normal monitoring and piggybacking. Let’s take the example of VMware again: You may have installed a Checkmk agent in your VM B which evaluates local information from the VM that is not known to the ESX host (e.g., processes running in the VM). In this case not only will the agent be queried, but its data will also be combined with the piggyback data received from host A:
3. Piggyback in practice
3.1. Setting up piggyback
First the good news — The piggyback mechanism often works completely automatically:
If piggyback data for other hosts is detected when querying A they are automatically saved for later evaluation.
If piggyback data from another host is found when querying B it will be used automatically.
However — as usual in Checkmk — everything is configurable. Namely, in the properties of a host (such as host B ) in the Monitoring agents box you can set how it should react to existing or missing piggyback data:

The default is Use piggyback data from other hosts if present. If available, piggyback data is used, and if none is there the host just uses its ‘own’ monitoring data.
With the Always use and expect piggyback data setting you force the processing of piggyback data. If the data is missing or outdated the Check_MK service will issue a warning.
And with Never use piggyback data any piggyback data found is simply ignored — a setting that you’ll only need in exceptional cases.
3.2. Hosts must be present
Of course for a host to process piggyback data the host itself must be present in the monitoring. In the example of ESX this means that you must also have your VMs as hosts in Checkmk so that they are actually monitored.
Meanwhile, you can automate this using the dynamic configuration and automatically create hosts for which piggyback data is available.
3.3. Host names and their assignments
In the above schemes it was somehow logical that the data from object B was assigned to host B in the monitoring. But what exactly is B?
With the piggyback mechanism the assignment always uses a name. The (special) agent writes an object name for each set of piggyback data. In the case of ESX, e.g. the name of the virtual machine. Some plug-ins — such as Docker — also have several options for what should be used as a name.
For the mapping to work correctly, the name of the matching host in Checkmk must of course be identical — including upper and lower case.
But what happens if the names of objects in the piggyback data are inappropriate or undesirable for monitoring? For this there is the special Hostname translation for piggybacked hosts rule set, which you can find in the Setup menu under Setup > Agents > Agent access rules.
To configure a rename you will need to do two things:
Create a rule and set the condition to access the source host – ie. host A.
Create a suitable name assignment value in the rule.
Here is an example of the value in a rule.
Two things are configured: first, all host names from the piggyback data are
converted to lowercase letters.
Then the two hosts vm0815 or vm0816 are also converted to the
Checkmk host’s mylnxserver07 or mylnxserver08 :

More flexible is the method using regular expressions found under Multiple regular expressions. This is useful if the renaming of many hosts is necessary, and it is done according to a specific scheme. Proceed as follows:
Activate the Multiple regular expressions option.
Add a translation entry with the Add expression button — two fields will appear.
In the first field — Regular expression — enter a regular expression that matches the original object name and which contains at least one subgroup – that is, a subexpression enclosed in parentheses. For a good explanation of these groups see the article on regular expressions.
In Replacement specify a schema for the desired target host name in which the values that were ‘trapped’ with the subgroups will be replaced by
\1,\2, etc.
An example of a regular expression would be, for example vm(.*)-local.
The substitute value myvm\1 would then translate the name
vmharri-local into myvmharri.
4. The technology behind this process
4.1. Transport of the piggyback data
As described above, the piggyback data is also transported to other hosts with the agent output from the source host. The output from the Checkmk agent is a simple text-based format which is shown in the article on monitoring agents.
What’s new is that a line is allowed in the output that starts with
<<<< and ends with >>>>.
In between is a host name. All further monitoring data starting from this line is
then assigned to this host.
Here is an example excerpt that assigns the section
<<<esx_vsphere_vm>>> to the host 316-VM-MGM:
<<<<316-VM-MGM>>>>
<<<esx_vsphere_vm>>>
config.datastoreUrl url /vmfs/volumes/55b643e1-3f344a10-68eb-90b11c00ff94|uncommitted 12472944334|name EQLSAS-DS-04|type VMFS|accessible true|capacity 1099243192320|freeSpace 620699320320
config.hardware.memoryMB 4096
config.hardware.numCPU 2
config.hardware.numCoresPerSocket 2
guest.toolsVersion 9537
guest.toolsVersionStatus guestToolsCurrent
guestHeartbeatStatus green
name 316-VM-MGM
A line with the content <<<<>>>> can be used to
end this assignment. Any further output then belongs again to the source host.
When processing the agent output Checkmk extracts the parts intended for other hosts
and places them in files under tmp/check_mk/piggyback.
Below this is a subdirectory for each target host
(for example, for each VM) — that is if we stick to our example with the
name B.
In this subdirectory there will then be a separate file with the actual data
from each source host. Their names would be A in our example.
Why is this so complicated? Well — one host can indeed get piggyback data from
multiple hosts, so a single file would not be enough.
Tip: If you are curious about what the piggyback data looks like,
look up the agent output from your monitoring site’s hosts in the
tmp/check_mk/cache directory. An overview of all involved files and
directories can be found below.
4.2. Orphaned piggyback data
If you are working in an environment where hosts automatically change the source host, we recommend using the dynamic host configuration. If you cannot or do not want to use dynamic host configuration, for example, because virtual machines are moved manually, you may receive piggyback data from a host that you have not even created in Checkmk. This may be intentional, but it may also be an error — e.g. because a name is not an exact match.
In the ‘Treasures’ section you will find a script called
find_piggy_orphans with which your Checkmk can search for piggyback data
for which there is no host in monitoring.
Simply call this script without any arguments.
The script will output a list with one line — sorted by name — for each
non-monitored piggybacked host found:
OMD[mysite]:~$ share/doc/check_mk/treasures/find_piggy_orphans
fooVM01
barVM02
This output is ‘clean’ and can, for example, be processed in a script.
4.3. Piggyback in distributed environments
Note that currently in distributed environments the source host and the piggybacked hosts must be monitored in the same site.
This is simply because — for efficiency reasons — the transmission of data between the hosts is done by using local file exchange running via the tmp/check_mk directory.
Future versions of Checkmk may provide a mechanism allowing the optional transmission of piggyback data across site boundaries.
5. Files and directories
5.1. File paths on the Checkmk server
| Path | Description |
|---|---|
|
Storage location for piggyback data |
|
Directory for piggyback data for Host B |
|
File with piggyback data from Host A for Host B |
|
Meta information for the hosts creating piggyback data |
|
Agent output from Host A — including any existing piggyback data in a raw-format |