1. Why own checks?
Checkmk already monitors many types of relevant data using a large number of its own standard check plug-ins. Nevertheless, every IT environment is unique, so that often very specialized requirements can arise. With local checks you have a facility to extend the agent on the target host for quickly and easily creating your own services.
These local plug-ins differ in one significant aspect from other checks: the calculation of a status occurs directly in the host on which the data is also retrieved. In this way the complex creation of checks in Python is not needed and there is thus a completely free choice of coding language for scripts.
2. Writing a simple local check
2.1. Creating the script
A local check can be written in any programming language supported by the target host. The script must be constructed so that each check produces a status line consisting of four parts. Here is an example:
0 "My service" myvalue=73 My output text who may contain spacesThe four parts are separated by blanks and have the following meanings:
| Example value | Meaning | Description |
|---|---|---|
|
Status |
The status of the service is given as a number: |
|
Service name |
The service name as shown in Checkmk, in the output of the check in double quotes. If the service name does not contain blanks, you can save the quotes. |
|
Value and metrics |
Metric values for the data. More information about the construction can be found in the chapter on metrics. Alternatively a minus sign can be coded if the check produces no metrics. |
|
Status detail |
Details for the status as they will be shown in Checkmk. This part can also contain blanks. |
There must always be a blank character between the individual parts of the output and the first text of the detailed status. Everything following will then count as status detail, which is why blank characters are allowed.
If there is uncertainty about a possible output, it can be simply tested by writing a small script with the echo command.
Insert the output to be tested into the echo command.
Make sure to mask the quotes for the service name with \ so that these characters are not interpreted by the echo command:
#!/bin/bash
echo "0 \"My 1st service\" - This static service is always OK"
For Windows hosts, such a script will look very similar to this:
@echo off
echo 0 "My 1st service" - This static service is always OK
Both scripts lead to the same result in the output:
0 "My 1st service" - This static service is always OKFor Checkmk only this output is relevant, not how you created this output.
By the way — you can write any number of outputs in a script. Each output line will have its own service created in Checkmk. Therefore, no newline characters are allowed in the output — unless they are masked, for example for a multiline output in Checkmk.
How it can be checked whether the local script will be correctly invoked by the agent can be seen in the Error analysis.
2.2. Distributing the script
Once the script has been written it can be distributed to the appropriate hosts. The path used will depend on the operating system. A list of path names can be found in Files and directories below.
Don’t forget to make the script executable on unix-type systems. The path shown in this example is for Linux:
root@linux# chmod +x /usr/lib/check_mk_agent/local/mylocalcheckIf you use the Agent Bakery, the script can be distributed with a rules-based procedure. More on rule-creation can be found in the chapter Distribution via the Agent Bakery.
2.3. Adding the service to the monitoring
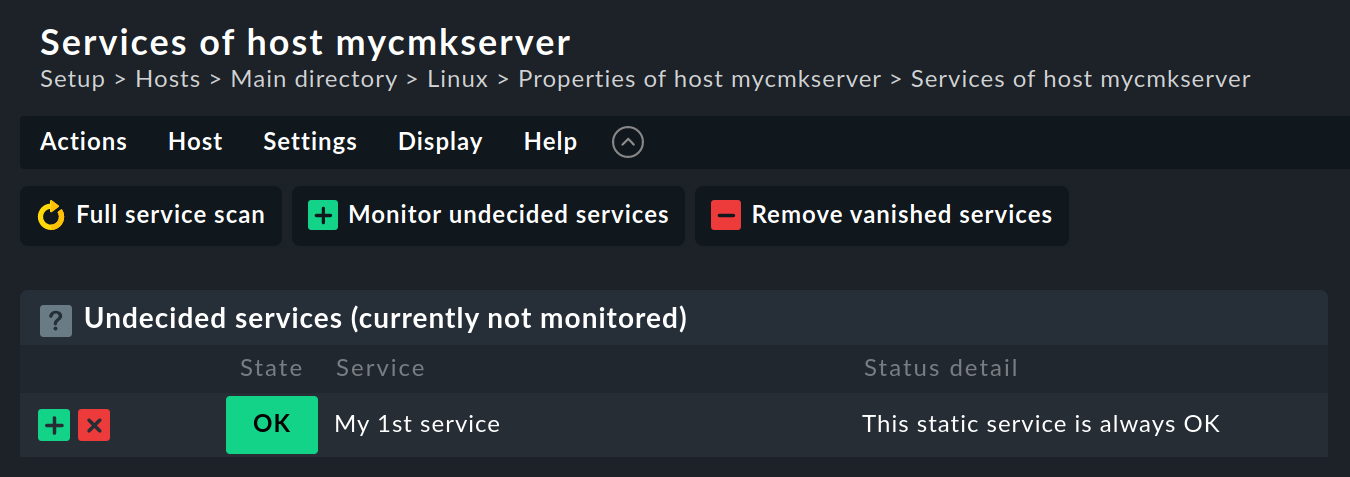
At every invocation of the Checkmk agent the local check contained in the script will also be executed and appended to the agent’s output. The Service discovery also functions automatically like with other services:

Once the service has been added to the monitoring and the changes have been activated, the implementation of the self-created service with the aid of a local check will be complete. Should a problem arise during the service discovery, the Error analysis can be of help.
3. Extended functions
3.1. Metrics
With a local script metrics can also be set.
To enable them the value of the check must always return P.
Then the state will be calculated by Checkmk.
The general syntax for this data is as follows:
metricname=value;warn;crit;min;maxwhere value is the current value, warn and crit set the (upper) thresholds, and min and max fix the range of values — for example like this:
count=73;80;90;0;100The values are separated with a semicolon.
All values except value are optional.
If a value is not required, the field remains empty or is omitted at the end, as in the following for warn, crit and max:
count=42;;;0Note: In the Checkmk Enterprise Editions the values for
min and max can indeed be set — but only for compatibility reasons.
Limiting the associated graph to a certain range of values has no effect in the Enterprise Editions.
3.2. Metric name
You should take special care when choosing the identifier of this metric - called metricname in the example here.
We recommend prefixing the identifiers to prevent overlap with metrics already present in Checkmk.
So, for example, instead of simply calling a metric that represents the number of
currently waiting requests in a queue you are monitoring, 'current',
we recommend a clearer identifier with a prefix - such as: mycompany_current_requests.
If you were to choose an identifier here that already exists in Checkmk, the representation of your metrics in graphs would be overwritten with the definitions that already exist.
Of course, you can also reuse an existing metric from Checkmk intentionally. So,
for a metric for an electrical current you could simply use the identifier
current in your local check. In case of doubt, however, you have to look up
the definition of this metric in ~/lib/python3/cmk/gui/plugins/metric by
yourself.
OMD[mysite]:~$ grep -r -A 4 'metric_info\["current"\]' ./lib/python3/cmk/gui/plugins/metrics/3.3. Multiple metrics
You can also have several metrics output.
These are then separated by the 'pipe' character |, for example like this:
count1=42|count2=23Attention: On Windows hosts you have to prepend a caret (^) to the pipe in the script, so that it does not get interpreted.
@echo off
echo 0 "My 2nd service" count1=42^|count2=23 A service with 2 graphs
A complete output with two metrics will look like this:
root@linux# /usr/lib/check_mk_agent/local/mylocalcheck
0 "My 2nd service" count1=42|count2=23 A service with 2 graphs
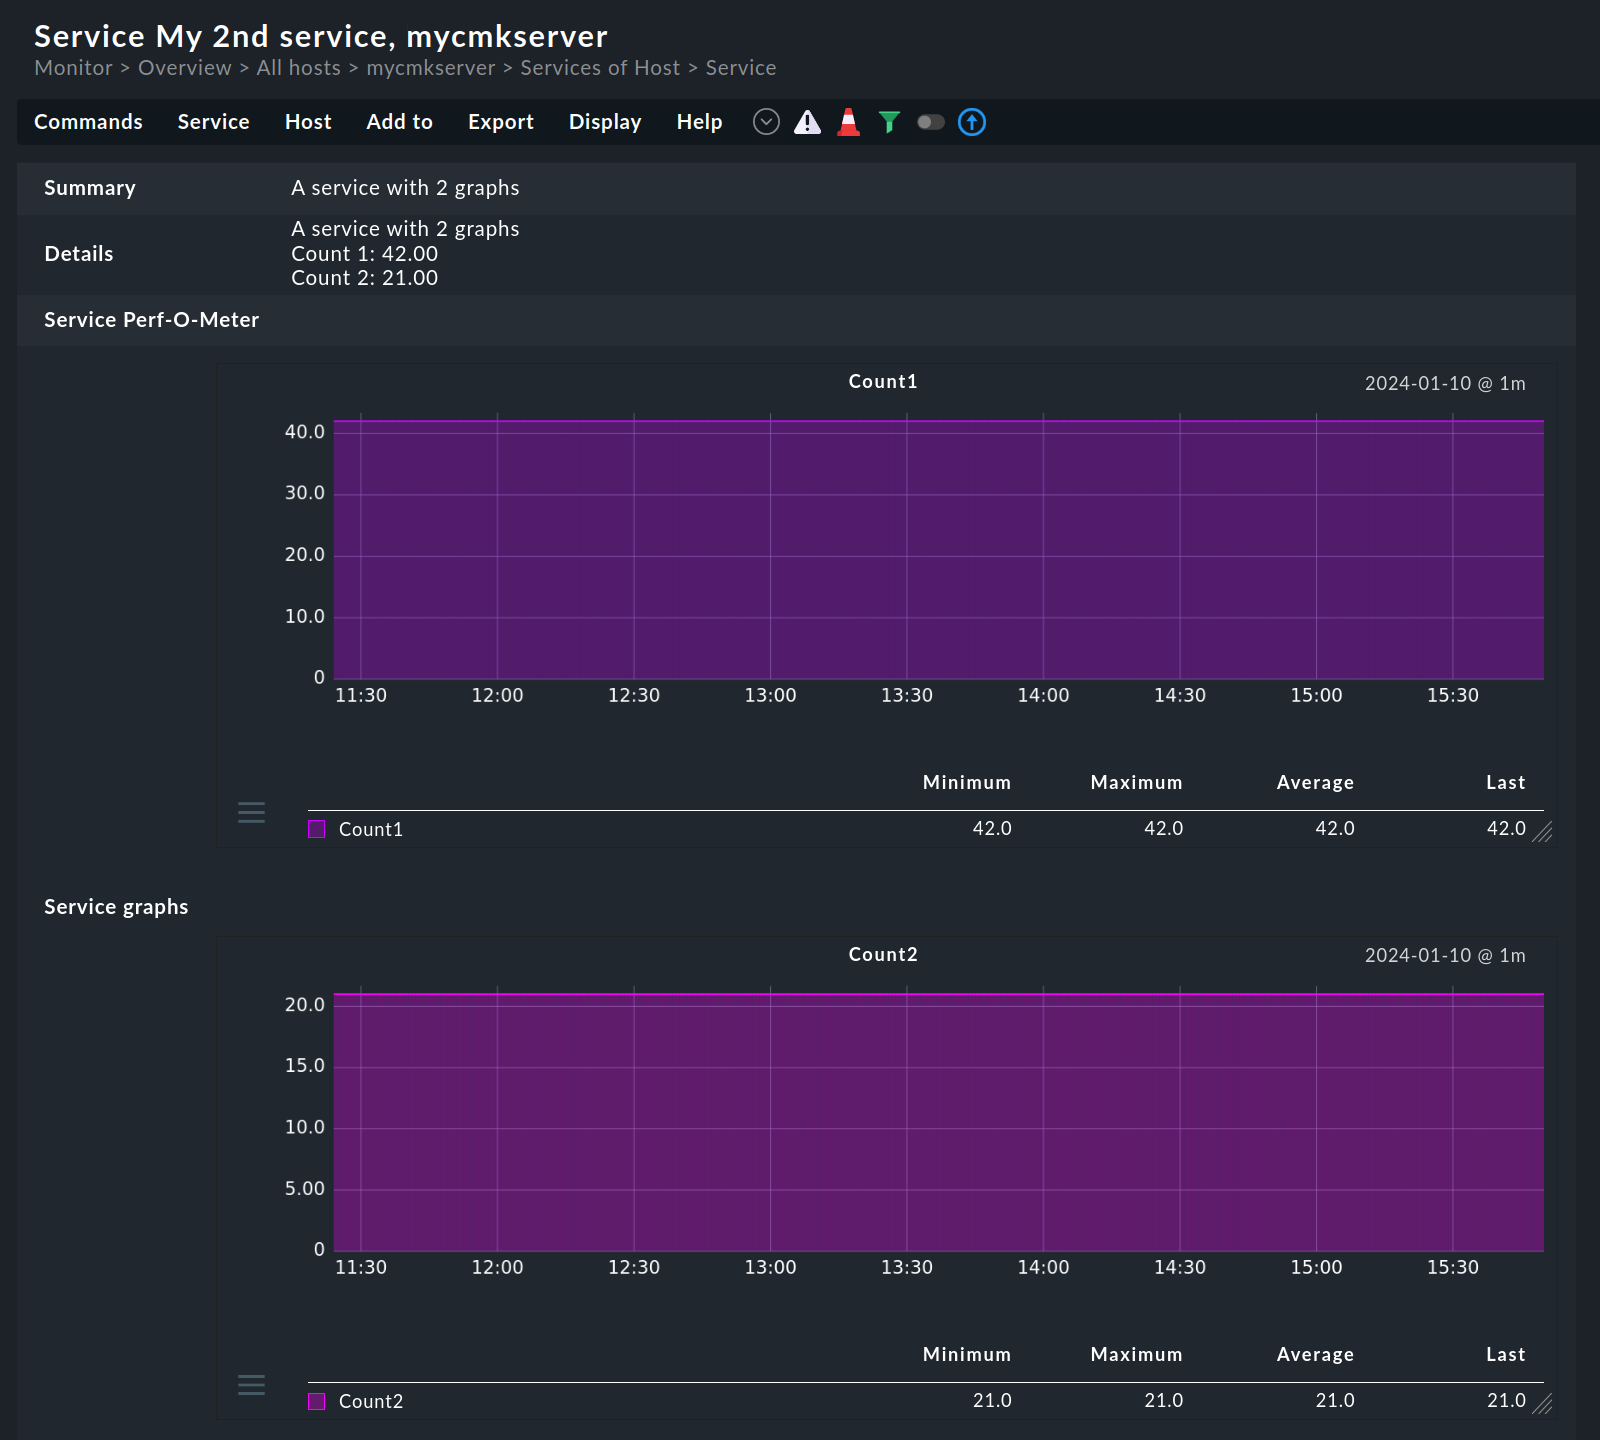
After you have also included the new service in the monitoring, you will see the text for the status detail in the Summary field in the service list. After clicking on the service, the page with the service details is displayed. The metrics are shown in the Details field and below this you will see the service graphs automatically generated by Checkmk:

3.4. Calculating status dynamically
In the previous chapters, you learned how to set threshold values for metrics and how to display them in the graphs. The next obvious step is to use these thresholds for a dynamic calculation of the service state. Checkmk provides exactly these options for extending a local check.
If you pass the letter P instead of a number in the first field of the output that determines the state, the service’s status will be calculated on the basis of the threshold as provided.
An output will then look like this:
root@linux# /usr/lib/check_mk_agent/local/mylocalcheck
P "My 1st dynamic service" count=40;30;50 Result is computed from two threshold values
P "My 2nd dynamic service" - Result is computed with no values
… and the display in a service view like this:

The display differs in two points from the one that we saw earlier:
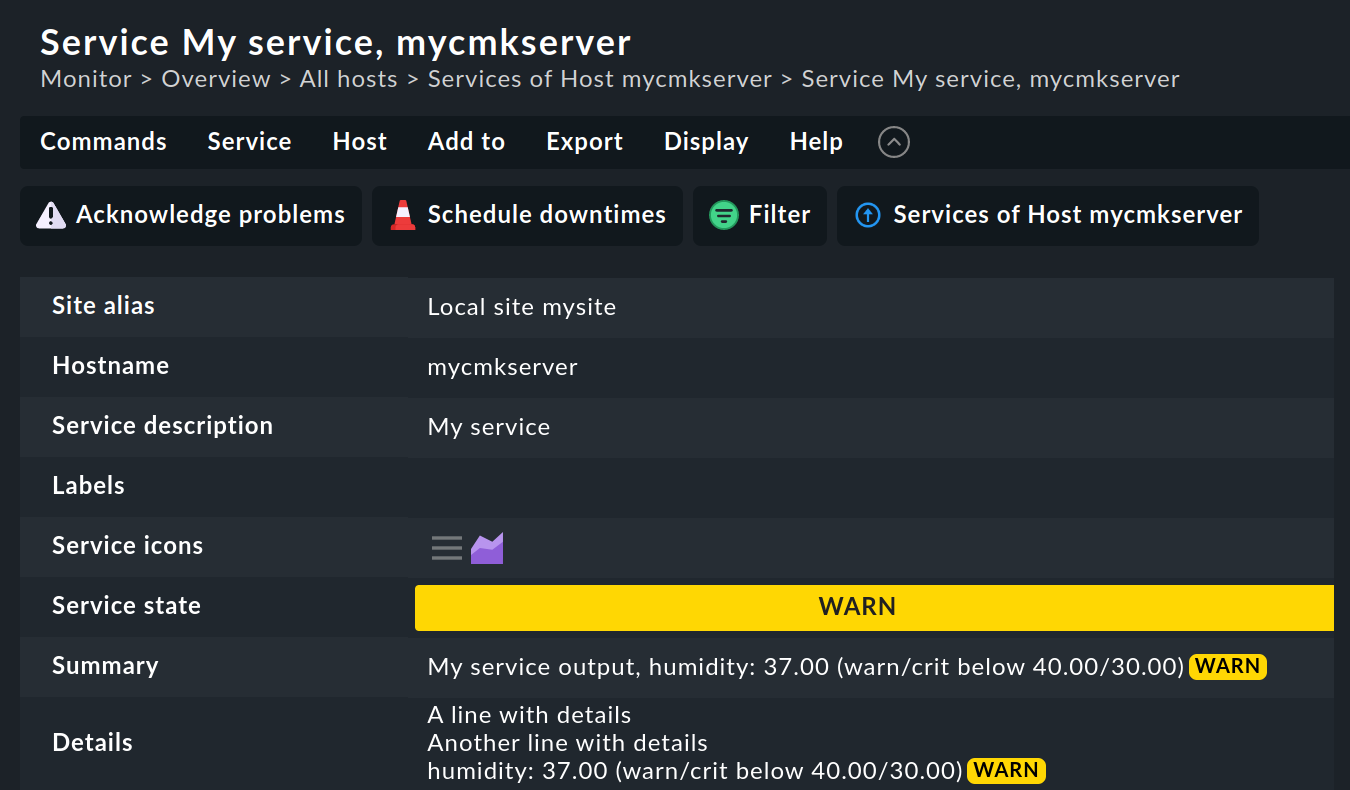
For services in the WARN or CRIT state, the Summary of the service shows all important information about the metrics (name, value, thresholds). This means you can always see how this status was calculated from a value. For all other states, the metric information is only displayed in the Details field.
If no metrics have been passed the service’s status will always be OK.
3.5. Upper and lower thresholds
Some parameters have not only an upper threshold but also a lower threshold. An example is humidity. For such cases the local check has the option of passing two threshold values each for the states WARN and CRIT. They are separated by a colon and represent the lower and the upper threshold value respectively.
In the general syntax, it looks like this:
metricname=value;warn_lower:warn_upper;crit_lower:crit_upper… and in the example like this:
root@linux# /usr/lib/check_mk_agent/local/mylocalcheck
P "My 3rd service" humidity=37;40:60;30:70 A service with lower and upper thresholds
… and in the display of a service view like this:

If you are only concerned with lower thresholds, leave out the upper threshold fields:
root@linux# /usr/lib/check_mk_agent/local/mylocalcheck
P "My 4th dynamic service" count_lower=37;40:;30: A service with lower thresholds only
With this output, you specify that the service should become WARN if the value is less than 40 and CRIT if it is less than 30: thus, at the specified value of 37, the service will get the WARN state.
3.6. Multi-line outputs
The option to spread an output over multiple lines is also available.
Because Checkmk runs under Linux you can work with the Escape sequence '\n' in order to force a line-break.
Even if due to the scripting language the backslash itself needs to be escaped, it will be correctly interpreted by Checkmk:
root@linux# /usr/lib/check_mk_agent/local/mylocalcheck
P "My service" humidity=37;40:60;30:70 My service output\nA line with details\nAnother line with details
In the service’s details these additional lines will be visible under the Summary:

3.7. Executing asynchronously and caching output
The output of local checks, like that of agent plug-ins, can be cached. This can be necessary if a script has a longer processing time. Such a script is then executed asynchronously and only in a defined time interval and the last output is cached. If the agent is queried again before the time expires, it uses this cache for the local check and returns it in the agent output.
Note: Caching is only available for AIX, FreeBSD, Linux, OpenWRT and Windows.
Configuring Linux
Under Linux or another unix-type operating system, any plug-in can be executed asynchronously. For a local check, the necessary configuration is very similar to that of a plug-in. To do this, create a subdirectory called the number of seconds you want the output to be cached and put your script in that subdirectory.
In the following example, the local check will be executed only every 10 minutes (600 seconds):
root@linux# /usr/lib/check_mk_agent/local/600/mylocalcheck
2 "My cached service" count=4 Some output of a long running script
The cached data is written to a cache directory.
For a service that provides cached data, the cache-specific information is added to the service view:

Configuring Windows
Under Windows, the configuration is also analogous to that of a plug-in. Instead of using a special subdirectory as with Linux & Co, the options are set in a configuration file:
local:
    enabled: yes
    execution:
        - pattern     : $CUSTOM_LOCAL_PATH$\mylocalcheck.bat
          async       : yes
          run         : yes
          cache_age   : 600
As you can see above, under Windows you can configure the asynchronous execution (with async) and the time interval (with cache_age) separately.
Alternatively, on Windows you can also do the configuration in the Agent Bakery.
4. Distribution via the Agent Bakery
If you are already using the Agent Bakery, you can also distribute the scripts with local checks to several hosts this way.
To do this, first create the directory custom on the Checkmk server as site user below ~/local/share/check_mk/agents/ and in it a subdirectory tree for each package of local checks:
OMD[mysite]:~$ cd ~/local/share/check_mk/agents
OMD[mysite]:~$ ~/local/share/check_mk/agents$ mkdir -p custom/mycustompackage/lib/local/
The package directory in the above example is mycustompackage.
Below that, the lib directory flags the script as a plug-in or as a local check.
The subsequent local directory then allocates the file explicitly.
Place the script with the local check in this directory.
Important: On Linux, you can configure asynchronous execution analogously as described in the previous chapter by now creating a directory under custom/mycustompackage/lib/local/ with the number of seconds of the execution interval and placing the script there.
Under Windows, you can use the rule sets Set execution mode for plugins and local checks and Set cache age for plugins and local checks. These and other rule sets for local checks under Windows can be found in the Agent Bakery under Agent rules > Windows Agent.
In the configuration environment of Checkmk, the package directory mycustompackage will be shown as a new option:
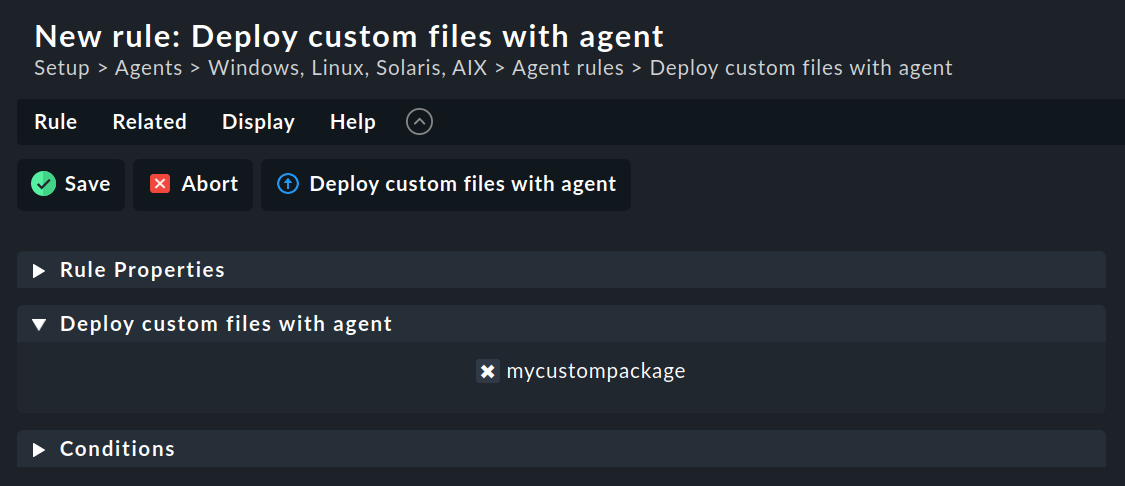
Open Setup > Agents > Windows, Linux, Solaris, AIX, create a new rule with Agents > Agent rules > Generic options > Deploy custom files with agent and select the newly-created package:

Checkmk will then autonomously integrate the local check correctly into the installation packet for the appropriate operating system. After the changes have been activated and the agent baked, the configuration will be complete. Now the agents only need to be distributed.
5. Error analysis
5.1. Testing the script
If you run into problems with a self-written script, you should check the following potential error sources:
Is the script in its correct directory?
Is the script executable, and are the access permissions correct? This is especially relevant if you are running the agent or script and you are not the root/System user.
-
Is the output compliant with the given syntax? The output of the local check must conform to the syntax as described in the chapters Creating the script and Extended functions. Otherwise, error-free execution cannot be guaranteed.
Problems and errors can arise in particular when a local check is intended to perform a task that requires a full-fledged check plug-in, for example when the output of the local check itself contains a section header or the definition of a host name as used when transporting piggyback data.
5.2. Testing agent output on the target host
If the script itself is correct, the agent can be run on the host.
With unix-type operating systems such as Linux, BSD, etc., the command below is available.
With the -A option the number of additional lines to be displayed following a hit can be specified.
This number can be customized to suit the number of expected output lines:
root@linux# check_mk_agent | grep -v grep | grep -A2 "<<<local"
<<<local:sep(0)>>>
P "My service" humidity=37;40:60;30:70 My service output\nA line with details\nAnother line with details
cached(1618580356,600) 2 "My cached service" count=4 Some output of a long running script
In the last line, you can recognize a cached service by the preceding cache information with the current Unix time and the execution interval in seconds.
Under Windows, you can achieve a very similar result with PowerShell and the Select-String 'cmdlet' as with the grep command under Linux. In the following command, the two digits behind the Context parameter determine how many lines are to be output before and after the hit:
PS C:\Program Files (x86)\checkmk\service> ./check_mk_agent.exe test | Select-String -Pattern "<<<local" -Context 0,3
> <<<local:sep(0)>>>
  0 "My 1st service" - This static service is always OK

  cached(1618580520,600) 1 "My cached service on Windows" count=4 Some output of a long running script
5.3. Testing agent output on the Checkmk server
As a last step the processing of the script output can also be tested on the Checkmk server with the cmk command — once for the service discovery:
OMD[mysite]:~$ cmk -IIv --detect-plugins=local mycmkserver
Discovering services and host labels on: mycmkserver
mycmkserver:
...
+ EXECUTING DISCOVERY PLUGINS (1)
  2 local
SUCCESS - Found 2 services, no host labels
… and also the processing of the service output with a similar command:
OMD[mysite]:~$ cmk -nv --detect-plugins=local mycmkserver
Checkmk version 2.0.0p2
+ FETCHING DATA
...
+ PARSE FETCHER RESULTS
Received no piggyback data
My cached service    Some output of a long running script(!!), Cache generated 6 minutes 52 seconds ago, Cache interval: 10 minutes 0 seconds, Elapsed cache lifespan: 68.71%
My service           My service output\, humidity: 37.00 (warn/crit below 40.00/30.00)(!)
For both commands we have shortened the output by lines not relevant for this topic.
If there are errors in a local check, Checkmk will identify them in the service output. This applies as well for erroneous metrics, for false or incomplete information in the script output, or an invalid status. These error messages should aid in quickly identifying errors in a script.
6. Files and directories
6.1. Script directory on the target host
| Path name | Operating system |
|---|---|
|
AIX |
|
FreeBSD |
|
HP-UX, Linux, OpenBSD, OpenWRT and Solaris |
|
Windows |
6.2. Cache directory on the target host
Cached data of individual sections, including the local section, is stored here and appended to the agent again with each execution, as long as the data is valid.
| Path name | Operating system |
|---|---|
|
AIX |
|
FreeBSD |
|
Linux, OpenWRT and Solaris |
