1. Introduction
Checkmk provides comprehensive options for the monitoring of Oracle databases. With the plug-in you can not only retrieve a database’s tablespaces or its active sessions, but also many other types of performance data. A complete list of the monitoring options can be found in our Catalog of Check Plug-ins. We extend this plug-in regularly, so it is always worth looking in the catalog. Among others, Checkmk can monitor the following values:
To be able to monitor the databases only the plug-in is required in addition to the agent on the database server. The Linux, AIX, Solaris, HP-UX and Windows operating systems are currently supported. No further additional software will be required for a monitoring, either on the Checkmk-Instance or on the database server.
Many of the steps to set up monitoring are the same for both Linux and Windows. For this reason, we will first describe the general steps, and then the steps specific to Windows and Linux. Please note that a setup using the Agent Bakery is currently only available for Linux, Solaris and AIX.
2. General steps for an initial setup
2.1. Create a user
In principle, the first setup is quick and requires only three steps.
The first step, of course, is to have a user who is also allowed to query the
databases. Provided that you are not using RAC, create a
user for each database to be monitored. How to access an instance differs
depending on the installed operating system. For Linux, you can do this for
example, by always first setting the relevant instance as an environment
variable for which a user is to be created. Normally you first switch to
the oracle user, but this can differ depending on the setup:
root@linux# su - oracle
oracle@myhos$ export ORACLE_SID=MYINST1
Then log on to the instance and create a user for the monitoring. To get all of
the data, the following permissions are required. In the following example,
the newly-created user is named checkmk. You can also specify any other
desired name:
sqlplus> create user checkmk identified by myPassword;
sqlplus> grant select_catalog_role to checkmk;
sqlplus> grant create session to checkmk;
sqlplus> connect checkmk/myPassword
sqlplus> exit
You can find out exactly how the login to a specific instance works in the Oracle documentation.
Multitenant databases
You can also configure the login for multitenant databases. This is usually
performed in the config using a special user and with the prefix C##. The assignment of permissions is a bit different as for regular users as you need to specify them for all current container and for all in the future:
sqlplus> create user c##checkmk identified by myPassword;
sqlplus> alter user c##checkmk set container_data=all container=current;
sqlplus> grant select_catalog_role to c##checkmk container=all;
sqlplus> grant create session to c##checkmk container=all;
sqlplus> exit
2.2. Create the configuration and user
After you have created a user, the next step is to enable the agent plug-in to later receive this information. The simplest way is for you to define the same login data for all instances, and set a default in the configuration. Now create a new configuration file on the Oracle host for Linux, AIX, Solaris or for Windows. In the following example the file for unix-type systems can be seen:
# Syntax:
# DBUSER='USERNAME:PASSWORD'
DBUSER='checkmk:mypassword'
For Windows this procedure looks very similar. There you set the variable in a PowerShell script:
# Syntax:
# $DBUSER = @("USERNAME","PASSWORD")
$DBUSER = @("checkmk","myPassword")
The standard user is all that the plug-in really requires. All other options that you can set in unix-type systems or under Windows are optional.
2.3. Getting the configuration on to the host
Now that you have created a user and have saved it in the configuration file, you must also place the plug-in in the correct agent directory. The correct file path for agent plug-ins is described in the articles on Linux and Windows. Solaris and AIX usually use the same path as that under Linux. Under Linux — and also under AIX or Solaris — be sure to make the plug-in executable, and correct it if necessary:
root@linux# cd /usr/lib/check_mk_agent/plugins/
root@linux# ls -lA
-rw-r--r-- 1 root root 120808 Jan 25 11:29 mk_oracle
root@linux# chmod +x mk_oracle
root@linux# ls -lA
-rwxr-xr-x 1 root root 120808 Jan 25 11:29 mk_oracle
2.4. Using the Oracle-Wallet
Alternatively, you can also use the Oracle Wallet to define the user directly and with a password in a configuration file. This has the advantage that you no longer need to store the access data in an unencrypted form on the Checkmk server and on the Oracle host. So even if you have defined the configuration file’s rights on the Oracle host to suit, the access data has nevertheless been removed from the server and is located on the Checkmk server as long as you use the Agent bakery.
The Oracle Wallet in turn stores the encrypted access data on the host to be monitored so that they can only be used, but no login data has to be made known explicitly. Checkmk can thus use this wallet, but in principle the access data needs only be known to the database administrator (DBA). Create — or the DBA can create — a wallet on the appropriate server:
root@linux# mkstore -wrl /etc/check_mk/oracle_wallet -createThe plug-in will access this file later whenever a connection to an instance is
to be established. So that the necessary user data can also be found, you must
enter this once in the wallet. In the following example you thus add the user
checkmk for the instance MYINST1:
root@linux# mkstore -wrl /etc/check_mk/oracle_wallet -createCredential MYINST1 check_mk myPasswordFor the plug-in to know where to look for the wallet, it must find two files.
The first file is the sqlnet.ora in which the info for the wallet’s
location can be found. The second file — tnsnames.ora — defines
the address of the instance and can then contact the instance via its alias.
So that the agent plug-in can access these files you can specify the path under Linux, Solaris and AIX using
the TNSALIAS extended variable.
This is especially useful if the files already exist.
Alternatively, you can create them explicitly.
Windows even requires that you specify them manually.
First create the sqlnet.ora file. The plug-in alternatively searches in
this file for the login data, so the correct file path to the wallet file
you just created must be entered here. Make sure that you set the
SQLNET.WALLET_OVERRIDE parameter to TRUE:
LOG_DIRECTORY_CLIENT = /var/log/check_mk/oracle_client
DIAG_ADR_ENABLED = OFF

SQLNET.WALLET_OVERRIDE = TRUE
WALLET_LOCATION =
 (SOURCE=
   (METHOD = FILE)
   (METHOD_DATA = (DIRECTORY=/etc/check_mk/oracle_wallet))
 )
Now the plug-in knows which credentials should be used. So that it also accesses
the correct address, create tnsnames.ora as the second file.
You can find examples of a configuration on the
Checkmk-Server, and also on the Oracle host.
The exact syntax can be found in the Oracle documentation, but as an example the
file could look like this:
MYINST1
  (DESCRIPTION =
    (ADDRESS = (PROTOCOL = TCP)(HOST = 127.0.0.1)(PORT = 1521))
    (CONNECT_DATA =
      (SERVER = DEDICATED)
      (SERVICE_NAME = MYINST1_ALIAS)
    )
  )
With this last step you have created the prerequisites for getting the access
data from the agent plug-in’s configuration file.
Instead, you simply enter a / (slash):
DBUSER='/:'You can of course add further access data to the wallet at a later date.
The tnsnames.ora file must then simply be amended as necessary.
3. Linux, AIX, Solaris
3.1. Plug-in and configuration file paths
Under unix-type systems Checkmk uses a uniform plug-in. On the one hand, this reduces maintenance effort, since SQL queries are not duplicated, and on the other hand you only need to pay attention to a single plug-in. On all supported systems the file paths for the agents are the same or very similar. Specifically, you need the following directories, if you have not changed them:
| OS | Plug-in File Path | Configuration File Path |
|---|---|---|
Linux, Solaris, HP-UX |
/usr/lib/check_mk_agent/plugins/ |
/etc/check_mk/ |
AIX |
/usr/check_mk/lib/plugins/ |
/usr/check_mk/conf/ |
3.2. Further options
In general setup you have already learned about the first variables for getting monitoring data from their Oracle instances. However, depending on the application scenario, you will quickly need further possibilities for better, individual control of the monitoring per instance.
Extended user configuration
With the standard login you can use regular or maybe even all instances of a database. However, there are special cases in which you require individual access data for specific instances. In the configuration file you therefore have the following three options for specifying users:
| Parameter | Description |
|---|---|
DBUSER |
The default if no individual access data has been defined for the database instance. |
DBUSER_MYINST1 |
Access data for a specific database instance — in this case for the instance |
ASMUSER |
Special access data for Automatic Storage Management (ASM). |
Important: For an ASM only one login at a time can be specified.
These variables additionally allow even more options, except for username and password. You can also determine whether the user is a SYSDBA or SYSASM, on which combination of address and port the instance listens to, and even which TNSALIAS should be used. However, these specifications are always — unlike user and password — optional. In addition to the above example, a configuration can look like this:
# Syntax
# DBUSER='USERNAME:PASSWORD:ROLE:HOST:PORT:TNSALIAS'
DBUSER='checkmk:myPassword'

DBUSER_MYINST1='cmk_specific1:myPassword1:SYSDBA:localhost:1521'
DBUSER_MYINST2='cmk_specific2:myPassword2::localhost::INST2'

ASMUSER='cmk_asm:myASMPassword:SYSASM'
A few explanations for the above example:
You can define any number of individual access data. These are always preferred to the standard.
Each option is separated from the others by a
:(colon).If an optional field is omitted in the middle of the string, a colon must be coded. See
DBUSER_MYINST2where no special role is specified.If after a certain point, no more optional fields are needed, you can omit the colons. See
ASMUSER, where neither the host nor the port is specified.
Including or excluding instances
In some cases you may not want to include particular instances in the monitoring. This may be because it is only a playground for developers, or for other reasons. To make the configuration as simple as possible in individual situations, you have various options to entirely or partially exclude one or more instances:
| Parameter | Description |
|---|---|
ONLY_SIDS |
Here you can determine which instances are to be monitored. This is a positive list, ignoring all instances that are not explicitly listed. This option is very useful if the number of instances to be monitored is smaller than the number of instances to be ignored. |
SKIP_SIDS |
Unlike |
EXCLUDE__{SID}_ |
With this option you can partially exclude instances. Again, you can use the value |
You will have already guessed: The order in which these options are processed
determines the result. The entries are in fact processed per instance
exactly in sequence as specified. Therefore if the variable ONLY_SIDS
is set, SKIP_SIDS is no longer evaluated, and it is no longer possible
to determine whether a variable EXCLUDE_ has been specified as
ALL for this instance.
If ONLY_SIDS is not set, the system proceeds according to the sequence.
In case of doubt — that is, as the default behavior — the instance will be monitored accordingly.
Below is an example in which all variables are set and what the behavior is like:
ONLY_SIDS='INST1 INST2 INST5'
SKIP_SIDS='INST7 INST3 INST2'
EXCLUDE_INST1='ALL'
EXCLUDE_INST2='tablespaces rman'
Since the positive list from the first line always has priority, the second and third lines are accordingly no longer evaluated. Only the fourth (last) line will be considered at a later date, since the instance is only to be partially evaluated here.
In practice, it only makes sense to use one of the variables to determine the number of instances to be monitored.
Determining the data to be fetched
As you learned in the previous section, it is not only possible to disable
instances completely, but also to only partially monitor them.
The operational purposes are diverse, and it is especially practical when
it is undesirable to have certain long-running sections to be included in
everything, or only basic information from test instances is required.
To restrict sections globally, set the corresponding variables directly — to
restrict only certain instances you can slot in the EXCLUDE__{SID}_
variable which you have already learned about in the
previous section.
The global variables are:
| Parameter | Description |
|---|---|
SYNC_SECTIONS |
Sections that are to be queried synchronously, i.e. every time the agent runs. Since the query interval is 60 seconds by default, the SQL queries used must be run through correspondingly fast. If the variable is not specified, all sections are queried. |
ASYNC_SECTIONS |
Sections that are to be queried asynchronously, i.e. only every x minutes. How long the data remains valid is determined by the |
SYNC_ASM_SECTIONS |
Here the same mechanism for ASM sections applies as that used by the |
ASYNC_ASM_SECTIONS |
Here the same mechanism for ASM sections applies as that used by the |
CACHE_MAXAGE |
This variable is used to determine how long asynchronously retrieved data remains valid. If the variable’s value is not specified, a default of 600 seconds (10 minutes) is used. |
The mechanism therefore allows a value specified in the configuration file to predefine a default and, if necessary, to adjust this value again for individual instances as required. A configuration could then look like this, for example:
# DEFAULTS:
# SYNC_SECTIONS="instance sessions logswitches undostat recovery_area processes recovery_status longactivesessions dataguard_stats performance locks"
# ASYNC_SECTIONS="tablespaces rman jobs ts_quotas resumable"
# SYNC_ASM_SECTIONS="instance processes"
# ASYNC_ASM_SECTIONS="asm_diskgroup"
# CACHE_MAXAGE=600

SYNC_ASM_SECTIONS='instance'
ASYNC_SECTIONS='tablespaces jobs rman resumable'

CACHE_MAXAGE=300

EXCLUDE_INST1='undostat locks'
EXCLUDE_INST2='jobs'
As you can see in the example, only the instance section is queried for the ASM instances and a minimum set for the asynchronous sections is specified on all regular instances.
Additionally, on the INST1 instance the synchronous sections
undostat and locks will be omitted. Since
the synchronous sections are not explicitly specified, all synchronous sections
are retrieved from all other instances. INST2 in turn queries only
three of the four asynchronous sections, since jobs was additionally
excluded. And finally, the cache of 10 minutes is reduced to 5 minutes
(300 seconds), as this is sufficient time to get all data.
Important: If you define in the configuration file which
sections you would like to retrieve, and by which method — you can also alter a
asynchronous section to a synchronous section — you must specify
all sections which should be executed in the respective area.
For example, if you only want locks from the synchronous
query, specify the entire synchronous list and simply omit locks:
# Just exclude 'locks' from sync sections:
SYNC_SECTIONS='instance sessions logswitches undostat recovery_area processes recovery_status longactivesessions dataguard_stats performance'
The same applies for the other three variables in which the sections can be determined.
Configuring the TNS Alias and TNS_ADMIN
coming soon
3.3. Monitoring remote databases
Under unix-type systems, you can not only retrieve locally running instances, but also log on to remote ones and retrieve the databases running there. This, for example, is advantageous if you do not have access to the underlying system, but still want to monitor the database. For monitoring remote databases, there are the following requirements:
The Linux AIO access library is installed. Under RHEL/CentOS the package is called
libaio.The Instant Client for Oracle Database is installed.
SQLPlus already exists in the installation, or must be installed as an extension package to the client.
As a rule, the conditions are already fulfilled when an Oracle installation is present on the host on which the plug-in is to be executed. Otherwise use the appropriate packages to do so.
In order for the plug-in to connect to the remote database, first store the
access data in the configuration file. This procedure is similar to what you
already know from DBUSER.
However there are a number of additional — mandatory — specifications:
# Syntax:
# REMOTE_INSTANCE_[ID]='USER:PASSWORD:ROLE:HOST:PORT:PIGGYBACKHOST:SID:VERSION:TNSALIAS'

REMOTE_INSTANCE_1='check_mk:mypassword::myRemoteHost:1521:myOracleHost:MYINST3:11.2'
REMOTE_INSTANCE_myinst1='/:::myRemoteHost:1521::MYINST1:11.2:INST1'

REMOTE_ORACLE_HOME='/usr/lib/oracle/11.2/client64'
In the example, two remote instances are being configured. So that each text line is unique, each variable is given an ID. These can be freely-chosen — they just have to be unique for each configuration file. As you have probably already noticed, the port specification is now followed by further values. These are partly optional, and partly necessary to establish a connection.
The first additional value used (=PIGGYBACKHOST) in the MYINST3
instance is myOracleHost. This specification assigns the results from
the query to the specified host. If this is present as a host in Checkmk,
the new services will be installed there accordingly instead of on the host
where the plug-in is running or from which the data was fetched.
You do not see this specification on the second
instance MYINST1 — the assignment to another host is optional.
The second new value SID is the instance name. Since the plug-in on the remote host cannot see what instances are running there, a configuration line must be specified for each remote instance — this value is therefore required and thus not optional.
The third value VERSION is required and is also due to the fact that
much meta-information is only available if you are directly on the host.
The version specification therefore also cannot be omitted, and it determines
which SQL queries can be passed to the instance.
In the example, both instances use version 11.2.
The fourth and last value TNSALIAS is again optional and can be used if you access the remote instance via the wallet or the LDAP/Active Directory. In the event that the instance responds only to a specific TNS alias, you can specify this alias here.
To also find the program sqlplus, use the REMOTE_ORACLE_HOME
variable to specify where the Oracle client is located on the host that runs the
plug-in. Only then are all resources available that are required for the queries.
Important: When querying remote instances, there are some restrictions and special features:
You cannot — understandably — exclude remote instances with
SKIP_SIDS, and in return you do not need to include them inONLY_SIDS.Instances with the same name (SID) must not be assigned to the same host. This is especially relevant if you are fetching instances from multiple remote and/or local hosts where identical names are used.
3.4. Setting up via the Agent Bakery
![]() The setup can be greatly simplified under Linux, AIX, Solaris and HP-UX
with the Agent Bakery, because syntax errors in
the configuration files are avoided, and adaptations to changing environments
can be implemented more easily. The main difference compared to a manual
configuration is that you only need to work on the Oracle host at the command
line if you want to make special Oracle-specific configurations.
The setup can be greatly simplified under Linux, AIX, Solaris and HP-UX
with the Agent Bakery, because syntax errors in
the configuration files are avoided, and adaptations to changing environments
can be implemented more easily. The main difference compared to a manual
configuration is that you only need to work on the Oracle host at the command
line if you want to make special Oracle-specific configurations.
Nevertheless, you cannot configure all functions of the plug-in using the Agent Bakery. On the one hand, when you are dealing with obsolete configuration options that are only available for compatibility reasons. These can then be replaced with the current options accordingly. On the other hand, if these are functions that require a major intervention and require significant expertise. Accordingly, the Custom SQLs cannot be configured directly in the Agent Bakery.
Use Setup > Agents > Windows, Linux, Solaris, AIX and the menu Agents > Agent rules > ORACLE Databases (Linux, Solaris, AIX to create a rule. Here you will find all options available to you for configuring the plug-in:
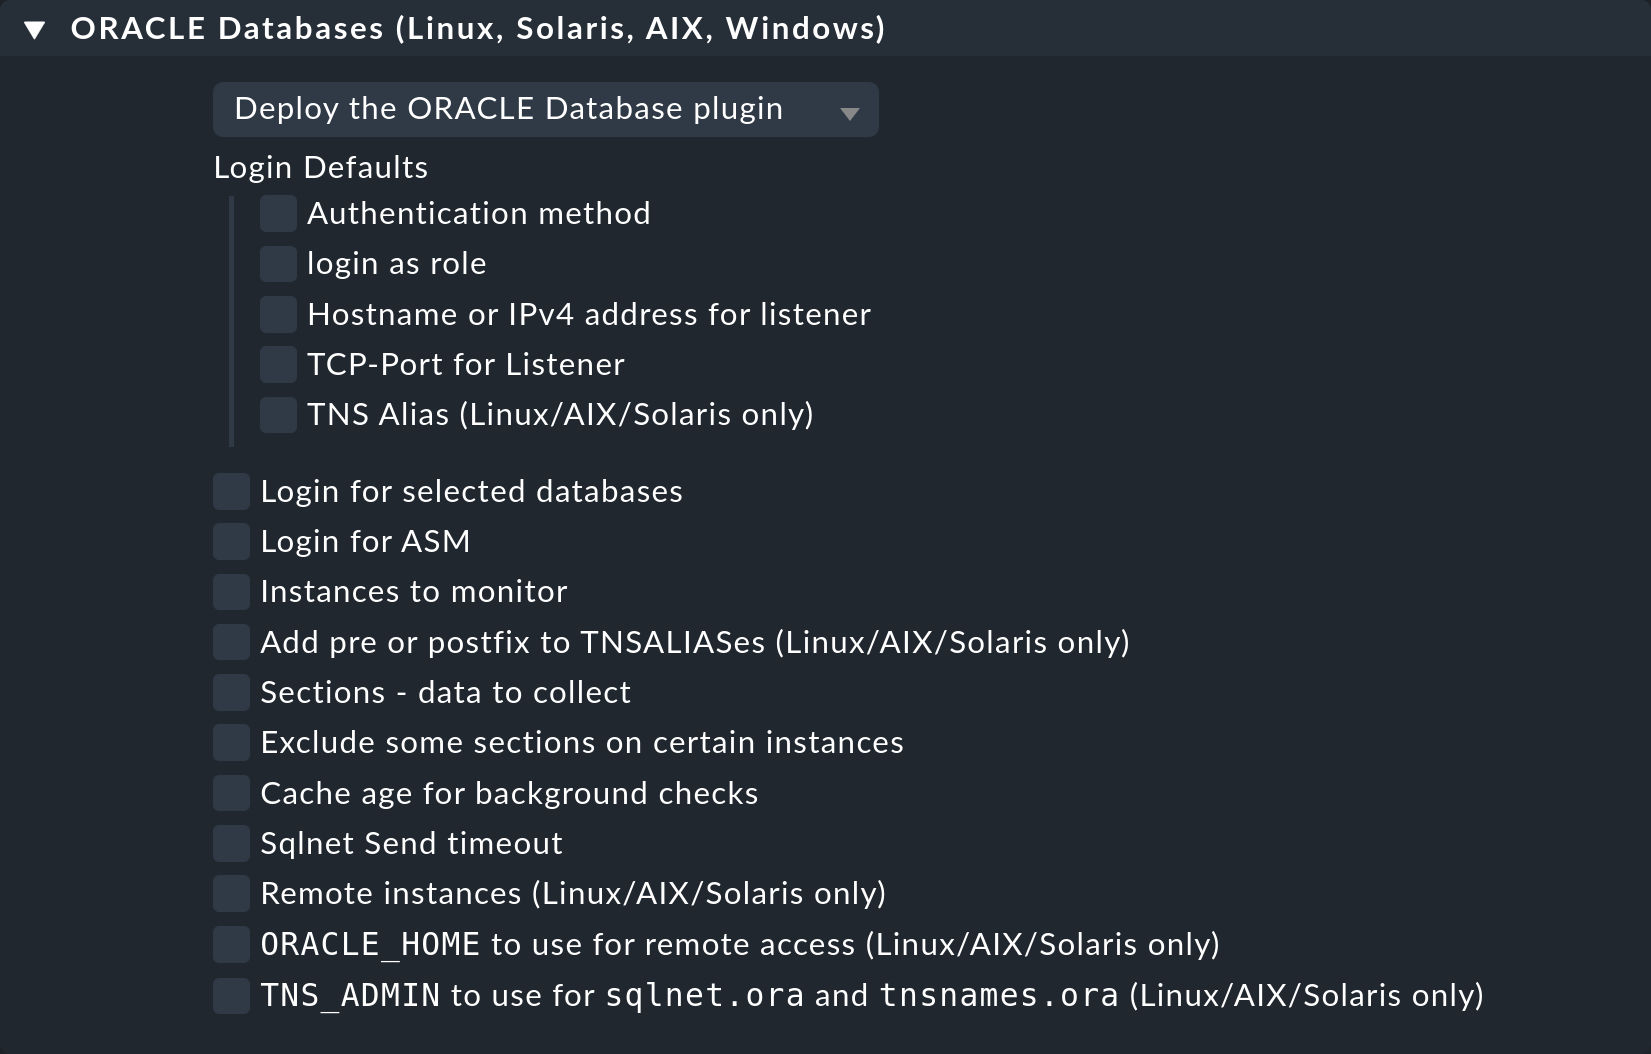
Configuring users
In the Agent Bakery you also have the option of creating standard users and creating exceptions for specific instances. The options — separated by a colon — that you find in the configuration file, you will find here as individual options which you can then fill out as needed. In the simplest configuration it will look something like this:
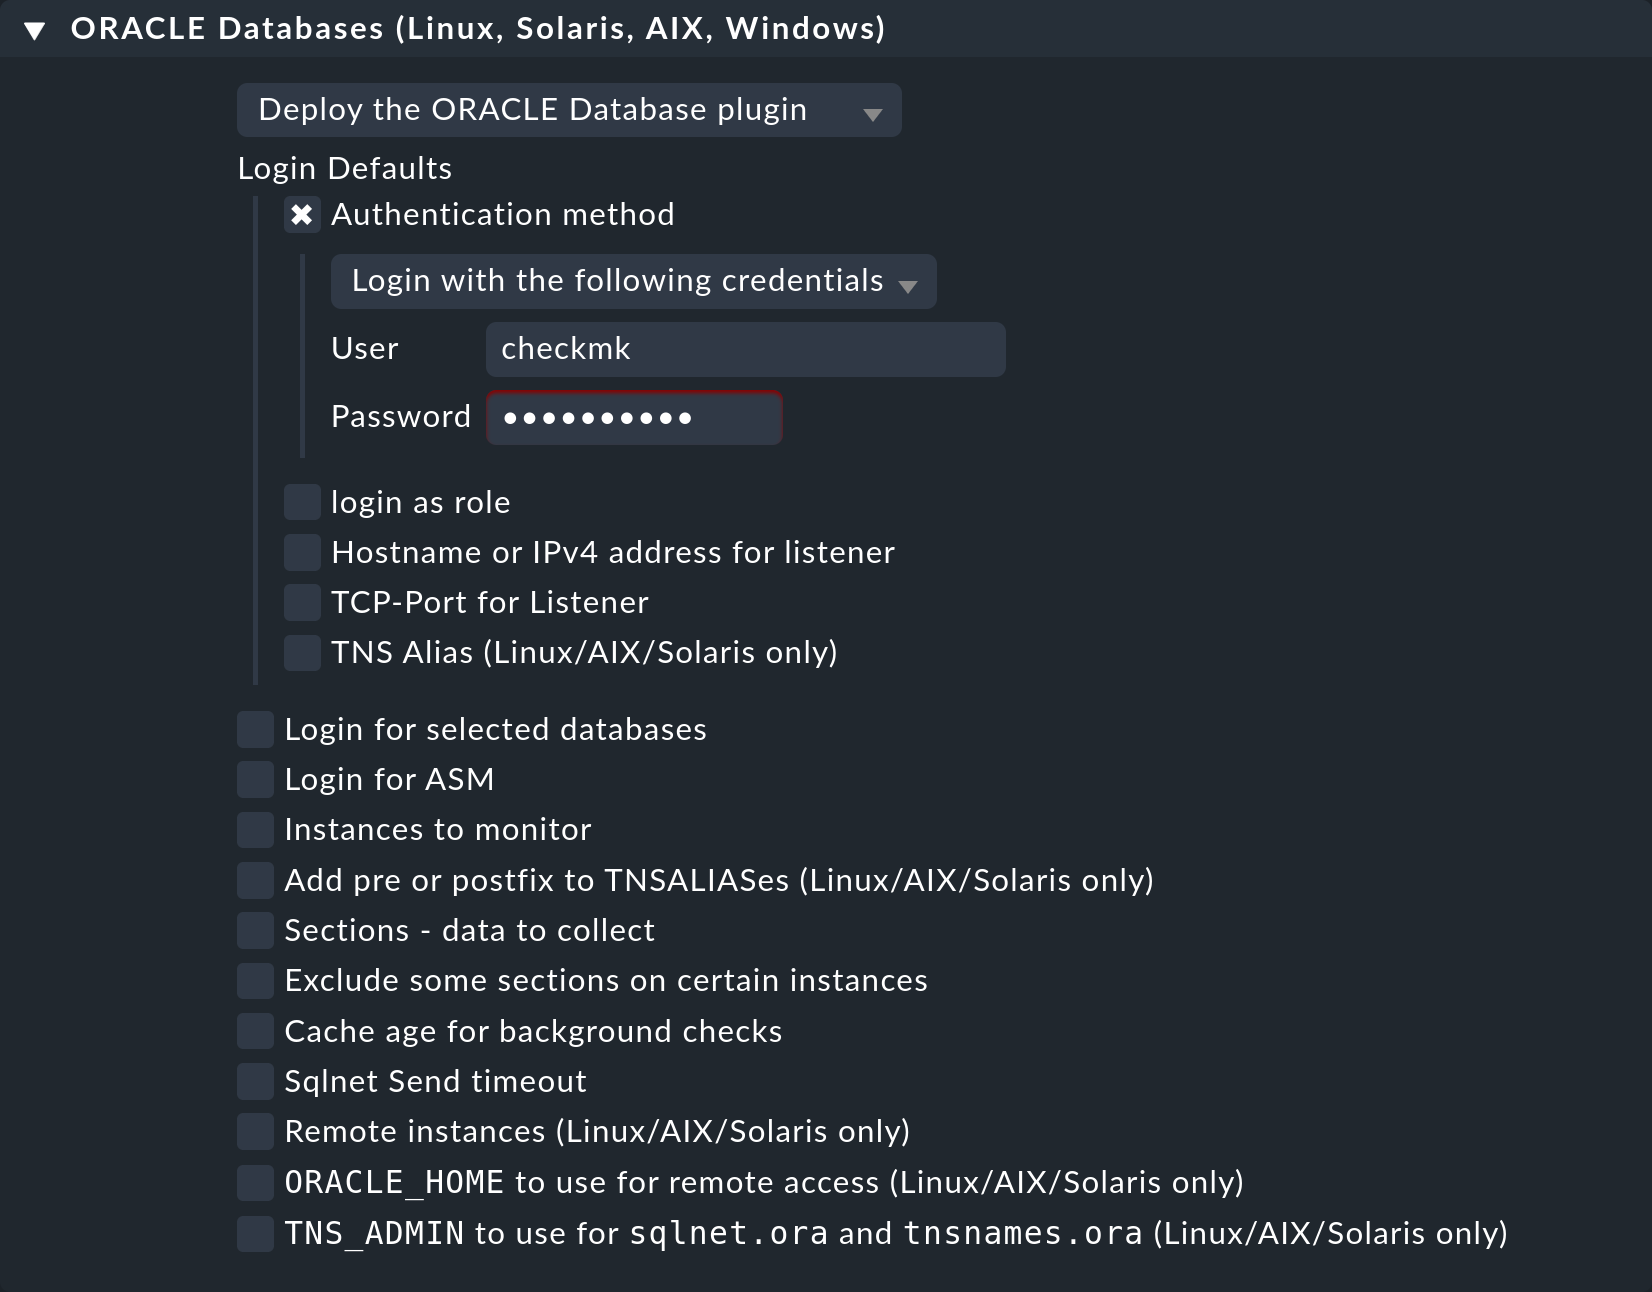
Of course you can also use the wallet here by selecting Authentication method in the dropdown menu, and simply changing to Use manually created ORACLE password wallet.
The configuration for an ASM is done analogously via the Login for ASM option, and the exceptions for specific instances can be found at Login for selected databases.
Advanced options
The following table lists the remaining options in the ORACLE Databases (Linux, Solaris, AIX) rule set, along with a reference to where to find a description of the option:
| Option | Description |
|---|---|
Instances to monitor |
This option combines several options of the configuration file, allowing you to include or exclude instances. |
Add pre or postfix to TNSALIASes |
This option allows you to extend the TNSALIAS either globally or for a specific instance. |
Sections - data to collect |
All available sections are listed under this option, and these can be configured individually at the global level. They therefore correspond to both variables |
Exclude some sections on certain instances |
If you do not want to use |
Cache age for background checks |
Specify here how long asynchronous sections should remain valid. The default value is 600 seconds (10 minutes). |
Sqlnet Send timeout |
This option is added to |
Remote instances |
Configure remote instances with this option. It contains all elements of the configuration that you already know. To specify the variable’s ID, via Unique ID you can select from various options. These only affect the specified ID and must therefore be unique. |
ORACLE_HOME to use for remote access |
Here you can determine where the agent plug-in can find the |
TNS_ADMIN to use for sqlnet.ora and tnsnames.ora |
If you have already created the corresponding files in another location, you can use this option — as described above — to provide the file path to the files. Otherwise, this is searched for under |
4. Windows
4.1. Plug-in and configuration paths
On Windows, PowerShell is used as a scripting language to monitor Oracle databases. The functionality is similar to the plug-in under unix-type systems, but contains only a part of this. To use the plug-in under Windows you need the following paths, if you have not changed them.
| OS | Plug-in path | Configuration path |
|---|---|---|
Windows |
C:\ProgramData\checkmk\agent\plugins |
C:\ProgramData\checkmk\agent\plugins |
Windows (Legacy Agent) |
C:\Program Files (x86)\check_mk\plugins\ |
C:\Program Files (x86)\check_mk\config\ |
Note: Since the Legacy Agent is only needed in very rare, exceptional cases, it is not considered in the following description. We therefore always refer to the current agent architecture here.
To activate the mk_oracle.ps1 plug-in, copy the plug-in from
C:\Program Files (x86)\checkmk\service\plugins\ into the plug-in
directory described above.
Alternatively, you can refer to the file in the installation path in the agent’s configuration file.
4.2. Special features under Windows
Windows normally prevents the execution of PowerShell scripts if they have not been signed. You can now work around this problem very easily by modifying the policies for running PowerShell scripts for the user who is running the Checkmk agent:
UP(C:\ProgramData\checkmk\agent\>):Set-ExecutionPolicy -ExecutionPolicy Bypass -Scope LocalMachine
UP(C:\ProgramData\checkmk\agent\>):Get-ExecutionPolicy -Scope LocalMachine
Bypass
This option is useful if for a short time you want to test a script or the general functionality of the Checkmk agent. To avoid compromising the security of your system, revert this setting on production servers after testing has been completed:
UP(C:\Program\checkmk\agent\>):Set-ExecutionPolicy -ExecutionPolicy RemoteSigned -Scope LocalMachine
UP(C:\Program\checkmk\agent\>):Get-ExecutionPolicy -Scope LocalMachine
RemoteSigned
Understandably, you probably don’t want to change the guidelines every 60 seconds. You therefore set a permanent exception only for the relevant scripts. The configuration script must also be added to the exceptions. For easy readability, in this example the output has been completely omitted:
UP(C:\ProgramData\checkmk\agent\>):Unblock-File -Path .\plugins\mk_oracle.ps1
UP(C:\ProgramData\checkmk\agent\>):Unblock-File -Path .\config\mk_oracle_cfg.ps1
4.3. Advanced options
In the general setup you have already learned about the first variables to get monitoring data from your Oracle instances. Further options that are also available to you under Windows are described in the following sections.
Advanced user configuration
As under Linux, you can also define not only a standard login for the Windows plug-in, but also individual logins for individual instances. You therefore have the same three options for specifying users:
| Parameter | Description |
|---|---|
DBUSER |
The default if no individual access data are defined for the database instance. |
DBUSER_MYINST1 |
Access data for a very specific database instance. In this case for the |
ASMUSER |
Special access data for the Automatic Storage Management (ASM). |
Important: Here, too, only one login can be specified for an ASM.
In addition, more options other than user name or password can also be specified here — these additional entries are also optional, however each entry must be filled in if it is used. A configuration may then look like this, for example:
# Syntax
# DBUSER = @("USERNAME", "PASSWORD", "ROLE", "HOST", "PORT")
# Default
# DBUSER = @("", "", "", "localhost", "1521")
$DBUSER = @("checkmk", "myPassword", "SYSDBA", "localhost", "1521")

@DBUSER_MYINST1 = @("cmk_specific1", "myPassword1", "", "10.0.0.73")
@DBUSER_MYINST2 = @("cmk_specific2", "myPassword2", "SYSDBA", "localhost", "1531")

@ASMUSER = @("cmk_asm", "myASMPassword", "SYSASM")
A few explanations regarding the above example:
You can define as many individual access data as you like. These will always have priority over the default.
Each option is defined in a list. The order of the entries is not arbitrary, so therefore the order may not be rearranged.
When an optional field remains unchanged but a field following it is to be edited, BOTH fields must be specified correctly. See
DBUSER_MYINST2where theHOSTis still set to localhost even though only thePORTis to be changed.If optional fields are no longer needed after a certain point, they can be omitted. See
ASMUSER, in which only the user’s role was specified.If no special role is to be assigned to the user, but
HOSTorPORTis to be customized, simply enter a pair of inverted commas/double quotes ("") in this position.
Enabling and disabling instances
Even under Windows, one does not always want to include certain instances. The reasons for this have already been described in the section covering Linux. Two of the three alternatives that you know from Linux can also be used here:
| Parameter | Description |
|---|---|
ONLY_SIDS |
Here it can be determined which instances are to be monitored. This is a positive list in which all instances that are not explicitly listed are ignored. This option is therefore very suitable if the number of instances to be monitored is smaller than the number of instances to be ignored. |
EXCLUDE__{SID}_ |
Since the |
The processing is done for each instance in the order given above. So first it is
checked whether the instance is in ONLY_SIDS, and only then whether
certain sections are to be excluded. If the variable EXCLUDE_ is set to
ALL, no section will be executed.
Below is an example where each variable is shown once:
$ONLY_SIDS = @("MYINST1", "MYINST3")
$EXCLUDE_INST1 = "tablespaces rman"
$EXCLUDE_INST3 = "ALL"
Note that ONLY_SIDS is a list, whereas EXCLUDE_INST1 is a
string containing sections separated by spaces.
Determining data to be fetched
The specification of which sections are to be actually fetched is done in the same way as with Linux, and the following is only an example for a configuration:
# DEFAULTS:
# $SYNC_SECTIONS = @("instance", "sessions", "logswitches", "undostat", "recovery_area", "processes", "recovery_status", "longactivesessions", "dataguard_stats", "performance", "locks")
# $ASYNC_SECTIONS = @("tablespaces", "rman", "jobs", "ts_quotas", "resumable")
# $SYNC_ASM_SECTIONS = @("instance", "processes")
# $ASYNC_ASM_SECTIONS = @("asm_diskgroup")
# $CACHE_MAXAGE = 600

$SYNC_ASM_SECTIONS = @("instance")
$ASYNC_SECTIONS = @("tablespaces", "jobs", "rman", "resumable")

$CACHE_MAXAGE = 300

$EXCLUDE_INST1 = "undostat locks"
$EXCLUDE_INST2 = "jobs'
Important: If you specify in the configuration file which sections are to
be fetched in which way — you can also convert an asynchronous section into a
synchronous one — you must specify all sections that are to be executed
in the respective field. For example, if you want to exclude only locks
from the synchronous query, specify the entire synchronous list and omit only locks:
# Just exclude 'locks' from sync sections:
$SYNC_SECTIONS = @("instance", "sessions", "logswitches", "undostat", "recovery_area", "processes", "recovery_status", "longactivesessions", "dataguard_stats", "performance")
The same applies for the other three variables in which the sections are determined.
4.4. Monitoring remote databases
Monitoring remote databases is currently not possible using the Windows plug-in. Therefore if you want to monitor remote databases, you need a host with a compatible unix-type operating system.
4.5. Setup via the Agent Bakery
![]() A setup via the Agent Bakery is currently only available for
unix-type operating systems.
A setup via the Agent Bakery is currently only available for
unix-type operating systems.
5. Clustered instances
5.1. Standby databases
Oracle supports so-called standby databases which can perform specified tasks, and which are usually simply copies of production or primary databases. These database concepts also require special monitoring mechanisms. You can find out more about these mechanisms in the following sections.
With Active Data Guard (ADG)
Once you have licensed and activated ADG, you do not need to make any changes to the configuration of the agent plug-in, since you can read from a standby instance at any time without having to interrupt the synchronization with the primary instance.
Without Active Data Guard (DG)
If the instances do not have ADG, the user with which the monitoring data from the standby instances is to be fetched needs the sysdba role. This authorization enables the user to fetch at least part of the data, even if the primary instance fails and the instance on the standby server has not yet been changed from MOUNTED to OPEN.
Assign the authorization to the user who is authorized to retrieve the data from the instance(s). Important: How this works may differ from the following example. Here the role is assigned to the user as created in the example above:
sqlplus> grant sysdba to checkmk;To enable the data to be queried by the agent plug-in on the standby server in
case of an error, create the user on the primary instance, and then copy the
password file to the standby server. Finally, in the plug-in’s configuration file, set the role of the user to sysdba:
# Syntax:
# DBUSER='USER:PASSWORD:ROLE:HOST:PORT:TNSALIAS'
DBUSER='checkmk:myPassword:sysdba'
Note that specifying a host, port, or TNS alias is optional, and can be omitted as always. In addition, the agent plug-in must of course be installed on both the primary Oracle host and the standby hosts.
Setting up clustered services
On the monitored host you need to perform certain actions, and on the Checkmk side it is also necessary that you customize the services and assign them to a cluster host — regardless of whether you use ADG or DG. The corresponding check plug-ins have already been prepared to the extent that they can also be configured as Clustered Services. Create a cluster host in Checkmk, and to this cluster host assign the individual Oracle hosts to which the primary and the standalone instances are assigned. Then assign the following services to this cluster host:
ORA .* RMAN Backup
ORA .* Job
ORA .* Tablespaces
After this you will no longer need to worry about which instance the data comes from, and will have ensured seamless monitoring of the above-mentioned services — even in the event of a switchover of the primary instance.
5.2. Real Application Cluster (RAC)
Since there is a central storage for the data in a RAC, it is sufficient here to create the user for the agent plug-in only once. Only the agent plug-in needs to be installed and configured on each node of the Oracle cluster.
Important: Always set up the cluster’s nodes yourself, and do not query the SCAN listener. This is the only way to ensure that access via the plug-in works correctly.
Setting up clustered services
Even with an RAC, it makes sense to combine specified services in a cluster host. In addition to the services that you assign to the cluster host under an (Active) Data Guard, you also assign the following services to the cluster host to ensure seamless monitoring in the event of switchovers:
ASM.* Diskgroup
ORA .* Recovery Area
6. Monitoring with own SQL queries (Custom SQLs)
6.1. Why specify own SQL queries?
With its official plug-in Checkmk already provides a large number of SQL queries with which you can monitor your database instances. To make these suitable for the widest possible range of technical and content requirements, they are of course kept in a very generalized form.
In order to be able to meet the individual requirements of each company for the
monitoring of a specific database, Checkmk
provides the possibility of defining your own SQL queries and having them queried with
the mk_oracle plug-in. These SQL queries are then automatically recognized and
monitored as own services in the Web interface.
Important: It is only possible to query own SQL queries under Linux, AIX and Solaris. Under Windows this option is not available.
6.2. Simple integration of own SQL queries
Writing SQL queries to be queried
The easiest way to connect such a SQL is to use the
Custom SQLs for Oracle DBs check plug-in. To do this,
first create the file mySQL.sql in the agent configuration directory of
the host where the SQL is to be executed.
The following is a dummy that illustrates the syntax:
/*Syntax help in comments. The first word is always the key word and ends with a ":"*/

/*details:Text to display in the service detail output*/
prompt details: Some details for the service output;

/*perfdata:METRIKNAME=CURRENTVALUE;WARN;CRIT;MAX METRIKNAME=CURRENTVALUE2;WARN;CRIT;MAX*/
prompt perfdata:MyMetricName1=10;15;20;30 MyMetricName2=16;15;20;30;
prompt perfdata:MyMetricName3=21;15;20;30 MyMetricName4=15;15;20;30;

/*long:Text to display in the long output of the service*/
prompt long: Here comes some long output for the service;
prompt long: Here comes some more long output for the service;

/*exit:Status of the service as a number*/
prompt exit:2;
The example shows on the one hand that you can define any number of statements in such a file. On the other hand, the syntax is very similar to that of a local check, especially with regard to performance values. In detail, this syntax is much more powerful here, because you can generate multiline output, and then process it on the Checkmk server as a service. In principle, all lines are optional and do not need to be filled. The possible keywords are in detail:
details: Here you can determine what should be output in the generated service’s Status Detail. This line is introduced with the keyword and a colon. The rest of the line is the output.perfdata: Performance data is passed with this keyword. Within a line, you can create any number of metrics — each separated by a space. You can also distribute the output of the metrics over several lines. Just always start with the keywordperfdata:.long: If the service should have a Long Output, you can specify it here. You can also use this keyword multiple times to create multiple lines in the Long Output.exit: If the output should have a certain status, you can specify this here. The known assignments 0,1,2,3 are available for the statuses OK, WARN, CRIT, UNKNOWN.
Note: You do not have to define the keyword elapsed manually.
It is generated automatically at runtime to check how long the commands you
defined took to process.
Configuring the mk_oracle-Plug-in
Now that you have defined your first, very simple SQL, make it known to the plug-in. This is done via the familiar configuration file, which you can modify accordingly:
SQLS_SECTIONS="mycustomsection1"

mycustomsection1 () {
    SQLS_SIDS="INST1"
    SQLS_DIR="/etc/check_mk"
    SQLS_SQL="MyCustomSQL.sql"
}
With the first option — SQLS_SECTIONS — you determine which
individual sections you want to have executed. In the example we have specified
only one, and then described it in more detail directly afterwards.
Each section is actually a small function called by the mk_oracle plug-in.
In this function you can then determine further details and specify for which
instances (SQLS_SIDS) this section applies. In addition, you also
define where the file with the SQL statements is located (SQLS_DIR),
and the name of this file (SQLS_SQL). This simple configuration is
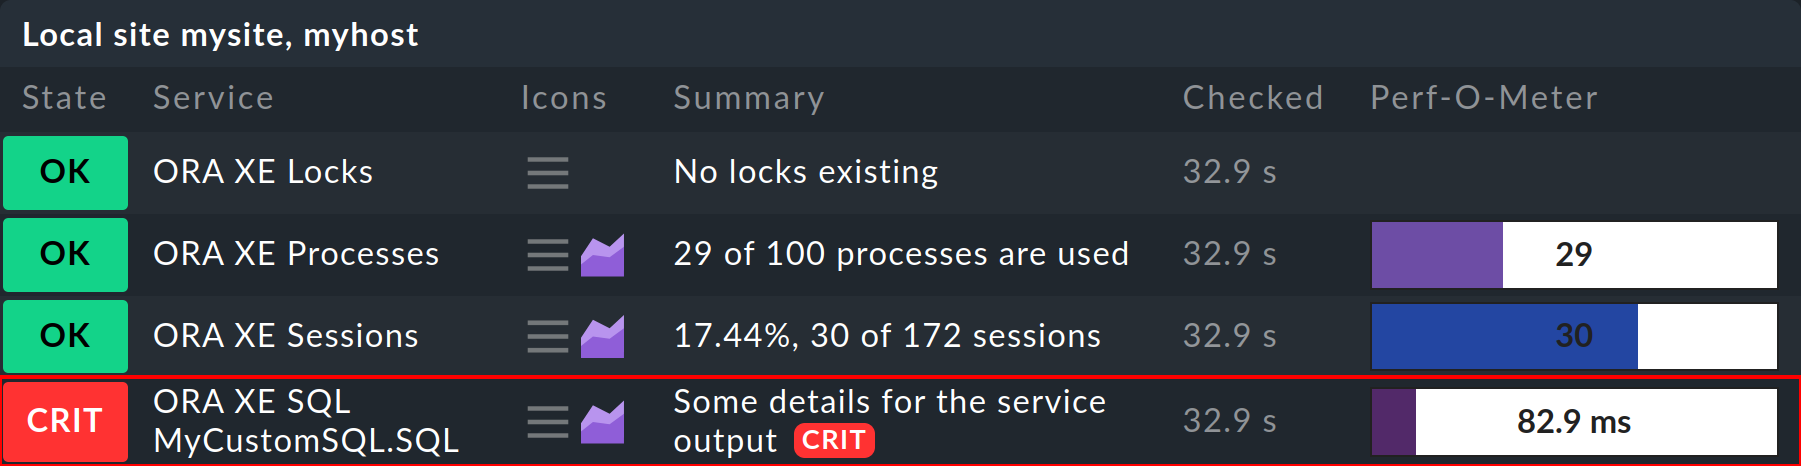
sufficient to be able to see the result in Checkmk. To do this, perform a service
discovery and activate the new service. Afterwards you will see this new service
with the other services in the host overview:
6.3. Advanced options
The possibilities to monitor with your own SQL queries of course go beyond the simple
case shown above. In the following you will find a small overview of the
available variables. For a detailed description you can also call the plug-in
with the --help option. Important: Variables that can only be
set outside or only inside a section function are marked accordingly.
All others can be defined in both sections.
If they are set outside of a section, they will apply globally to all sections.
| Variable | Short description | optional |
|---|---|---|
SQLS_SECTIONS |
The self-defined section functions to be executed by the plug-in. Important: This variable can only be set outside of a (global) section function. |
no |
SQLS_SIDS |
The instances that are to execute the section(s). Can be set globally or per section. |
no |
SQLS_DIR |
The file path under which your own SQL queries were stored. Can be set globally or per section. |
no |
SQLS_SQL |
The file that contains the instructions for a section. |
no |
SQLS_SECTION_NAME |
The section name when you have written your own check plug-in for the individual SQL queries. |
ja |
SQLS_SECTION_SEP |
The separator of the individual elements in a line as ASCII-ID. This variable can only be used in conjunction with the |
ja |
SQLS_ITEM_NAME |
Determines an individual identifier for the service name. Normally the SID and the file name of the SQL queries are taken over. Important: This variable can not be used together with the variable |
ja |
SQLS_MAX_CACHE_AGE |
Performs the same task as |
ja |
SQLS_DBUSER |
Defines an individual user for the sections. |
ja |
SQLS_DBPASSWORD |
Defines an individual password for the sections. |
ja |
SQLS_DBSYSCONNECT |
Extends the connection via a SYS role for the sections. |
ja |
SQLS_TNSALIAS |
Sets an individual TNSALIAS for the sections. |
ja |
6.4. Using your own check plug-ins
If the possibilities of the syntax described above are not sufficient, you can
also use the SQLS_SECTION_NAME variable to output your own section name
for one or more SQL queries. However, this requires that you have also written an
appropriate check plug-in and included it in your Checkmk instance.
If you have written such a check plug-in, you are completely free in the syntax for the plug-in’s output and can go your own way. Since this method is the most comprehensive, and also the most difficult, it is only mentioned here for completeness. It assumes that you know how to program a Checkmk check and integrate it into the monitoring instance. After that you simply assign the individual SQL queries with the variables to this check plug-in.
7. Diagnostic options
7.1. Testing connections
Linux, AIX, Solaris
If you have problems connecting to one or more instances on an Oracle server,
the first thing you can do is to check basic parameters.
With the -t option you can display the details of a connection.
In the output the dummy sections have been omitted for readability.
Also note that the plug-in must be provided with the file path to its
configuration file beforehand, as it relies on this.
The following is an example on a Linux server:
root@linux# export MK_CONFDIR="/etc/check_mk/"
root@linux# /usr/lib/check_mk_agent/plugins/mk_oracle -t
---login----------------------------------------------------------------
    Operating System:       Linux
    ORACLE_HOME (oratab):   /u01/app/oracle/product/11.2.0/xe
    Logincheck to Instance: XE
    Version:                11.2
    Login ok User:          checkmk on ORA-SRV01 Instance XE
    SYNC_SECTIONS:          instance dataguard_stats processes longactivesessions sessions recovery_status undostat logswitches recovery_area performance
    ASYNC_SECTIONS:         tablespaces rman jobs ts_quotas resumable
------------------------------------------------------------------------
Since this call is more likely to be made in the event of an error, you will of course then also receive further information: Both the connection string that was used for the connection and the first 100 characters of the error message that was returned during the connection attempt. With the help of this information, you can quickly identify simple configuration problems and then correct them accordingly.
Windows
The plug-in does not accept any parameters under Windows. So to test the connection here, temporarily limit the sections to be retrieved to instance and activate the DEBUG option:
# Syntax:
# $DBUSER = @("USERNAME", "PASSWORD")
$DBUSER = @("checkmk", "myPassword")

SYNC_SECTIONS = @("instance")
ASYNC_SECTIONS = @("")
DEBUG = 1
Then run the plug-in manually. Again, you will get information about how the plug-in tries to access the instances. An output may then look like this, for example:
C:\ProgramData\checkmk\agent\plugins\> .\mk_oracle.ps1
2020-08-23T12:48:20.3930944+02:00 DEBUG:value of DBVERSION software = xxx112020xxx
<[oracle_instances]>
2020-08-23T12:48:20.3930944+02:00 DEBUG:value of inst_name = xxxXExxx
2020-08-23T12:48:20.3930944+02:00 DEBUG:value of DBVERSION database = xxx112020xxx
2020-08-23T12:48:20.3930944+02:00 DEBUG:value of the_section = sql_instance
2020-08-23T12:48:20.3930944+02:00 DEBUG:now calling multiple SQL
2020-08-23T12:48:20.3930944+02:00 DEBUG:value of sql_connect in dbuser = checkmk/myPassword@(DESCRIPTION=(ADDRESS=(PROTOCOL=TCP)(HOST=localhost)(PORT=1521))(CONNECT_DATA=(SID=XE))) as sysdba
<[oracle_instance]>
XE|FAILURE|...
7.2. Getting a log generated
Linux, AIX, Solaris
If the error cannot be found by checking a simple connection, the next step is to create a complete log, which logs all of the plug-in’s steps. Again, you will need the file path to the configuration file, and also the path to the plug-in’s cached data. Again, the output of the sections has been omitted here to improve readability:
root@linux# export MK_CONFDIR="/etc/check_mk/"
root@linux# export MK_VARDIR="/var/lib/check_mk_agent/"
root@linux# /usr/lib/check_mk_agent/plugins/mk_oracle -l
Start logging to file: /var/lib/check_mk_agent/log/mk_oracle.log
When in doubt, you can use this log to identify very precisely on which line of the script the problem has occurred.
Windows
Logging under Windows works similarly to the connection test itself. If the connection itself is stable, you can add the real sections back in the configuration file and then get a complete output of the logging accordingly.
7.3. Debugging the plug-in
Linux, AIX, Solaris
If you can’t get to the problem, even with the help of the log, as a last resort
the plug-in provides the complete output of all steps for an error analysis.
This output is therefore the most comprehensive, and certainly the most
difficult to read method to get to the cause of a problem, and should therefore
only be used as a last resort.
You can call the debugging with the -d option.
Do not forget the necessary environment variable:
root@linux# export MK_CONFDIR="/etc/check_mk/"
root@linux# /usr/lib/check_mk_agent/plugins/mk_oracle -d
Important: In this output sensitive data such as passwords is not masked. So everything is readable in plain text.
Windows
A similar functionality is available under Windows. However, since you cannot pass any arguments to the plug-in, you have to switch on tracing manually:
C:\ProgramData\checkmk\agent\plugins\> Set-PSDebug -Trace 1
C:\ProgramData\checkmk\agent\plugins\> .\mk_oracle.ps1
8. Files and directories
8.1. Linux, AIX and Solaris
| File path | Description |
|---|---|
/usr/bin/check_mk_agent |
The agent that collects all data about the host. |
/usr/lib/check_mk/plugins/mk_oracle |
The usual directory where the plug-ins are located. Note that the path under AIX is slightly different: |
/etc/check_mk/oracle.cfg |
The configuration file for the plug-in. Again, the difference is AIX: |
/etc/check_mk/sqlnet.ora |
The configuration file required for the Oracle Wallet. |
/etc/check_mk/tnsnames.ora |
The configuration file which, if you specify it manually, determines an alias for a schema. Sample files are also located in the Oracle installation, but since the path differs from installation to installation, it cannot be specified in a standardized way. |
8.2. Windows
| File path | Description |
|---|---|
C:\Program Files (x86)\checkmk\service\check_mk_agent.exe |
The agent that collects all data about the host. |
C:\ProgramData\checkmk\agent\plugins\mk_oracle.ps1 |
The usual directory where the plug-ins are located. |
C:\ProgramData\checkmk\agent\config\mk_oracle_cfg.ps1 |
The configuration file for the plug-in. |
C:\ProgramData\checkmk\agent\config\sqlnet.ora |
The configuration file required for the Oracle Wallet. |
C:\ProgramData\checkmk\agent\config\tnsnames.ora |
The configuration file which, if you specify it manually, determines an alias for a schema. Sample files are also located in the Oracle installation, but since the path differs from installation to installation, it cannot be specified in a standardized way. |
8.3. On the Checkmk server
| File path | Description |
|---|---|
share/check_mk/agents/cfg_examples/mk_oracle.cfg |
Here are examples of the configuration under Linux, AIX or Solaris. The plug-in needs such a configuration to be able to fetch data, since access data can be defined there. |
share/check_mk/agents/windows/cfg_examples/mk_oracle_cfg.ps1 |
Examples for the configuration under Windows can be found here. |
share/check_mk/agents/windows/plugins/mk_oracle.ps1 |
The plug-in for Windows that fetches the data on the Oracle host. |
share/check_mk/agents/plugins/mk_oracle |
The plug-in for unix-type systems, which fetches the data on the Oracle host. |
share/check_mk/agents/plugins/mk_oracle_crs |
This plug-in provides data to an Oracle Cluster Manager. |