1. Introduction
Worldwide, Docker has become one of the most widely used software products for container virtualization. As necessary as end-to-end and transparent monitoring of containers is, it is also complex due to these containers' dynamic and multi-layered architecture.
Checkmk can monitor Docker containers directly via the Linux agent. But Checkmk monitors not only the general status of the daemon or the container, but also the container itself. A full list of the elements that can currently be monitored can be found in the Catalog of Check Plug-ins.
Alongside the status and inventory information which Checkmk can determine over the node (docker-jargon for ’the host on which the containers are running’), Checkmk can also determine detailed status information for the containers. For this every container has to be added as a separate host in Checkmk if the container is to be monitored. Its data will be piggybacked from the node to this host.
Within the ![]() Checkmk Enterprise Editions, container hosts can be automatically created or removed using the dynamic configuration.
Checkmk Enterprise Editions, container hosts can be automatically created or removed using the dynamic configuration.
2. Setting up
2.1. Installing the agent and plug-in
To be able to monitor a Docker node with Checkmk, it must first be monitored with the normal Linux agent. This will give you a basic monitoring of the host system, however there will be no information about the Docker daemon or about the container.
You will need the mk_docker.py agent plug-in, which you can find here: Setup > Agents > Other operating systems > Plugins
Install the plug-in to the agent’s plug-in folder (usually /usr/lib/check_mk_agent/plugins).
For detailed information on installing an agent plug-in, see the Linux agent article.
root@linux# install -m 0755 mk_docker.py /usr/lib/check_mk_agent/pluginsIn the ![]() Checkmk Enterprise Editions you can also do this with the Agent Bakery, which comes with the appropriate rule set for monitoring Docker: Docker node and containers
Checkmk Enterprise Editions you can also do this with the Agent Bakery, which comes with the appropriate rule set for monitoring Docker: Docker node and containers
Note, that the docker Python library is required (not docker-py).
At least Version 2.6.1 is necessary.
You can easily check this by entering python on the command line:
root@linux# python3
Python 3.8.10 (default, Nov 26 2021, 20:14:08)
[GCC 9.3.0] on linux
Type "help", "copyright", "credits" or "license" for more information.
>>> import docker
>>> docker.version
'5.0.3'
If required you can install the library with pip3:
root@linux# pip3 install dockerAttention: The packages, docker-py or python-docker-py respectively, must not be installed.
These make an outdated and incompatible version of the Docker library available under the same namespace!
If docker-py (or both variants) have been installed, a single uninstall is not enough because pip3 cannot fix the namespace.
In this case, to ensure that the correct version is installed, please execute the following commands:
root@linux# pip3 uninstall docker-py docker
root@linux# pip3 install docker
If you now perform the service discovery in Checkmk and activate the changes, you should find some new services that affect the Docker node itself:
2.2. Fine tuning the plug-in
You can configure different parameters of the plug-in.
For example you can save resources by deactivating unnecessary sections or, if required, by customizing the Docker API Engine endpoint (the default is the Unix socket unix://var/run/docker.sock).
Create the configuration file /etc/check_mk/docker.cfg on the Docker host.
A template with detailed explanations can be found in the Checkmk directory ~/share/check_mk/agents/cfg_examples/docker.cfg.
In the Enterprise Editions you can easily configure all parameters with the Agent Bakery.
2.3. Monitoring the containers
Creating the container hosts
Of course the interesting aspect is the monitoring of the Docker containers. This will be implemented automatically by installing the plug-ins, however the services will not be assigned to the docker node, rather Checkmk assumes a single host per docker container.
The mechanism used here is called piggyback:
The plug-in or special agent transports data of other hosts — ‘piggybacked’ so to speak — alongside its own data.
Checkmk places this data in the tmp/check_mk/piggyback directory.
All you have to do in the Setup is to create hosts with the correct names, and the services will then be automatically assigned to them.
In the Enterprise Editions you can have these hosts created automatically. Use the Piggyback connector in the dynamic configuration. Note the following, if you create the hosts manually:
The host name must exactly match the directory created in
tmp/check_mk/piggyback. By default, this is the 12-character short ID of the container (for example,2ed23056480f).If the containers do not have their own IP addresses (which is usually the case), set Network address > IP address family# to No IP.
For Monitoring agents be sure to set Checkmk agent / API integrations to No API integrations, no Checkmk agent.
You can set the Parents field in the section Basic settings to the host name of the Docker node.
It is also important that the Docker node and its containers are monitored from the same Checkmk site.
Once the container hosts have been created, and after performing a service discovery, new services appear on these.
If you have a Linux agent installed in the container, it will be executed automatically. However since many services monitored by the agent within the containers actually show information from the node (for example, CPU load, temperature and many other operating system parameters), these were removed.
Alternative names for container hosts
By default — as mentioned above — the 12-character short ID for the container is used as the name for the container host.
This can optionally be configured differently.
To do this, in the configuration file docker.cfg (see Fine tuning the plug-in) set the container_id option to long in order to use the complete container ID as the name, or to name in order to use the container name.
![]() Checkmk Enterprise Editions users can set this up in the Agent Bakery using the rule Docker node and containers, option Host name used for containers.
Checkmk Enterprise Editions users can set this up in the Agent Bakery using the rule Docker node and containers, option Host name used for containers.

Incidentally: With the Access to agents > General settings > Hostname translation for piggybacked hosts rule set you can define quite flexible rules for renaming host names contained in piggyback data. With this method you can also solve the problem of having containers with the same name on two different Docker nodes, for example.
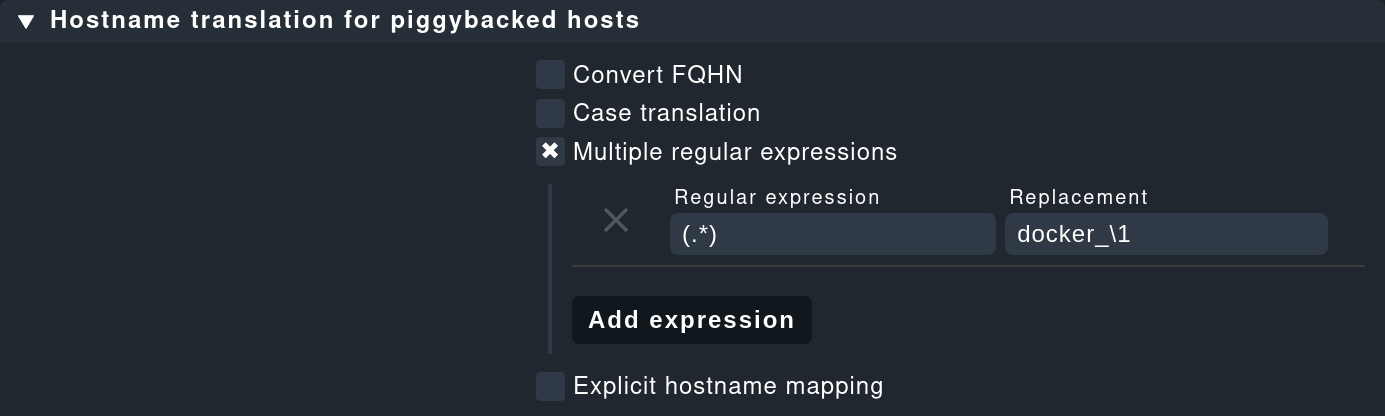
See the The Piggyback Mechanism article for more options and a more detailed description of this function.
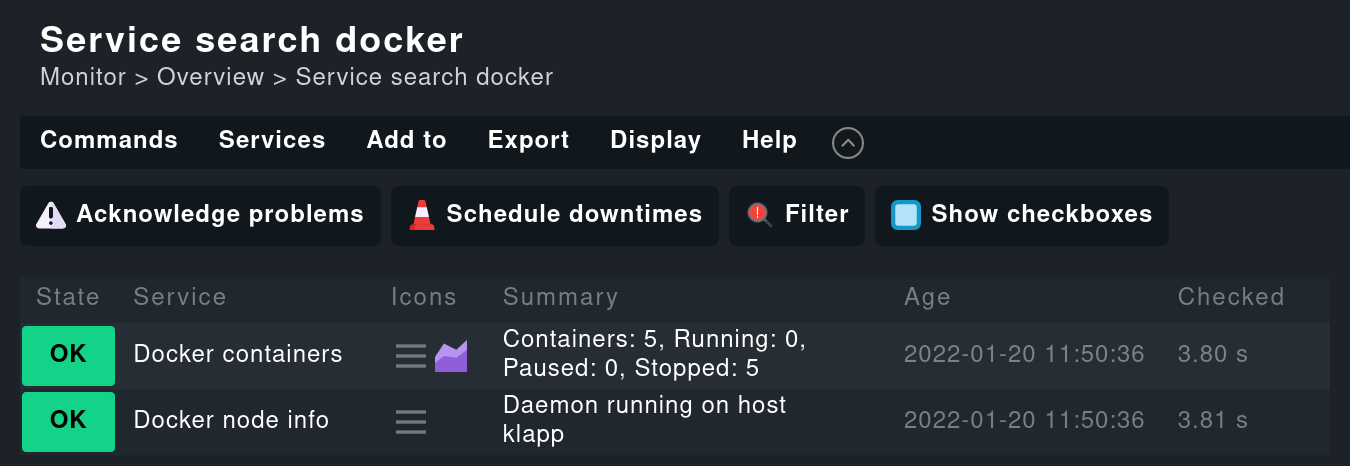
Monitoring the host’s status
Since a container’s host status cannot really be verified using TCP packets or ICMP, this must be determined in another way. The Docker container status service facilitates this — in any case it checks whether the container is running, and can thus be used as a secure tool for detecting the host’s status. Define a rule in the Host Check Command rule set for this purpose, and set the Use the status of the service… option to the mentioned service. Don’t forget to set the conditions so that only containers are affected. In our example all containers are located in a folder with the same name:

Operating the agent directly in the container
To monitor details in the container itself (e.g., running processes, databases, log files, etc.), it is necessary that the Checkmk agent is installed and executed in the container itself.
This is especially true for the roll out of agent plug-ins.
The three plug-ins mem, cpu and diskstat (Disk I/O) work without an agent in the container though, and are analyzed by the Checkmk agent on the node itself.
Especially for self-created Docker images you might want to roll out the agent itself into the container. In this case the data is no longer analyzed — as described above — by the Docker node’s agent. Instead of this a separate agent runs in each container. Calling this agent will still be bundled in a piggyback procedure via the Docker node however.
However the agent installed in the container only works if all necessary commands are also present in the container. Especially with minimally-built containers based on Alpine Linux it could very well be that elemental things such as Bash are not present. In such a situation you should monitor the container from the Docker node.
The use of the Host Check Command rule set will in this case only be required if the container is not pingable — but it will otherwise function exactly as described above.
3. Diagnostic options
3.1. Diagnosis of a Docker node
Should the setup not be successful, there are a number of options for analyzing the problem. If applicable, verify that a Checkmk agent with at least version 1.5.0 or a later version is installed on the host.
If the version of the agent on the host is suitable, next check if the data is present in the agent’s output. You can download the output as a text file: in a host view in monitoring via the Download agent output action menu entry:

Alternatively, you could search the agent cache directly. For clarity the output in the following example is abbreviated to the output for the node:
OMD[mysite]:~$ strings tmp/check_mk/cache/mydockerhost | grep "<<<docker"
<<<docker_node_info>>>
<<<docker_node_disk_usage:sep(44)>>>
<<<docker_node_images>>>
<<<docker_node_network:sep(0)>>>If the sections are not shown here, the Docker installation will not be recognized. The following command is used for the Docker node info service. This command must be executable in exactly this form on the host. If necessary, check your Docker installation:
root@linux# docker info 2>&13.2. Diagnosis for a container host
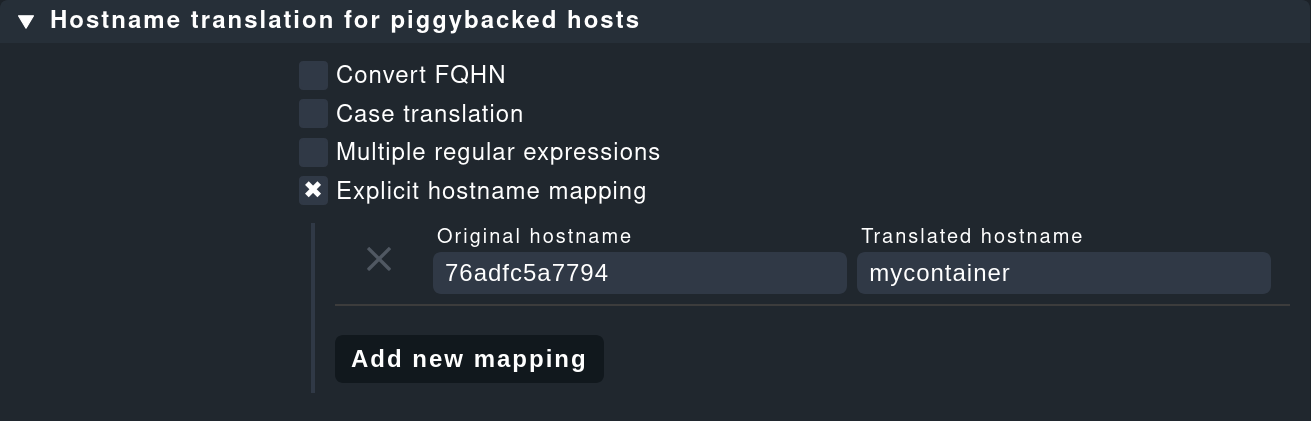
If the container host receives no data, or respectively, no services are detected, first check if piggyback data is available for this host. The host’s name must be identical to the ID of the container. Alternatively, you can also make a manual assignment using the Hostname translation for piggybacked hosts rule set. Here, however, only the Explicit hostname mapping option is suitable:
To verify whether piggyback data will be created for an ID, you can check the following directory:
OMD[mysite]:~$ ls -l tmp/check_mk/piggyback/
76adfc5a7794  f0bced2c8c96  bf9b3b853834
4. Host labels
In Checkmk there are so-called host labels. Amongst others the Docker monitoring automatically sets these labels:
for the Docker node the
cmk/docker_object:nodelabel,for each of the containers the
cmk/docker_image,cmk/docker_image_name,cmk/docker_image_versionandcmk/docker_objectlabels.
You can use these labels, e.g. in conditions for your rules, to make your monitoring configuration dependent on the image used in a container.
5. Files and directories
| File path | Function |
|---|---|
|
Checkmk stores the piggyback data here. For each host a subfolder with the host’s name will be generated. This contains a text file with the host’s data. The filename is the host that supplied the data. |
|
Here the most recent agent output from all hosts is saved temporarily. The contents of a host’s file is identical to that from the |