1. Introduction
Checkmk has a very modular structure, and those with a knowledge of Python programming can extend it in many places. Among other things it is possible to extend Checkmk with the following elements:
Own checks and agent plug-ins, including input masks for the configuration environment.
Own plug-ins for the Checkmk HW/SW inventory
Extensions for the GUI (views, dashboards, columns, icons, etc.).
Definitions of graphs or Perf-o-Meters
Notification and alert handler scripts (also in shell or other scripting languages).
All of these these extensions can be implemented by placing additional files in the ~/local directory within the Checkmk site.
To manage these extensions, to roll them out in distributed environments and also share them with other users, Checkmk provides its own package format the Checkmk extension package — in short MKP.
An MKP can include any desired set of extensions — for example, a set of check plug-ins including associated manual pages, threshold configuration environments and associated metric definitions. It can furthermore contain settings for distribution via the Agent Bakery. An MKP has a name, a version number and can be installed or removed with a simple action.
Note: The two-step install/uninstall process described in this article applies to Checkmk 2.1.0p21. Earlier versions use a one-step install/uninstall. This new process was retrofitted to facilitate upgrading from 2.0.0 to 2.1.0 (and later from 2.1.0 to 2.2.0).
1.1. The Checkmk Exchange
On the Checkmk Exchange, programmers of plug-ins can provide packages for other Checkmk users and exchange these amongst themselves. From the Exchange you can download and use extensions for free. Please note that packages from the Exchange are shared voluntarily by other users and are without any warranty. Improperly programmed plug-ins can lead to increased CPU/system loads and memory requirements. In addition, it is possible that an MKP was developed for older versions of CMK and thus may not be fully compatible (from version 1.6.0 to 2.0.0 Checkmk changed from Python 2 to Python 3). In extreme cases there can be a risk of data or service loss. We therefore strongly recommend that before using third-party MKPs in a production environment, they should first be installed on a test site.
1.2. Tools for MKPs
There are two tools for managing MKPs:
The command line command
mkp.The Setup menu item Extension Packages (
Checkmk Enterprise Editions only)
We will now introduce both management tools in more detail. They are compatible with each other so that you can use the command line command and Extension Packages without "messing anything up".
2. Managing extension packages via the Setup menu
The function for managing MKPs via the GUI is available only in the Enterprise Editions of Checkmk.
In the Setup menu you enter the management of MKPs via Setup > Maintenance > Extension packages.
Here you can add, modify or create new MKPs:
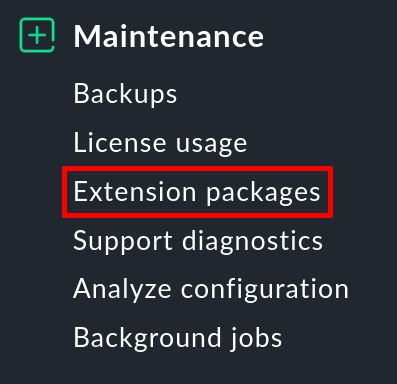
2.1. Adding an MKP
An MKP that you have downloaded from the Exchange, for example, can be uploaded to Checkmk by clicking the Upload package button and will then be made available for installation.
To do this, the file must be present on the machine that is also running your web browser.
The file extension of the package must be .mkp.

Following an installation, the extension package will initially be available. It is located under All packages (enabled or disabled):
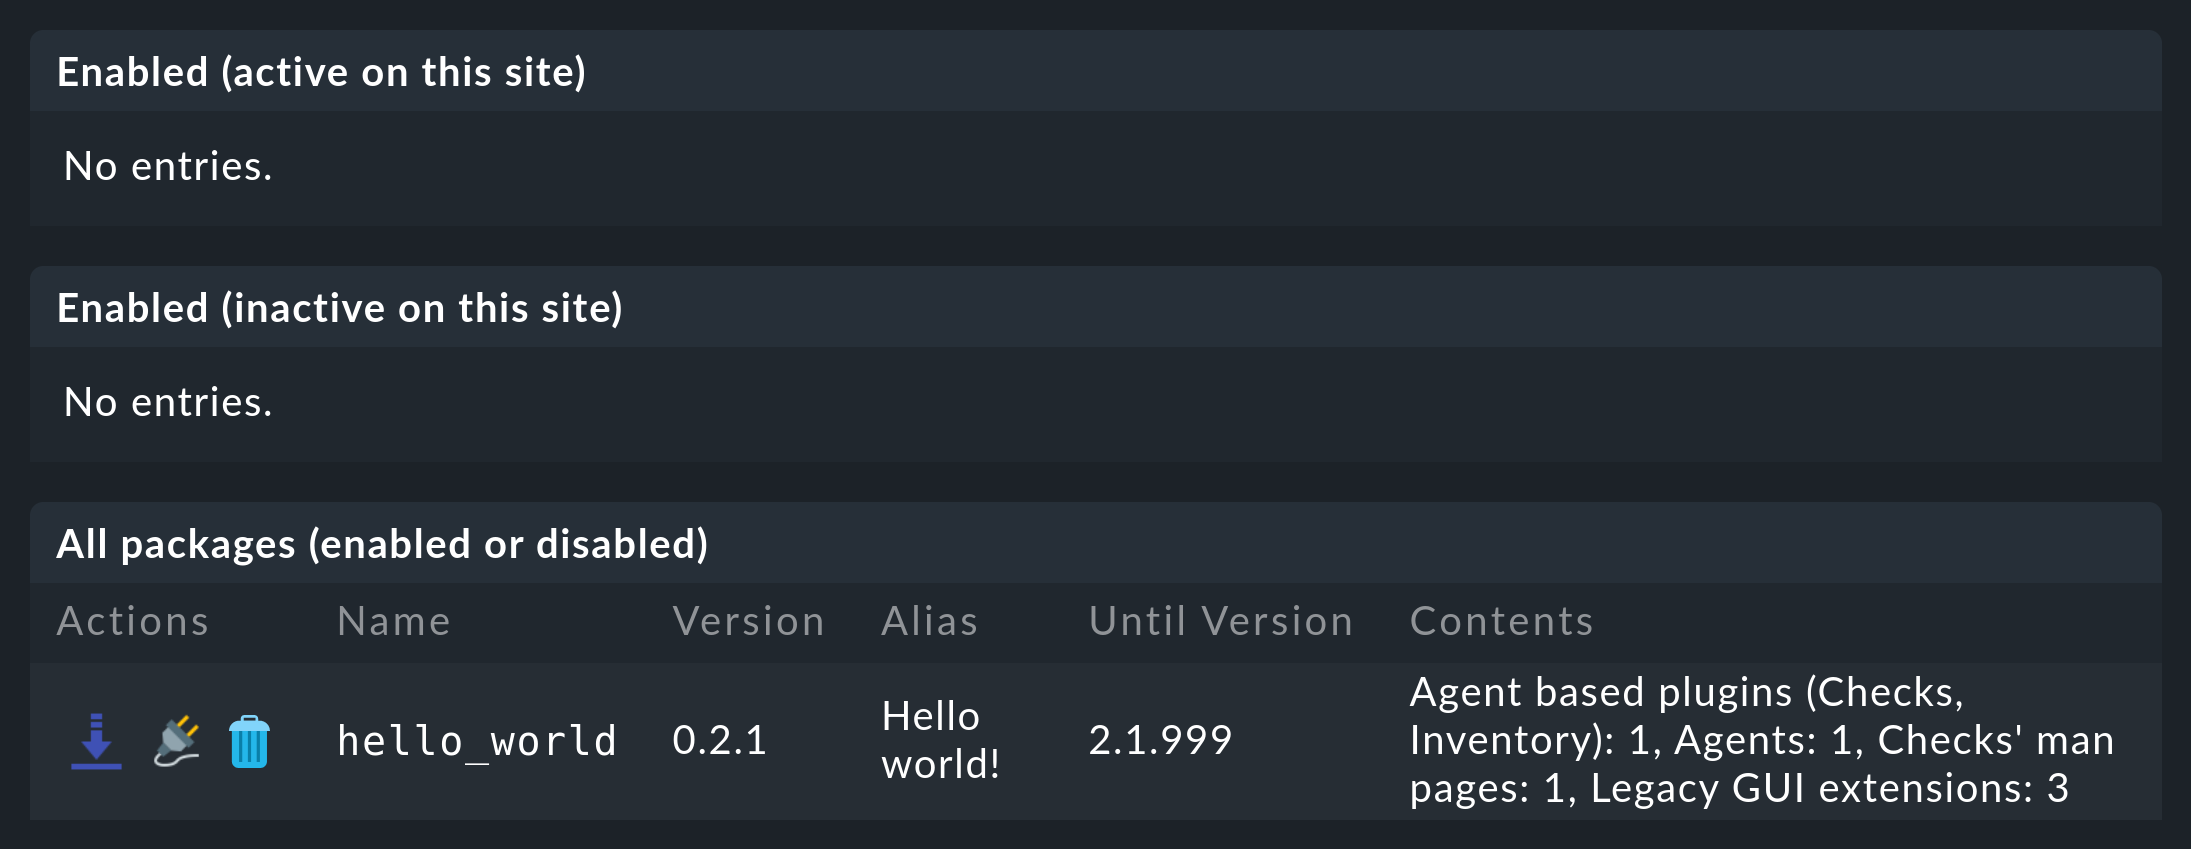
2.2. Activating an MKP
Only with a click on the plug icon ![]() will an available package also be activated.
During activation, the files are installed in a folder hierarchy under
will an available package also be activated.
During activation, the files are installed in a folder hierarchy under ~/local/.
The package description file is also placed in ~/var/check_mk/packages/.
After activation, the package will also appear in the list of enabled and active MKPs — Enabled (active on this site):

Now perform an activation of changes, after which all functions from the package will be anchored in the system and ready for use.
2.3. Disabling and removing packages
The complete deletion of a package is also done in two stages.
With the ![]() button you first deactivate a package in the list of active packages.
In this step the installed files are removed, but the MKP is still kept — this step only reverses the activation.
button you first deactivate a package in the list of active packages.
In this step the installed files are removed, but the MKP is still kept — this step only reverses the activation.
Using the ![]() icon in the list of all packages, you can again delete installed and unused packages.
When deleting, the package is deleted and with it the extension is completely removed — i.e. the opposite of adding a package.
icon in the list of all packages, you can again delete installed and unused packages.
When deleting, the package is deleted and with it the extension is completely removed — i.e. the opposite of adding a package.
2.4. MKPs in distributed environments
In the case of a distributed setup, it is sufficient to make the packages available on the central site.
For each remote site associated with the central site, you can then separately determine whether the customizations should be propagated to that remote site.
All you have to do is activate the Replicate extensions option.
After that, the MKPs and all other changes below the ~/local directory will also be transferred during synchronization.
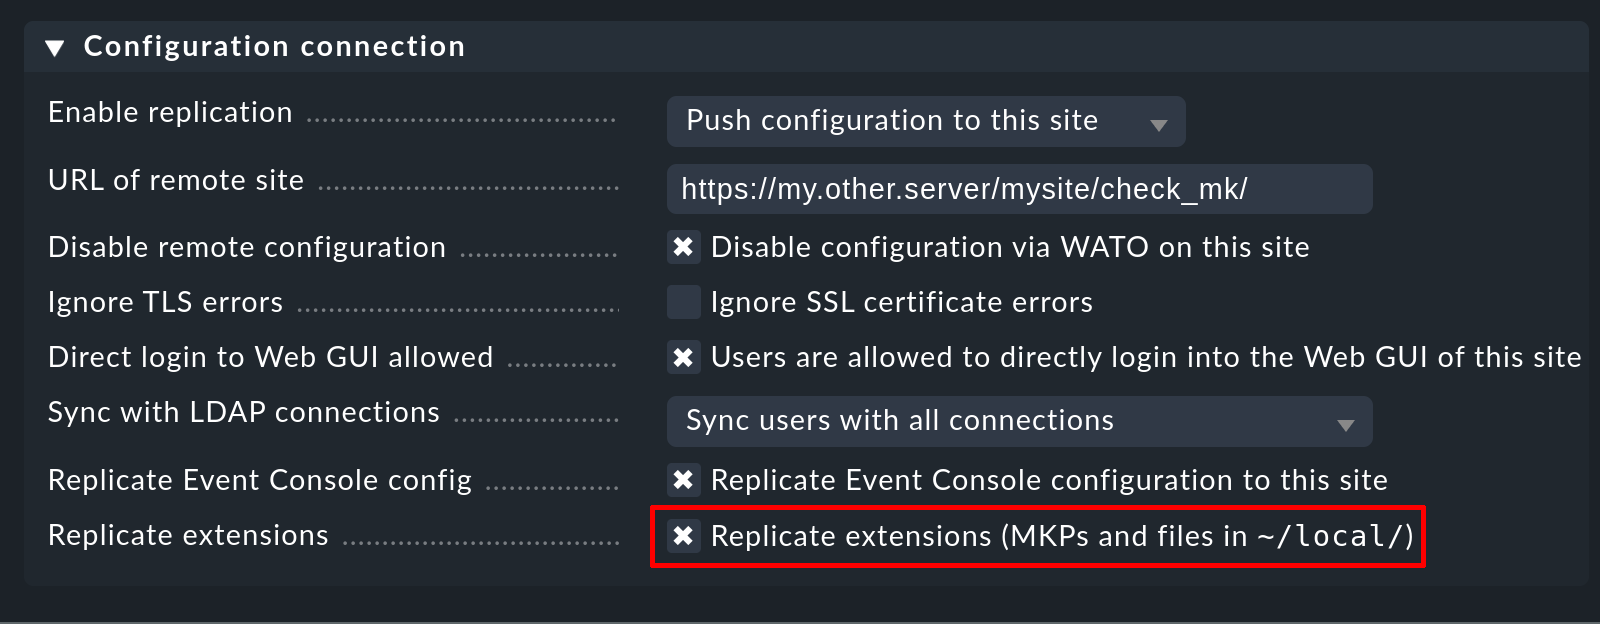
If a transfer is not desired, simply turn off the option for this or all sites.
Important: The customizations for the distributed setup will only be transferred if the Enable replication option is set to Push configuration to this site.
2.5. Special case: Enabled but inactive packages
Risk of loss of settings! When updating the major version, Checkmk deletes rules that are no longer required. If you uninstall packages before the update in order to install a new version after the update, settings that are still required may be lost. Instead, always install new and old packages in parallel as described in this section and only remove old packages after the update. |
A special case is the attempted activation of a package that does not match the Checkmk version used. Such a package that is enabled, but whose activation fails because of an incompatible Checkmk version, will end up in the Enabled (inactive on this site) list.
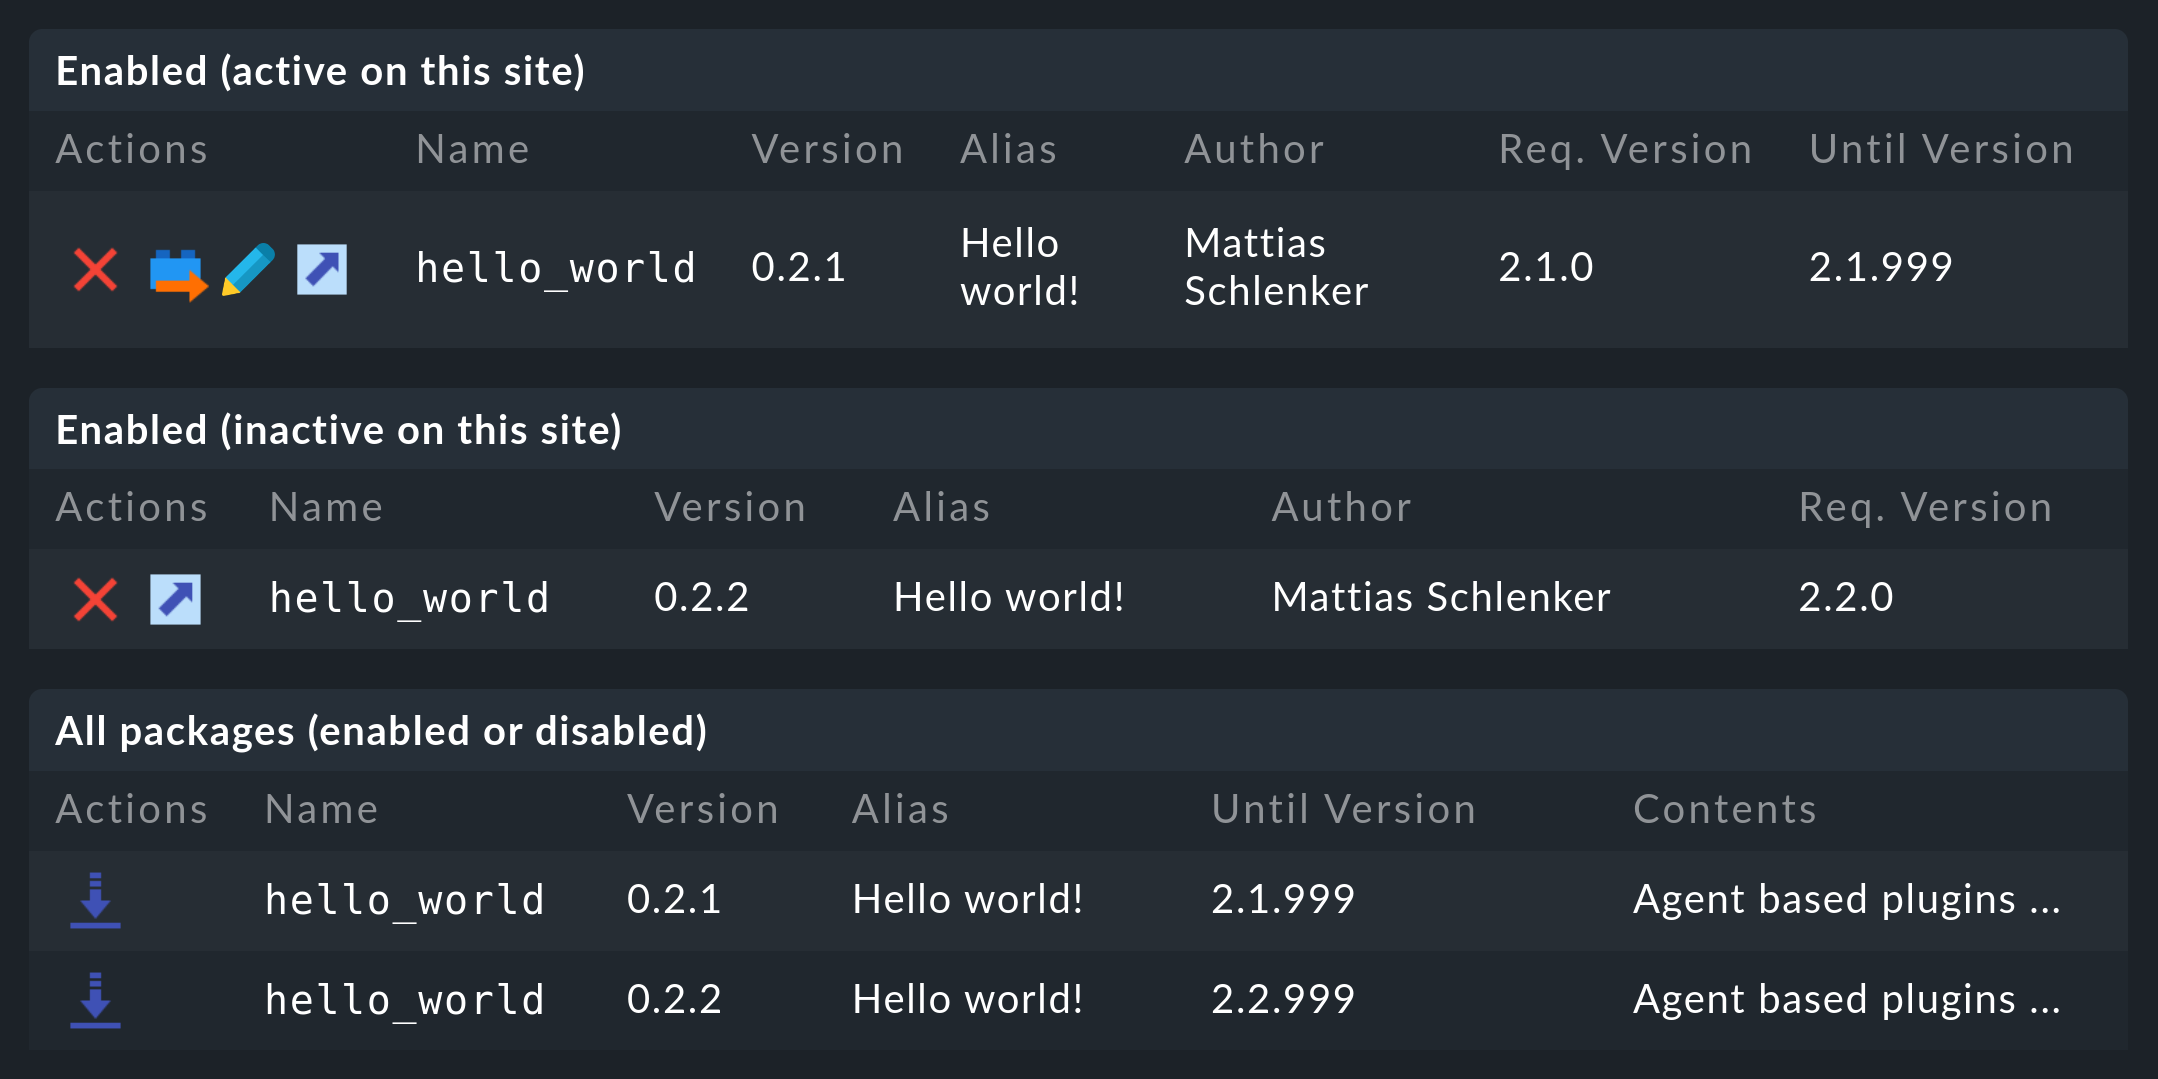
But why install packages that do not match the Checkmk version you are using? There are two good reasons:
An update of the Checkmk version: You have the possibility of storing packages for both the old and the new versions — when you next perform an update, the newer package will be activated automatically.
Distributed Monitoring: To facilitate updates, the Checkmk major version of remote sites may be one higher than that of the central site. However, this previously made it difficult to distribute MKPs because these had to be compatible with both major versions. With the ability to unlock mismatched packages, you can keep packages on the central site that match both the source and target versions. The newer version will then be automatically activated during an update.
From the version numbers shown in the above screenshot, you can see that it is a Checkmk 2.1.0 central site that provides packages for remote sites that have already been upgraded to 2.2.0.
3. MKPs for developers
If you are programming or modifying your own plug-ins for Checkmk, please see the articles on the existing programming interfaces and the file system structure, the integration into the Agent Bakery and the guidelines for check plug-ins.
3.1. Unpacking packages
The ![]() unpack icon unpacks the packaged files under
unpack icon unpacks the packaged files under ~/local/ and only removes the package description.
As a result, the files will be unpackaged and the extensions will remain active.
This is the opposite of creating a package from previously unpackaged files.
In practice, you will most likely need to unpackage when you want to customize an extension and later repackage it with any changes. For example, you can use our Hello world! example, which does nothing useful, but can serve as a template to help you get started with your first custom package.
3.2. Creating packages
Creating your own MKP is very easy once the programming work has been completed.
The starting point is that you have created your own files in the appropriate directories under ~/local/.
For example, for custom, agent-based check plug-ins, the correct directory is ~/local/lib/check_mk/base/plugins/agent_based.
These files do not initially belong to any package and are therefore listed under Unpackaged files:
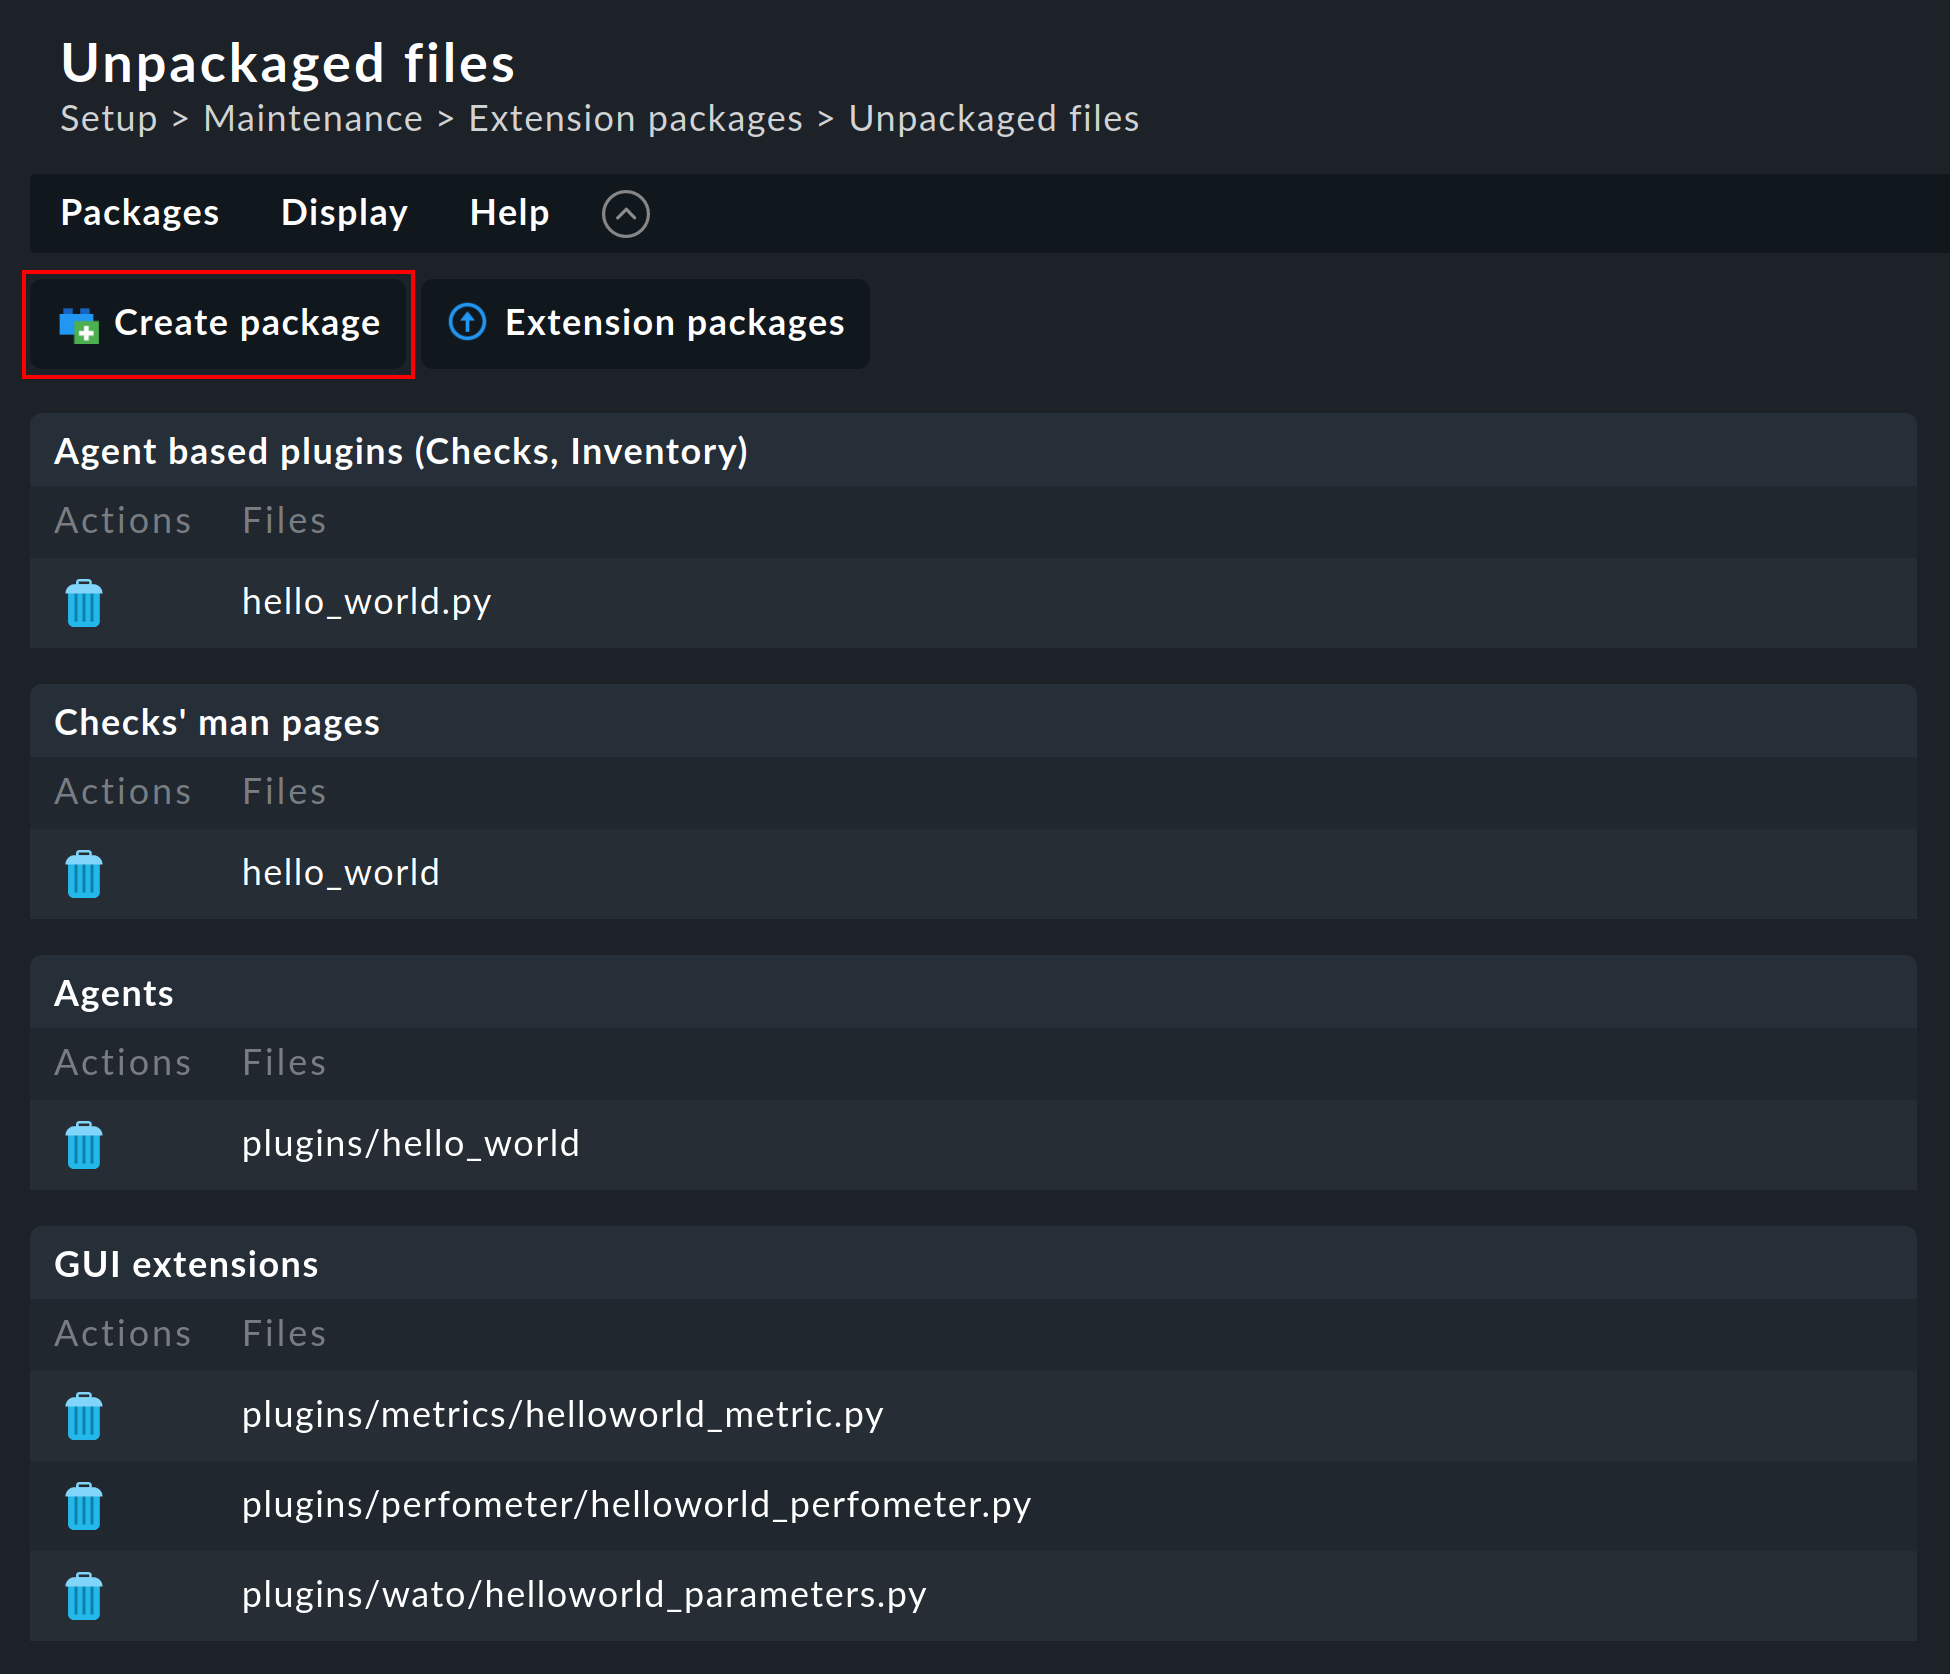
The ![]() Create package button will open the dialog for creating a new package:
Create package button will open the dialog for creating a new package:
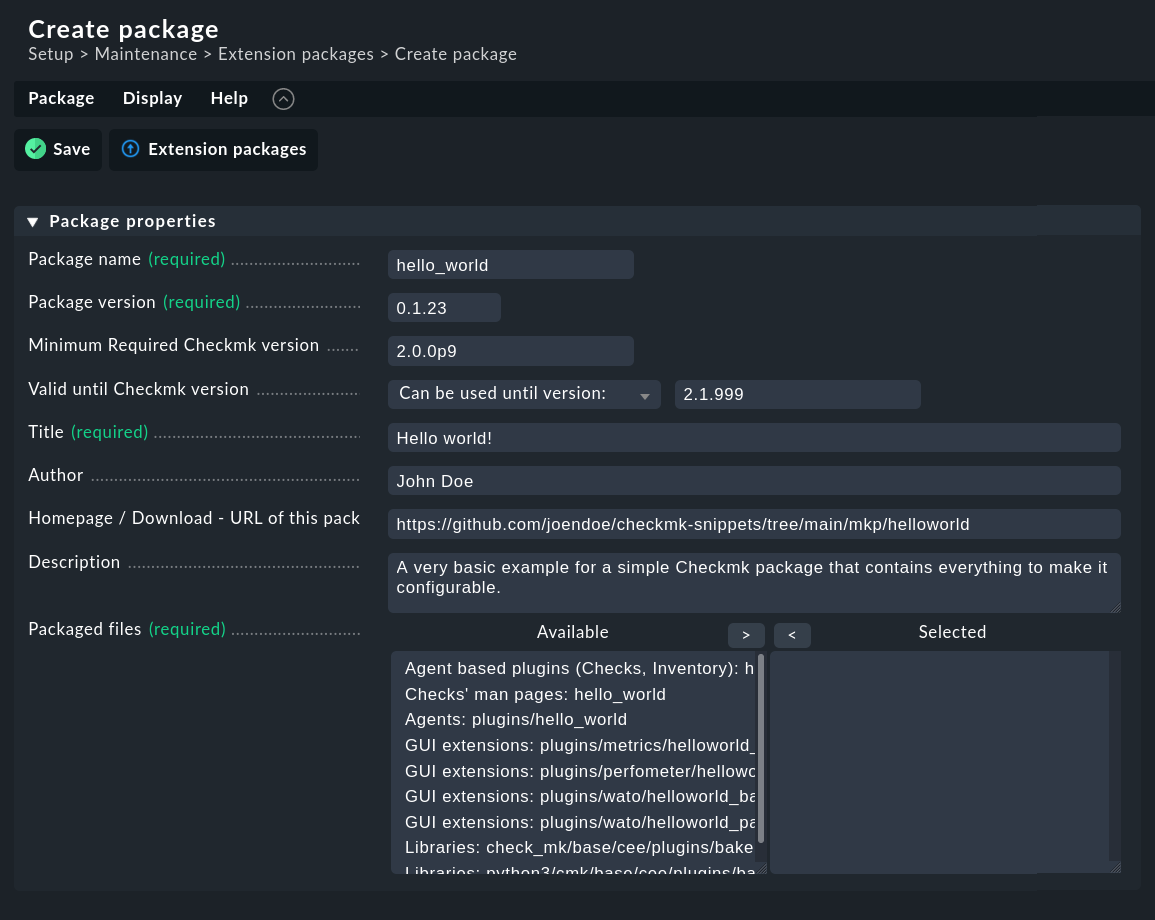
Besides the obvious information, it is important that you select at least one file to be packed. When creating a package, a description is added under ~/var/check_mk/packages/, which, in addition to the general information, also contains the list of the included files.
The highest supported Checkmk version is of course difficult to predict without a crystal ball.
As a rule of thumb it can be assumed that something that was programmed for 2.0.0 without using old APIs will also run with 2.1.0 and 2.2.0.
Therefore the highest Checkmk version is used to identify older packages, which require more intensive testing and possibly customization.
You can now use this package — e.g. to transfer it to another system or upload it to the Exchange — or, with the ![]() icon in the package list, to download it as an MKP file.
icon in the package list, to download it as an MKP file.
When making changes to packaged files, the package does not need to be rebuilt.
Click ![]() to change the version number, save the modified package and re-download it if necessary.
to change the version number, save the modified package and re-download it if necessary.
4. MKPs on the command line
You can also perform all of the above actions on the command line.
For this use the mkp command (which is actually an abbreviation for cmk -P):
OMD[mysite]:~$ mkp
Usage: check_mk [-v] -P|--package COMMAND [ARGS]

Available commands are:
   create NAME             ...  Collect unpackaged files into new package NAME
   pack NAME               ...  Create package file from installed package
   release NAME            ...  Drop installed package NAME, release packaged files
   find                    ...  Find and display unpackaged files
   list                    ...  Show a table of all known packages
   list NAME               ...  List files of installed package
   list PACK.mkp           ...  List files of uninstalled package file
   show NAME               ...  Show information about installed package
   show PACK.mkp           ...  Show information about uninstalled package file
   install PACK.mkp        ...  Install or update package from file PACK.mkp
   remove NAME VERSION     ...  Uninstall and delete package NAME
   disable NAME [VERSION]  ...  Disable package NAME
   enable NAME VERSION     ...  Enable previously disabled package NAME
   disable-outdated        ...  Disable outdated packages

   -v  enables verbose output

Package files are located in /omd/sites/mysite/var/check_mk/packages.
4.1. Installing an MKP
The installation of a package is accomplished with the mkp install command.
For this, first you must of course load the MKP file onto the Checkmk server (e.g. with scp).
After that the installation is performed with the following command:
OMD[mysite]:~$ mkp install /tmp/hello_world-0.2.1.mkpYou can list the installed packages with the mkp list command:
OMD[mysite]:~$ mkp list
Name        Version Title        Req. Version Until Version Files State
----------- ------- ------------ ------------ ------------- ----- -----------------------------
hello_world 0.2.1   Hello world! 2.1.0        2.1.999       6     Enabled (active on this site)
4.2. Disabling and removing packages
Uninstalling a package is done in two stages.
First, the package is disabled with mkp disable.
This deletes installed files, but still keeps the package — for example for a later reactivation.
The specification of the version number is only required in the event that the name alone is not unique:
OMD[mysite]:~$ mkp disable hello_world 0.2.1In the package list you will now see this package has the Disabled state when you again call mkp list:
OMD[mysite]:~$ mkp list
Name        Version Title        Req. Version Until Version Files State
----------- ------- ------------ ------------ ------------- ----- --------
hello_world 0.2.1   Hello world! 2.1.0        2.1.999       6     Disabled
A subsequent mkp remove command will then irrevocably delete the package:
OMD[mysite]:~$ mkp remove hello_world 0.2.14.3. Special case: Enabled but inactive packages
Risk of loss of settings! When updating the major version, Checkmk deletes rules that are no longer required. If you uninstall packages before the update in order to install a new version after the update, settings that are still required may be lost. Instead, always install new and old packages in parallel as described in this section and only remove old packages after the update. |
A special situation is the installation of a package that does not match the Checkmk version in use:
OMD[mysite]:~$ mkp install /tmp/hello_world-0.2.2.mkp
The package requires Check_MK version 2.2.0, but you have 2.1.0p21 installed.
A package which has been enabled, but whose activation fails due to an incompatible Checkmk version, will be identified with the Enabled (inactive on this site) state.
OMD[mysite]:~$ mkp list
Name        Version Title        Req. Version Until Version Files State
----------- ------- ------------ ------------ ------------- ----- -------------------------------
hello_world 0.2.2   Hello world! 2.2.0        2.2.999       6     Enabled (inactive on this site)
hello_world 0.2.1   Hello world! 2.1.0        2.1.999       6     Enabled (active on this site)
Above we explained the reasons for installing incompatible packages — i.e. for updates and distributed environments.
Similarly, as in setup, use mkp enable packagename version to enable a package, or mkp disable packagename version to disable an existing enabled package.
4.4. Unpacking packages
You can unpack an existing and active package (State: Enabled (active on this site)) with the mkp release command.
The extension files will be retained and only the download package and its description will be deleted:
OMD[mysite]:~$ mkp release mypackage4.5. Creating packages
The procedure for creating MKPs on the command line is analogous to that using the Setup menu.
First you create your extensions in the appropriate directories within ~/local/.
You then list all unpackaged files with mkp find:
OMD[mysite]:~$ mkp find
/omd/sites/mysite/local/lib/check_mk/base/plugins/agent_based/mycheck
/omd/sites/mysite/local/lib/check_mk/base/plugins/agent_based/mycheck_manpage
Now create a package configuration with the mkp create command, which (for now) contains all of these files.
Specify the desired name of the new package:
OMD[mysite]:~$ mkp create mypackageYou now edit the properties of the package with a text editor.
The file for this is located in ~/var/check_mk/packages/mypackage:
{'author': 'myName',
 'description': u'This package contains a check plugin',
 'download_url': 'http://www.example.com',
 'files': {'agent_based': [],
           'agents': [],
           'checkman': ['mycheck'],
           'checks': ['mycheck'],
           'doc': [],
           'inventory': [],
           'lib': [],
           'notifications': [],
           'pnp-templates': [],
           'web': []},
 'name': 'myPackage',
 'num_ files': 2,
 'title': 'My own check plugin',
 'version': '1.0',
 'version.min_required': '2.0.0',
 'version.packaged': '2.0.0p23'
 'version.usable_until': '2.1.999'}
Edit this file according to your needs.
Make sure you use the correct Python syntax. Unicode strings — i.e. texts containing non-ASCII characters, such as umlauts — must be prefixed with a lower-case u.
At the entry files you can remove files which should not be be packaged.
Under version.min_required you enter the minimum version of Checkmk that is required to use the package.
Afterwards you can create a MKP file using mkp pack:
OMD[mysite]:~$ mkp pack mypackage
OMD[mysite]:~$ ll *.mkp
-rw-rw-r-- 1 mysite mysite 495 Dez 22 13:36 mypackage-1.0.mkp