1. Hosts, services and agents
Before you begin with the actual monitoring, we will briefly explain some important terms. First of all, there is the host. A host in Checkmk is any stand alone, physical or virtual system monitored by Checkmk. Usually these are things with their own IP address (servers, switches, SNMP devices, virtual machines), but also, for example, Docker containers or other logical objects which do not have such an IP address. Each host always has one of the states UP, DOWN, UNREACH or PEND.
On each host a number of services are monitored. A service can be anything — for example, a file system, a process, a hardware sensor — but it can also simply be a certain metric such as CPU utilization or RAM usage. Each service can have one of the states OK, WARN, CRIT, UNKNOWN or PEND.
In order for Checkmk to be able to request data from a host, an agent is necessary. This is a small program that is installed on the host and which provides data on the state (or 'health') of the host. Servers running Windows, Linux, or Unix can only be effectively monitored by Checkmk if you install a Checkmk agent there — an agent provided by us. In the case of network devices and many appliances, the manufacturer will usually have built-in an agent that Checkmk can easily query using the standardized SNMP protocol. Cloud services such as Amazon Web Services (AWS) or Azure alternatively provide an interface ('API') that can be queried by Checkmk via HTTP.
2. Preliminary considerations for DNS
Even though Checkmk does not require name resolution of hosts, a well-maintained Domain Name System (DNS) makes configuration much easier and avoids errors, since Checkmk will then be able to resolve the host names on its own without you needing to enter IP addresses in Checkmk.
So setting up a monitoring system is a good opportunity to check whether your DNS is up to date and, if necessary, to add any missing entries.
3. Folder structure for hosts
Checkmk manages your hosts in a hierarchical tree of folders — quite analogous to what you know from files in your operating system. If you only monitor a handful of hosts, this may seem not so important to you. But remember — Checkmk is designed to monitor thousands and tens of thousands of hosts — so good order can be half the battle won.
Before you include the first hosts into Checkmk, it is therefore advantageous to think about the structure of these folders. On the one hand, the folder structure is useful for your own overview. More importantly, however, it can be used for the configuration of Checkmk. All configuration attributes of hosts can be defined in a folder, which are then automatically inherited by its subfolders and hosts contained there. Therefore, it is elementary, not only but especially for the configuration of large environments, to set up a well-considered folder structure from the beginning.
Once you have created a folder structure, you can change it — but you must do so very carefully. Moving a host to another folder can have the effect of changing its attributes without you being aware of it.
The real consideration when building a folder structure that will be most useful to you is the criteria by which you want to organize the folders. The criteria can be different at each level of the tree. For example, you can distinguish by location in the first level and by technology in the second level.
The following classification criteria have proven themselves in practice:
Location/Geography
Organization
Technology
Sorting by location is particularly obvious in larger companies, especially if you distribute the monitoring over several Checkmk servers. Each server then monitors a region or a state/country, for example. If your folders map this distribution, then you can define, for example, in the folder 'Munich' that all hosts in this folder are to be monitored from the Checkmk site 'muc'.
Alternatively, 'organization' (i.e. the answer to the question 'Who is responsible for a host?') may be a more meaningful criterion, since location and responsibility may not always be the same. For example, it may be that one group of your colleagues is responsible for the administration of Oracle, regardless of the actual physical location of the corresponding hosts. If, for example, the folder 'Oracle' is intended for the hosts of the Oracle colleagues, it is easy to configure in Checkmk that all hosts below this folder are only visible to these colleagues and that they can even maintain their hosts there themselves.
Structuring by technology could, for example, provide a folder for Windows servers and one for Linux servers.
This would simplify the implementation of the scheme 'The sshd process must run on all Linux servers'.
Another example is the monitoring of devices such as switches or routers via SNMP.
Here, no Checkmk agent is used, but the devices are queried via the SNMP protocol.
If these hosts are grouped in separate folders, you can make the settings necessary for SNMP, such as the 'Community', directly at the folder.
Since a folder structure can only rarely reflect the complexity of reality, Checkmk provides another supplementary possibility for structuring using the host tags — but more on this in a separate chapter on fine-tuning the monitoring. For more information on the folder structure, see the articles about administration and structuring of hosts.
4. Creating folders
You can access the administration of folders and hosts via the navigation bar, the Setup menu, the Hosts topic and the Hosts entry — or more briefly via Setup > Hosts > Hosts. The Main page is then displayed:

Before you create your first folder, we will briefly discuss the structure of this page, as you will find the various elements on most Checkmk pages in one form or another.
Above the page title Main you will find the breadcrumb path, which shows you where you are currently located within the Checkmk interface. Below this, the menu bar is displayed, which summarizes the possible actions on this page in menus and menu items. The menus in Checkmk are always context-specific, i.e. you will only find menu entries for actions that make sense on the current page.
Below the menu bar you will find the action bar, in which the most important actions in the menus are offered as buttons for direct clicking.
You can hide the action bar with the ![]() button to the right of the Help menu and show it again with
button to the right of the Help menu and show it again with ![]() .
When the action bar is hidden, the icons for the actions are displayed in the menu bar to the right of
.
When the action bar is hidden, the icons for the actions are displayed in the menu bar to the right of ![]() .
.
Since you are currently on an empty page (without folders and without hosts), the important actions for creating the first object are additionally offered via even larger buttons — so that the options offered by the page cannot be overlooked. These buttons will disappear after the first object has been created.
Now let’s get back to the topic that brought you to this page: the folders and how to create and edit them. One folder — the main folder — exists in every freshly set up Checkmk system. It is called the Main, as you can see in the title of the page.
Below the main folder, you will now create the three folders Windows, Linux, and Network as a simple exercise.
Create the first of the three folders by selecting one of the actions offered to create a folder, e.g. the ![]() Add folder button.
On the new page Add folder enter the folder name in the first box Basic settings:
Add folder button.
On the new page Add folder enter the folder name in the first box Basic settings:

Windows
In the above image, the Show-less mode is active and only the entry that is absolutely necessary for creating a folder is displayed. Confirm the entry with Save.
Analogous to the Windows folder, create the other two folders Linux and Network.
After that, the situation will look like this:

When you point the mouse at the tab or the top of a folder icon, the folder unfolds to reveal the icons you need to perform important actions with the folder (change the properties, move the folder or delete it). |
5. Adding the first host
Now everything is ready to add the first host to monitoring — and what could be more obvious than monitoring the Checkmk server itself? Of course, it won’t be able to report its own total failure, but it’s still useful because you not only get an overview of CPU and RAM usage, but also a number of metrics and checks that relate to the Checkmk system itself.
The procedure for adding a Linux host (as well as a Windows host, for that matter) is basically as follows:.
Creating a host
Downloading and installing the agent
Registering the host
Once the host has been created in the configuration environment, the services are configured and the changes for the monitoring environment are activated.
5.1. Creating a host
In the Checkmk interface, open the same Main page where you already created the three folders: Setup > Hosts > Hosts. Switch to the Linux folder by clicking on it.
Click Add host and the Add host page will open:

As with the creation of the three folders above, the Show less mode is still active.
For this reason, Checkmk only displays in the form the most important host attributes required for creating a host.
If you are interested, you can view the rest by clicking on the three ellipsis points ![]() in each of the open boxes and opening the two closed boxes at the bottom of the page.
Checkmk is a complex system that has an answer to every question.
That’s why you can configure a lot of things for a host (but not only there).
in each of the open boxes and opening the two closed boxes at the bottom of the page.
Checkmk is a complex system that has an answer to every question.
That’s why you can configure a lot of things for a host (but not only there).
In this form, you only need to fill in one field, namely Host name under Basic settings.
You can assign this host name quite freely and it can be up to 240 characters long. It can consist of letters, numbers, dots, hyphens, and underscores. However, you should be aware that the host name is of central importance, as it serves as an internal ID (or key) for the unique identification of the host in the monitoring. Since it is so important in Checkmk and is used frequently, you should carefully consider the naming of your hosts. A host name can be changed later, but since this is a complex process, you should avoid doing so.
It is best if the host can be found under its name in the DNS. The good news: Checkmk checks for you whether this is the case. As soon as you type the host name into the input field, Checkmk checks the resolvability of the name in the background and then tests whether the host can be reached:

localhost does not cause any problemsIf the host name cannot be resolved, the success message shown above will be replaced by a corresponding error message.
If you use host names that cannot be resolved via DNS, you can also enter the IP address manually in the IPv4 address field. However, if you enter an IP address, Checkmk skips the host name resolution check and tests the reachability of this IP address directly. You will then receive feedback on the result next to the field with the IP address. The details on host names, IP addresses, and DNS can be found in the article on host administration.
Tip: On many pages — including this one — you can display additional help texts for the attributes. To do this, select Show inline help from the Help menu. The selected setting remains active on other pages until you turn off the help again. The following image shows the inline help for the IPv4 address parameter:

Incidentally, Checkmk stops checking the host name or IP address in the background if you select the No IP value in the IP address family field. 'No IP' is relevant for hosts that are queried via a special agent. Special agents are however not relevant in this example, in which the host is to be monitored with a Checkmk agent.
5.2. Downloading and installing the agent
On the Add host page — which you hopefully still have open from the previous section — you will find the Monitoring agents section, which includes the Checkmk agent / API integrations option. Here you specify which data is used for the host and which is discarded. For each value with Checkmk agents, the page offers the Test agent connection button, including for the default value API integrations if configured, else Checkmk agent:

The default setting is appropriate, since although there is no API integration, a Checkmk agent is supposed to provide the data. Testing the agent connection will likely fail, since there is currently no agent on the Checkmk server — that is, the host to be monitored — at least none that we are aware of. Click Test agent connection anyway, because after the test fails, you will then have the option to obtain the agent:

Communication with the Checkmk agent may not be possible for a number of reasons. One of these is that the communication partner is not present, meaning the Checkmk agent has not yet been installed. You will now fix this. After clicking Download Checkmk agent, the Install Checkmk agent slideout opens, which will guide you through the three steps to get the Checkmk agent up and running:

First, select the appropriate operating system on which the agent is to be installed. Since the Checkmk server is a Linux machine, you need the Checkmk agent for Linux. For Linux, you must also select the appropriate package file: RPM for Red Hat Enterprise Linux (RHEL), its binary-compatible distributions, and SUSE Linux Enterprise Server (SLES), or DEB for Debian and Ubuntu.
The first step is simple — and just the right thing to warm up with. Save the host with Save host & next step. This is necessary because the final registration requires an existing host in Checkmk, as stated in the text of the slideout.
Next, select the second step, which begins with a prompt to generate a token. You must authenticate yourself for both the download and the registration described in the next section, typically using your username and password. The slideout offers a shortcut and increased security here, performing authentication for these actions using a one-time token (OTT), which is valid for a successful execution within a limited period of time.
Before the token can be used, it must be generated. So first click on Generate one-time token. The slideout will then look something like this:

The command shown combines two separate commands and links them with &&.
This first downloads the Checkmk agent to the host and the second installs it.
To the right of the command, you will find the ![]() icon to copy the command to the clipboard.
icon to copy the command to the clipboard.
Open a terminal on the target host, paste the copied command, and execute it.
You only need to make a single entry.
After downloading and before executing the dpkg installation command, sudo will prompt you to enter your password.
In our example, the agent is installed on the Checkmk server, which means you do not need to run the command on another computer. However, in the slideout, you can also select a different operating system, such as Windows, and use the corresponding command to download and install the Checkmk agent on a Windows host. |
The Agent Controller is installed along with the agent; among other things, the controller establishes a TLS-encrypted connection to the Checkmk server during registration.
This is described in the next section.
For the Agent Controller to install successfully, a Linux distribution with the systemd init system is required; this has been the standard in most Linux distributions since 2015.
For the rare cases in which the Agent Controller cannot be used, you can find information in the article Monitoring Linux in legacy mode.
This completes the installation of the agent. You can leave the slideout and the command line open. Both will be needed again when registering the host.
5.3. Registering the host
After successfully installing the Checkmk agent, you can check off the second step in the slideout with Next step: Register agent. Now only the third and final step remains. Registering the host with the Checkmk server establishes the trust relationship between the two. More precisely, the trust relationship is established between the host’s Agent Controller and the Checkmk site’s Agent Receiver. Following registration, communication between the host and the server will then be encrypted using Transport Layer Security (TLS).
Registration is performed by calling the Agent Controller cmk-agent-ctl on the command line.
By default, the command requires the name and password of a Checkmk user with registration permissions.
Instead, as was the case earlier when downloading the agent package, authentication via one-time token is used for this action as well.
After you click Generate one-time token, the slideout looks something like this:

In the command shown, the one-time token is used with the -ott option.
The registration process now proceeds in the same way as the download and installation described in the previous section.
Copy the command and run it in a terminal.
As with the installation command, sudo requires you to enter your password.
You will then be prompted to confirm the identity of the Checkmk site you wish to connect to.
To do this, the server certificate to be confirmed is displayed.
Confirm with Y to complete the process.
If no error message appears, the encrypted connection has been established.
All data is transmitted in compressed form over this connection.
After this (for now, final) trip to the command line, we return to the Checkmk interface. Complete the last step with Close & test connection. The slideout closes and takes you back to the page with the host properties. The agent connection test is restarted, and the result should now look something like this:

5.4. Diagnostics
Murphy’s law ("Anything that can go wrong, will go wrong.") unfortunately cannot be overridden by Checkmk. Things can go wrong, especially when you are trying them for the first time. This is why it is important to have good troubleshooting options.
In the previous section, you learned how to test communication between the Checkmk server and the Checkmk agent on the host. For more troubleshooting options, see the article on monitoring agents. That article also describes testing via the web interface, which you can start on the Properties of host page using the Save & run connection tests button. You can find additional testing and diagnostic options in the article on the Linux agent.
5.5. Configuring services
Once the host itself has been included, the really interesting part begins — the configuration of its services. On the Properties of host page, click Save & run service discovery and the Services of host page will appear.

On this page, you specify which services on the host you want to monitor. In addition, the top box shows you whether problems have been detected with the host’s data sources. If the agent on the host is accessible and running correctly, Checkmk will automatically find a number of services and suggest these for monitoring.
It may take up to one minute for a newly configured agent to provide information about the services it has detected. If there are problems with the service discovery, and when even a repeated Rescan fails, Checkmk will check whether the agent is installed and registered at all. If this is not the case, Checkmk will display a message on this page offering to complete the installation and/or registration. This performs the same agent connection test described in the section Downloading and installing the agent. |
For each of these services, there are the following options:
Undecided : You have not yet decided whether to monitor this service.
Monitored : The service is currently being monitored.
Disabled : You have chosen not to monitor the service.
Vanished : The service was being monitored, but it now no longer exists.
This page shows all services ordered by the above categories into tables. As you have not yet configured a service, you will see only the Undecided table.
If you click Monitor undecided services, all of the services will be directly added to the monitoring and all of the Undecided services will become Monitored services.
Conversely, services can also disappear, for example, when a file system has been removed. These services will then appear in the monitoring as UNKNOWN and on this page as Vanished and can be removed from the monitoring with Remove vanished services.
For now, it is easiest to click the Accept all button, which does everything at once — adding missing services, removing vanished ones — and additionally apply any changes found to host and service labels.
You can always visit this page later to customize the configuration of the services. Sometimes new services are created by changes to a host, for example, when you include a Logical Unit Number (LUN) as a file system or configure a new Oracle database instance. These services then appear as Undecided, at which point you can include them in the monitoring individually or all at once.
Further information on the services that a Checkmk server provides as standard can be found in the Monitoring your own system article.
5.6. Activating changes
Checkmk initially saves all changes you make only in a temporary 'configuration environment' that does not yet influence the currently-operating monitoring. Only by 'activating of pending changes' will they be transferred to the 'monitoring environment'.
It often makes sense to activate multiple actions together in the configuration environment. A good example of this is the actions you have performed so far in this chapter. Only when the newly-created host has been activated along with the services found and adopted during service discovery will the host and services be visible together in monitoring all at once.
You can see how many changes have accumulated so far that have not yet been activated in the navigation bar, in the Changes icon, and there by the number in the yellow circle. When you click this icon, you will see the details of these pending changes:
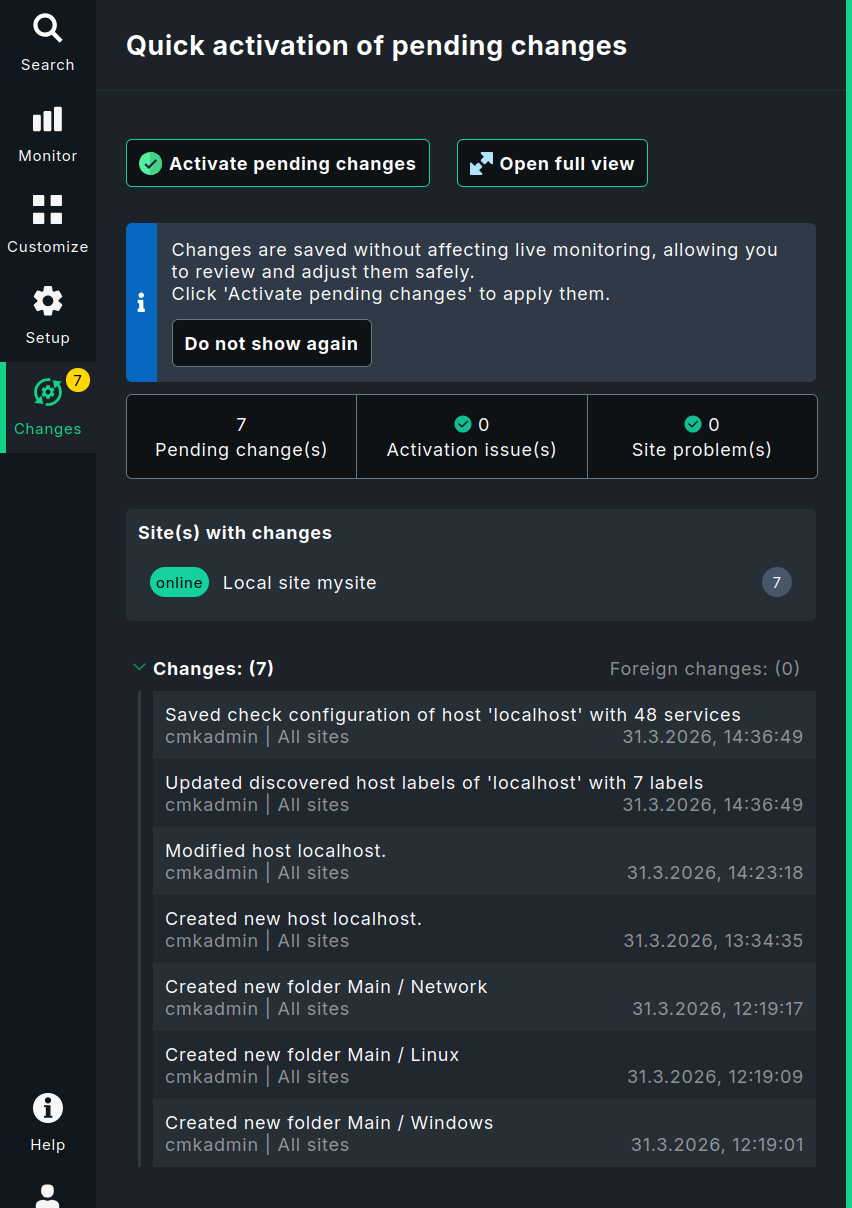
This slideout displays the most important information. You can view the full overview by clicking the Open full view button, which opens the Activate pending changes page. This is necessary, for example, if the slideout shows issues with activation or with sites that might prevent activation.
Now click the Activate pending changes button to apply the changes. After a short wait, you will receive confirmation that the changes have been successfully activated and everything is up to date. The number in the Changes symbol has disappeared and will remain so until the next change is pending.
In the article on configuring Checkmk, you can learn more about the differences between the configuration and monitoring environments. It also explains how to revert pending changes instead of activating them.
To verify that everything has been successful, switch to the monitoring environment, for example by selecting Monitor > Overview > Main dashboard in the navigation bar.

You have now successfully added the first host and its services to monitoring: Congratulations!
6. Adding more hosts
For help setting up hosts for common application scenarios, see the welcome page. Right in the first topic Add your first host, you’ll find buttons that let you start creating hosts for both on-premises and cloud environments. The following sections explain the general procedure for creating hosts for these usage cases.
6.1. Monitoring Windows
Just as for Linux, Checkmk also has its own agent for Windows.
This is packaged as an MSI package.
You can download, install, and register the Checkmk agent for Windows in the same way as is described in the previous section for a Linux host.
To display the appropriate Windows commands, simply select Windows instead of Linux in the slideout for installing the Checkmk agent.
Be sure to create the host in the designated Windows folder.
Since Windows is structured differently from Linux, the agent naturally detects different services. You can find a detailed introduction to this topic in the article on monitoring Windows.
6.2. Monitoring with SNMP
Professional quality switches, routers, printers and many other devices and appliances already have a built-in interface for monitoring from the manufacturer — the Simple Network Management Protocol (SNMP). Such devices can be monitored very easily with Checkmk — and you don’t even need to install an agent.
![]() In Checkmk Ultimate, you can monitor SNMP devices that cannot transmit their data directly to the Checkmk server using the Checkmk Relay.
In Checkmk Ultimate, you can monitor SNMP devices that cannot transmit their data directly to the Checkmk server using the Checkmk Relay.
Before SNMP devices can be configured to use a Checkmk Relay, the relay must first be set up. For instructions on how to do this, see the article The Checkmk Relay.
The basic procedure for setting up an SNMP device is always as follows:
In the device’s management interface, enable SNMP for read access from the IP address of the Checkmk server.
Assign a community. This is simply a password for access. Since this is usually transmitted in plain text over the network, there is limited benefit to choosing a very complex password. Most users simply use the same community for all devices within a company. This also greatly simplifies configuration in Checkmk.
In Checkmk, create the host for the SNMP device as described above, this time in the designated
Networkfolder.-
If the host is to be monitored via a Checkmk Relay, enable the Monitored on relay attribute in the host’s properties under Basic settings and select the name of the previously configured Checkmk Relay. This attribute is only displayed if the Show-more mode is enabled in this box.
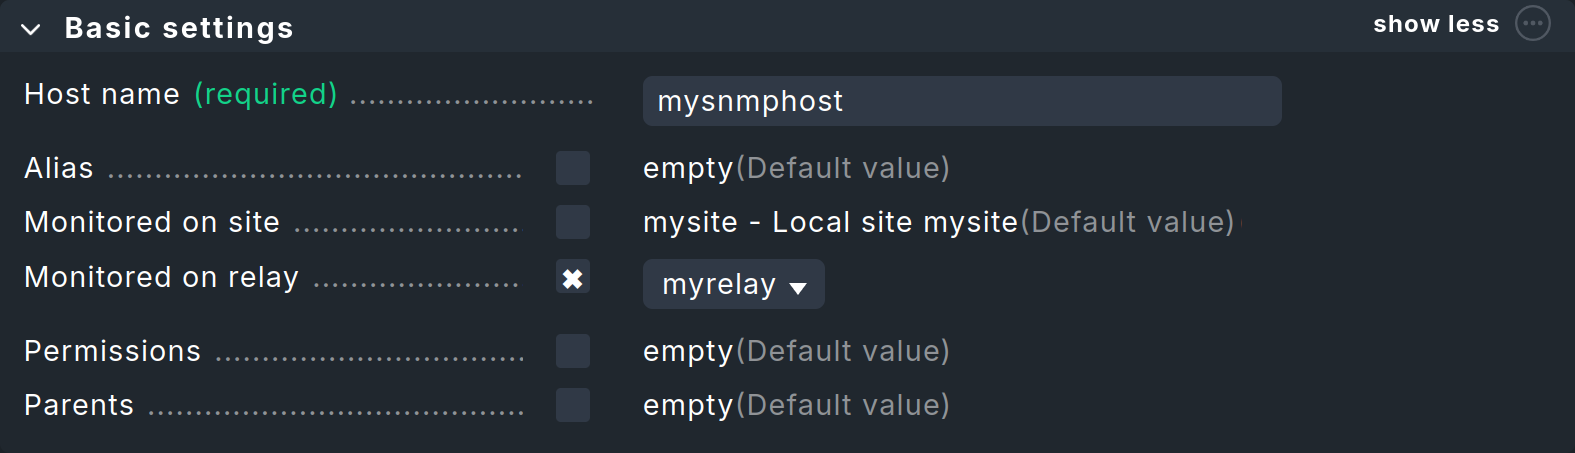 A Checkmk Relay can only be selected if it has been set up beforehand
 In the host properties, in the Monitoring agents section, enable Checkmk agent / API integrations and select No API integrations, no Checkmk agent.
In the same box, enable SNMP and select SNMPv2 or v3.
-
If the community is not
public, enable the SNMP credentials entry, select SNMP community (SNMP Versions 1 and 2c), and enter the community in the input field below.
For the last 3 steps, the result should then look like the image below: Configuring the monitoring agent for SNMP
If you have created a separate folder for all SNMP devices, simply configure the Monitoring agents for that folder. This will automatically apply the settings to all of the hosts in that folder. |
The rest proceeds as usual. If you like, you can click the Save & go to connection tests button to view the Test connection to host page. There you can immediately see whether SNMP access is working; here, for example, for a switch:

On the Properties of host page, click Save & run service discovery to display the list of all services. Of course, this looks completely different than on Linux or Windows. By default, Checkmk monitors all ports currently in use on all devices. You can customize this later as desired. In addition, one service that is always OK displays general information about the device, and another service displays the uptime.
You can find a detailed description in the article on monitoring via SNMP.
6.3. Monitoring cloud, containers and virtual machines
You can also monitor cloud services, containers and virtual machines (VM) with Checkmk, even if you do not have access to the actual servers. Checkmk uses the application programming interfaces (API) provided by the manufacturers for this purpose. These interfaces always use HTTP or HTTPS for access.
The basic principle is always the following:
Prepare access for Checkmk in the manufacturer’s management interface.
Create a host in Checkmk to access the API.
Configure this host by specifying the objects to be monitored, such as VMs, EC2 instances, containers, etc.
For the monitored objects create additional hosts in Checkmk or automate their creation.
In the User Guide you can find step-by-step instructions for setting up a monitoring of Amazon Web Services (AWS), Microsoft Azure, Google Cloud Platform (GCP), Docker, Kubernetes and VMware ESXi.