1. Introduction
Checkmk allows you to comprehensively monitor MySQL and Galera clusters for MySQL. You can find a complete list of monitoring options in our Catalog of Check Plug-ins. Among other things, Checkmk can monitor the following:
In order to be able to monitor the databases, besides the Checkmk agent you only need the agent plug-in on the database server. Additional software is neither required on the Checkmk, nor on the database server.
Next, we will describe setting up MySQL monitoring for Linux and Windows hosts. Later we will go into setting up using the Agent Bakery.
2. Setting up the monitoring
2.1. Creating a user
Linux and Windows
The only requirement for setting up monitoring within MySQL is that a database user and its password must be available. This user only needs reading rights to the MySQL instances. If such a user does not yet exist, create it in the instances to be monitored. To do this, log on to MySQL with a user with sufficient access rights, and then create a new database user:
mysql> CREATE USER 'checkmk'@'localhost' IDENTIFIED BY 'MyPassword';This newly created user needs authorization to read the instances. Therefore,
check whether the user has the necessary permissions, or add them with the
following command. The following example does this for the user checkmk:
mysql> GRANT SELECT, SHOW DATABASES ON *.* TO 'checkmk'@'localhost';If you use MySQL replication, the user must at least have the REPLICATION CLIENT right to monitor the replica server:
mysql> GRANT REPLICATION CLIENT ON *.* TO 'checkmk'@'localhost';2.2. Installing the plug-in
Linux
The required mk_mysql plug-in can be found on your Checkmk server in the
~/share/check_mk/agents/plugins/ directory. As a first step, copy this
plug-in into the plug-ins directory for the agent
on the host to be monitored. The plug-ins directory is usually
/usr/lib/check_mk_agent/plugins. As soon as the script is in the
specified directory, make it executable:
root@linux# chmod 700 mk_mysqlThis plug-in can of course also be run asynchronously if required.
Windows
The Agent for Windows comes with a number of plug-ins as standard. That is why you will also find the plug-in for monitoring MySQL on your host after installing the agent. Simply copy this into the correct directory for use.
PS> copy "c:\Program Files (x86)\checkmk\service\plugins\mk_mysql.vbs" c:\ProgramData\checkmk\agent\plugins\2.3. Creating the configuration file
Linux
Then create a file with the name mysql.cfg in the
configuration directory (regular:
/etc/check_mk) for the Checkmk agent on the target host.
Using the user data entered in this, the agent can retrieve the desired
information from your MySQL instance. Specifying a database user is optional,
but we recommend this, as the agent usually executes the plug-in as root.
This is done in the usual format for MySQL configuration files:
[client]
user=checkmk
password=MyPassword
Saving the access data with the following command protects against unauthorized access:
root@linux# chmod 400 mysql.cfgWindows
On a Windows host, create a file named mysql.ini in the directory below:
[client]
user=checkmk
password=MyPassword
If you run multiple MySQL instances with different user names and passwords on
the host, simply create one .ini file per instance using the following naming
scheme: mysql_INSTANCE-ID.ini
2.4. Creating services
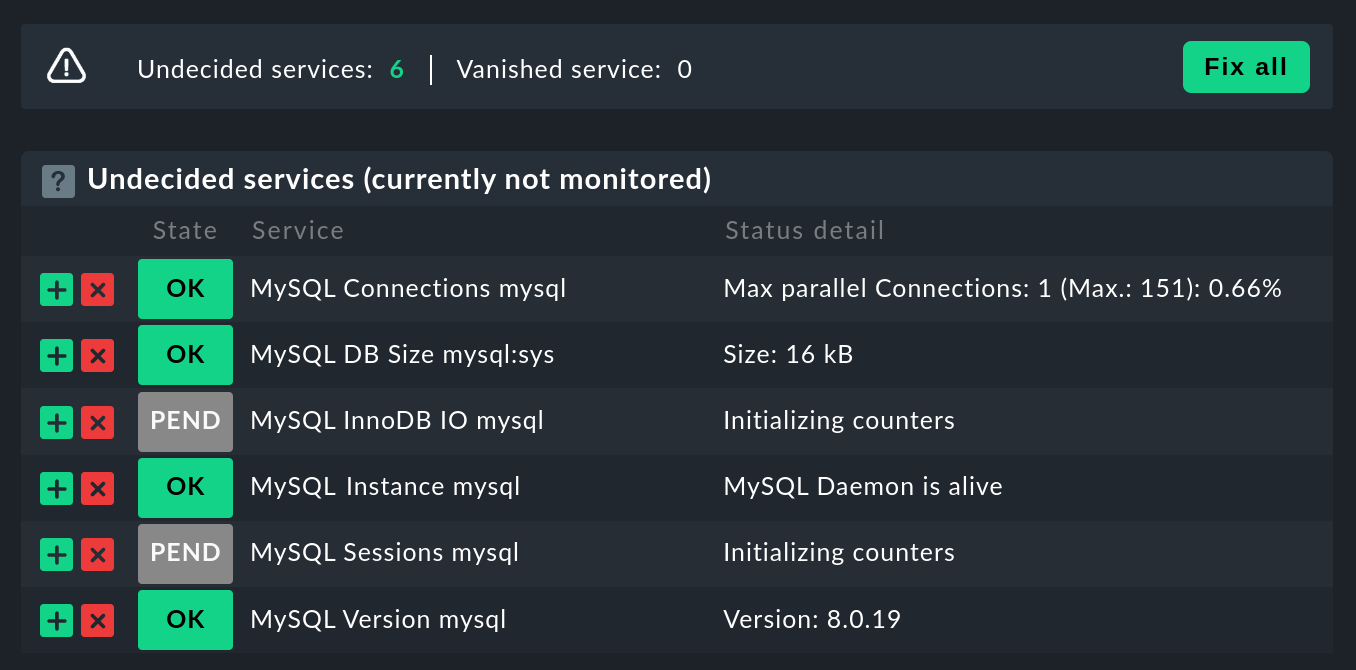
Now that you have installed and configured the plug-in, you can perform a service discovery for this host. The following screenshot shows only a selection of the services that can be found:

3. Advanced configuration
3.1. Executing a plug-in asynchronously
The plug-in for monitoring MySQL like so many others can be run asynchronously, for example to take longer runtimes into account for large MySQL instances.
Linux
On a Linux host, the plug-in is only moved to a subdirectory of the plug-in
directory. For example, if you only want to run the plug-in every 5 minutes,
simply move the mk_mysql script to a subdirectory called 300.
Detailed instructions for the asynchronous execution of plugins can be found in
the article on the Linux agent.
Windows
To run the plug-in asynchronously under Windows, adjust the configuration of
the agent, and expand the execution section under plugins
with the following entry:
plugins:
    execution:
        - pattern: mk_mysql.vbs
          cache_age: 300
          async: yes
You can find detailed instructions for the asynchronous execution of plug-ins on a Windows host in the article on the Windows agents.
3.2. Additional options for the configuration files
Setting up communication with MySQL via socket
Instead of letting the agent communicate with MySQL via TCP, you can instruct Checkmk to address the socket.
To do this, simply define the variable socket in the mysql.cfg file.
Here is an example of the Windows configuration file:
[client]
user=checkmk
password=MyPassword
*socket=/var/run/mysqld/mysqld.sock*
Defining hosts manually
Furthermore, it is also possible to set the MySQL host manually via the
configuration files. The corresponding variable is simply called host.
Here again using the example of Windows:
[client]
user=checkmk
password=MyPassword
*host=127.0.0.1*
3.3. Configuring thresholds
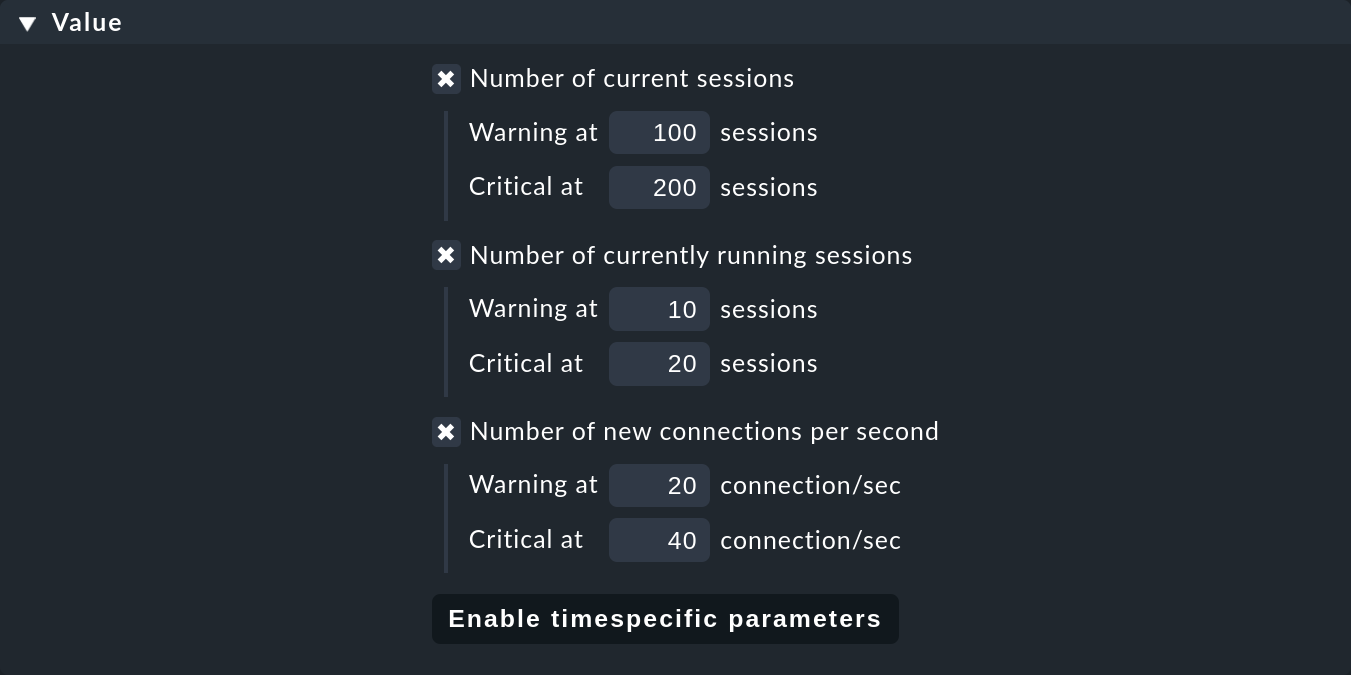
Monitoring sessions
Some of the checks set up in this way have no preset threshold values. This is usually the case because there are no reasonable default values that would be sufficient in most cases. However, these can be set up in a few simple steps. For example, you can find the MySQL Sessions & Connections rule via the familiar Host & Service Parameters. This can be used to define meaningful threshold values for the MySQL sessions service that are useful for your MySQL instance.

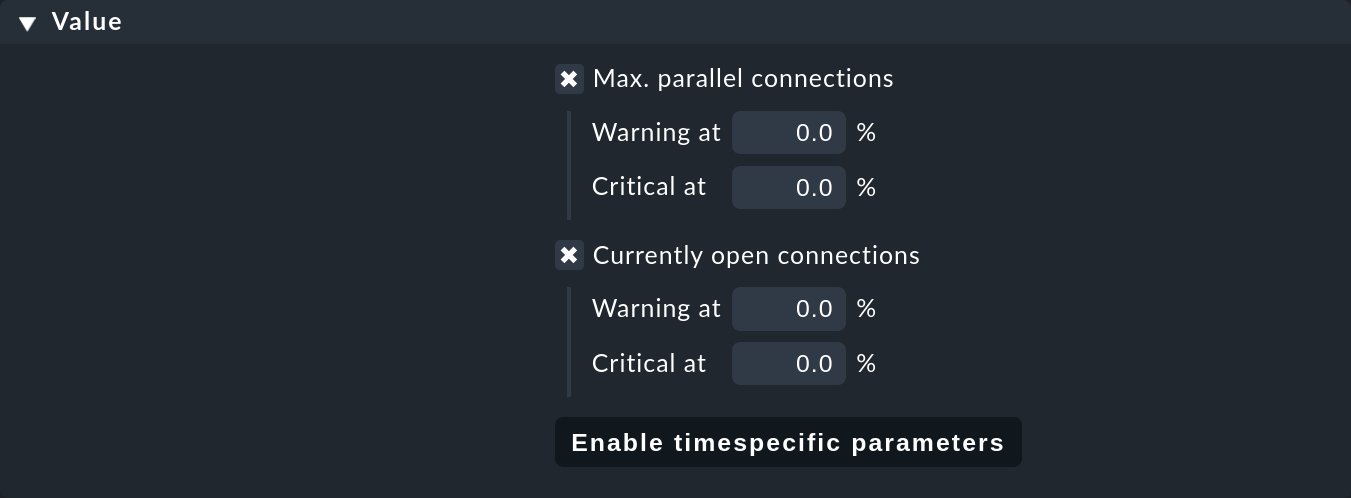
Monitoring connections
We have also not specified any threshold values for the utilization of the maximum number of simultaneous connections specified by MySQL, since these depend much more on the structure of your MySQL instance than with other services. The establishment of corresponding threshold values can be accomplished in a jiffy with a rule from the MySQL Connections set. The same goes for the amount of open connections.

Monitoring database sizes
The size of individual databases in MySQL is monitored by the MySQL: Capacity check plug-in. Threshold values for this plug-in can be determined with the Size of MySQL databases rule.

3.4. Monitoring log files
With the help of the Logwatch check plug-in you can also monitor the log files generated by MySQL for errors.
After setting up the plug-in, first check where the corresponding log files are located in your MySQL instance.
Their exact location can be found in your instance’s .ini or .cnf file.
You can enter the logs you are interested in in the Logwatch configuration file and make the following entries for example on a Linux host:
/var/log/mysql/error.log
 W Can't create/write to file
 C [ERROR] Can't start server
 C mysqld_safe mysqld from pid file /var/run/mysql/mysqld.pid ended
4. Configurations using the Agent Bakery
The setup is much simplified with the
Agent Bakery, since syntax errors in the
configuration files are avoided, and adaptations to changing environments can
easily be made. The main difference compared to a manual installation is that
only for special MySQL-specific configurations you have to work on the MySQL
host on its command line.
For the initial setup, it is sufficient if you
set up the database user on the MySQL host,
and create a corresponding rule in the bakery. You can find the rule set
under Setup > Agents > Windows, Linux, Solaris, AIX > Agent rules.
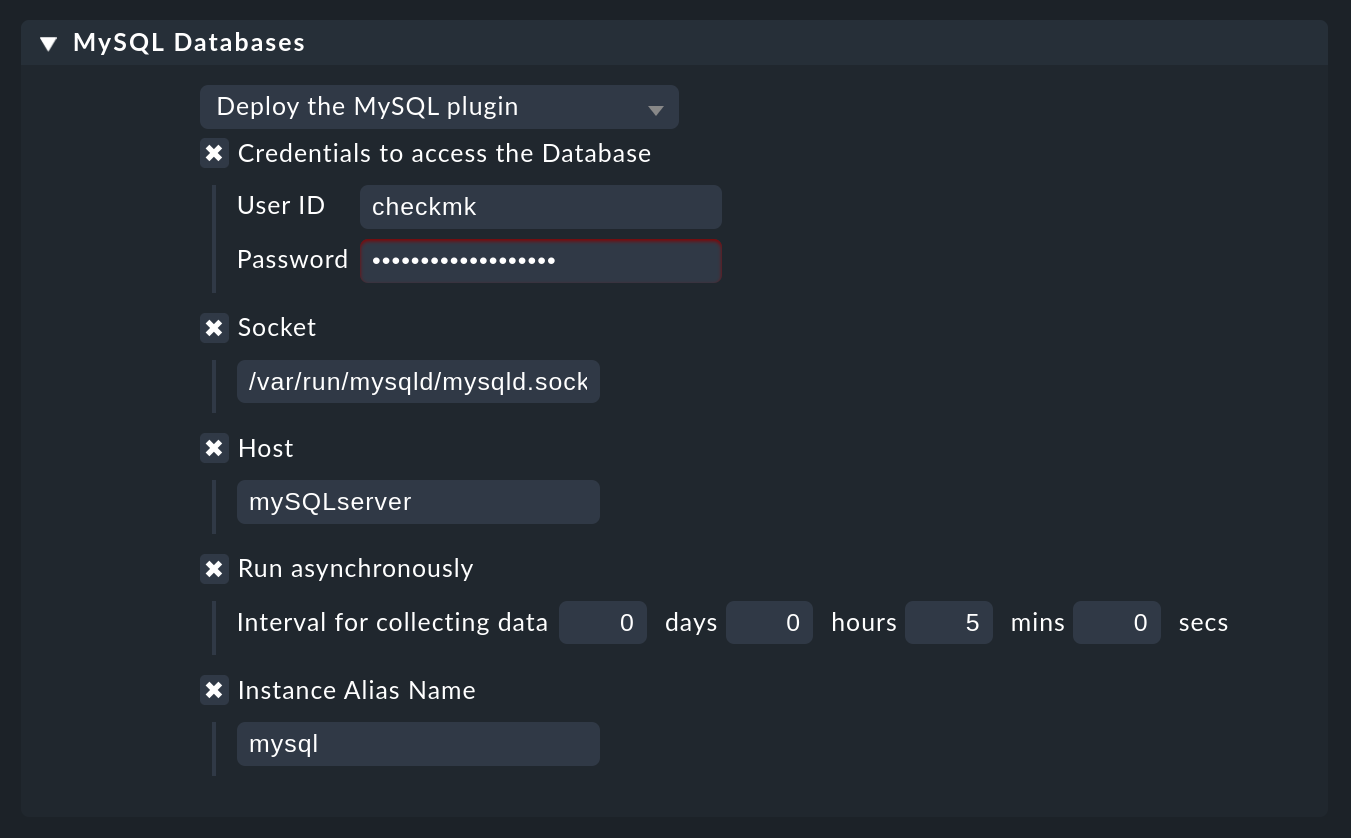
You can then search for MySQL in the search field:

Enter the user ID and password for the new database user. With the following field you can set the Checkmk agent for Linux hosts so that it does not establish the connection to MySQL via TCP, but instead via the socket. Depending on the size and utilization, this can contribute to better performance.
An asynchronous version of the MySQL plug-in can also be defined using this rule set. This can be useful to take longer runtimes into account with large MySQL instances, or if the status data is simply not required every minute.

5. Diagnostic options
If, for example, unexpected behavior or problems arise when setting up the monitoring, it is recommended to check directly on an affected host. Since the plug-ins for monitoring MySQL for both Linux and Windows are shell or Visual Basic scripts, they can easily be executed without the agent. Regardless of the operating system used, only the relevant configuration directory needs to be made known to the shell or to the command line.
5.1. Diagnostic options under Linux
First check the applicable directories for your respective host.
user@host:~$  grep 'export MK' /usr/bin/check_mk_agent
export MK_LIBDIR='/usr/lib/check_mk_agent'
export MK_CONFDIR='/etc/check_mk'
Now use the export command to create the MK_CONFDIR and
MK_LIBDIR environment variables. Customize the commands according to
your actual directories.
root@linux# export MK_CONFDIR="/etc/check_mk/"
root@linux# export MK_LIBDIR="/usr/lib/check_mk_agent"
Important: These environment variables only exist in the currently open shell, and disappear as soon as you close them.
You can then run the mk_mysql script directly in the of the Checkmk
agent’s plug-in directory.
root@linux# $MK_LIBDIR/plugins/mk_mysqlIf all rights have been granted to the database user correctly, you should now see several hundred lines of output even in a small and fresh MySQL environment.
5.2. Diagnostic options under Windows
In order to be able to run the Check plug-in on a Windows host manually, first
open a command line with admin rights. Now set the MK_CONFDIR
environment variable in this command line this is required so that the
plug-in can find your configuration files.
PS> set MK_CONFDIR=c:\ProgramData\checkmk\agent\configImportant: Here too an environment variable set here is not permanent, but only exists for as long as this command line is open.
During the actual execution of the plug-in, it is advisable to redirect the output to the command line.
Windows provides the on-board tool cscript for this purpose.
PS> cscript c:\ProgramData\checkmk\agent\plugins\mk_mysql.vbs5.3. Possible errors and error messages
mysqladmin: connect to server at xyz failed
The error message connect to server at xyz failed indicates that the
user specified in the configuration file has no access to MySQL. First check
that no transmission errors have crept in when creating the configuration file
(mysql.cfg or mysql.ini).
If the username or password specified in the configuration file is incorrect, you will receive something like the following error message:
Access denied for user checkmkDatabase size is not output
If you see a whole series of data from your MySQL instance in Checkmk, but there is no service that monitors the size of the databases it contains, this is an indication that the database user does not have the SELECT right.
Check your database user in MySQL with the following command:
mysql> show grants for 'checkmk'@'localhost';
+--------------------------------------------------------------------------+
| Grants for checkmk@localhost                                             |
+--------------------------------------------------------------------------+
| GRANT SELECT, SHOW DATABASES ON *.* TO `checkmk`@`localhost`             |
+--------------------------------------------------------------------------+
If the keyword SELECT is missing in your output, grant the database user the appropriate rights as specified in the user setup chapter.
6. Files and directories
6.1. On the MySQL host
Linux
| File path | Function |
|---|---|
|
The agent that collects all data about the host. |
|
The usual directory in which plug-ins are stored. |
|
The configuration file for the MySQL plug-in. |
|
Additional configuration file for specifying host-specific sockets. |
Windows
| File path | Function |
|---|---|
|
The usual plug-ins directory. |
|
The usual configuration directory. |
|
The usual configuration directory up to Checkmk version 1.6.0 |
|
The usual plug-ins directory up to Checkmk version 1.6.0 |
6.2. On the Checkmk server
| File path | Function |
|---|---|
|
The plug-in that retrieves the data from the MySQL host. |
