1. Introduction
1.1. Clusters, nodes and cluster services
When deploying critical and mission-critical services such as databases or E-Commerce web sites, you will be unlikely to be relying on the host running those services to live a long, stable, rash-free life. Rather, you will factor in the possible failure of one host and ensure that other hosts are on standby to take over services immediately in the event of a failure (or failover), so that the failure will not even be noticeable to the outside world.
A group of networked hosts working together to accomplish the same task is called a computer network or computer cluster, or more simply, a cluster. A cluster acts and appears as a single system externally and organizes its hosts internally to work together to accomplish the common task.
A cluster can perform various tasks, for example an HPC cluster can perform high-performance computing, which is used, among other scenarios, when calculations require much more memory than is available on a single computer. If the cluster has the task of providing high availability, it is also called an HA cluster. This article is concerned with HA clusters, i.e. when we refer to a 'cluster' in the following text, we always mean an HA cluster.
A cluster offers one or more services to the outside world: the cluster services, sometimes referred to as 'clustered services'. In a cluster, the hosts that make it up are called nodes. At any given time, each service is provided by just one of the nodes. If any node in the cluster fails, all services essential to the cluster’s mission are moved to one of the other nodes.
To make any failover transparent, some clusters provide their own cluster IP address, which is sometimes also referred to as a virtual IP address. The cluster IP address always refers to the active node and is representative of the entire cluster. In the event of a failover, the IP address is transferred to another, previously passive node, which then becomes the active node. The client that communicates with the cluster can be oblivious to an internal failover: it uses the same, unchanged IP address and does not itself need to do any switching.
Other clusters do not have a cluster IP address. Oracle database clusters in many of their variants are a prominent example. Without a cluster IP address, the client must maintain a list of IP addresses of all nodes that could provide the service. If the active node fails, the client must detect this and switch to the node that is now providing the service.
1.2. Monitoring a cluster
Checkmk is one of the clients that communicates with the cluster. In Checkmk, all of the nodes in a cluster can be set up and monitored — regardless of how the cluster software internally checks the status of the individual nodes and, if necessary, performs a failover.
Most of the checks that Checkmk performs on the individual nodes of a cluster deal with the physical properties of the nodes, which are independent of whether the host belongs to a cluster or not. Examples include CPU and memory usage, local disks, physical network interfaces, etc. However, to map the cluster function of the nodes in Checkmk, it is necessary to identify those services that define the cluster’s task and a transfer to another node might be necessary — the cluster services.
Checkmk helps you to monitor the cluster services. What you need to do is:
Create the cluster.
Select the cluster services.
Perform a service discovery for all of the associated hosts.
How to proceed is described in the next chapter using the following sample configuration:
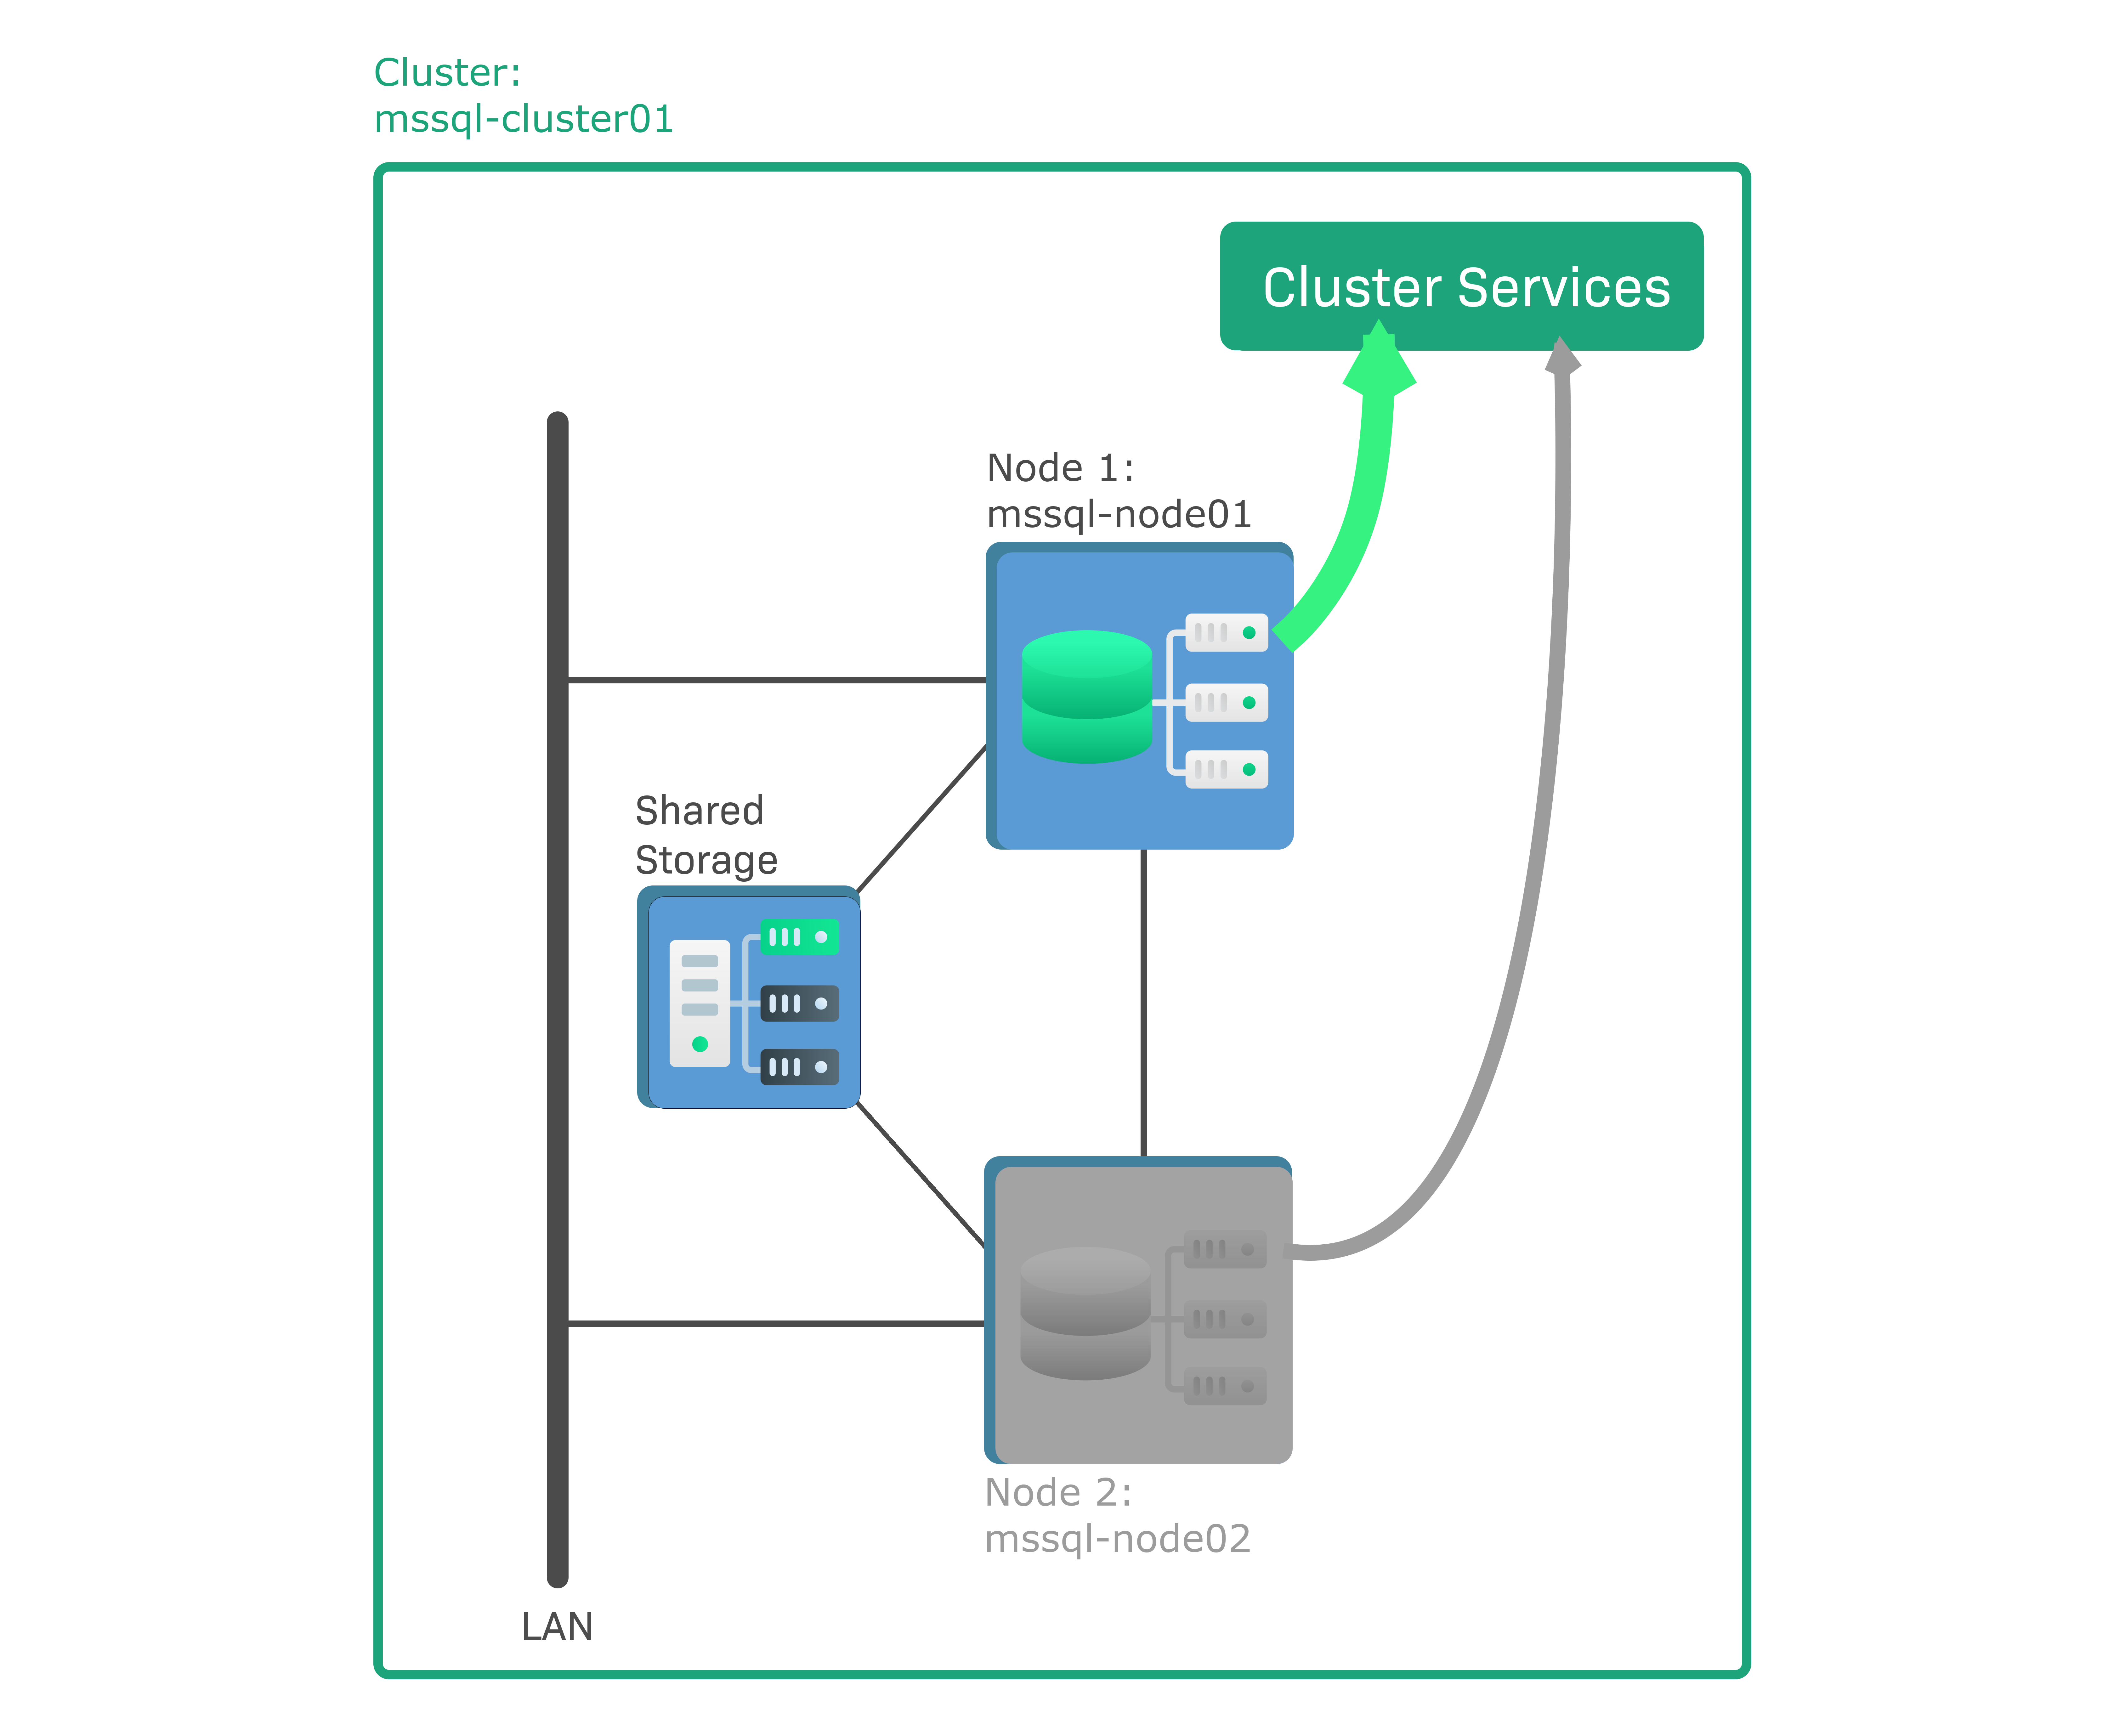
In Checkmk, a Windows failover cluster is to be set up as an HA cluster consisting of two nodes with Microsoft SQL (MS SQL) Servers installed. This is a so-called active/passive cluster, which means that only one, the active node, runs a database instance. The other node is passive and only becomes active in the event of a failover, when it will boot the database instance and replace the failed node. The data in the database instance is not stored on the nodes themselves, but on a shared storage medium, e.g. a storage area network (SAN), to which both nodes are connected. The sample configuration consists of the following components:
mssql-node01is the active node running an active database instance.mssql-node02is the passive node.mssql-cluster01is the cluster to which both nodes belong.
In contrast to this example, it is also possible that the same node can be included in more than one cluster. In the last chapter you will learn how to configure such overlapping clusters using a modified sample configuration.
2. Setting up clusters and cluster services
2.1. Creating a cluster
In Checkmk, the nodes and the cluster itself are created as hosts (node hosts and cluster hosts), with a special host type defined for a cluster host.
Here are some points to consider before setting up a cluster host:
The cluster host is a virtual host to be configured with a cluster IP address if one is present. In our example, we assume that the cluster host name is resolvable via DNS.
Cluster hosts can be configured in the same way as 'normal' hosts, for example with host tags or host groups.
For all participating hosts (this always means the cluster host and all its associated node hosts), the data sources must be configured identically, i.e. in particular, some may not be configured via a Checkmk agent and others via SNMP. Checkmk ensures that a cluster host can only be created if this requirement is met.
In a distributed monitoring all participating hosts must be assigned to the same Checkmk site.
Not all checks work in a cluster configuration. For those checks that have cluster support implemented, you can read about this in the manual page of the plugin. You can access the manual pages from the menu Setup > Services > Catalog of check plugins.
In our example, the two node hosts mssql-node01 and mssql-node02 have already
been created and set up as hosts. To find out how to get this far,
see the article on monitoring Windows servers — and there in the
chapter on extending the standard Windows agent with plug-ins, for our example
the MS SQL Server plug-ins.
Start the creation of the cluster from the menu Setup > Hosts > Hosts and then from the menu Hosts > Add cluster:

Enter mssql-cluster01 as the Hostname, and enter the two node hosts
under Nodes.
Note: If you are dealing with a cluster without a cluster IP address, you will need to take a not-so-comfortable detour, by selecting No IP in the Network Address box for the IP Address Family. But to prevent the host from going DOWN in the monitoring, you must change the default 'Host Check Command' for this via the rule of the same name — from Smart PING or PING to, for example, the state of one of the services which is to be assigned to the cluster host — as will be explained in the next section. For more information on host rule sets, see the article on rules.
Complete the creation with Save & view folder and activate the changes.
2.2. Selecting cluster services
Checkmk cannot know which of the services running on a node are local and which are cluster services — some file systems may be local, others may be mounted only on the active node. The same is true for processes: While the 'Windows Timer' service is most likely running on all nodes, a particular database instance will only be available on the active node.
Instead of making Checkmk guess, select the cluster services with a rule.
Without a rule, no services will be assigned to the cluster. We will assume in
this example that the names of all MS SQL Server cluster services begin with
MSSQL and that the file system in the shared storage device is
accessible via the D: drive
Start with Setup > Hosts > Hosts and click the cluster name. On the Properties of host page select from the menu Hosts > Clustered services. You will land on the Clustered services rule set page where you can create a new rule.
Regardless of whether and how the hosts are organized into folders, be sure to create any rules for cluster services so that they apply to the node hosts on which the services run. Such a rule is ineffective for a cluster host.
Under Create rule in folder, select the folder that contains the node hosts. You will be taken to the New rule: Clustered services page:
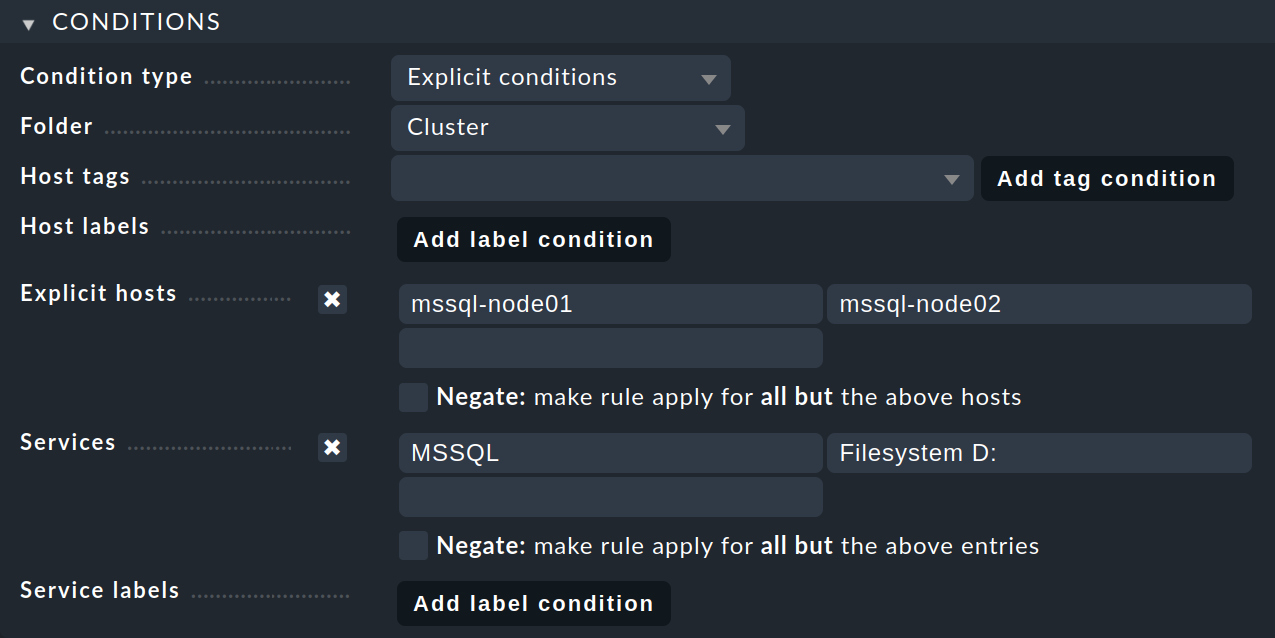
In the Conditions box, enable Explicit hosts and enter the active node
host mssql-node01 and the passive node host mssql-node02.
Then enable Services and make two entries there: MSSQL for all MS
SQL services whose name starts with MSSQL and Filesystem D: for the
drive. The entries are interpreted as regular expressions.
All services that are not defined as cluster services will be treated as local services by Checkmk.
Finish creating the rule with Save and activate the changes.
2.3. Perform a service discovery
For all participating hosts (cluster and node hosts), a new service discovery must be performed at the end so that all newly defined cluster services are first removed from the nodes and then added to the cluster.
Under Setup > Hosts > Hosts, first select all hosts involved and then select from the menu Hosts > On Selected hosts > Discover services. On the Bulk discovery page, the first option Add unmonitored services and new host labels should produce the desired result.
Click Start to begin the
service discovery for multiple hosts.
Upon successful completion — indicated by the
Bulk discovery successful message — exit and activate the changes.
To find out whether the selection of cluster services has led to the desired
result, you can list all services that are now assigned to the cluster:
Under Setup > Hosts > Hosts, in the host list at the cluster host entry click the ![]() icon to edit the services.
On the following page Services of host all cluster
services are listed under Monitored services:
icon to edit the services.
On the following page Services of host all cluster
services are listed under Monitored services:

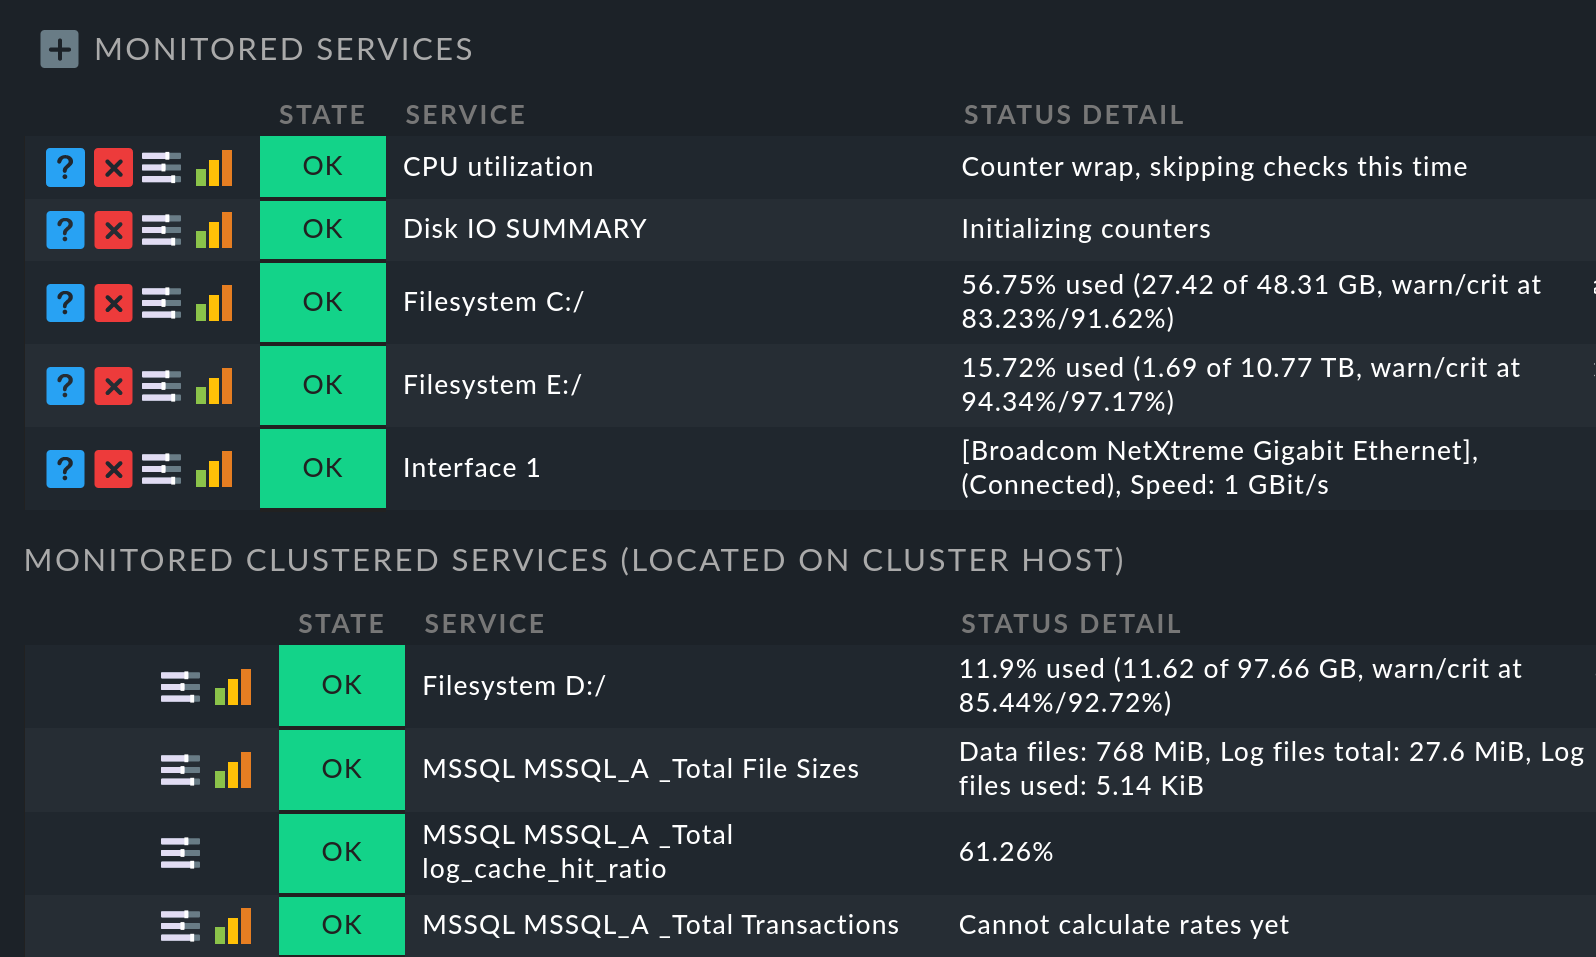
On the other hand, for node hosts, those very services which have been moved to the cluster will now be missing from the list of monitored services. On the node host, you can find these again by looking at the end of the services list in the Monitored clustered services (located on cluster host) section:
Tip: If you run local checks in a cluster where the Clustered services rule has been applied, you can use the Local checks in Checkmk clusters rule set to influence the result by choosing between Worst state and Best state.
2.4. Automatic service discovery
If you let the service discovery be done automatically via the Discovery Check, you have to consider a special aspect. The Discovery Check can automatically delete disappearing services. However, if a clustered service moves from one node to another, it could be incorrectly registered as vanished and then deleted. On the other hand, if you omit this option, services that actually disappeared would never be deleted.
3. Overlapping clusters
It is possible for several clusters to share one or more nodes. These are then referred to as overlapping clusters. For overlapping clusters, you need a special rule to tell Checkmk which cluster services of a shared node host should be assigned to which cluster.
Below we will present the basic procedure for setting up an overlapping cluster by modifying the example of the MS SQL Server cluster from an active/passive to an active/active cluster:
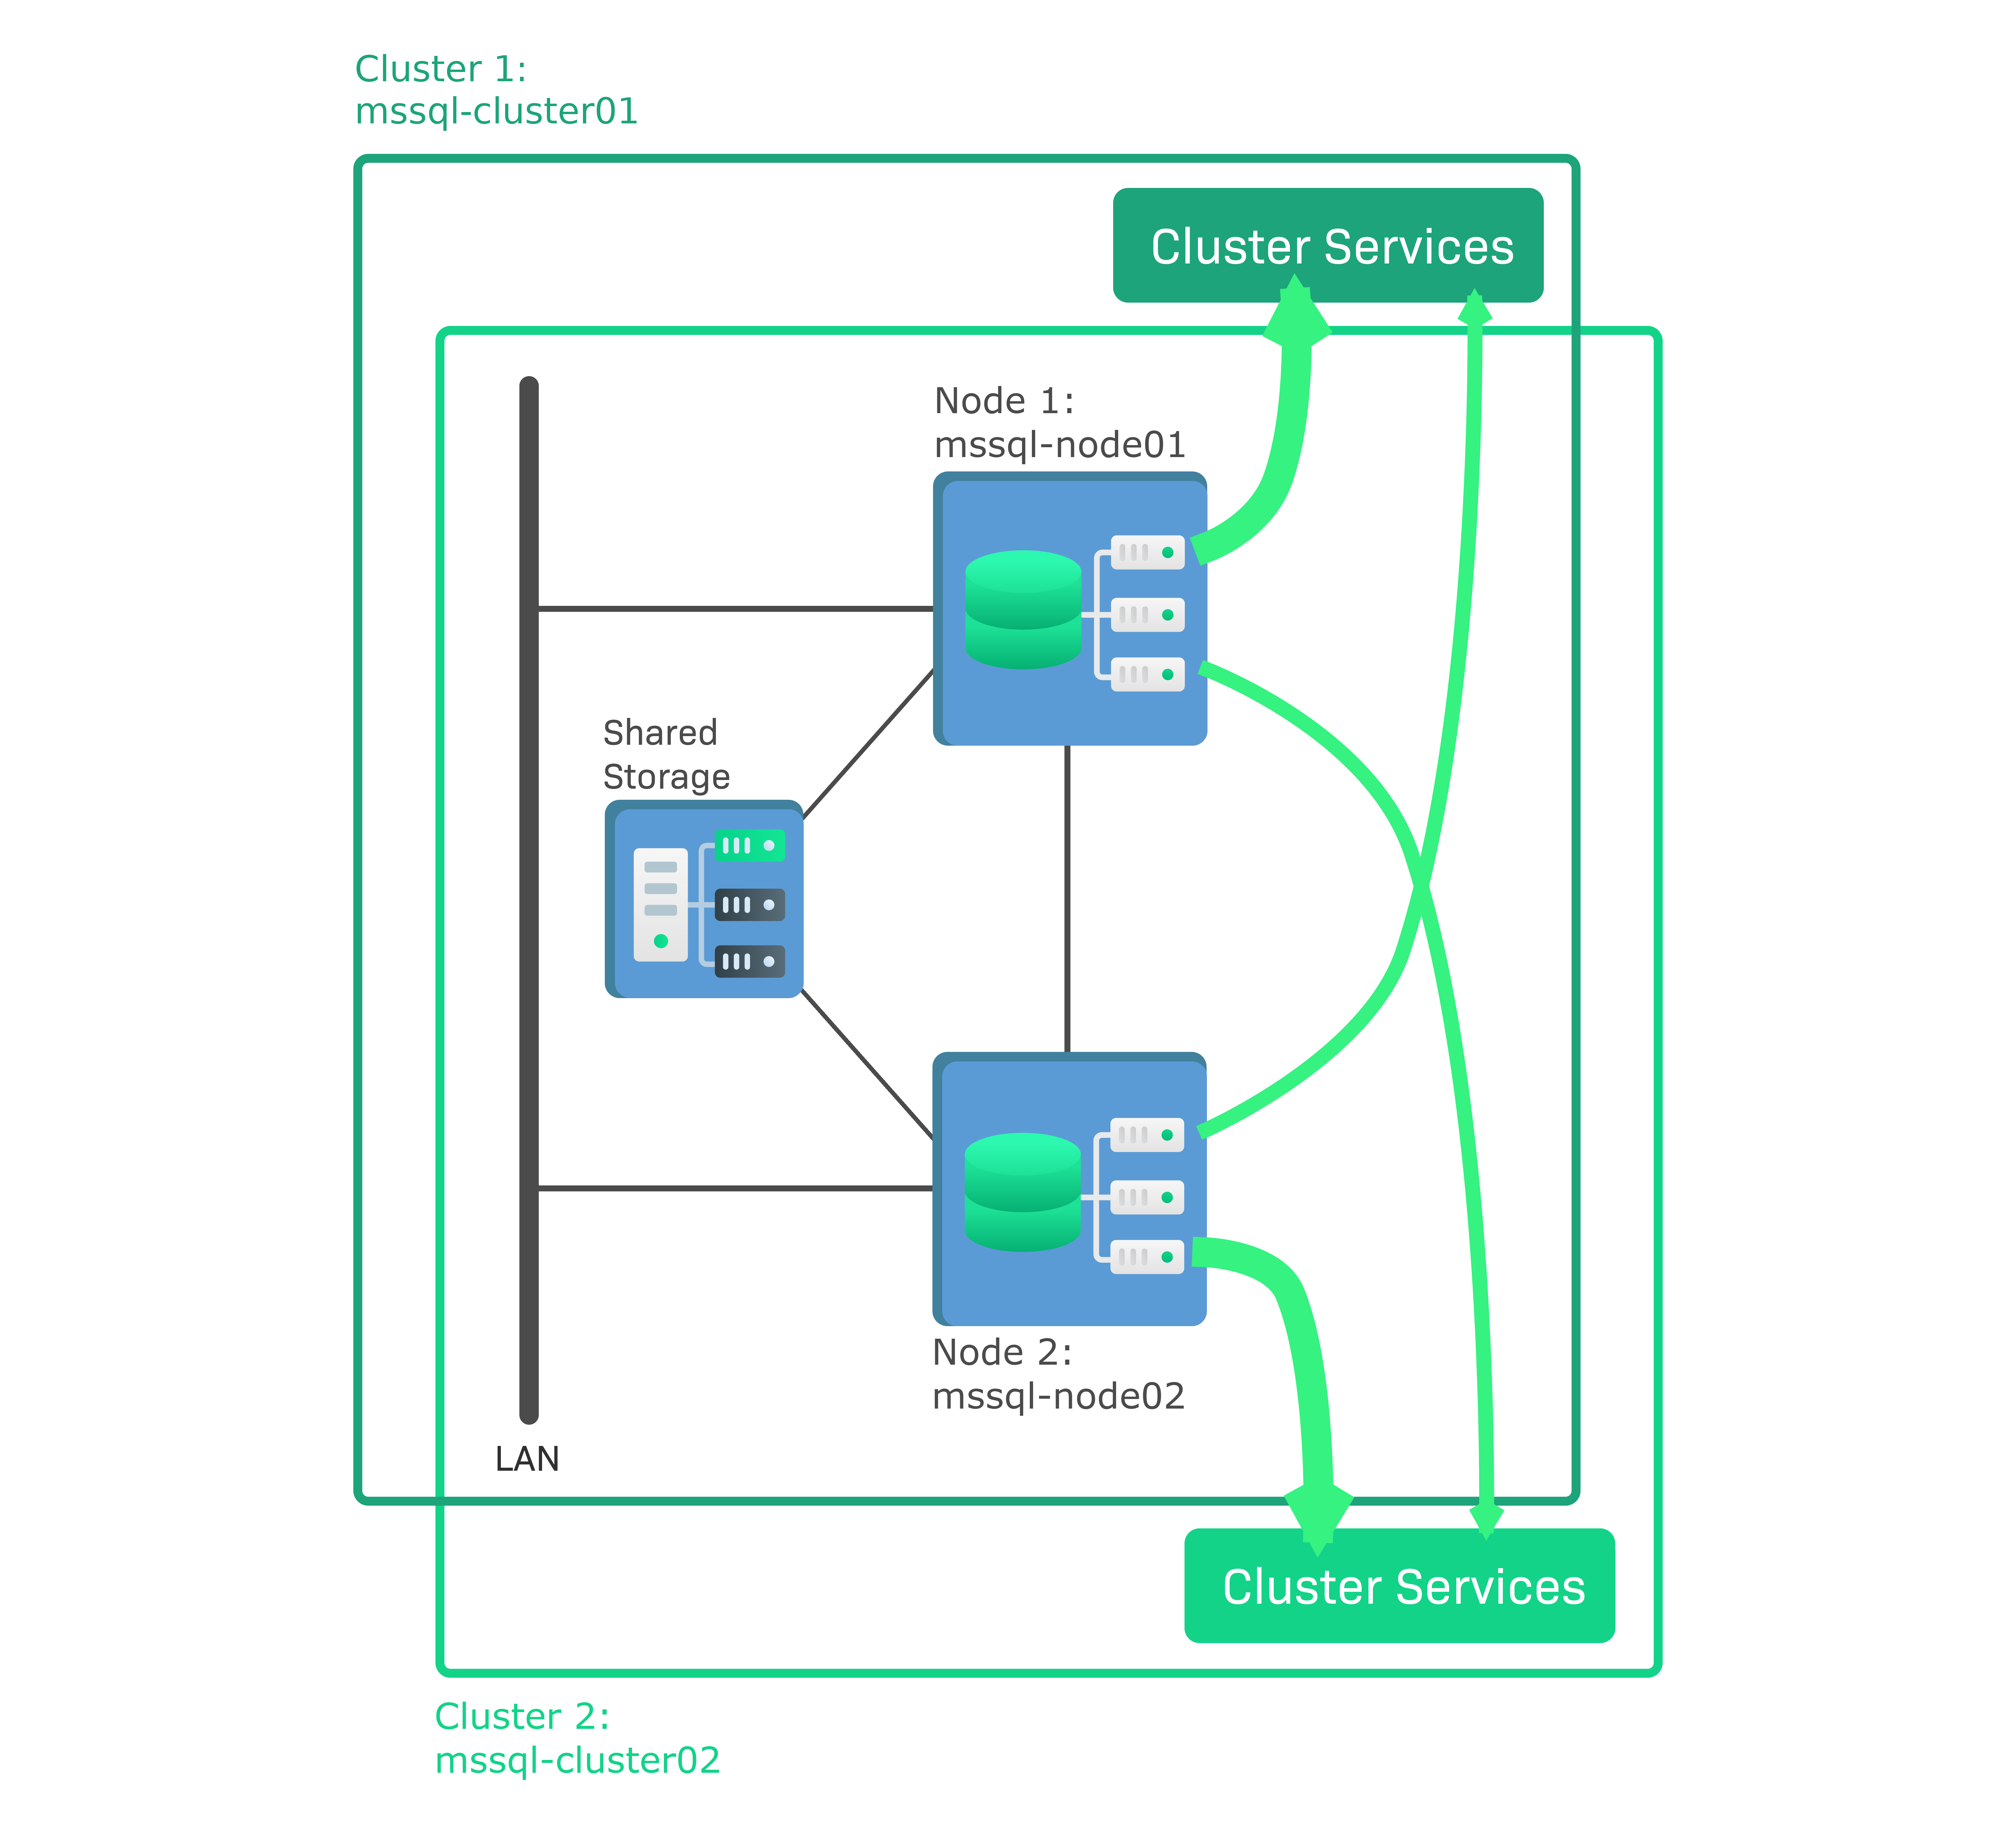
In this configuration, not only is MS SQL Server installed on both node hosts, but a separate database instance is running on each of the two nodes. Both nodes access the shared storage medium, but on different drives. This example implements a 100 % overlapping cluster because the two nodes belong to both clusters.
The advantage with the active/active cluster is that the available resources of the two nodes are better utilized. In the event of a failover, the task of the failed node is taken over by the alternative node, which then runs both database instances.
This sample configuration thus consists of the following components:
mssql-node01is the first active node currently running the database instanceMSSQL Instance1.mssql-node02is the second active node currently running the database instanceMSSQL Instance2.mssql-cluster01andmssql-cluster02are the two clusters to which both nodes belong.
You only need to slightly modify the first step for setting up the active/passive
cluster for an active/active cluster: You create the first cluster
mssql-cluster01 as described above. Then you create the second cluster
mssql-cluster02 with the same two node hosts.
In the second step, instead of using the general Clustered services rule set to select cluster services, use the rule set especially-created for overlapping clusters Clustered services for overlapping clusters. This allows you to define in a rule the cluster services that will be removed from the node hosts and added to the selected cluster.
For our example with 100 % overlap we need two of these rules: The first rule defines the cluster services of the first database instance, which run on the first node host by default. Since in the event of a failover these cluster services are transferred to the second node host, we assign the services to both node hosts. The second rule does the same for the second cluster and the second database instance.
Let’s start with the first rule: Under Setup > General > Rule search find the rule set Clustered services for overlapping clusters and click on it. Under Create rule in folder again select the folder that contains the node hosts.
Under Assign services to the following cluster enter the
cluster mssql-cluster01:

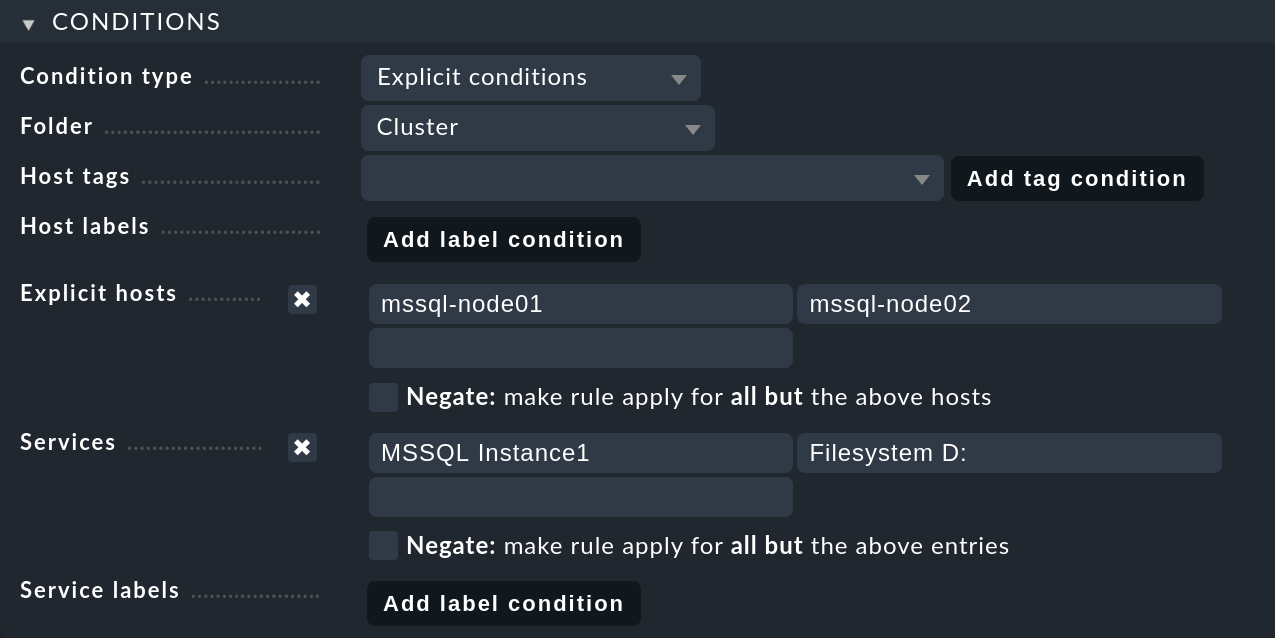
In the Conditions box, enable Explicit hosts and enter both node hosts.
Next, activate Services and make two entries there: MSSQL Instance1
for all MS SQL services from the first database instance,
and Filesystem D: for the drive:
Finish the creation of the first rule with Save.
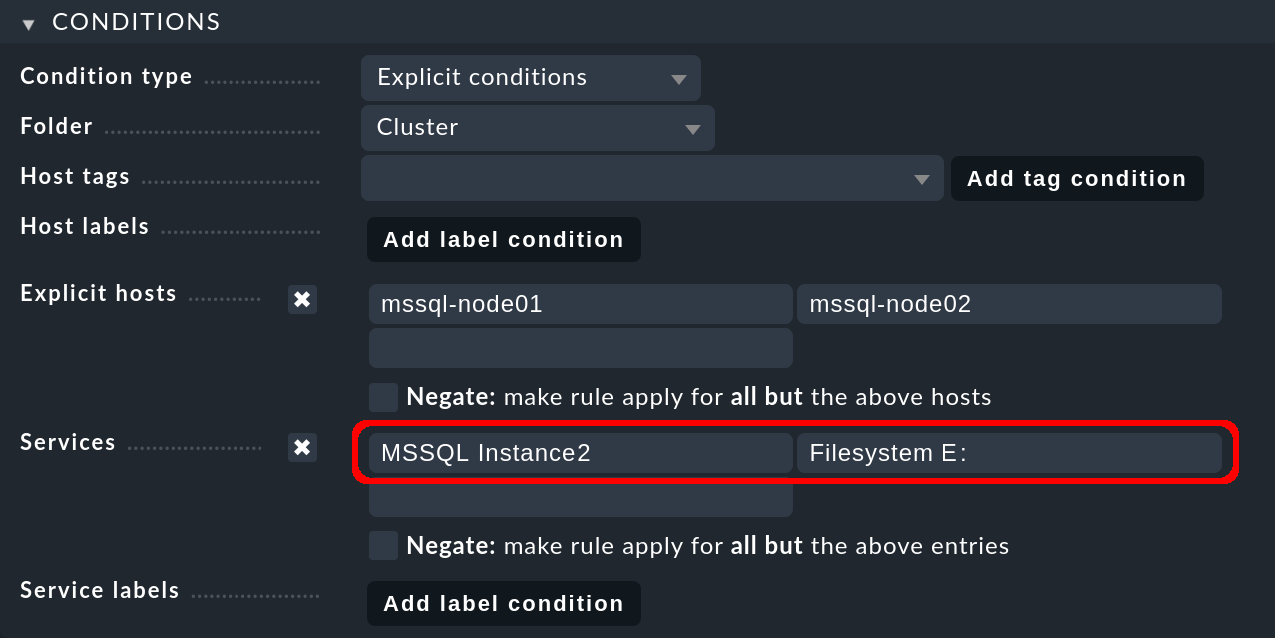
Then create the second rule, this time for the second cluster mssql-cluster02
and again for both node hosts. Under Services you now enter
MSSQL Instance2 for all MS SQL services in the second database instance.
The second node host, on which the second database instance runs by default,
accesses its storage medium under a different drive, in the following example
via the E: drive:
Save this rule as well and then activate the two changes.
Finally, perform a service discovery as the third and very last step in the same way as described above — as a Bulk discovery for all of the associated hosts, i.e. the two cluster hosts and the two node hosts.
Note: If multiple rules define a cluster service, the more specific rule Clustered services for overlapping clusters with the explicit assignment to a specific cluster takes precedence over the more general rule Clustered services. For the two examples presented in this article, this means that the last two specific rules created would never allow the general rule created in the first example to apply.
