1. Auto-registration
![]() Cloud systems such as Amazon Web Services (AWS), Microsoft Azure or Google Cloud Platform (GCP) independently create and delete 'objects',
which correspond to the hosts in Checkmk.
In order for these cloud objects, once they have been created, to be included without delay as hosts in a Checkmk monitoring, a solution without manual intervention is required.
Cloud systems such as Amazon Web Services (AWS), Microsoft Azure or Google Cloud Platform (GCP) independently create and delete 'objects',
which correspond to the hosts in Checkmk.
In order for these cloud objects, once they have been created, to be included without delay as hosts in a Checkmk monitoring, a solution without manual intervention is required.
Checkmk provides the answer with its auto-registration feature — which enables hosts to be created automatically.
As automatic host creation is mainly needed for the cloud environments referred to above, auto-registration is only available in the ![]() Checkmk Cloud Edition.
Checkmk Cloud Edition.
Auto-registration is achieved through communication between the Checkmk agent and the Checkmk server. The agents' Agent Controller makes a request for registration to the server’s Agent Receiver, transmitting the data required to create the host. If the Agent Receiver accepts the request, registration is performed and a TLS-encrypted connection is established. The host is then created, a service discovery is performed and the changes are activated, so that the host will be added to the monitoring environment — a completely automatic process.
For this automation to work, appropriate preparation is of course necessary. Let’s start on the Checkmk site, with the creation of a user who has the authorization for auto-registration, a folder in which the hosts are to be created, and a rule that allows the Agent Receiver to process registration requests without manual intervention. By the way, when configuring the folder, you can specify whether the agents for the hosts to be created there should work in the Cloud Edition’s pull mode or push mode.
Then comes the Checkmk agent: Here, the information for a registration request is specified by an agent rule and then packed (baked) into an agent package by the Agent Bakery. This agent package configured for auto-registration is then installed on the hosts that are to be able to perform auto-registration.
How all of this actually works is explained in the following chapters.
2. Setting-up auto-registration
2.1. Creating a user for the auto-registration
The permissions needed to register and create hosts are contained in the Agent registration user role. This allows you to create a special user who by definition is not allowed to do anything other than register hosts.
Start the creation of an automation user with Setup > Users > Users > Add user as described in the article on user management. First enter the user name and its full name in the Identity box. Important here are the two options in the Security box. Select Automation secret for machine accounts and enter the automation password or have it generated randomly. Under Roles, assign only the Agent registration user role to the user. The permissions to register new hosts are available in this role only in the Cloud Edition.
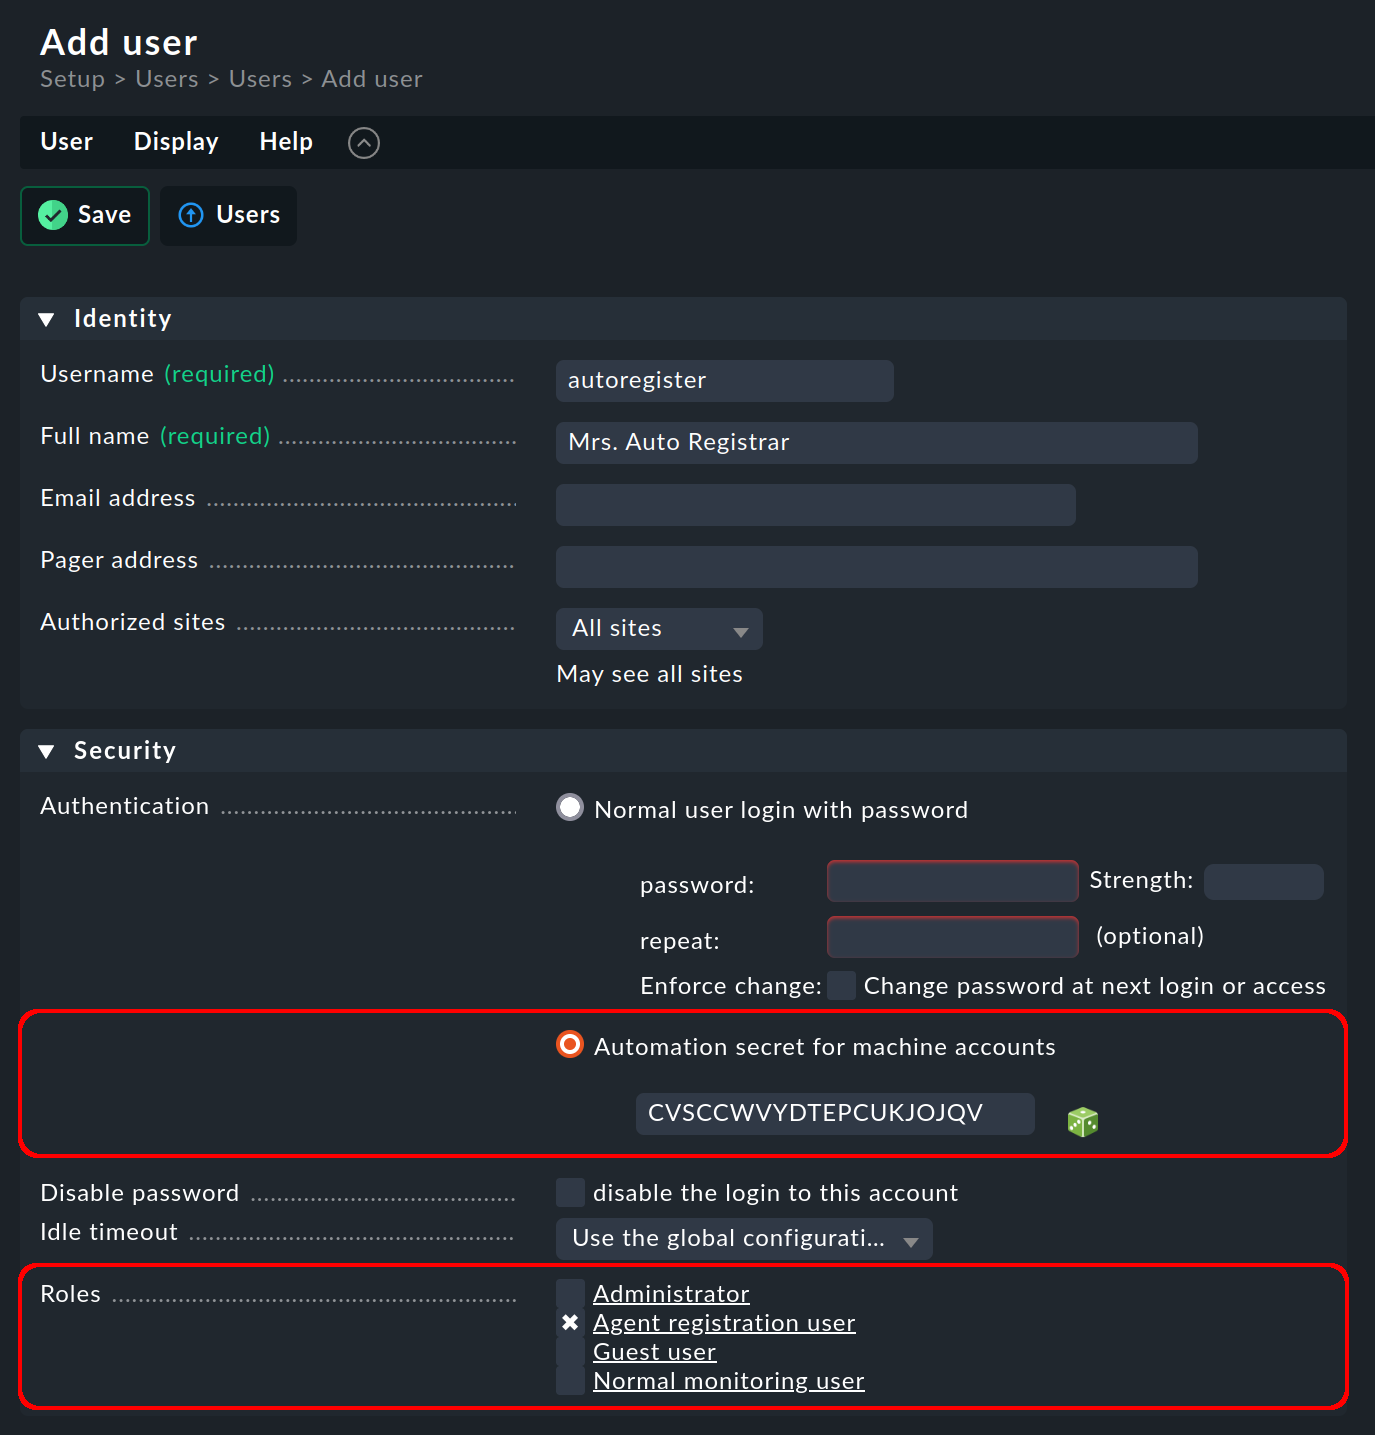
By specifying the above options, you ensure that the new user can only be used for auto-registration. Save your entries with Save.
2.2. Creating a folder for the new hosts
The automatically created hosts are to be created in a new folder. Alternatively, you can use an existing folder if you configure that folder as described below.
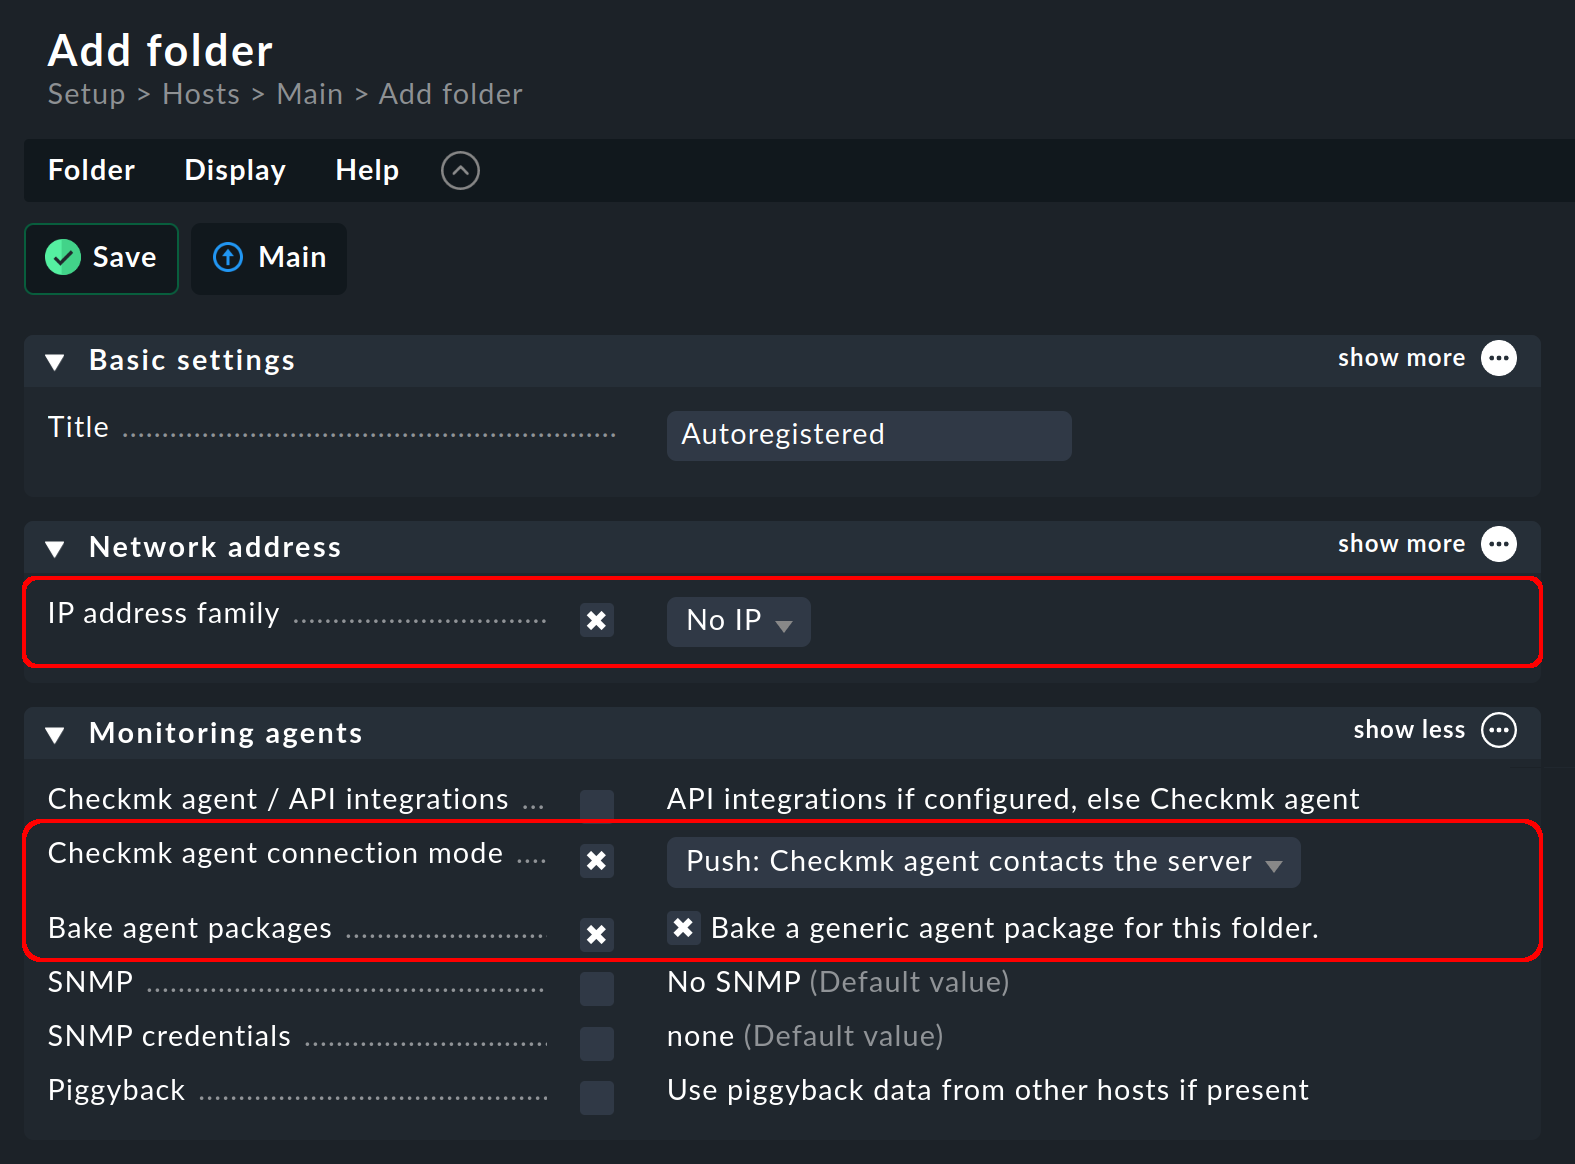
Start the creation of a folder with Setup > Hosts > Hosts > Add folder. Give the new folder a name in the Basic settings box.
The Network address box includes the IP address family option. If you want the host’s Checkmk agents to be set up to use the pull mode, you can leave the default value IPv4 only unchanged. For push mode, select the value No IP. This prevents the host’s accessibility from being checked via Smart Ping.
In the following Monitoring agents box, you specify two important options for the auto-registration. With Checkmk agent connection mode you decide whether the Checkmk agent should work in pull mode or (as in the following image) in push mode. This option is only available in the Cloud Edition. Finally, in Bake agent packages, activate the Bake a generic agent package for this folder checkbox. This allows you to use the Agent Bakery, to create an agent configuration for a folder and all of the hosts it contains, and any hosts that may be added to this folder in the future.
Complete the creation of the folder with Save.
2.3. Creating a rule for the Checkmk site
The decision on which hosts are allowed to register automatically, what names they are given and what else happens to them following registration, is made in Checkmk — not surprisingly — with rules. The labels with which the host’s agent will register play a decisive role in this. But first things first.
The Agent registration rule set is only available in the Cloud Edition. You can find it under Setup > Agents (if the Show more mode is active) or by searching the Setup menu. Start with Add rule the creation of a new rule and assign in the first box Properties, as usual with Checkmk, first an ID and a title.
In the following Matching criteria box, you specify which labels are to be accepted when the Checkmk server receives a request for registration from an agent.
These agent labels are used exclusively for auto-registration and are different from the labels otherwise used in Checkmk to identify hosts and services.
Two agent labels are supplied by the Checkmk agent and can be selected from the list:
cmk/hostname-simple contains the host name without the domain component (hence simple) which is intended for designating a unique host name in Checkmk, and cmk/os-family contains the host’s operating system which can be used, for example, to store the hosts in different folders.
You can also enter your own labels with Custom label.
The colon-separated key-value pair that makes up a label (e.g. cmk/os-family:linux) is evaluated separately.
This way you can explicitly specify that a key (e.g. cmk/os-family) must exist (Exists), may not exist (Does not exist) or is only accepted with a given value (Equals).
You can also enter a regular expression (Regex) as the value.
If you define multiple agent labels, they will be logically linked with AND.
In the following example, in addition to the predefined label cmk/hostname-simple, the custom label my_autoregister_label is also to be checked:
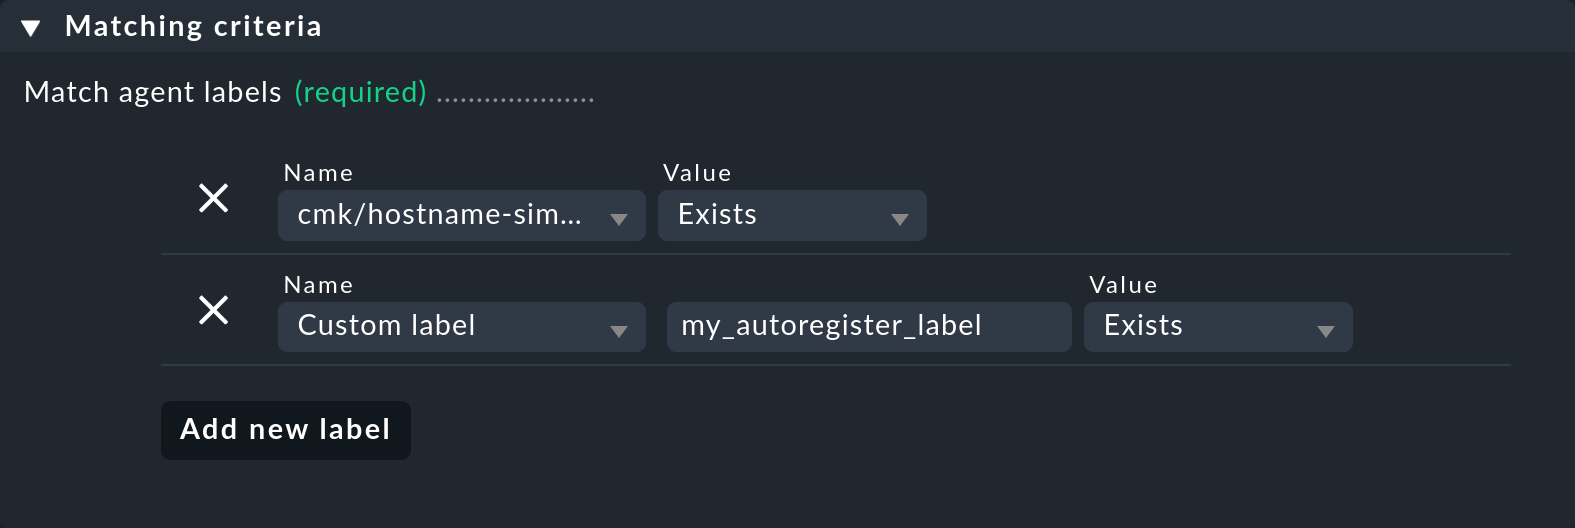
cmk/hostname-simple and my_autoregister_label keys existNote: Every host that has been successfully registered automatically receives the cmk/agent_auto_registered:yes host label appended by Checkmk.
You cannot use this label here, however, because it is not an agent label and is only assigned following the registration.
In the next box, Action, you determine what should happen when the evaluation of the labels takes effect: Create the host or not. If you select Stop and do not create hosts, the rule evaluation is then complete and the next two boxes are no longer relevant. In our example, however, hosts are to be created:

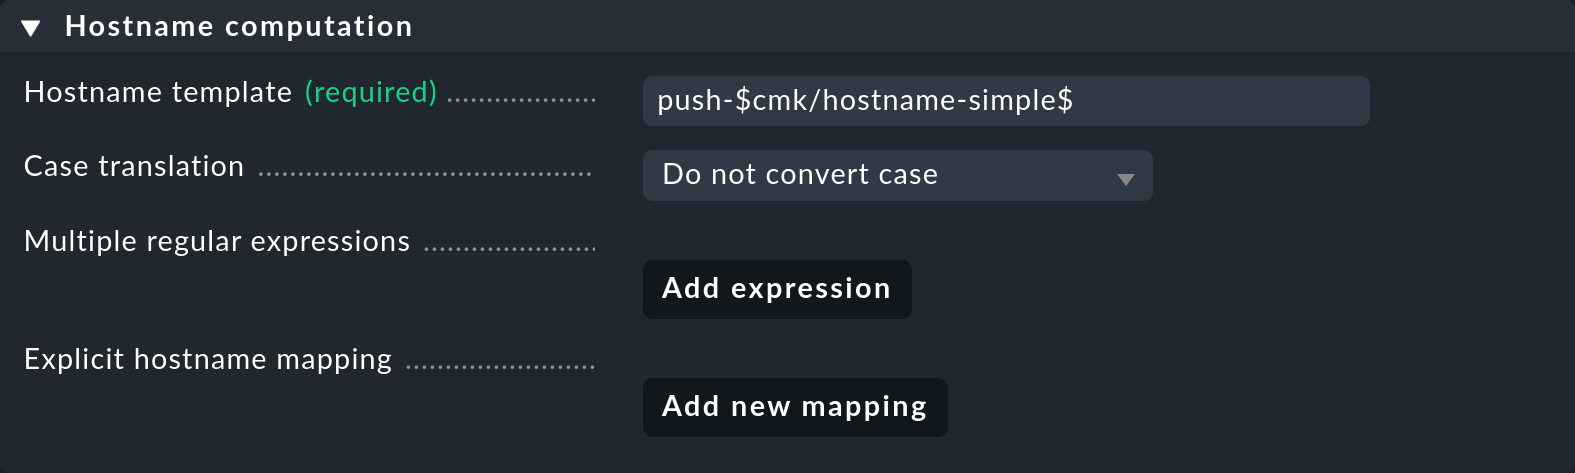
In the Hostname computation box, you now specify which name the host should receive.
In the Hostname template box, enter the template.
Here you can use macros to read the actual values from the agent labels that you selected in the Matching criteria box above — with $cmk/hostname-simple$, for example, the simple host name supplied by the Checkmk agent.
You can then modify the template, if desired, by converting to lower or upper case, and substitutions with regular expressions and with explicit host names.
These are, by the way, the same options that are available in customizing the names of piggyback hosts.
More information can also be found in the inline help.
push-
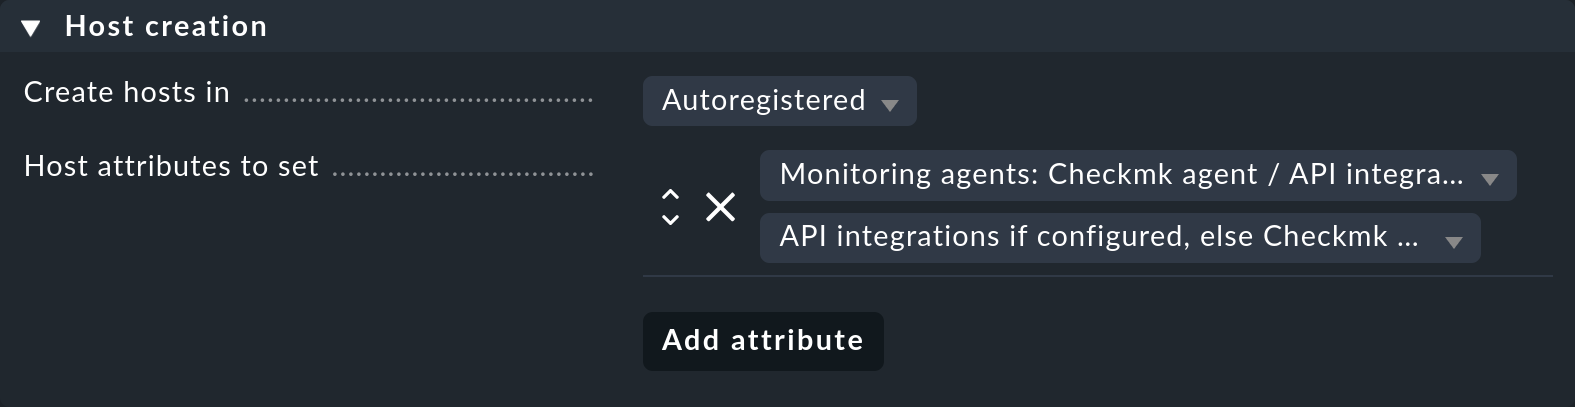
Finally, in the Host creation box, select the predefined folder in which the new hosts are to land. In addition, you can specify attributes that are to be given to the host. You can read more about these attributes in the article on host administration.
Autoregistered folderAfter saving the rule, return to the Agent registration page. Here you will find the Agent labels simulator. If you have defined many rules, the simulator will help you to keep track of them. You can enter agent labels and with Try out simulate whether and which rule applies when an agent label is sent. The results will show you the colored traffic light symbols as described in the article on rules.
2.4. Creating a rule for the Agent Bakery
After configuring the Checkmk site in the previous section, we now deal with the Checkmk Agent Controller. For this, you use the Agent controller auto-registration (Cloud Edition) rule set in the Agent Bakery, which, as its title suggests, is only available in the Cloud Edition. You can find the rule set in the Agent Bakery under Agent rules or the quickest way is to search for it in the Setup menu. Create a new rule.
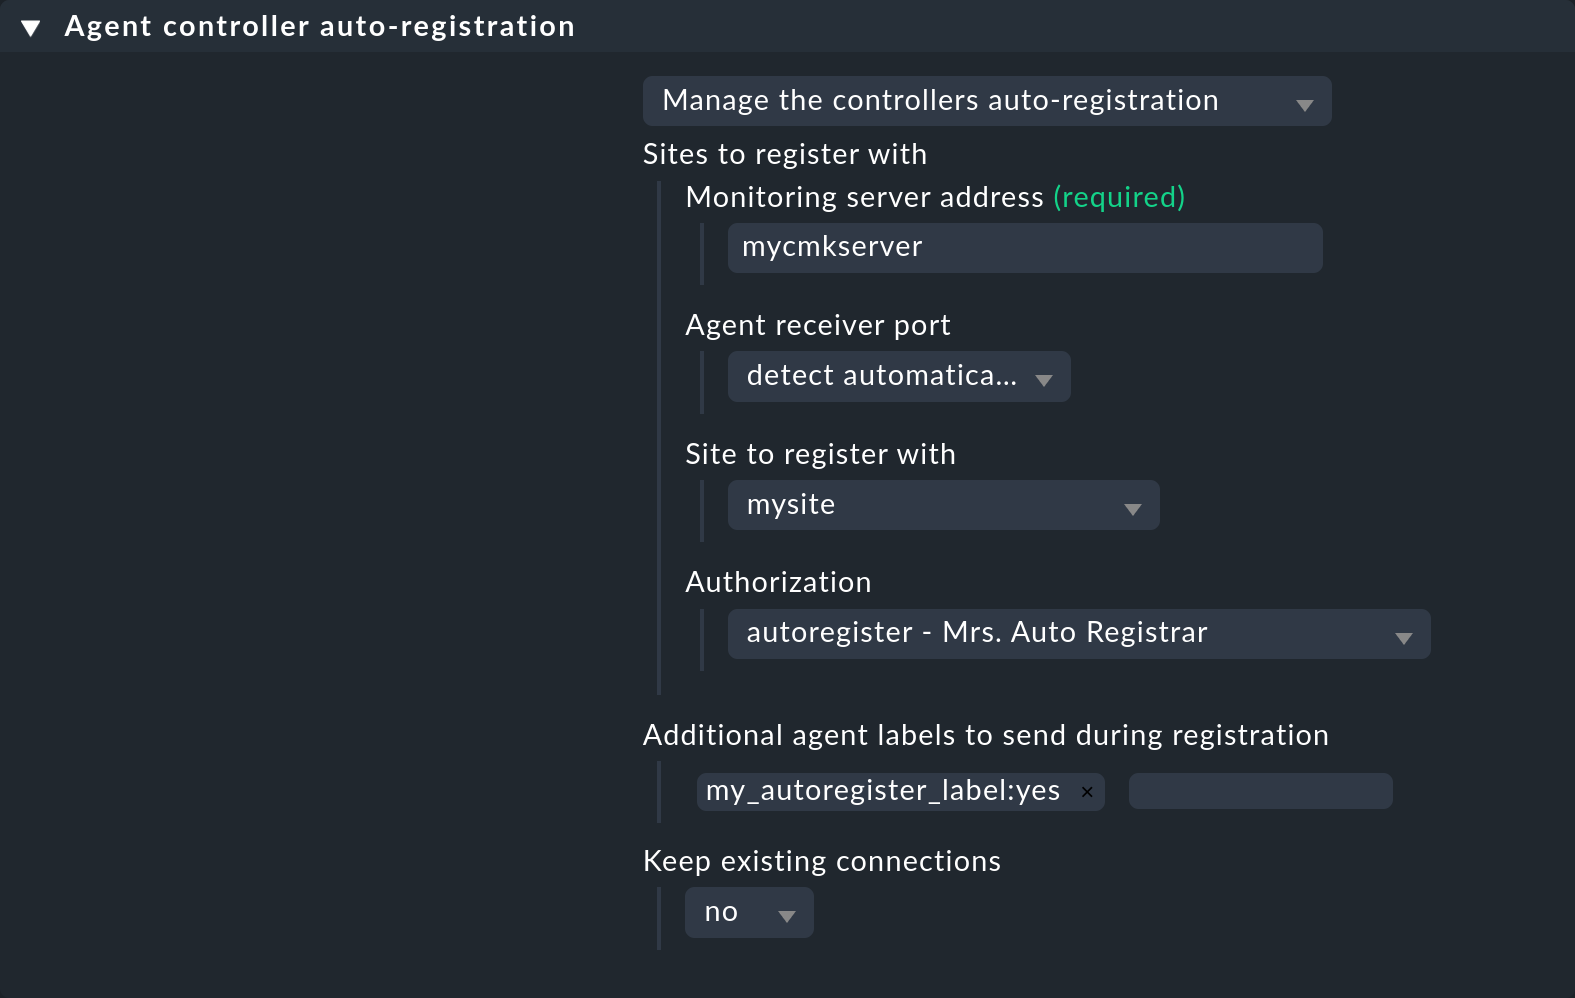
In the Agent controller auto-registration box, provide the Agent Controller with all of the information it needs to make a registration request to the Agent Receiver: the Checkmk server (Monitoring server address), if applicable, the port number for the Agent Receiver (Agent receiver port), the Checkmk site (Site to register with) and the predefined automation user for auto-registration.
You can also define your own labels here at the Additional agent labels to send during registration option.
For the auto-registration to work, these labels must match the ones
which you have entered under Custom label in the rule for the Checkmk site:
in the example, the previously created custom label with the my_autoregister_label key.
With the final option Keep existing connections you determine
whether the Agent Controller should delete (no) or keep (yes) already existing connections.
If you have configured manual connections to other Checkmk sites in addition to the automatic registration of a connection,
and want to keep these even after a restart of the Agent Controller cmk-agent-ctl, you should set this option to yes.
Important: For the last box in this rule, Conditions, again select the predefined folder as Folder.
2.5. Baking an agent package
Now continue in the Agent Bakery with Setup > Agents > Windows, Linux, Solaris, AIX.
Click on ![]() and bake yourself a new agent.
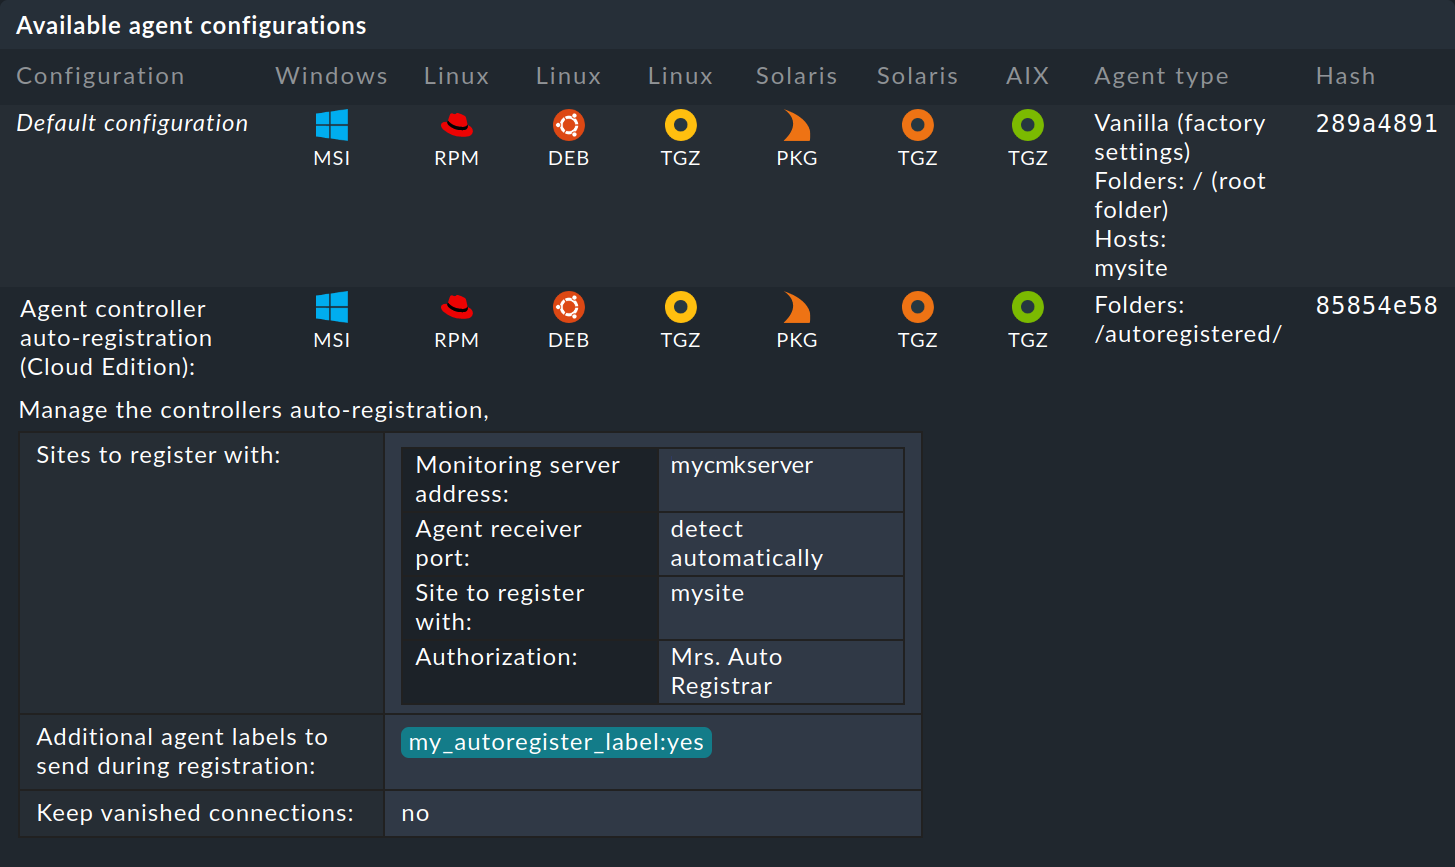
As a result, in addition to the Vanilla (factory settings) agent configuration, you will receive a new line for the configuration
in which the rule created in the previous section has been baked in:
and bake yourself a new agent.
As a result, in addition to the Vanilla (factory settings) agent configuration, you will receive a new line for the configuration
in which the rule created in the previous section has been baked in:
2.6. Download and install the agent package
The agent package must now be installed on each host that is to start auto-registration. Download the agent package appropriate for the host’s operating system and install it on the host. The procedure is the same as usual in the Agent Bakery. For more on this, see the articles on the monitoring agents, the Linux agent and the Windows agent.
2.7. Process verification
After installing the agent package, the Agent Controller evaluates the /var/lib/cmk-agent/pre_configured_connections.json file
and issues the registration command for a connection that it contains.
If the Agent Receiver accepts this command, the connection will be set up and the host created in the Checkmk site.
A service discovery is then performed and the changes activated, so that the host will also be visible in the monitoring. Note that during the automatic activation, any other accumulated changes — also from other users — will also be activated.
This process can take several (up to 5) minutes from the installation of the agent package until the host appears in the monitoring. You can track the individual steps in this process in Setup > General > Audit log.
On the host you can use a command to display the Agent Controller’s connection status, which looks like this following a successful registration in push mode:
root@linux# cmk-agent-ctl status
Version: 2.2.0-2023.03.21
Agent socket: operational
IP allowlist: any
Connection: myhost/mysite
UUID: b11af975-40a8-4574-b6cd-12dc11c6f273
Local:
Connection mode: push-agent
Connecting to receiver port: 8000
Certificate issuer: Site 'mysite' agent signing CA
Certificate validity: Tue, 21 Mar 2023 12:29:41 +0000 - Tue, 21 Mar 2028 12:29:41 +0000
Remote:
Connection mode: push-agent
Registration state: discoverable
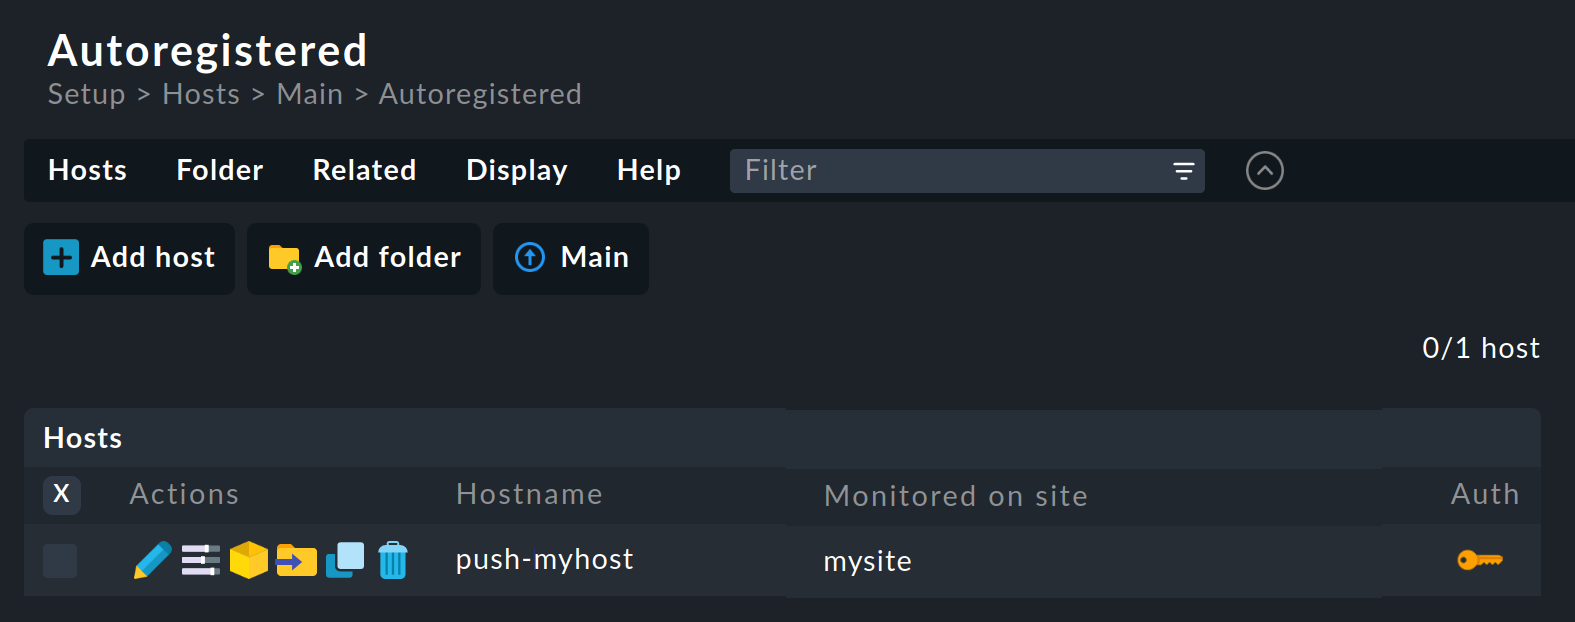
Host name: push-myhostAutomatically created hosts can also be automatically removed. The Cloud Edition thus provides the two most important components for the lifecycle management of hosts. By the way, automatic removal also works for manually created hosts — and in all editions.
3. Testing and fault diagnosis
You can follow the individual steps in the process of the creation of the host in monitoring (creation of the host in the Setup, service discovery and activation) in the Checkmk site under Setup > General > Audit log.
You verify the successful automatic registration on the host with the cmk-agent-ctl status command.
However, these verifications mentioned in the previous section will only show the desired results if the process has been successful. If the results are not as shown above, it may be because a registration request was submitted by the Agent Controller but not accepted by the Agent Receiver.
For an overview of all registration requests that have been rejected by the Checkmk site, see the Agent registration page, above,
in which you created the rule for the Checkmk site.
There are many possible reasons for a rejection.
In the following image you can see two examples — a misspelling (my_autoregister_labell) in the agent label submitted by the agent, and a host that already exists:
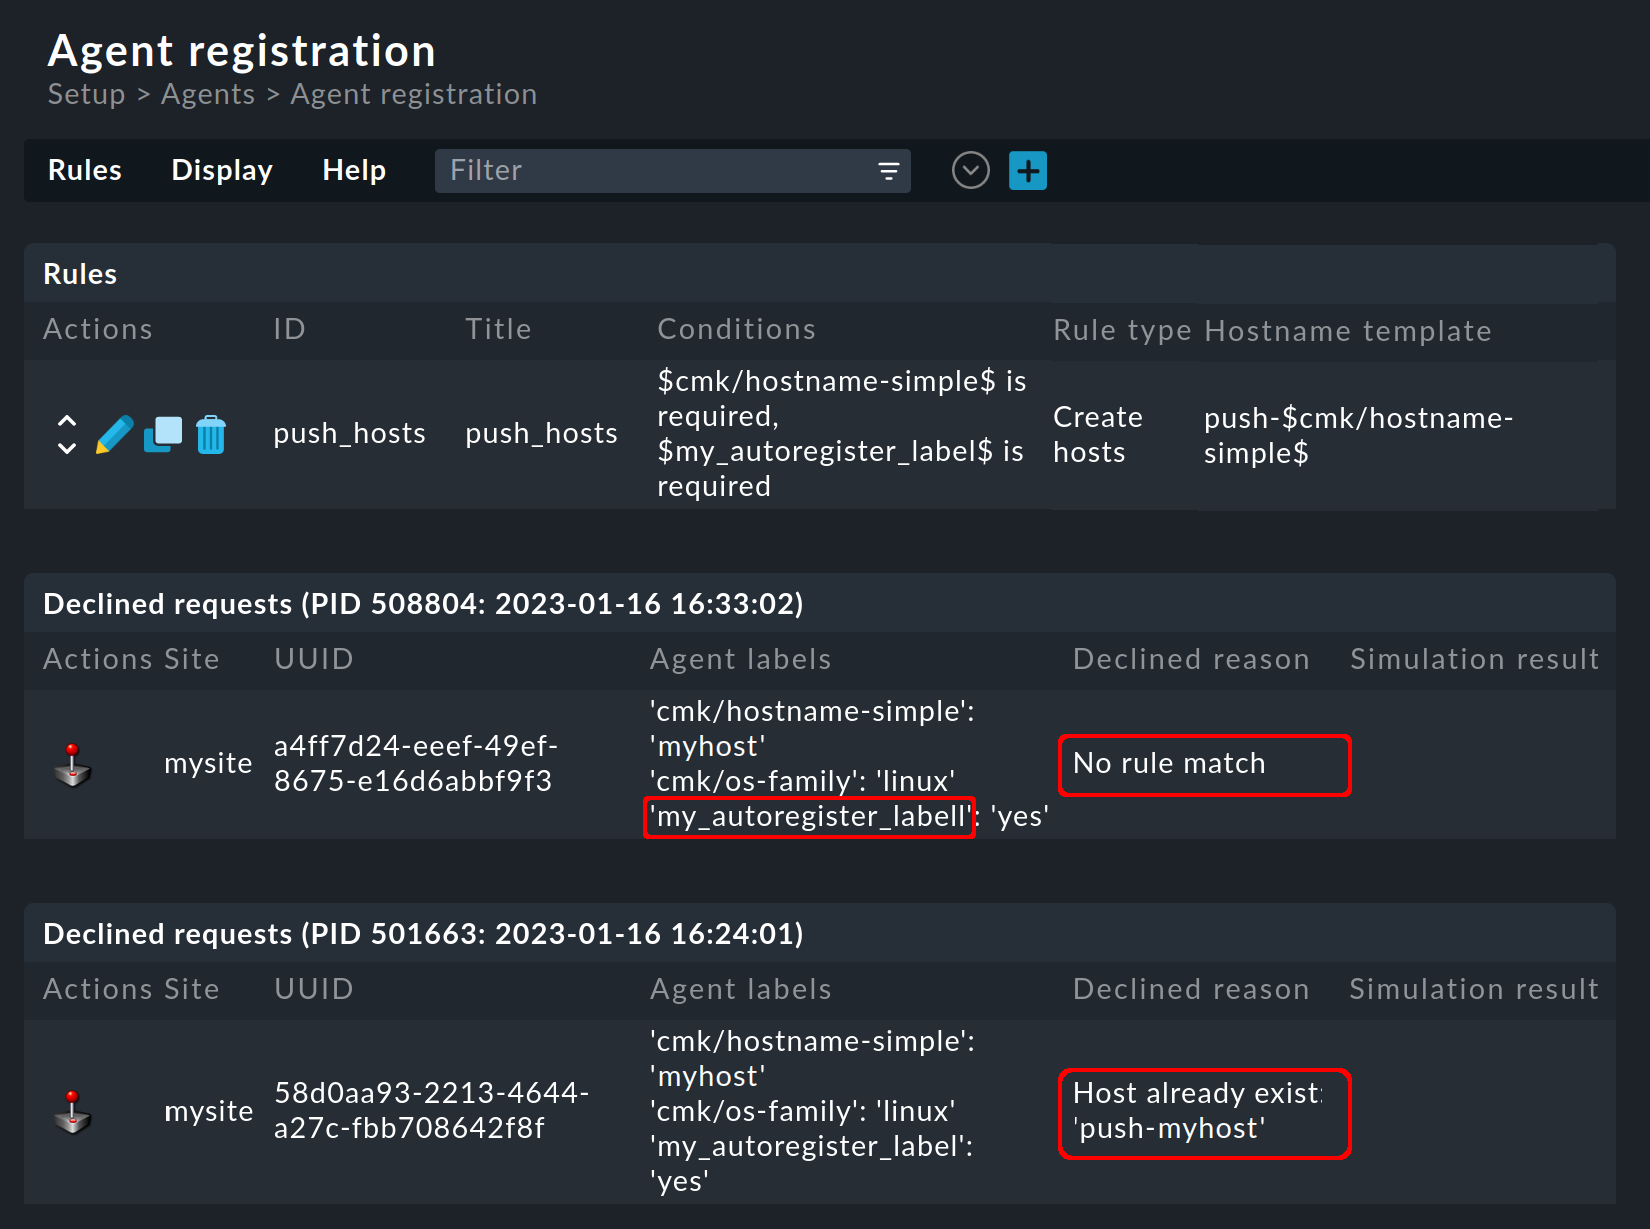
For each rejected request, in the first column, Actions, you can start a simulation, the result of which is displayed in the last column, Simulation result.
For a fault diagnosis beyond this, for further information see the articles on the Linux agent and the Windows agent — among others — on the topics of communication between an agent and a Checkmk site, as well as on (manual) registration.
4. Files and directories
4.1. File paths on the monitored Linux host
| File path | Description |
|---|---|
|
Contains a list of connections registered with the Agent Controller. |
|
Contains a pre-configured connection integrated into the agent package via the Agent Bakery to a site for the auto-registration in the Cloud Edition. |
4.2. File paths on the monitored Windows host
| File path | Description |
|---|---|
|
Contains a list of connections registered with the Agent Controller. |
|
Contains a pre-configured connection integrated into the agent package via the Agent Bakery to a site for the auto-registration in the Cloud Edition. |
4.3. File paths on a Checkmk server
| File path | Description |
|---|---|
|
Contains for each connection its UUID as a soft link pointing to the folder containing the agent output. |
|
Log file for the agent registration. You can control the verbosity of the messages in 6 levels via Setup > General > Global settings > User interface > Logging > Agent registration. |
|
Contains the log files for the Agent Receiver. |