

1. Introduction
 The commercial editions can update their agents on Linux, Windows and Solaris automatically.
This feature enables easy updating of the agents in the case of new Checkmk versions, and even a changed configuration of the agents can be applied automatically.
In this way you can take advantage of the Agent Bakery to apply individual configurations to hosts.
The commercial editions can update their agents on Linux, Windows and Solaris automatically.
This feature enables easy updating of the agents in the case of new Checkmk versions, and even a changed configuration of the agents can be applied automatically.
In this way you can take advantage of the Agent Bakery to apply individual configurations to hosts.
The Agent Updater plug-in enables automatic updates of the Checkmk agent on the monitored hosts. After the initial setup, the Agent Updater ensures that configuration changes for your agents are automatically rolled out to the appropriate hosts at scheduled intervals. The advantage for large environments with many monitored hosts that share similar characteristics is obvious: You implement changes just once, and the distribution of the updated agents happens entirely on its own—without you having to manually access each monitored host to download and activate the new agent there.
This article describes how to set up automatic agent updates on your monitored hosts.
In the chapter Setting up automatic updates, you will learn what preparatory steps are required and how to enable automatic agent updates for hosts.
The chapter Diagnosis helps you assess whether all updates are being distributed as intended.
The chapter Maintenance summarizes one-time and recurring tasks.
The chapter Deployment scenarios provides tips for implementing the typical scenarios described and highlights additional considerations for each.
The configuration of automatic updates in distributed monitoring is covered separately in the chapter Agent updates in distributed monitoring.
Since we strongly recommend using HTTPS, you will find specific instructions for securing your setup in the chapter Working with HTTPS.
The chapter Troubleshooting lists some common errors, their causes, and possible solutions.
In the chapter Files and directories, you will find all relevant paths on the Checkmk server and on the monitored host.
2. Setting up automatic updates
To implement the updates, follow these steps: First open Setup > Agents > Windows, Linux, Solaris, AIX and select Agents > Automatic updates:

See Prerequisites for a list of prerequisites that need to be met for the automatic updates to work correctly.
You can simply tick these off in order.
Do not forget that you can get more information for each of these items via Help > Show inline help.
Clicking on  will take you directly to the setting you need to configure.
Specifically, the settings described in the following five sections must be made and then activated via the Master switch.
will take you directly to the setting you need to configure.
Specifically, the settings described in the following five sections must be made and then activated via the Master switch.
2.1. Creating a signature key
The system is designed in a way that the agents can download updates via HTTP or HTTPS from their central monitoring server. Because agents contain executable code it is especially important to guard against the possibility of falsified agents coming from an attacker. Signature keys are used for this purpose. These keys consist of a pair of public and private keys (the public-key method).
You can create as many signature keys as you like. Each of these is secured with a passphrase, which you will subsequently need to enter each time you sign. This prevents, for example, an attacker gaining access to a monitoring server backup from signing agents.
To generate a signature key,
for the first entry, Signature keys, click and, on the next page, click Generate key.
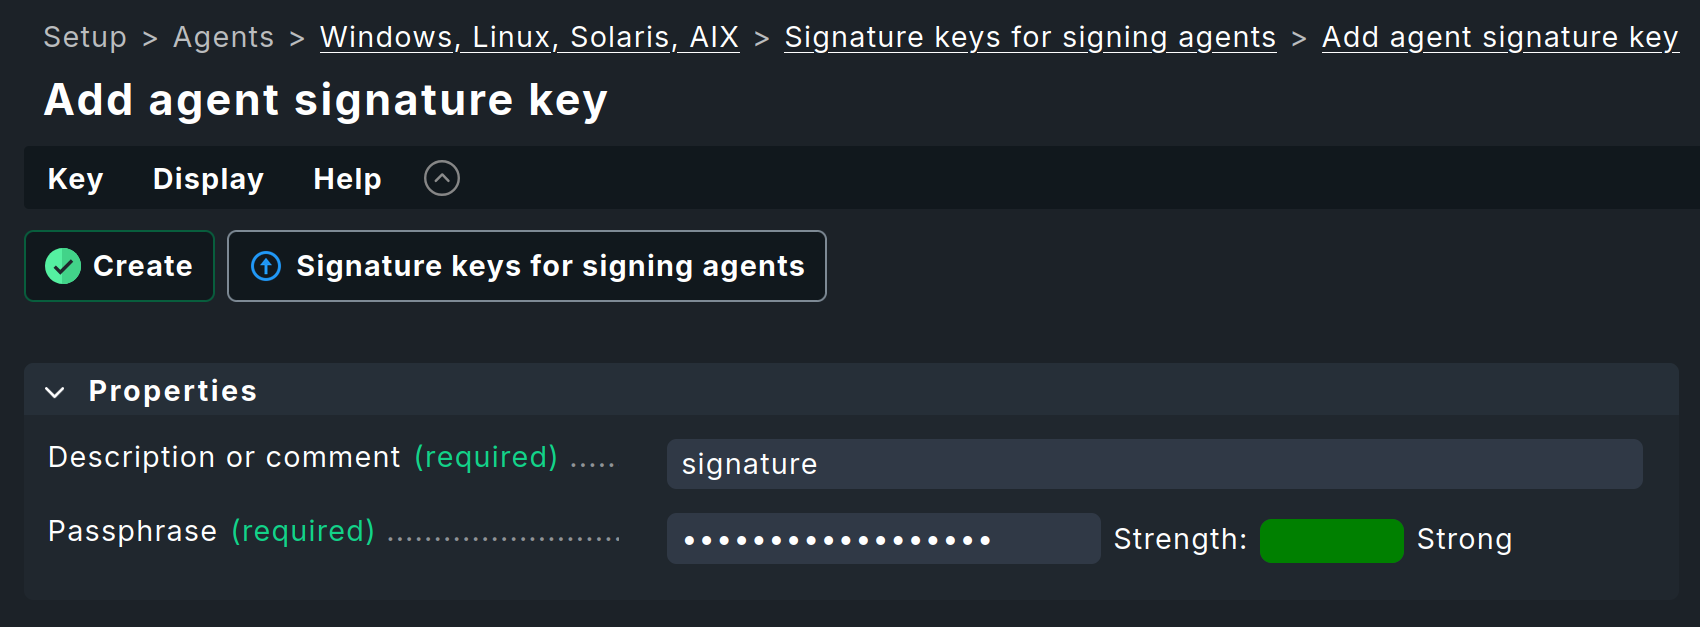
Enter the passphrase, make a note of it, and click Create to generate the key.
 |
The signature key cannot be changed or recovered later. If the key or passphrase is lost, this may mean that all agents will have to be updated manually. |
Signature keys have a limited lifespan. This means that it is sometimes necessary to replace a signature key. For more information, see the chapter Maintenance.
2.2. Configuring the update plug-in
The actual update is performed by an agent plug-in named cmk-update-agent.
This is called by the agent in a definable cycle (e.g. once per hour).
At this time it asks the deployment server (your central monitoring system) if there is a new package available for this host, and if so it will then perform the update.
The plug-in must of course be present and correctly configured in the agent. To do this, extend the agents with this plug-in using the Agent updater (Linux, Windows, Solaris) rule set. You can find this rule set by clicking on the Configuration of update plug-in entry on the Automatic agent updates page.
Note that the rule set here follows the 'First rule per parameter wins' principle. This allows you to define basic settings in general so that they do not have to be set again and again in the more specific rules. In addition, the inline help provides more information about each item as soon as you activate it.

Below are a few explanations of the individual points.
Activation
Check the Activation option and select the appropriate value (Deploy plugin …) to add the plug-in to the agent. Here, for example, rule inheritance can be used to set a default in a higher-level folder and override this for individual hosts/folders as needed.
Update server information
Optional configuration data for the connection of the Agent Updater to the Checkmk server can be entered here. If this entry is not configured, the information must be entered later when registering the Agent Updater.
Usage
In the case of distributed monitoring with central setup, the Agent Updater receives its relevant update server by default from the Checkmk site to which it connects. This option can be used to configure that the update server entered here is used permanently and that the automatic update server will be ignored.
DNS name or IP address of update server
Here you enter—with a few exceptions—the name of the server on which you are currently configuring this rule. Therefore, you can copy the URL from your current browser window.
An exception to this approach would be if the affected hosts should be 'moved' to another Checkmk server. For this situation, once only, enter a different server here. See also below under Deployment scenarios. Enter the DNS name under which the Checkmk server can be accessed. It is important here that the host to be monitored can resolve this DNS name and that it has been configured as a host in Checkmk. When using HTTPS, make sure that the name of the certificate matches the name of the Checkmk server known to the host.
Name of Checkmk site of update server
Here you enter—with a few exceptions—the name of the site on which you are currently configuring this rule. An exception to this approach would be if the affected hosts should be 'moved' to another Checkmk site. In such a case, for one time only, enter a different site here. See also below under Deployment scenarios. In a distributed monitoring with central setup, the site where you want to register may also be different from the central site where this rule is configured.
Protocol to use for fetching updates
If—as we recommend—you use HTTPS, you must ensure that the Agent Updater also has a CA certificate (CA = Certification Authority) available to verify the connection.
|
Depending on the server configuration, the use of HTTPS (including forwarding from HTTP to HTTPS) may be forced. In such a case, configuring this rule to HTTP has no effect. |
Certificates for HTTPS verification
CA or self-signed certificates configured here are available to the Agent Updater for the verification of HTTPS connections. Alternatively, in the case of a distributed monitoring with central setup, certificates can also be made available to the Agent Updater from the Checkmk site, or these can be imported directly during the connection via command line parameters.
|
If the server’s certificate chain is signed with a public CA, the connection can normally be verified without imported certificates. However, as soon as imported certificates from one of the mentioned sources are available to the Agent Updater, all other CA certificate authorities are ignored! In the case of problems with the configuration of HTTPS, please consult the following FAQ below. |
Interval for update check
Here you specify the interval in which the Agent Updater queries the configured monitoring server whether any updates are available. As long as the specified interval has not expired, a cached call is returned, so as to burden the network load as little as possible. It usually makes sense to use an interval of not less than 10 minutes, otherwise there is the very great danger that your network will be very heavily burdened if you have a large number of Checkmk agents. If you do not set a value here a default value of 1 hour will apply.
Proxy settings
This rule setting is likewise optional. The Agent Updater initially assumes that there is a direct connection to the Checkmk server on the target host, even with configured proxy settings, and ignores all local proxy settings. If this is the desired behavior this rule setting can therefore be omitted. Otherwise either enter proxy settings manually, or use the host’s existing environment variables.
Executable format (Linux)
You can optionally specify how the plug-in is added to the agent installation package. How the rule behaves by default depends on the target system:
Linux (deb, rpm, tgz): You do not have to manually edit anything for these systems; the agent updater is passed as a 64-bit binary. You can also optionally select a 32-bit binary for legacy systems, or the old Python script. Note: For the binary you will need the glibc package (minimum the 2.5 version). Linux distributions have generally met these requirements since 2006.
Windows: For Windows hosts Checkmk will always deploy a 32-bit executable. This rule is therefore ignored by default. Note: Should you find a 64-bit binary of the agent updater on any of your Windows hosts, this version dates back to an older version of Checkmk and is not up to date.
Solaris: You do not have to modify anything here either. Checkmk will use the Python script even if you leave the default value on the 64-bit binary.
Other architectures: If you have packages for other architectures such as arm or ppc, set this option manually to Python, since Checkmk does not intercept this automatically and no binaries are offered for these platforms.
If you still need to rely on the old Python script the following requirements apply to the system:
Python3 in version 3.4 or newer
The Python-Modules requests, PySocks and pyOpenSSL
Signature keys the agent will accept
Select at least one signature key whose signature should be accepted by the Agent Updater. You can also optionally specify multiple keys. This can be the case if, for example, you want to disable an old key. For this purpose the host’s Agent Updater must in the interim accept both keys.

Save all your entries by clicking on  Save.
Save.
2.3. Baking and signing agents
Next, you can immediately bake and sign the agents configured in this way in a single action. This is because the newly created and customized rules will not be found in the installation packages until you have created/baked them again.
To do this, click the Baked agents entry on the Automatic agent updates page, and then click Bake and sign agents. You must now enter the passphrase for the signature key. After you click Bake and sign, the baking procedure will start as a background process. When this process has completed, you will be informed:

All agents signed in this way will be assigned to a corresponding  symbol.
If you have created multiple keys, sign with these additional keys separately.
symbol.
If you have created multiple keys, sign with these additional keys separately.
It is sufficient for the Agent Updater on the host to be monitored if the new package has been signed with one of the keys known to the updater.
The properties of each available baked agent package appear in the Agent Bakery overview. Here you can check, for example, whether the updater plug-in is included in the agent package (Deploy plug-in that updates agent automatically).
2.4. Registering the Agent Updater
In the next step, register the hosts for which you want to set up the Agent Updater on the Checkmk server.
Registration serves to establish a trust relationship between the host and the Checkmk server. Once registered, the Agent Updater on a host may download its own agent from the server at any time without a password. It is not possible to download agents intended for other hosts (since these could contain confidential data).
So that the Checkmk server knows which agent must be provided for which host, the agent and server agree on a secret key (the host secret) during registration. This key is stored locally on the Checkmk server along with the host’s name as it is known in the monitoring.
This signature ensures the agent’s authenticity regardless of the selected protocol. However, the recommended approach is to use HTTPS, since HTTP does not provide encryption for the transmission. The agent may contain passwords in scripts and configuration files.
Since a new host does not yet trust the Checkmk server, and the server does not yet know that the host is to be updated automatically, the agent must, once only, be manually installed on the host.
To do this, first go to Setup > Agents > Windows, Linux, Solaris, AIX and download the appropriate package for the host from the Agent Bakery. Make sure that the package actually includes the Agent Updater plug-in.
The necessary steps for implementation are explained in the following sections.
Selecting a user for registration
Registration must be performed by a Checkmk user who has the necessary permissions.
 |
Note that the |
You can perform the registration as an administrator, i.e., with a user who has been assigned the administrator role, since an administrator has all permissions. However, if for security reasons you need to use a user who is only allowed to register an agent updater, you can also do so. You must create such a user manually, as Checkmk does not currently create it automatically. To do this, proceed as follows:
First, create a new role on the Setup > Users > Roles & permissions page by cloning the existing no_permissions role.
Edit the new role by giving it descriptive names in Internal ID and Alias and assigning only the following permissions to the role.
The quickest way to find these is to search for them using Find on this page in the long list on the permissions page:
Register host & download monitoring agents of your hosts.
Register all hosts & download all monitoring agents.
Use the GUI at all
Then, on the Setup > Users > Users page, create a new user with a descriptive Username (e.g., agent_updater_registration) and assign only the newly-created role to this user.
Click Automation secret for machine accounts to create the new user as an automation user.
You will be prompted for the corresponding automation password during registration.
The following sections show the registration with an automation user agent_updater_registration created in this way.
Completing registration
- Linux
Now copy the agent package to the host and install it with
rpmordpkg(Linux package installation).After installation, you will find the agent updater plug-in in the directory
/usr/lib/check_mk_agent/plugins/3600/cmk-update-agent. The subdirectory’s value of3600indicates the interval for the update check in seconds (here for the default value of one hour). A script of the same name is also stored under/usr/bin/, so thatcmk-update-agentis also available as a command.Now call the agent updater with the
registerargument. Enter the required information in sequence.With the following command, you now register the agent updater from a Linux host:
Alternatively, you can perform the registration in non-interactive mode by entering the required data via the command line options. A call to the
cmk-update-agent register --helphere shows the settable options.- Windows
Now copy the agent package to the host and install it with
msiexec(Windows package installation).After installation, the agent updater is integrated into the Windows agent
C:\Program Files (x86)\checkmk\service\check_mk_agent.exe. The updater itself can be controlled with thecheck_mk_agent.exe updatercommand.Now call the agent updater with the
registerargument. Under Windows this must be done in a command prompt with administrator rights. Enter the required information in sequence.As the agent updater for Windows hosts is integrated into the agent itself, the command for registering it looks like this:
Alternatively, you can perform the registration in non-interactive mode by entering the required data via the command line options. The complete command for registration looks like this:
The
-Soption is used to pass the automation password of the automation user.
General information about registration
When registering, the plug-in also needs the name of the host as it is known in the monitoring. This is not necessarily identical to the computer’s host name. The host name is then stored locally together with the key.
To use HTTPS, HTTPS must also be set up on your monitoring server. HTTP is much easier here, but does not provide encryption of the transmission. Since the agent can theoretically contain passwords, HTTPS is the recommended method. The authenticity of the agent is however ensured independently by the signature.
Registration is only required once. On registration the agent and the server agree a secret key (host secret) known only to this host. The password you enter is not stored anywhere.
While the interactive mode only polls fields that are not yet in any configuration file, the non-interactive mode allows all fields displayed in the help to be set and has the highest priority for this call. Options that are saved only in
cmk-update-agent.statewill be overwritten—options fromcmk-update-agent.cfg, however, won’t. More details on this can be found below at Viewing the local configuration.
Following a successful registration the host secret is stored at the agent in the /etc/cmk-update-agent.state file.
On the server it is located in ~/var/check_mk/agent_deployment/myhost.
From now on the host secret allows the host to download its own agent from the server without requiring a password.
It is not possible to download agents from other hosts, since these could contain confidential data.
2.5. Master switch
From now on, the hosts you have equipped with the agent package and the Agent Updater will check with their assigned Checkmk site at the specified interval to see if agent updates are available.
By default, automatic agent distribution is initially disabled globally in your site.
To finalize the setup, activate it by clicking Master switch.
This changes the Activation of automatic agent updates global setting under Setup > General > Global Settings > Automatic Agent Updates.
All conditions should should now have been fulfilled. The Prerequisites table should now look like this:

From now on, the Agent Updater will regularly check for a new version of the agent, following the configured update interval. As soon as a new version is available and signed, the Updater will automatically download and install it.
At the same time, the Master switch provides a way to globally disable updates.
To verify that updates are being distributed as intended, you can now jump to the section on diagnosis.
3. Diagnosis
There are quite a few sources of information for diagnosing whether all updates work as intended.
3.1. Agent deployment statistics

This overview shows how the individual hosts in the agent update behave.
The inline help gives further explanations.
Clicking on  provides a detailed list of the individual hosts.
You can also get to the complete list of all registered hosts via the Monitor > System > Agent update status view.
There you can then search for individual hosts.
provides a detailed list of the individual hosts.
You can also get to the complete list of all registered hosts via the Monitor > System > Agent update status view.
There you can then search for individual hosts.

In this list you will also find documentation on how the hash of an agent starts, which agent is intended for a host (Target Agent), which agent was most recently downloaded from the host (Downloaded Agent), and which agent is currently installed on the host (Installed Agent). In this way you can always see if the specifications have been met or where the process is currently located. It should be noted here that the status information appears to the left directly in the communication between the Agent Bakery and agent updater, while the Update Check and Update Check Output fields come from the agent updater plug-in when querying the host’s agent, and that due to caching (defined by the query interval) these may be updated at a different time.
3.2. The Check_MK Agent service
If you have installed the agent updater plug-in on an agent, it will regularly output the current status of the update in the form of monitoring data. The service discovery generates a new service with the name Check_MK Agent on the host. This again reflects the current state of the update. This way you can be notified of any problem with the updates.

Among other things, the state of the service signals how the status of the signature key is assessed. The following states are possible:
WARN: The signature key’s certificate is corrupt, no longer valid, or will become invalid in the next 90 days.
CRIT: There is no valid certificate for the signature key or the certificate will lose its validity within the next 30 days.
3.3. Viewing the local configuration
The behavior of the agent updater is governed by the two files cmk-update-agent.cfg and cmk-update-agent.state.
It always applies that defined values from the .cfg file override those from the .state file.
If the agent updater shows unexpected behavior, it is sometimes worth having a look in the configuration.
There is also a handy feature if you call the agent updater directly from the command line:
3.4. Log messages
In the event of a problem you will also find log data for the updates on the host to be monitored.
On Linux cmk-update-agent logs important information to syslog—such as warnings and errors:
Jul 02 13:59:23 myhost [cmk-update-agent] WARNING: Missing config file at ./cmk-update-agent.cfg. Configuration may be incomplete.
Jul 02 13:59:23 myhost [cmk-update-agent] ERROR: Not yet registered at deployment server. Please run 'cmk-update-agent register' first.
A more detailed log file cmk-update-agent.log including debug output and possible tracebacks can be found on Linux and on Windows:
2026-01-16 07:49:23,295 [288229] DEBUG: Starting Checkmk Agent Updater v2.4.0p19
2026-01-16 07:49:23,295 [288229] DEBUG: Updating the certificate store "/var/lib/check_mk_agent/cmk-update-agent/cas/all_certs.pem"...
2026-01-16 07:49:23,297 [288229] INFO: Updated the certificate store "/var/lib/check_mk_agent/cmk-update-agent/cas/all_certs.pem" with 1 certificate(s)
...
2026-01-16 07:49:23,326 [288229] DEBUG: Successfully read /var/lib/check_mk_agent/cmk-update-agent/cmk-update-agent.state.
2026-01-16 07:49:23,326 [288229] DEBUG: Successfully read /var/lib/check_mk_agent/cmk-update-agent/cmk-update-agent.state.
2026-01-16 07:49:23,327 [288229] DEBUG: Saved deployment status to /var/lib/check_mk_agent/cmk-update-agent/cmk-update-agent.state.
2026-01-16 07:49:23,327 [288229] INFO: Target state (from deployment server):
2026-01-16 07:49:23,327 [288229] INFO:   Agent available:     True
2026-01-16 07:49:23,327 [288229] INFO:   Signatures:          1
2026-01-16 07:49:23,327 [288229] INFO:   Target hash:         37221b87f5cb46a2
2026-01-16 07:49:23,327 [288229] INFO: Agent 37221b87f5cb46a2 already installed.
2026-01-16 07:49:23,340 [288229] DEBUG: Caught Exception:
Traceback (most recent call last):
  File "cmk_update_agent.py", line 1733, in main
  File "cmk_update_agent.py", line 714, in run
  File "cmk_update_agent.py", line 1372, in _run_mode
  File "cmk_update_agent.py", line 1071, in _do_update_as_command
  File "cmk_update_agent.py", line 1150, in _do_update_agent
  File "cmk_update_agent.py", line 1221, in _check_signatures
Exception: No valid signature found.
Under both systems you can also use the command line option --logfile LOGFILE to specify an alternate path for the log file.
4. Maintenance
If you use automatic agent updates, you may—or may even need to—take care of certain matters from time to time, as described in this chapter.
4.1. Skip or disable automatic updates
Once set up, at the configured interval the Agent Updater will download and install any new compatible agents from the Agent Bakery. If you want to temporarily or permanently disable the automatic distribution of updates for one, several, or all hosts, you have the following options.
Removing the Agent Updater plug-in from a host completely
To completely remove the Agent Updater from a specific host, use the Agent updater (Linux, Windows, Solaris) rule set to adjust the host’s settings so that the update plug-in is disabled there. The agent will then remove its updater automatically with the next scheduled update!
It goes without saying that the Updater can only be reactivated by manually installing a new agent package. However, the registration will remain unchanged and does not need to be renewed.
Restricting the distribution of updates to specific hosts
To restrict the distribution of agent updates to specific hosts in your site, you can configure distribution conditions. This can be useful, for example, to test a new agent on a small number of hosts first before rolling it out to a larger number of hosts. This important step prevents a potential error from becoming more widespread.
The middle box on the Automatic agent updates page is used for this purpose:

The conditions are always linked by a conjunction (logical AND). Only hosts that meet all of the specified conditions will receive the update. Once you have defined conditions for selecting hosts here, you can enter individual host names in the Test hostname before activation field and check whether updates are now enabled for these hosts or not.
You can also access the page for configuring the conditions via Setup > Global settings > Automatic agent updates > Selection of hosts to activate agent updates for.
To clear all conditions and thereby reactivate the distribution of updates to all hosts, use the Reset to default option on the Setup > Global settings > Automatic agent updates > Selection of hosts to activate agent updates for page.
Disabling the master switch
To stop the distribution of agent updates entirely within your site, simply disable the Master switch. All settings you have configured in the instance and on the hosts will be preserved.
You can re-enable the Master switch at any time.
4.2. Migrating to a new monitoring site
Should you want to move to a new Checkmk site in a single-site setup without losing the hosts registered on the server, it should be noted that for a successful agent update process the following information on server and host must match:
The name under which the host is monitored and registered.
The host secret, which was automatically assigned during registration.
The signature used to sign the agents.
To achieve this, follow these steps:
First add all hosts whose registration information is to be migrated to the new site to the monitoring. Make sure the hosts in the new site are monitored under the same name. Then copy the
~/var/check_mk/agent_deploymentfolder from the old to the new monitoring site.Export the signature key(s) that are accepted by the agents installed on the hosts. The signature keys can be exported and imported using Setup > Agents > Windows, Linux, Solaris, AIX > Agents > Signature keys.
Import these signature keys from step 2 on the new monitoring site.
Configure the Agent Updater rule on the new monitoring site according to the instructions, and sign the baked agents with the imported signature key(s).
Lastly, in the Agent Updater rule on the old site, configure the fields for the update server and the name of the Checkmk site conforming to your new monitoring site, and bake the agents again. Note: Please check at this point that you have specified everything correctly before you re-bake the agents.
As soon as the next automatic updates have been processed on the hosts, the Agent Bakery of the old monitoring site will be locked out. From that time on the hosts to be monitored will only answer to the new Checkmk server. Following the second automatic update the agent will be installed by the new Checkmk server accordingly.
4.3. Replacing a signature key
Newly created signature keys for the Agent Updater are valid for 10 years in Checkmk. However, this was not always the case. Signature keys created with older versions of Checkmk may be valid for significantly longer, or they may only be valid for 2 years. In Werk #17102 you can find out from which patch version Checkmk started creating signature keys with a 10-year validity period. That page also explains how it came to be that keys have different validity periods.
It is therefore entirely possible that you will need to deal with expired signature keys in the near or distant future. Starting with the Checkmk patch version specified in Werk #17102, you can view the expiration date of a signature key in the Agent Bakery under Setup > Agents > Windows, Linux, Solaris, AIX > Agents > Signature keys.
Information about signature keys that are about to expire is sent by Checkmk in a timely manner to allow sufficient time to generate a new key and replace the expiring one. Checkmk administrators receive a one-time warning via email 90 days before expiration, followed by a daily email 20 days before expiration. Five days before expiration, all contacts associated with the affected host receive a one-time "Service Risk Advisory" email. A host will be affected if an active Agent Updater rule applies to it, and all signature keys contained in that rule have expired or are about to expire.
Replacing a signature key before it expires
|
When replacing a signature key, you must always ensure that the new key is recognized as valid and trustworthy before removing the old one. |
A key replacement is performed using the following steps:
Create a new signature key.
Before you can replace a signature key, you must first create a new one. Follow the procedure described in the section Creating a signature key. If the old key has the descriptionsignature—as in the examples in this article—the new one could be namedsignature_new, for example.-
Enter the new signature key in the existing rule Agent updater (Linux, Windows, Solaris).
The configuration of the update plug-in currently contains only the old keysignature. Edit this rule and add the new signature keysignature_newto the parameter Signature keys the agent will accept. We recommend adding the new key to the rule and not yet removing the old key—at least not until you are certain that the agent update works with the new key. The relevant change to the rule might look something like this: With this setting, the Agent Updater will accept two signature keys
 Bake and sign the agent with the old key.
In principle, follow the same procedure described above in the Baking and signing agents section.
It is very important that you sign the package with the old signature key, not the new one. Why the old one? The new signature key you have just created is not (yet) recognized by any host. Therefore, no Agent Updater will accept a package signed with the new key, which is unknown to it. So, to get the package installed on the host using the new signature key, you must sign it with the old one. Once you understand this principle, the procedure is not nearly as strange as it seems at first glance.Coffee break.
Now you have to wait until the newly built packages, which contain the new signature key, have been distributed to all hosts. How long this takes depends on how you have configured the Interval for update check option.
You can check the current status in Monitor > System > Agent update status.-
Check for success.
As mentioned in the previous chapter on Diagnosis, the details of the Check_MK Agent service displays information about the Agent Updater: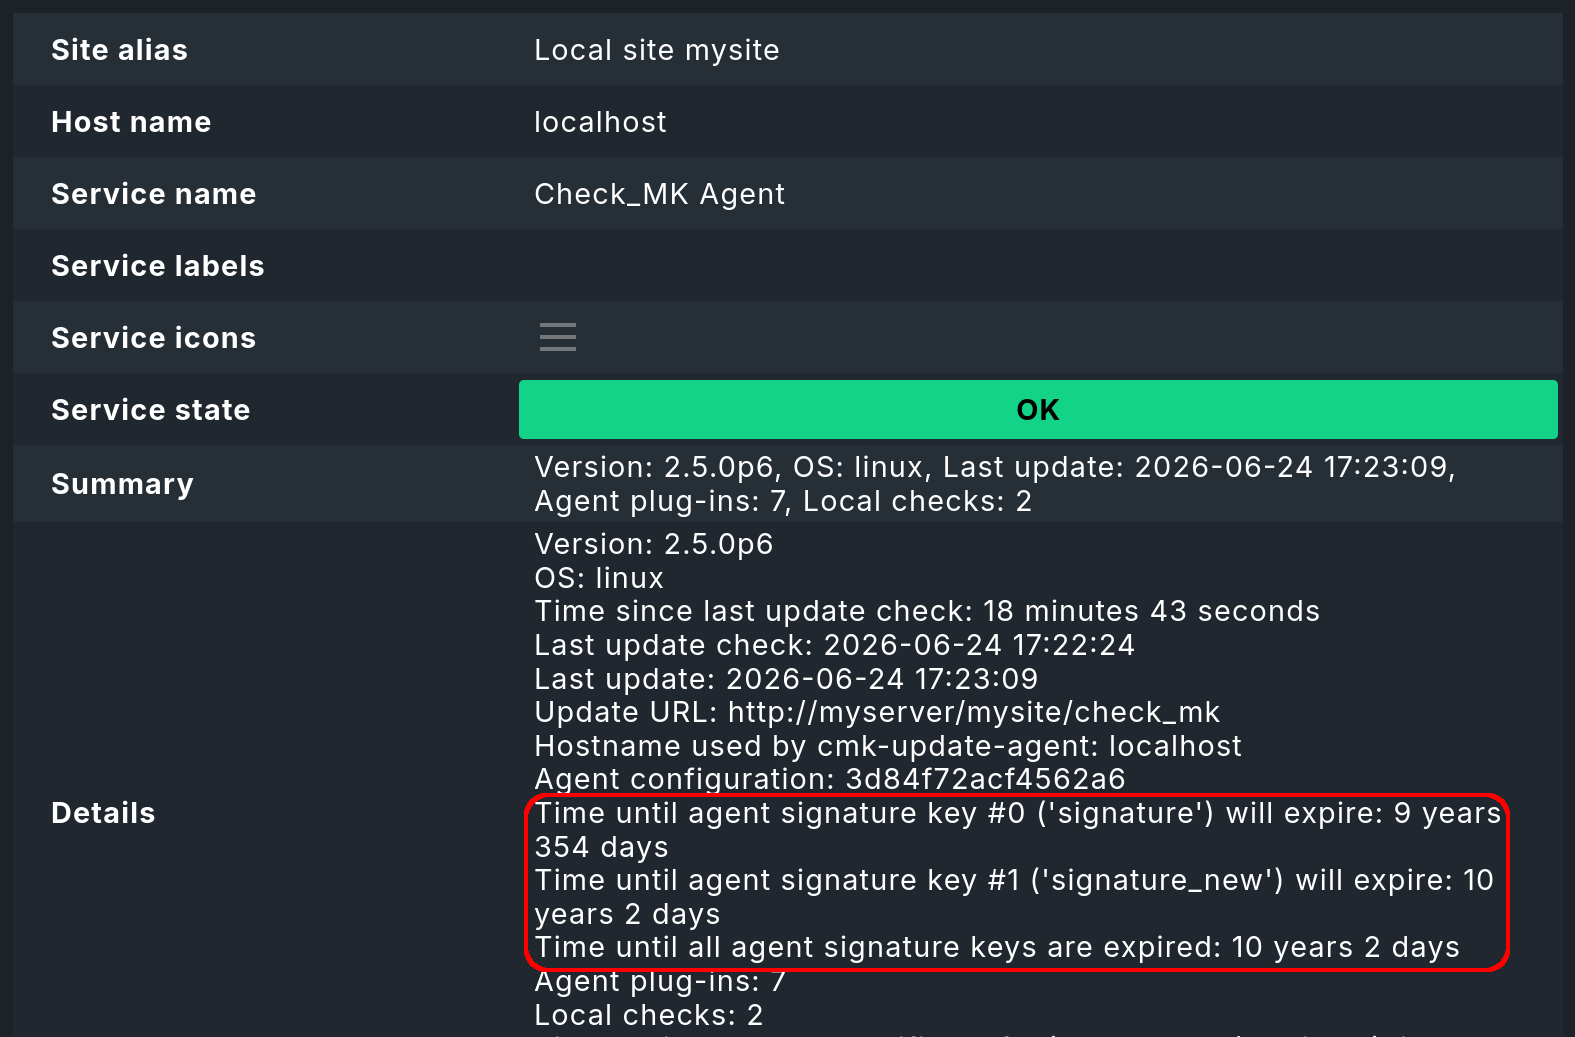 The Agent Updater will now accept both the old and the new signature keys
 Bake and sign the agent with the new key.
Since Checkmk shows you that the Agent Updater now also accepts the new key, you can complete the key change. Remove the old key from the Agent Updater rule, and then build and sign the agent again—this time with the new key. After that, it’s time for a second coffee break, followed of course by a success check.Finally, you can delete the old signature key under Setup > Agents > Windows, Linux, Solaris, AIX > Agents > Signature keys. Checkmk only allows you to delete a key if it is not used in any Agent Updater rule.
Replacing an expired signature key
If all of the signature keys accepted by the Agent Updater have expired, there is unfortunately no way around having to manually trigger the update of a previously created agent package on the host.
The following procedure omits the details of the individual steps, which you can find in the previous section:
Create a new signature key.
Enter the new signature key in the existing rule Agent updater (Linux, Windows, Solaris).
Bake and sign the agent with the new key.
-
Log in to the host and force a one-time update of the agent from the Checkmk server, without a signature check, using the following command:
Verify the success in the details of the Check_MK Agent service.
5. Deployment scenarios
5.1. The Agent Updater as automatic installer
|
This is not an official feature of the Agent Updater. These instructions are therefore intended primarily for more experienced users. The official way to install a Checkmk Agent on a host is to download and run the agent package appropriate for the system. It is however also possible to allow the Checkmk Agent to be installed initially by the Agent Updater, since this also works as a stand-alone program. |
Proceed as follows:
Copy the cmk-update-agent binary or the
cmk_update_agent.pyscript to the host to be monitored (both can be found at~/share/check_mk/agents/pluginson the Checkmk server).Register the host on the Checkmk server by invoking
cmk-update-agent register. Here it makes sense to pass the required registration information directly via the command line – especially if you want to use an installation script. The corresponding options can be displayed when callingcmk-update-agent register --help.Then, with a final call to the Agent Updater plug-in, install the agent with all of the configuration details for the host being monitored. However since there is no local configuration (the Agent Updater also displays a corresponding warning), and thus no signature for the agent package to be downloaded, call the updater once more with
cmk-update-agent --skip-signaturesto explicitly trust the downloaded package. The prerequisite for the installation by Agent Updater is, of course, that the Agent Bakery has a suitable agent package ready for the target host on the Checkmk server.
6. Agent updates in distributed monitoring
Since Checkmk 2.0.0 it has also been possible to distribute baked agents via remote sites. The prerequisite for this is a distributed monitoring with central setup and a connection which allows the central site to be reached from the remote sites via HTTP/HTTPS.
Such a distributed monitoring can—especially temporarily—also be operated with different Checkmk versions. This makes it possible to successively switch larger systems to a new Checkmk version. In this case, however, be sure to follow the notes on mixed-version monitoring environments in distributed monitoring.
6.1. Functionality
Technically, the feature is implemented in such a way that requests for updates on remote sites are forwarded to the central site — so that the entire configuration as well as the baking of the agents takes place exclusively on the central site. Agent packages that have already been requested at a remote site are cached on the remote site (as long as they are valid), so that the packages do not have to be downloaded again from the central site. In addition, the requested data will be checked for consistency on the remote site, so that unnecessary connections to the central site are avoided.
Unlike in a single-site setup, the appropriate update server for the hosts does not originate exclusively from the set of rules for the Agent Updater, but is communicated to the requesting Agent Updater by the contacted Checkmk site. In this process, a host is provided with its server by the site from which it is being monitored. The specification of a Checkmk server is therefore only needed for the one-time registration, which can theoretically take place at any site—that is accessible from the host—in the entire distributed monitoring system. If the connection to the automatically determined server fails, the previously saved server (from the rule configuration or previously-entered manually during registration) is used as a fallback.
6.2. Configuration
The distribution of agent packages via remote sites does not have to be activated separately — the respective remote site recognizes the situation automatically and accordingly communicates with the central site as well as the requesting Agent Updater. If the agents are to report explicitly only to the central site for updates, this can be done via a fixed update server in the rule set for the Agent Updater.
However, to ensure that agent updates actually work in distributed monitoring, a few settings must still be configured on the central site—these are all located in Setup > General > Global settings in the section titled Automatic agent updates.
If the settings differ for each remote site, they can be edited separately as well.
To do so, go to Setup > General > Distributed monitoring and choose the gear icon  in the desired site’s row to access that site’s Site specific global settings.
Connection to central agent bakery
At this point, the URL through which the central site can be accessed from the remote site must be specified, including its protocol and the character string /check_mk/, for example https://myserver.example.com/mysite/check_mk/.
While the Checkmk site will try to identify all other missing settings itself, the specification of this URL is not optional, as this connection direction will otherwise not be established in the case of a central configuration.
If the protocol is HTTPS, the remote site automatically uses the CA or self-signed certificates available in the setup for the verification of the connection Setup > General > Global Settings > Site management > Trusted certificate authorities for SSL.
Connection to remote agent bakery
Since the remote sites are not necessarily accessible from the respective monitored hosts via the same URL as from the central site, a URL can be configured here for this purpose. This URL is then automatically communicated to the host (or the requesting agent updater) when a connection is made to a Checkmk site. The configuration as Site specific global settings makes particular sense here. If no URL is specified, it is assumed that the remote sites are accessible from both the central site and from the monitored hosts under the identical URL. If it is an HTTPS connection, the appropriate certificate can also be automatically made available to the host. Since the central CA store cannot be used for this, appropriate certificates can be specified at this point. Alternatively, the certificates can also be specified in the Agent Updater rules.
7. Working with HTTPS
At various points in this article there are references to securing the respective connections via HTTPS. Here, we will once again provide a general overview of what needs to be done to fully secure connections via HTTPS. Both the connection from a remote to its central site, and from a host to a Checkmk site can and should be secured via TLS, i.e. using HTTPS. This is independent of whether it is a single site setup or a distributed monitoring.
7.1. Configuring HTTPS
In order to be able to connect to a Checkmk site via HTTPS, first the monitoring server must be configured for HTTPS. This can be achieved, for example, via a suitable configuration of the system Apache, or most simply via the HTTPS settings on the Checkmk appliance.
Whether a Checkmk server is then addressed via HTTP or HTTPS is determined by the URL configured in each case.
If this begins with https://, the server is addressed via the HTTPS protocol using port 443.
This also applies to the protocol you configured with the Update server information setting.
In principle, you can force forwarding from HTTP to HTTPS on the Apache side and (initially) exclude individual paths for this.
For configuration details, see the Apache documentation for the mod_rewrite and mod_redirect modules.
7.2. Providing certificates
In order for an HTTPS connection to be established, it must be possible to verify the contacted server’s certificate chain or the self-signed certificate (depending on how the server is configured). The provision of suitable CA or self-signed certificates makes this possible and can be realized in various ways.
Connections from a host to a Checkmk server
The agent updater always attempts to verify HTTPS connections and terminates these if a verification is not possible. Certificates for verification are available to the agent updater from the following sources:
The Agent Updater: By default, the Agent Updater comes with a Python runtime environment including any required modules. Also included is the certificate bundle of the Certifi module, which in turn is based on the Mozilla project’s certificate collection. This ensures that public CAs are made known to the Agent Updater in a timely manner, even when operating system updates are pending.
Certificates via the Agent Bakery: Certificates contained in the Certifi module are ignored once one or more certificates have been imported via one of the following mechanisms. Certificates from the following sources are stored locally on the host and used only by the Agent Updater:
Using the Certificates for HTTPS verification setting, certificates can be baked into an agent package and will be available to the Agent Updater from installation (or an update).
When configuring the connection to the remote site via Setup > General > Global settings > Automatic agent updates > Connection to remote agent bakery, you can specify certificates that can be used to verify the HTTPS connection to the respective remote site. This is especially useful if it is not yet clear at configuration time which host will be assigned to which site. This import option can also be used to reduce the number of agents to be baked, since the correct certificates for the respective update servers do not have to be host-specifically configured.
Certificate Store:
the Agent Updater may use the operating system’s Certificate Store only if the Agent Updater has been configured to use the System-Python instead of the supplied Python runtime environment, and no Certifi module is configured in the System-Python.
Since many factors such as the installation parameters or the _PIP_STANDALONE_CERT environment variable are involved here, we do not officially support such a configuration.
Certificate via command line — Import certificate:
You can also call the Agent Updater with the command line argument --trust-cert.
This retrieves and imports the server certificate.
This is done without taking into account the type of certificate:
The certificate is trusted without further checking of a possible chain—regardless of whether it is a self-signed certificate, a certificate at the end of a public certificate chain or a certificate signed with an internal CA.
|
|
Certificate via command line — Ignore certificate:
If there is no valid certificate available to the Agent Updater at all, the certificate validation can be bypassed by using the --insecure command line argument for a call.
This can be useful if the valid certificate is already waiting to be retrieved from the server on the next connection,
but the Agent Updater will be 'locked out' by this missing certificate.
|
This actually completely deactivates the certificate check for this call. Communication still takes place in encrypted form, so the use of this argument is 'better than nothing'. |
Connection from a remote site to a central site
The distribution of certificates is simpler when connecting from a remote to the central site, since the setup procedure is not exited at all. The remote site can use the Checkmk certificate store under Global settings > Site management > Trusted certificate authorities for SSL. It is therefore sufficient to import the certificate(s) via the central site, if necessary also via Site specific global settings when the central site is accessible under multiple URLs.
Procedure for replacing a certificate
If you work with your own certification infrastructure, you ideally use a root certificate that is valid for a very long time and whose associated key is regularly used to create intermediate certificates. These are then in turn used to sign the server certificates. In this case, you roll out intermediate certificates as a certificate chain on the Checkmk server. The hosts that receive automatic agent updates now only need to be made aware of the root certificate.
If you are unsure whether a new server certificate requires a new root certificate, use the following command. Use it to determine the identifier of the root key used to sign a server certificate:
If the displayed identifier is identical for both the old and the new certificate, no further action is required. Hosts that trust this root certificate can continue to obtain updates even if the certificate chain changes—provided that the chain was correctly stored in the system Apache.
If a self-signed certificate or a short-lived root certificate from an internal CA has been used up to now, or if the previous root key of one of your internal CAs has been compromised, proceed as follows when replacing the certificate:
Add the new certificate using the Certificates for HTTPS verification parameter (in the Agent updater (Linux, Windows, Solaris) rule).
Re-bake the agent packages and update all hosts in the monitoring. Ensure that this update has been run for all hosts before proceeding.
Now replace the server certificate.
Test with a few hosts in which it is easy to reinstall the agent manually if it fails, to see if it is possible to update again using the new certificate.
If the preceding step (4) could be performed successfully—you can (the certificate will expire), or must (the key was compromised)—remove the old certificate and perform another agent update.
8. Troubleshooting
This chapter first deals with typical, general errors and their causes:
The Agent Updater will really only be run once within the update interval, so an error will be continuously-displayed until either you call the plug-in manually, or the next interval is pending.
The agent updater creates its own status file cmk-update-agent.state independently (under Linux/Unix in /etc, and under Windows in the config folder).
This file remains on the host after uninstallation, so that the registry information does not get lost.
A new installation will find the file and continue using it.
If this situation is undesirable, simply delete the cmk-update-agent.state file manually after an uninstall.
The Monitor > System > Agent Update Status page displays all of the hosts that are are in the monitoring and for which a status file exists on the Checkmk server.
It does not matter if the host actually reports to the Checkmk server for automatic updates.
Should an unexpected host be displayed here, it is worth taking a look in the /omd/sites/mysite/var/check_mk/agent_deployment folder — the cause will probably be an old or accidentally-created registry.
The Agent Updater is designed to explicitly trust only the certificates which are usually specified under Agent updater (Linux, Windows, Solaris) in the HTTPS configuration. In particular locally-installed certificates are ignored. It can also occur that the Checkmk server is accessible through the browser, while the Agent Updater cannot connect due to an incorrect configuration.
In the HTTPS configuration of the Agent Updater rule a root certificate must be specified with which the connection to the Checkmk server can be verified. In other words: the certificate chain included in the Checkmk server’s server certificate must be verifiable by the certificate given here. Often the server certificate is specified here instead—this is however not suitable for this purpose.
Take a look at the Checkmk server’s certificate chain with the OpenSSL tool.
Due to the chain’s length, for clarity here only a relevant section is shown and the omitted sections marked by [...]:
For the last entry—in our case subject=/CN=mymonitoring.example.net—you need a valid root certificate.
This must not necessarily be—as in this example—the issuer of the certificate.
It will usually be a chain of issuers.
Then look at the certificate used. Here too due to the length it will be shortened as in the above example:
The top certificate—seen in the above excerpt—is not permitted to have a dependency on another certificate.
You can see that the Issuer and the Subject are identical and that the option CA:TRUE is included.
In addition the issuer’s chain that authenticates an object must be consistent up until the final entry.
You therefore also need all intermediate certificates if the issuer of the last certificate should not be a CA.
It has occasionally occurred—especially on Red Hat/CentOS systems—that the call to rpm triggered by the automatic update repeatedly fails,
while a manual call to cmk-update-agent processes successfully.
The cause in these cases was a SELinux policy that prevented an error-free call if rpm was called by a child process of xinetd.
You can solve the problem, i.e., get to the bottom of it by analyzing the SELinux logs, and adjusting the policy accordingly using the audit2allow tool.
The following section deals with problems that are indicated by specific error messages:
On some Linux systems the program Prelink is installed and a cronjob is activated
which regularly examines all binary files on the system, and adapts them if necessary to speed up the programs.
However the Agent Updater plug-in is packaged with the PyInstaller program which is not compatible with such actions, and is therefore broken.
Checkmk therefore has a blacklist entry for deb/rpm packages which is stored under /etc/prelink.conf.d,
and—if prelink exists—sets an entry in the existing /etc/prelink.conf file.
Since this problem is difficult to handle, it can still happen that these measures do not take effect—especially in the case of a subsequent setup of prelink.
Therefore, if you install prelink later, set the entry yourself and add the following line to the file with the following command:
This error message occurs when the /tmp directory with the flag noexec was mounted in the system.
To fix this problem, you can either remove the flag, or—if you deliberately set and require the flag—on the Checkmk server
in Setup create a rule under Agents > Windows, Linux, Solaris, AIX > Agents > Agent rules > Installation paths for agent files (Linux, Unix).
There you can define the tmp directory in the Directory for storage of temporary data (set TMPDIR environment variable) option yourself.
The Agent Updater plug-in will then in future write temporary files in the defined directory.
That works even if you call the plug-in manually with the helper script in /usr/bin/cmk-update-agent.
If the Check_MK Agent service displays the warning No valid signature found, this means that the agent package intended for the host in the Agent Bakery has not been signed with one of the accepted keys.

In the simplest case, all you need to do is sign your agents using the Sign agents function in the Agent Bakery with one of the keys displayed under Signature keys the agent will accept.

As soon as the Agent Updater makes its next report from the affected host to the Checkmk server, and the cache interval for the service has expired, the warning will disappear.
However, if the host does not have (or no longer has) a single signature key that is located on the Checkmk server, you must repeat the bake and sign with a key displayed under Signature keys the agent will accept, then copy the baked agent to the affected host and reinstall it there.
On an affected host, you can run cmk-update-agent -v or check_mk_agent.exe updater -v to get more details about this error.
The detailed error message explicitly lists the signatures from the Agent updater plug-in’s configuration file that do not have an accepted (i.e. configured) counterpart on your Checkmk server.
Ignoring signature #1 for certificate: certificate is unknown.
No valid signature found.
9. Files and directories
9.1. File paths on the Checkmk server
| File path | Description |
|---|---|
|
Contains the baked agents, sorted first in subdirectories by operating system (e.g. |
|
Contains files with the names of the registered hosts. One such file contains the time of the last registration and the host secret. |
9.2. File paths on the monitored host
- Linux
File path Description /usr/lib/check_mk_agent/plugins/3600/cmk-update-agentThe agent updater plug-in as binary or script, depending on the configuration in executable format. The subdirectory
3600stands for the interval for the update check in seconds (here for the default value of one hour)./usr/bin/cmk-update-agentScript to call the agent updater plug-in and register the agent with the command
cmk-update-agent register./etc/check_mk/cmk-update-agent.cfgConfiguration file for the agent updater plug-in, which contains the settings of the Agent updater (Linux, Windows, Solaris) rule. Do not edit this file, because it is written to during installations and updates.
/etc/cmk-update-agent.stateFile with registry information, including the host secret.
/var/lib/check_mk_agent/cmk-update-agent.logExtensive log file with debug messages.
- Windows
File path Description C:\ProgramData\checkmk\agent\plugins\cmk_update_agent.checkmk.pyThe agent updater plug-in as a Python file.
C:\Program Files (x86)\checkmk\service\check_mk_agent.exeAgent program to register the agent with the command
check_mk_agent.exe updater register.C:\ProgramData\checkmk\agent\config\cmk-update-agent.cfgConfiguration file for the agent updater plug-in, which contains the settings of the Agent updater (Linux, Windows, Solaris) rule. Do not edit this file, because it is written to during installations and updates.
C:\ProgramData\checkmk\agent\config\cmk-update-agent.stateFile with registry information including the host secret.
C:\ProgramData\checkmk\agent\log\cmk-update-agent.logExtensive log file with debug messages.
C:\ProgramData\checkmk\agent\bakery\check_mk.bakery.ymlConfiguration file created by the Agent Bakery, which among other things defines the interval for the update check.